to create comfort in your home and install an electric “warm floor” under the tiles with your own hands, especially since for this you can choose several types of equipment that differ in both installation method and performance characteristics.
But to ensure that the result does not disappoint, it is important, before starting work, to correctly calculate the power of the “warm floor”, prepare an accurate installation diagram and take into account the design features of the floor and the functional purpose of the room.
Laying heated floors under tiles
Selecting a heating element
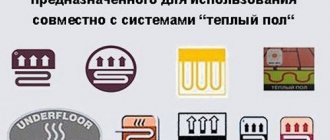
The basis of a heated floor system are heating elements, presented in the form of mats, cable or infrared film.
Work on forming the floor must begin with the selection of a cable that will provide the highest quality heating.
Heating cable
Two types of cables are suitable for organizing a heated floor:
- Resistive.
They emit the same amount of heat along their entire length, but when overheated they create a risk of burnout. The most budget option is a single-wire resistive cable. Two-wire costs a little more, but is easier to install;
- Self-regulating.
Able to regulate the amount of heat generated depending on the temperature of its own heating. The price of such a cable is higher than that of a resistive cable, but it works more reliably.
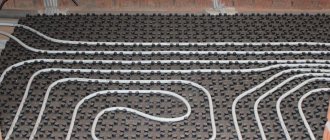
Both types of thermal cables are laid in two ways - snake and snail.
Important! Due to the risk of overheating, resistive cables are laid in such a way that they go around large appliances that generate heat.
Cable mats
The mats are the same heating cables, but already laid in a certain way on a reinforced plastic mesh. The installation of the mats is simplified as much as possible - they are laid out according to the developed pattern directly on the floor base, and the tiles are laid on top using glue.
The direction of laying is not of fundamental importance. Mats can be rolled out along both short and long walls.
The disadvantage of cable mats is their inertia - the floor warms up quickly, but cools down just as quickly. Therefore, thermomats are more suitable as an auxiliary rather than a main source of heat.
Carbon mats
The carbon system is based on the use of an infrared emitter with a heating element in the form of graphite-silver rods. They are connected to each other via a highly secure cable with a core of stranded copper wire.
The carbon rods are covered with a polyester or polyethylene shell on top, and carbon paste is located inside.
When the mat is powered from the mains, the paste heats up and begins to radiate heat.
Externally, carbon mats look the same as cable mats, but with fewer jumpers. The technology of their installation is no different. The advantage of the system is that the cables are connected to the conductor in a parallel circuit, so if one element fails, the rest continue to function.
But practice shows that infrared emitters quickly burn out at the joints, so many builders prefer not to use a carbon system for floor heating.
Infrared film
Another option for infrared heating is carbon film, the operating principle of which is similar to carbon mats. Thanks to its minimal thickness, the system saves space while providing high-quality heating.
Infrared film can be laid dry at any stage of repair work and turned on immediately after installation. But this type of heating element has a number of disadvantages. It separates the laid tiles from the adhesive base, which can lead to deformation of the cladding.
In addition, in situations where cement mortar is used for laying tiles, the film corrodes and becomes unusable.
Advice! Film flooring is more suitable for laying under linoleum, parquet or laminate. If you still need to lay the film under the tiles, it is better to choose perforated material.
Types of structures
There are several types of structures that can be installed under tiles. Before making a final decision on choosing a specific type, you need to carefully study the features and differences of such systems. The most commonly used types of systems are:
- water - assumes the presence of a large and heavy screed into which the pipeline will be laid. The main disadvantage is that a lot of pressure is exerted on the original surface, so it needs to be further strengthened. There is also a danger of flooding of neighbors in the event of a pipe break. Installation is quite complicated, can only be done by a professional (installation on your own is not possible), the process itself takes about a month, because... you need to wait for the screed to completely harden.
- Infrared – capable of providing a large amount of infrared radiation at a relatively low heating temperature of the cables. This variety has a small thickness, so installation can be done even in apartments with low ceilings. The only drawback is that the infrared view is better suited for installation under laminate / parquet rather than tiles.
- Electric floor - works from the general electrical network, but its connection does not require obtaining specialized permission from the relevant authorities. The only drawback may be the cost of operating the system due to the high price of electricity. The solution to this problem is to lay special advanced heating cables that independently regulate energy consumption based on the ambient temperature.
Considering the positive and negative aspects described above, we can highlight the most optimal option. In a multi-storey building, install an electric heated floor, possibly without obtaining any permits (which you will certainly encounter when installing a water heated floor). The installation process takes only a few days and can be carried out by the owners of the premises.
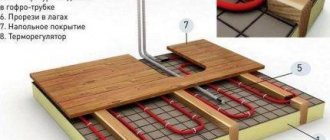
Electrical floor diagram
Counting the number and power of mats
First you need to decide on the power of the mats, and then calculate their number. Since tiles are installed mainly in the bathroom and kitchen, it is worth taking the indicators for these rooms as a guide:
- average power for the kitchen – 110-130 W/m2;
- the average power for a bath, shower and toilet is 120-150 W/m2.
These indicators are relevant only if the heated floor is installed as an auxiliary heating system. If the electric floor is designed to thoroughly heat a kitchen or bathroom, the power of one mat should be at least 140-180 W/m2.
Next, we calculate the usable area of the room - multiply the length of the room by the width and subtract the area that household appliances will occupy.
Now you can calculate the number of mats - divide the usable area by the area of one element of the selected power.
Cost of heating systems
To give an idea of the price of electric heated floors, the table shows several system models:
| Model | Short description | Specific power W/linear m | Mat width | Price |
| "National Comfort" NK-250 | Single-core heating cable, 10 m | 25 | — | 1920 |
| Arnold Rak PHS-CT | Two-core heating cable, 9 m | 20 | — | 2100 |
| "Teplolux" ECO 5-100 | Two-core heating cable, 5 m | 20 | — | 1600 |
| DEVI DTIR-150 69 / 75 | Mesh two-core mat | 75 | 0.5 m | 3900 per lin. m. |
| Veria Quickmat-150 | Single core mesh mat | 75 | 0,5 | 2835 per sq.m. |
Calculation of heating cable length
The length of the electrical cable will depend on the total power of the system. It is calculated by multiplying the average power (W/m2) by the total area of the room; it is also recommended to add a reserve of 30% for heat loss. Here you can focus on the optimal indicators for the kitchen and bathroom described above.
Then we determine the type and rated power per linear meter of cable - it can vary from 10 to 60 W/m. Next, we divide the total power of the system by the power of the linear meter of cable - we get the length.
Thus, it is obvious that the more powerful the heating cable is chosen, the less of it will be needed for installing the electric floor.
Basic rules for installing heated floors
Installation of a heated floor using different heating elements - mats and cables - will have significant differences.
Principles of cable floor installation
General procedure:
- Preparation of the base, arrangement of a thermal insulation layer, elimination of cracks, irregularities, cleaning of dirt, priming.
- Installation of a thermostat with two grooves - for the power supply and for the cable connection.
- Layout of cable mats and cables according to the selected diagram, output of wires to the thermostat.
- Installation of temperature sensor.
- Performing a screed or applying an adhesive composition with grooves.
- Floor tiling.
Important! When arranging the floor with mats to fix the tiles, you must purchase a special tile adhesive for the heating elements. The heating cable can be laid under a cement screed.
Principles of installing infrared floors
General scheme of work:
- Cutting the infrared fabric into strips according to the layout plan.
- Insulating the edges of heating elements.
- Laying a backing made of foamed propylene and foil that prevents infrared heat loss.
- Place the cut infrared film on a plane, secure with stationery tape.
- Fixing the clips on the copper strip connecting to the cable.
- Laying polyethylene film to protect against tile adhesive.
- Installation of thermostat and sensor.
After applying a thin layer of tile adhesive, laying the tiles is possible only after it has dried.
Significant characteristics of decorative coatings in a heated floor system
Since we take the system under consideration as the main one, it makes no sense to delve into the electrical or infrared subtypes - the water main is the leader. And its specificity is such that the temperature of the coolant can quickly increase and become critical, but it will not be possible to instantly cool down without causing damage to, say, exclusive parquet from a branded collection. In the construction of a heated floor, the finishing layer carries not only and not so much a decorative load, but a practical one - it transfers heat from the circuit to the room. It turns out that there are two main requirements for the finish:
- resistance not only to constant heating, but also to possible overheating;
- sufficient thermal conductivity.
But, if you go deeper, this list will expand by at least one position – environmental friendliness. Today they shout about ecology on every corner, often turning concern for the environment into a real farce. However, it is not at all necessary to open a chemical production branch in your home when this can be avoided. We can count the number of materials in which there are no aggressive substances on one hand; the saving grace is that they are in bound form and under normal conditions are not released into the outside world. Constant heating, even if not strong, cannot be classified as normal conditions. Perhaps the devil is not as terrible as he is painted, and the danger is mythical, but when it comes to the health of loved ones, it is better to play it safe.
General step-by-step installation technology
To install a heated floor under ceramic tiles, you need to competently perform installation work in 10 stages.
Surface preparation
The area for laying mats or cables must be level and clean. For pronounced unevenness, cracks and protrusions, it is best to use a cement screed that will hide all the flaws. If the flaws are insignificant, it is enough to fill the cracks and sand the protruding areas.
Then the floor is cleared of debris, thoroughly swept and treated with a primer.
The next stage is started only when the primer is completely dry.
Create a schema
Regardless of the type of electric floor, preparation of the thermostat is necessary. It can be powered from an already installed outlet or directly from the network. As a rule, the connection diagram for the thermostat is indicated in the instructions. Also, two channels are grooved in the wall: one for the corrugation of the temperature sensor, the second for the power wires of the heating cable.
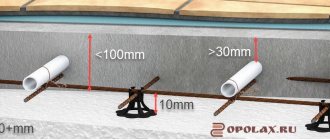
Important! The cable and mats should be laid in such a way that there is a distance of about 10 cm from the walls.
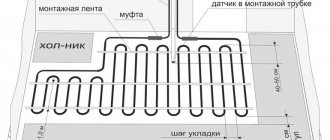
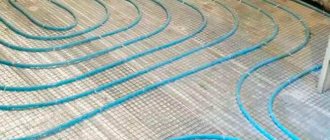
The easiest way to lay a cable is considered to be a snake. The mats are laid either straight or randomly in those areas where more intense heating is required. When laying the cable, both ends are led out to the thermostat, and the coupling is subsequently hidden under the tie.
Then a temperature sensor is mounted in a special plastic pipe and all the wires powering the heating system are connected.
Material calculation
The number of heating mats and linear meters of cable is calculated according to the diagram given above. In addition you will need:
- thermal insulation materials;
- damper tape;
- connecting wires;
- tile adhesive;
- tile;
- fasteners;
- thermostat and temperature sensor;
- grounding copper cable;
- RCD protection system.
The amount of tiles and thermal insulation is calculated based on the floor area with allowances for trimming. The amount of tile adhesive will depend on the curvature of the floor.
But you can rely on the instructions from the manufacturer of the product per square meter.
Checking old electrical wiring
The larger the area of the room intended for underfloor heating, the more powerful the wiring should be. Therefore, you must first calculate the cable cross-section in terms of power, current and length so that the core does not heat up and melt the insulation.
The calculation takes into account the rated power of the cable and electrical appliances that it must power.
If the core diameter is too small, the wiring will have to be replaced and adjusted to the new system.
Also, do not forget that the residual current device and the circuit breaker must correspond to the new electrical load.
Surface thermal insulation
The quality of heated floor installation will largely depend on the quality of the base insulation. A properly laid base will not only reduce heat loss, but also increase the efficiency of the electrical system.
Penofol is best suited for thermal insulation purposes. This is a modern multilayer material with a polyethylene base and a self-adhesive base. The outer part of the penofol is made of foil, which prevents heat from escaping from under the floor.
Penofol is glued to the floor, joint to joint, extending 3-5 cm onto the walls. The joints are sealed with foil tape, and damper tape is laid around the perimeter of the room, preventing direct contact with the heating elements.
Advice! For rooms with low ceilings, it is recommended to use polystyrene foam or polypropylene instead of penofol.
Installing a temperature sensor and thermostat
The thermostat is designed to turn the system on/off, as well as adjust the heating temperature. It is mounted on the wall near the outlet.
The temperature sensor is designed for independent operation of the heating system and its optimization without control by the owners. The sensor is mounted directly into the floor in a corrugated pipe laid in a groove.
It should be installed centrally between two turns of the cable. The inner end of the corrugation is insulated with sealant, the outer end is connected to the thermostat.
Control test
The cable or mats are checked before they are laid on the surface - for this purpose their resistance is measured with a multimeter. The resistance should not differ from the specified passport parameters by more than 10%.
If the indicators are within normal limits, you can begin installation.
Attaching the heating element
The easiest way to install thermomats is to spread them along the floor plane in the selected position and connect to the thermostat.
The cable is laid in a snail or snake pattern and secured with mounting tape. To make the work easier, you can use plastic clamps to secure the electric floor. It is very important to maintain the same distance between the turns of the cable, otherwise the site will heat up unevenly.
After laying out the material, it is necessary to check the resistance again - it should coincide with the data of the first measurement.
Filling the screed
The screed serves as the basis for the cladding and promotes better heat distribution across the floor. Traditionally, a cement-sand screed consisting of three parts sand and one part cement is used for pouring. Water is added to them until a viscous consistency is obtained and PVA glue is added to increase the viscosity of the solution.
To save cement, crushed stone is added to the solution - 5 parts to 1 part cement. The recommended pouring thickness is about 3-5 cm.
Important! You cannot add a large amount of water to the solution, otherwise cracks will appear in the screed as it hardens.
If mats are chosen as the heating element, no screed is required - tiles can be laid directly on the film.
Laying tiles
Laying a floor with a cement screed can only be done when the mortar has set. Complete drying may take a month, but you can start covering the surface 2-3 days after pouring the screed. Ceramic tiles are laid on a heated floor according to the same principle as on any other base.
It is better to place it on glue, which will not “steal” additional centimeters of height. The adhesive must be specially marked “warm floor” or indicate the permissible temperature range. The adhesive composition must be applied to the mat very carefully with a soft spatula so as not to damage the system.
When using a solution, you need to ensure that there are no voids in the layer, which could cause the cable to overheat.
Within a day you will be able to walk on the heated floor. It is recommended to fully start the system and grout the seams when the glue, mortar and cement base are completely dry.
Underwater rocks
The main mistakes made by inexperienced electric heating system installers:
- incorrect calculation of the required power,
- laying cables or mats in closed areas of the floor,
- the presence of air voids when pouring screed or laying tiles,
all this leads to a sharp decrease in efficiency or even failure.
If we consider it from the point of view of economics, the disadvantage of such a system will be a fairly high fee for the energy consumed, compared to gas heating.
You can come across claims against electric heated floors as a source of increased electromagnetic radiation. This is more typical for single-core cables.
Overview of methods
dolzhna-byt-rovnoj-i-chistoj.jpeg”>