The process of installing heated floors involves installing heating elements and connecting the heated floor. The connection to the network is made through a thermostat. It is actually the link that controls the heating mode. After processing the information received from the temperature sensors, the thermostat either turns on or turns off the heating. Connecting an electric heated floor practically comes down to connecting it to electricity and a thermostat. It must be said that these operations are so simple that you can safely perform them yourself, although, as in any other matter, there are some secrets. Let's try to understand all the nuances.
The principle of operation of the thermostat
It regulates the supply of electricity, which is converted in the heating elements into heat, heating. When the floor cools down or heats up to its set temperature, the device will turn the system on or off. It works constantly, even when the floor is in an inactive phase, releasing the accumulated heat. This ensures the safety of heated floors from overheating and possible fire, although this is quite rare. This entire process is served by a temperature sensor that responds to the slightest temperature changes.
Simple electronic and mechanical thermostats have proven themselves over time; they are more popular and stable in operation. Programmable ones are considered more complex and “capricious”. But the connection of all types is almost the same, despite the filling.
When purchasing a kit, make sure that all components are in place: temperature sensor, terminals, mounting box and installation instructions.
Is it possible to extend pipes if they are not long enough?
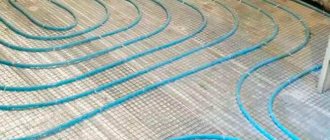
As you know, it is better to make a loop of a warm water floor than a solid one, this gives the system reliability, and connections are made at the points of attachment with the collector. If the heated room is large, it is recommended to divide the area into several branches.
In order not to make a mistake in the size of the loop, you should make the calculation correctly. To do this, you can use an online calculator.
However, if necessary, it is still possible to lengthen the contour of the heated floor by connecting the missing section of pipe to it, which, by the way, is allowed according to GOST. It is possible to extend heated floor loops using various methods; for this, butt joints are used, most often press fittings.
For your information! In such cases, it is recommended to use pipelines and fittings from the same manufacturer.
To summarize, we can say that connecting underfloor heating pipes is acceptable, and there are various ways. But it is more practical and reliable to lay a single loop, especially under the screed, so that in case of leakage you do not have to destroy the concrete layer.
In addition, preference should be given to high-quality pipe products and connecting parts from trusted manufacturers. In such cases, the heating floor will serve you for a long time and will create a comfortable atmosphere in the house.
Selecting a thermostat
When choosing and subsequently installing a thermostat for an electric floor, it is recommended to give preference to: programmable thermostats operating according to an energy-saving scheme, the presence of self-diagnosis functions, provide for the existing power limit and install a special magnetic starter, provide for the presence of a remote floor temperature sensor.
The connecting wires to the thermostat are connected with conductors of different colors. Temperature regulators are rated for a current of 16A. It has been noted that with the correct choice of thermostat, electricity consumption can be reduced by 50 percent. Significant savings in material resources for those who installed the heated floor with their own hands!
Rules for laying cables. Carrying out calculations
In order to correctly plan and calculate your cable “warm floor”, you need to know the basic “postulates” regarding its correct installation.
Thermal insulation
Let's start with the fact that a layer of thermal insulation under the heating system is mandatory. Even if there is a heated room underneath the ceiling. Otherwise, the generated heat will be wasted “in vain” on unnecessary heating of the massive ceiling and the main walls on which it rests. In any case, the ceiling (especially the base on the ground) will be colder than the heating cable, that is, it will “pull” heat onto itself, despite its enormous heat capacity. Heat losses, and therefore electricity costs, will become unacceptably high.
What should the thermal insulation layer be like? Actually, a professional thermal engineering calculation is required. But you can also use their values, derived “in the laboratory” and tested practically.
Below is a diagram showing the dependence of the amount of heat loss (Y-axis) on the thickness of the insulation in millimeters (X-axis). The diagram was compiled based on the results of calculations for a room with an optimal level of thermal insulation of walls, windows, and ceilings (with poor insulation, starting a “warm floor” is a generally pointless task). Extruded polystyrene foam boards (EPS, XPS) with an average thermal conductivity coefficient of approximately 0.033 W/(m×℃) are considered as insulation.
Dependence of the amount of heat loss of a “warm floor” on the thickness of the lower insulating layer
What do we see?
If the insulation is completely neglected, then even in conditions of complete thermal insulation of the room, up to a third of the heat generated by the cable (about 32%) is simply lost.
With increasing thickness, heat loss rapidly decreases. But completely reducing them to zero is unattainable. An interesting feature is that with an EPPS thickness of 30 mm, losses reach 12-13% (almost three times), and then their decline becomes not so “rapid” at all. So, with a thickness of 40 mm, the loss is about 8÷9%. With further increase in thickness, this trend only increases. That is, we can say that a layer of 30÷35, maximum 40 mm will be optimal, and with a further increase in thickness, practically no gain can be expected.
Where is the cable laid? Its length and laying pitch.
Installation of a “warm floor” must be preceded by drawing up an accurate scaled cable layout diagram. What criteria are taken into account?
A similar diagram should be drawn up for each room where the “warm floor” will be installed.
- The installation location of the thermostat (item 1) must be designated so that it is not covered by any pieces of furniture, curtains, etc. Usually it is placed at the level of sockets, one of the devices of the block being created. It is to this point that the power cable corresponding to the power of the “warm floor” should be connected.
- The location of the temperature sensor (item 2) is immediately determined and must be marked on the diagram. The sensor should be placed at a distance of approximately 500÷600 mm from the wall, and always in the middle of the loop of the laid heating cable.
- The diagram should also indicate the location of the couplings - switching and end couplings (positions 3 and 4). Their number and location depend on which cable is used, single- or double-core.
- The drawing indicates the boundaries of the area where the cable will be laid. The fact is that, as already mentioned, it is not placed under stationary pieces of furniture and household appliances (item 5). The distance from the walls (N) is at least 50 mm, and from heating devices or other heat sources - at least 100 mm.
- Using the outlined boundaries, you should then immediately determine the surface area on which the cable will be laid out - we will need this value soon. By the way, it is considered quite normal for the area of the “warm floor” to be about 75% of the total area of the room.
- To apply a “drawing” of the cable layout to the diagram, you need to know the pitch size (in our drawing – D) between adjacent turns, and this cannot be determined in any way without the exact length. And both of these values are “tied” to the required specific heating power.
And this power, in turn, depends on the operating conditions of the heated floor and on the characteristics of the base on which it is mounted (on the ground or, say, above a heated room). You can use the following values:
| Features of the premises and planned operation of the heating system | “Warm floor” is planned to serve as the main source of heat in the room | “Warm floor” will work together with heating, it is created only to increase the level of comfort |
| Floor on the ground or above an unheated room | 180 W/m² | 130 W/m² |
| The floor above the heated room | 150 W/m² | 110 W/m² |
- Further, each manufactured heating cable must have a specific power in the list of characteristics - watts per linear meter of length. For example, 15 W/linear m.
- Having the area and specific power values for the floor and the cable, it is easy to calculate the minimum required length. Well, knowing the length, calculate the laying step.
We will not “torment” the reader with formulas - we will simply offer a calculator that will quickly and accurately calculate both of these quantities.
Let us only add that if, according to calculations, the laying pitch is greater than 300 mm, then it would be better to slightly increase the cable length in order to reduce the pitch. Otherwise, a “zebra effect” may occur, that is, alternating warm and cold stripes on the floor.
Calculator for calculating the length of the heating cable and its laying pitch
Go to calculations
After the calculations, you can finish drawing up the diagram - and you can begin to implement it.
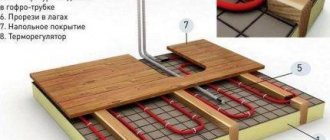
Install and connect the device
It is built into the wall like a regular socket or switch. The location is selected closer to the existing wiring (for example, at the same switch). A hole is hollowed out in the wall, where the mounting box is inserted, and the power supply wires (+ and -) and the temperature sensor are connected to it, then the thermostat itself is connected.
The 200 V network wires, heating cable and temperature sensor are supplied on the side. They differ in color (phase - brown, white or black, zero is marked in blue, and earth is marked in yellow-green).
Connection options for different types of systems
Let us immediately note that it is more convenient to work with a cable with two current-carrying conductors than with a single-core structure, since only one end is connected to the thermostat.
Differences in heating elements dictate some connection features.
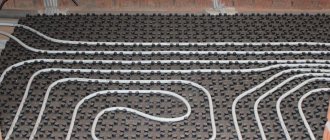
Cable heated floor
When laying cable floors, both single- and double-core heating elements are used.
Accordingly, the circuits do not differ much in the nuances of connecting to the thermostat, but otherwise the installation principle is the same. And now about the process itself. To begin with, the base is leveled, a layer of thermal insulation and damper tape are laid. Even before installation begins, the power wires must be pulled to the location of the thermostat with the expectation that the coupling will remain in the body of the screed. The next steps are as follows:
- the mounting tape is laid on a heat-insulating layer or directly on top of the subfloor, if, of course, there is a warm room underneath;
- the cable is evenly laid out along the tape fastenings;
- install the sensor in the corrugated tube;
- check the cable resistance, it must correspond to the value specified in the passport - for this you will need a tester;
- pour the screed and wait for it to harden;
- activate the system by connecting electrical wiring, power wires from the temperature sensor and heating sections using screw terminals.
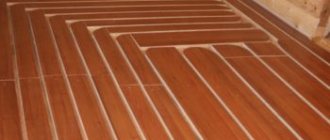
The best option for cable layout is considered to be a snake. When choosing another method, make sure that its lines do not intersect.
Thermomat
Thermomat is a type of heating cable, so the installation approach for both systems is quite similar. It is, of course, easier to work with mats. This is facilitated by several factors: there is no thermal insulation, the screed is poured with a thin layer, etc. That is, there is a clear saving on building materials and the required amount of work. One cannot fail to note as an advantage the minimal rise in floor height.
If, when connecting the heating mats to the thermostat, the length of the cold ends is not enough, then the missing part is cut out from the heating mat. The coupling remains inside the screed.
Film heated floor
This is a modern model of a heated floor, where bimetallic or carbon elements act as a heating element. It is connected to the network through copper conductors passing along the edges of the heating film. The floor is laid on a special substrate, usually made of reflective material, which is rolled out onto the base. Sheets of film are connected in parallel. In the latter, one of the pair of conductive strips is connected to the previous one, and the second is soldered to the terminals and brought to the thermostat.
And in this case, too, the connection of the heated floor sensor is carried out in a plastic corrugated tube (16 mm). It is placed either in a groove made in the floor, or the device is fixed to the surface of the film. Where the wall meets the floor, you need to provide as much bend as possible, then the cable will fit freely in the tube. To prevent moisture from getting into the tube, it must be plugged at the end.
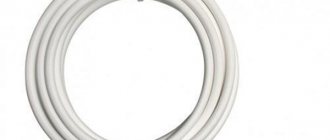
Which pipes are best to use?
For floor lines, only those circuits that can withstand high temperatures are suitable.
Today on the market there is a variety of products made from the following materials: copper, metal-plastic, cross-linked polyethylene. Separately, we will talk about galvanized pipe materials.
Each type has its own characteristics and is intended for use in specific conditions.
PEX pipes made of cross-linked polyethylene
Pipes made of cross-linked polyethylene have excellent performance characteristics, which give them an undeniable advantage over other materials, and are therefore popular both for cold water supply and for installation in heated floor structures.
The material for their manufacture is polyethylene with a certain density. Stitching of products is carried out using several methods.
Depending on the production process, the pipeline is of different classes:
- PEX-a - high-density polyethylene is used in production. The production method is peroxide, which involves melting polyethylene under high temperature. After which, the resulting amorphous mixture is squeezed out through a special forming hole, this method is called extrusion.
PEX-a is a multi-layer construction, with an aluminum insert placed between the layers, which helps maintain the shape of the product. A special glue is used to connect the layers; it does not change its properties under the influence of temperature.
For your information! The product is capable of transmitting oxygen to the coolant. To eliminate penetration, manufacturers began to equip it with an EVOH protective coating on the outside - this is a layer of thin plastic (polyvinylethylene).
- PEX-b - for its production, medium-density polyethylene is taken, which is softened to a solid consistency. With this method, crosslinking is done after extrusion.
- PEX-c - the raw material in this case is also medium-density polyethylene. Crosslinking is carried out at a temperature equal to the environment, while the state of the material is solid.
Hoses made of cross-linked polyethylene are widely used in the installation of heated floors, but PEX-a is more often used, as they have good elasticity and allow laying a line with a bend of up to 5 diameters.
PEX-b is harder and therefore breaks easily. And PEX-c does not tolerate high temperatures well, and therefore is more often used for cold water. In addition, products made from this material are durable and lightweight, which is a plus when installing it yourself.
PEX-a pipes have memory - when deformed, they are able to completely restore their shape; for this they need to be heated. PEX-b does not have such properties, while PEX-c has this property reduced.
Polyethylene PE-RT
PE-RT pipes are modified; they differ from PEX in the absence of seams. A system made from such tubes is practically silent and withstands sub-zero temperatures, but although it tolerates high positive temperatures well, it does not last long.
In addition, this material is susceptible to the action of aggressive substances, and there is no structural memory. But, despite this, heat-resistant polyethylene is widely used in heated floors, as it has a reasonable price.
Metal-plastic
A metal-plastic pipe for underfloor heating is an excellent option. It is flexible and plastic, and can be bent even without heating. In addition, the material is durable, tolerates temperature changes well and is environmentally friendly.
The metal-plastic pipeline consists of several layers - cross-linked polyethylene inside, then metallized foil, and a polymer coating on the outside, which protects against mechanical damage. In this design, corrosion does not form and scale deposits do not occur. If installed correctly, the pipeline will last more than 50 years.
If we compare which is better - metal-plastic or cross-linked polyethylene for heated floors, we can note the high thermal conductivity of plastic. But at the same time, there is a high risk of the coil breaking, and since such a product does not have the ability to restore its shape, this section will have to be removed.
Metal
Metal pipes for warm water floors are available in the following types:
- Copper ones have a high cost, so they are not very popular when installing hydrofloors. In addition, laying such a pipeline is not easy; special equipment is required, and it is unlikely that it will be possible to install it yourself.
However, it is worth noting that a copper pipe is an ideal option for heated floors, as it has excellent characteristics:
- high thermal conductivity;
- durability;
- not susceptible to corrosion;
- ductility and strength.
- Stainless steel corrugated steel is a relatively new type that is well suited for heated floors, but due to its high price it is not used often. The product has a protective polymer coating, and the stainless metal is not subject to corrosion and is resistant to mechanical, chemical and temperature influences.
In addition, this model has increased flexibility; installation in the most complex patterns is possible, without the risk of creasing.
To summarize , we can say that the most popular models that are used for heated floors are a metal-plastic pipe or a cross-linked polyethylene pipe .
They have good performance characteristics and are affordable. But if financial resources allow, then it is better to use a metal (copper) pipeline; it has high thermal conductivity and durability.
Video: Installation of single-core and double-core heating cables
Secrets of treating joint pain from our regular reader.
Hello!
My name is Genady Alekseevich. I am a stove maker with over 20 years of experience. I am engaged in both repair and construction of Russian stoves and fireplaces. I always perform the work very efficiently and carefully, which negatively affects the condition of the joints. As I grew older, the pain began to get worse, to the point where I could no longer work. Having tried many medicinal and traditional methods of treatment, I realized how serious my disease was, since there was no positive effect. Until I came across one remedy that I want to tell you about.
This is a unique mixture of the rarest and most powerful natural healing substances. This remedy has proven its effectiveness not only for patients, but also for science, which has recognized it as an effective drug. Pain in the joints and back goes away in 10-15 days, as studies have shown. The main thing is to strictly follow the instructions in the method. You can order the product in original packaging, with a quality guarantee, at
Electric heating floor connection diagram.
The control element in an electric heated floor is a thermostat. Currently, there are two main types of thermostats:
- -mechanical, where the desired heating temperature is set by a mechanical rheostat.
- -electronic, where the temperature of the heating elements is set using an electronic relay. Such controllers may have a programming device that can initiate operation of the heating system at specified time periods.
Thermostats of any type are designed to regulate the following types of electrical heating elements:
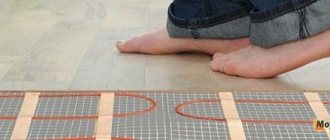
Heating cable. It is an electrical cable with high resistance, placed in reliable insulation. When electric current passes through the cable, it heats up.
Heating cable for heated floors - photo
The next type of electric floor heating element is the heat mat. In this design, the heating cable is placed on a thermal insulation film with a given pitch.
And finally, the heating element can be a special film that emits infrared rays. Its thickness does not exceed half a millimeter and a flat semiconductor heating strip is mounted in its layer.
Connection diagram for a heated electric floor via a thermostat
The heated electric floor must be connected to the power cable through a thermostat. This achieves savings in electricity spent on heating the room.
As a rule, the wiring diagram is shown on the thermostat body or in its data sheet. You can install the thermostat yourself without resorting to the services of third parties.
The power cable can be connected to the thermostat directly through the wiring. Also, the thermostat, and accordingly the heating elements of the warm electric floor themselves, can be connected through a regular outlet.
The figure below shows a schematic diagram of connecting the thermostat.
Thermostat connection diagram - photo
It is important to know that it is advisable to connect the thermostat to the network through a separate circuit breaker.
One of the connection diagram options is shown in the figure below.
Calculation of the number of thermostats
Perhaps there will be several rooms in your house in which heated electric floors will be installed. In this case, it is advisable to provide for the installation of separate thermostats and temperature sensors for each heating circuit. This will avoid additional loads on the power grid. This is especially important if the heated rooms have different operating modes. So the living space can be heated only during sleep, and the bathroom only when it is in use.
When installing thermostats separately, it is necessary to provide for the installation of individual temperature sensors for each heated room.
Connection diagram for a warm water floor.
The method of connecting a warm water floor is somewhat different from an electric floor. Let's consider ways to connect underfloor heating with liquid coolant to heating systems.
You can connect your warm water floor to the main heating system. However, this method must be used with certain attention. Perhaps large heat losses from the carrier will lead to your neighbors starting to complain about the cold. Without harm to neighbors, it is possible to connect warm water floors in apartment buildings in rooms where the stationary system switches to reverse flow. Also in this case, the temperature of the water in the heating system will not be too hot.
The big disadvantage of this scheme for connecting water heated floors will be the impossibility of smoothly adjusting the temperature of the coolant. Even if you install valves on the inlet and outlet sections of the heating circuit, the heating temperature will still depend on the heating of the main system.
Connection diagram for a heated water floor to an individual heating system.
The scheme for connecting a heated water floor to an individual heating system is practically free of disadvantages. However, this method can only be used in private homes.
Below is a schematic diagram of connecting a heated water floor.
The diagram shows the following structural elements:
- Thermostatic control valve mechanism. The signal to this part is supplied from a remotely installed temperature sensor. If the system reaches the set temperature, it closes the coolant supply.
- Balancing valve device. It prevents the coolant from idling in the heating circuits. If the coolant supply is turned off, it starts it in a small circle without a boiler.
- A circulation pump that provides additional coolant pressure in heating circuits.
- Safety thermostat. It is placed on the coolant inlet pipe and monitors the temperature level in the system.
- Electric drive of the water manifold valve group. Designed to control valves of heating circuits.
- Water collector of the floor heating system, distributing the coolant flow along the circuits.
- The valve of the water manifold (aka bypass) ensures the circulation of the coolant in a small circle.
- Remote temperature controller for the coolant of a heated floor system. Several of them can be installed in the system, which is why you can individually regulate the temperature in each room equipped with heated floors.
You can also familiarize yourself with the connection diagram for a heated floor with liquid coolant by watching the training video:
Video - Warm water floor diagram
Another option for connecting a heated water floor can be the use of a hydraulic separator. It is a specialized container in which coolant accumulates. Typically, such a container is mounted in a manifold cabinet in a special wall niche.
An approximate diagram of such a connection is shown in the figure.
An important point in connecting a heated floor with a liquid coolant is the installation of a water collector. All circuits of the heating system are connected to it, and the temperature and operating pressure of the coolant in each circuit can be adjusted individually.
Scheme of placement and connection of circuits with liquid coolant
When drawing up a connection diagram for a heated water floor, it is also necessary to calculate the location of the heating circuits. Obviously, they should not be located in places where stationary equipment will be located in the room.
There are two main schemes for connecting water floor heating circuits: “snake” and “snail” (or “spiral”). In regions with cold climates, it is recommended to use a “spiral” connection scheme, since in this case the entire room will be heated fairly evenly and the floor surface will not experience severe temperature deformations.
Laying pipes using the snake and snail method
The heated floor system can be used as an independent heating system or in conjunction with traditional heating radiators. With this connection scheme, heating radiators are first connected to the coolant flow, and then, on the return stroke, the coolant passes through the underfloor heating circuits.
This figure shows a combined heated floor connection diagram.
- A pump that circulates the coolant.
- Heating radiators,
- Boiler,
- Tank with membrane partition.
- Control device
- Stopcocks.
Installation and commissioning of hidden heating systems is a fairly simple process if we are not talking about water-based structures. Electric heating circuits are suitable for rooms of any configuration and purpose, and unlike more complex water systems, there are practically no restrictions on their use.
Installation and arrangement of such a heating element consists of laying the coolant itself and connecting it to a power source. This is not a difficult job that does not require special knowledge and enormous experience, but if the installation of the source itself does not cause many problems, then not everyone knows how to connect a heated floor to a thermostat.
Scarecrow
If you need to scare away birds, you should make a device from compact discs. They need to be secured to a hoop and attached to the board.
The advantage of heated floors
- Does not take up additional space, which allows you to implement design ideas.
- Guarantee that there are no drafts in the house. The heat evenly rises by 2-2.5 meters, which is ideal for warming up the apartment.
- Electric models are equipped with a heat regulator, which allows you to control the temperature according to the outside temperature.
- The air does not dry out and the optimal humidity of the room is maintained.
- Compared to traditional heaters, it warms up the room faster.
- Heating systems are hidden from prying eyes, which does not spoil the external style of the room.