Installing heated floors under laminate on a wooden base is gradually gaining popularity. There are 3 main types of design, each of which differs in efficiency, reliability and cost. Which one you should choose depends on the type of room.
For example, a water floor with a heavy concrete screed is more suitable for private houses, and an electric floor for apartments. You can do the installation yourself, the main thing is to take into account all the recommendations from the manufacturer and follow the instructions.
Find out how to install various types of electric heated floors under laminate: infrared, carbon, cable, in the form of heating mats, amorphous metal.
How to make your own electric heated floor
Cable and film floors vary significantly in thickness, so their installation has a number of nuances. But to imagine the scope of the work ahead, let’s consider the main stages of installation of both systems.
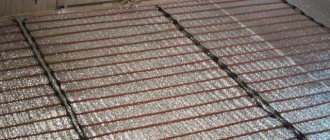
Cable system installation instructions
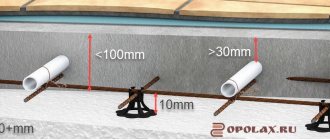
The installation of a structure made of conductive cables is carried out by analogy with the installation of a water floor, with the difference that such spacious niches are not required for the wiring, so instead of slats, you can get by with small recesses.
If the size of the room requires a large heating area, it makes sense to make several electrical circuits and connect each to a separate thermostat so as not to overload the network (+)
The sequence of work looks like this:
- The gaps between the beams are insulated with a layer of thermal insulation (for example, mineral wool, ecowool or perlite).
- Then a heat-reflecting layer of foil material is laid, on top of which a mesh with a cell of 50*50 or 40*40 mm is attached.
- Small recesses are made in the subfloor joists where the cable turns, and metal insulation is applied to each cut.
- Then the electrical cable is laid, fixed to the grid with special clamps.
- A temperature sensor is installed between the wires, enclosed in a corrugated tube and connected to the thermostat.
The power cable is supplied in a metal sleeve to the socket and connected through a thermostat, after which the structure is checked for functionality.
After this, you can lay the subfloor for laying the laminate.
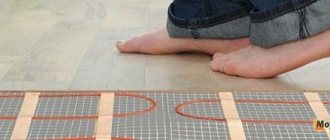
Installation of film infrared floor
As already mentioned, the simplest and most accessible option for arranging heated floors for beginners in the renovation business is an infrared system.
To install infrared floors, do not use nails or other fasteners that damage the film - this may cause a short circuit
Work algorithm:
- A heat-reflecting substrate (4 mm thick) with a lavsan coating, which does not conduct electric current, is laid over the entire area of the room. The joints between layers of material are glued together with mounting tape.
- The heated area is marked.
- The heating film is cut at the cut locations according to the layout plan.
- Then the film is spread on the floor, the sections are connected to each other in parallel using grommets. After connecting and crimping the wiring, the connection point is sealed with bitumen insulation, and the film strips are fastened end to end with tape.
- To prevent the wires from being deformed, small grooves are cut in the insulating layer with a stationery knife, the cable is placed there and secured with tape.
- Now installs the heating sensor (its wire is also hidden in the foil material).
- A hole is made on the wall (usually at a height of 50-100 cm from the floor) for the thermostat, and a groove is drawn to it for wiring the sensor and power supply.
During the installation process, try not to bend or crease the film so as not to damage its integrity, because the performance of the entire heated floor system depends on this
Water circuit installation instructions
To arrange water heating, you can use ready-made modules, OSB or chipboard boards with channels cut with a router for pipes. You also need to select pipes, a thermostat, insulation, and waterproofing.
The length of the pipes is calculated based on the layout method and the size of the heating zone - a warm floor can be either an additional or the main source of heat.
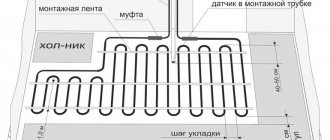
Depending on the layout of the room, the arrangement of furniture and the design of the heating system, you can lay the pipes in loops, snails or spirals, but for self-installation the simplest “snake” is considered the easiest (+)
For wooden houses, the lath installation method is most often used. To do this, you need to prepare the surface of the subfloor - make a flooring on beams made of plywood or OSB with a thickness of 15-20 mm, level it if necessary and insulate it (the maximum permissible unevenness is 2 mm per 1 linear meter).
It makes sense to install a water heated floor if the house is equipped with autonomous heating, but connecting to a centralized network is not recommended for a number of reasons - in an apartment it is simply prohibited, and in a private house there is a risk that the pipes will not withstand pressure surges (+)
Stages of upcoming work:
- Think over the layout and calculate the pipes for the floor. It is important that the slatted base is installed perpendicular to the supporting joists.
- Then cut strips from moisture-resistant plywood, 2.5-3 cm wide less than the pitch for laying out the pipes. For example, for a step of 20 cm, stripes with a width of 17 cm are needed, for 30 cm - 27, etc. The thickness of the slats should exceed the diameter of the pipes by 10-15 mm.
- Lay a layer of hydro- and vapor barrier (foil polyethylene is most often used).
- A damper tape is attached along the perimeter of the walls, which will provide the necessary clearance when the materials expand due to heating.
- In accordance with the layout plan, the pipe location markings are transferred to the floor.
- Then cut slats are installed on the logs or the surface leveled with wooden materials so as to form a groove for the pipeline. In places where it is planned to rotate the contour according to the markings, it is advisable to round off the planks themselves, and then secure them with self-tapping screws.
- Now heat-conducting plates are laid between the slats, which must occupy at least 80% of the floor area to ensure uniform heating of the laminate.
- Water circuit pipes are installed in the grooves of the profile.
Then the structure is checked for functionality by connecting to the heating circuit. To make sure there are no leaks or deformation of the pipes, it is worth observing the operation of the system for a couple of days, creating maximum pressure.
If desired, heat-conducting plates can be replaced with pieces of thin aluminum sheet or metal profile, but the use of foil for such purposes is useless
At the final stage, all that remains is to cover the “pie” with waterproofing (for example, a layer of polyethylene at least 100 microns thick) to reduce noise effects when heating and cooling the pipes. For finishing the flooring, kiln-dried plywood or gypsum fiber sheets that conduct heat well are best suited.
But before sheathing begins, the heated floor must work for at least 2 days, after which it must cool to a temperature of 15-17°C.
Additional information about installing warm water floors on a wooden base is presented in this article.
Penofol floor insulation technology
The insulator can be used to insulate surfaces made of any material. Before laying Penofol on the floor, stock up on glue to fix it to the base and reinforced tape to seal the joints. They will improve the quality of the heat-insulating layer.
Selection of materials for floor insulation
Along with the canvas, they always buy a means for securing it to the base and a tape that prevents the formation of cold bridges at the joints of the material. The correct choice of components will reduce heat loss in the apartment.
Penofol for flooring is available in various designs. For insulation, rolls with special letter designations are used:
Type “A” - with a foil layer on one side;
Type “B” - with a metal layer on both sides;
Type “C” - with foil on one side and a sticky surface on the other;
Type “ALP” - the foil layer is covered with polyethylene.
Glue can be special or universal. In any case, he must meet the following requirements:
- There is permission to use the product indoors. The degree of toxicity is indicated in the certificate of conformity.
Withstands large temperature changes.
Has antiseptic properties.
Does not lose its characteristics throughout the entire life of the house.
For the best fixation, special solvents are added to the glue, and they are different for each material. If this factor is not taken into account, the substance may damage the sample.
The product must comply with the conditions in which the insulation is used. For example, in saunas, solutions must be heat-resistant and resistant to hot steam. Before laying foil Penofol on a metal floor, you should make sure in advance that the substance does not contain water. The liquid can cause corrosion of the base and failure of the product.
Adhesive tape is a metallized (aluminum) reinforced tape designed to seal and insulate surfaces. The main indicators that it should have:
- High degree of adhesion. It depends on the thickness of the adhesive layer, the minimum value is 20 microns.
Ability to resist water, dust, bacteria.
High strength and wear resistance.
Maintains characteristics for a long time in the range from -20 to +120 degrees.
Laying Penofol on a concrete base
Let's look at some ways to insulate a cold base. As a rule, to insulate a concrete floor, the product is used together with another type of heat insulator.
Features of the work:
- Clean the concrete surface from dirt and add a layer of expanded clay.
Prepare cement laitance and pour the mixture onto the base. The solution will ensure that the granules set and cover them with a film. Stop working for a day to allow it to harden. After hardening, you can move freely on the insulation.
Fill the expanded clay with a screed and level it to the horizon.
Roll out a roll on the floor with a 10-15 cm overlap on the wall. Cut off the excess with scissors. If there is no adhesive layer on the insulator, secure it to the base with a special means. The use of a retainer is optional, but it will prevent the insulator from moving when installing the finishing coating.
Before gluing, thoroughly clean, vacuum and prime the concrete surface. Apply the product to the entire canvas, on the side without foil. Coat the edges especially carefully.
After applying the solution, do not touch the material for a couple of minutes so that the glue hardens a little. Place the sheet on the concrete, smooth it out and hold it until it sets.
To insulate a concrete base, instead of expanded clay, you can use polystyrene foam or high-density polystyrene foam 5-10 cm thick. In this case, it is better to lay Penofol type “C” on it, which is easily fixed with an adhesive layer.
Place the second strip next to it end-to-end, and glue the connection of the blades with aluminum tape.
Install the slats on the base in increments of 35-40 cm along the entire length of the room and secure with dowels. Align the surface of the beams in a horizontal plane using a hydrostatic level. If you plan to fill the space between the beams with other insulation, for example, foam plastic, mineral wool, their height should be 5 cm greater than the thickness of the insulator to organize a ventilated space.
Buy beams in sizes 100×100 or 100×150 mm, where 150 is the width. The length of the beams should correspond to the size of the room so that they do not have to be extended. Modification of the slats negatively affects the stability and strength of the frame.
Why is it important to pay attention to the structure of the plywood itself?
When making the final choice of insulation, you should also take into account what kind of plywood is planned for it.
This component is divided into popular brands:
- FSF has an extremely high degree of moisture resistance, so during installation it requires the use of toxic types of glue. The best options for such coverage are considered to be non-residential premises (garages, warehouses, offices). The basis is a reliable concrete screed that is not afraid of high humidity;
- FC is a material that contains special urea resins that are completely harmless to humans in terms of toxicity. For this type of plywood, wood obtained by processing coniferous or deciduous plants can be used as a base for the flooring.
Taking this into account, floor insulation is selected for the specific environment in which it will serve. And a lot depends on the type of plywood itself!
Types and scope of application of penofol
Main types of material
| TYPE | COMPOUND | APPLICATION |
| A | Foiling only on the outside | Used in combination with polystyrene foam |
| IN | Aluminum foil lining on both sides | Can be used without additional materials |
| WITH | Self-adhesive type, foil-lined on one side. On the other hand, it is impregnated with a contact adhesive composition. | Installation is carried out without the use of additional adhesives. |
| R and M | The foiling is one-sided, has a relief base | Suitable for interior and exterior work |
| Super NET | NET – means network. Double-sided foiling. | It is used for thermal insulation of pipelines, heating mains, air ducts. |
| A.L.P. | Laminated penofol. A cellophane film is applied over the foiling. | Widely used in agricultural work. |
You may find the brand "Penofol 2000"
- This is the cheapest type of penofol. It is of low quality and less durable.
Scope of application of penofol
The scope of application of insulating material is extensive. The main thing is to choose the right type of penofol.
In construction
reflective heat insulator is used:
Other applications:
- Refrigerators, refrigerators, vans.
- Cars.
- Railway carriages.
Necessary tools, materials
for installation work:
- Wooden beams.
- The slats are 15–20 mm thick.
- Antiseptic.
- Adhesive composition for certain types of penofol.
- Dowels, self-tapping screws for fastening the frame.
- Aluminum tape for gluing joints.
- Scissors.
- Furniture stapler.
How to properly lay a film electric floor
Description of the technology on how to properly lay a heated floor:
Drawing up a drawing This is especially important in cases where large premises are being designed. It is recommended to use heating film only in open areas - it is not needed under furniture. In addition, the weight of heavy objects can cause a breakdown of the system. It is recommended to distribute the strips in the longitudinal direction, which will reduce the number of joint sections. If there is electrical wiring at the base of the floor, a distance of 5 cm must be made from it. Other heating sources (oven, fireplace, radiator, etc.) must be removed from the film at a distance of at least 20 cm.
Preparing the base. All dirt must be removed from the rough surface, differences and defects must be eliminated. This is best done using a leveling mixture. Further installation work may be continued only after the fill has completely dried. To improve the heating efficiency, it is advisable to cover the base with a layer of thermal insulation, gluing the joints with special tape.
Laying the film. The main task is to correctly distribute it over the entire floor area. This almost always requires cutting the film into separate fragments: this operation can only be carried out along special lines applied to the surface of the material. If you cut the film anywhere else, it will cause serious damage.
Fixation. Having laid the strips of material according to a previously drawn up drawing on how to lay an electric heated floor, they must be well secured. This can be done using tape, staples or regular furniture nails. There are special transparent areas for fasteners at the edges of the film: doing this in other places is prohibited due to the risk of damaging the heating circuit.
Network connection. Having secured the heating strips, they must be connected to electricity. For this purpose, the product kit includes special contact clamps. They are connected to the system in a special way: each element is inserted into the gap between the layers of film and connected to copper wire. Strong fixation of each clamp is carried out using a grommet, which must be riveted with a special device
If it is not available, you can use a regular hammer for these purposes: you need to act very carefully to avoid damage to the graphite inserts. Next, the contact clamps are connected with pliers to the copper wire in the protective sheath.
When performing installation yourself, it is recommended to arm yourself with some useful tips on how to properly lay a heated floor:
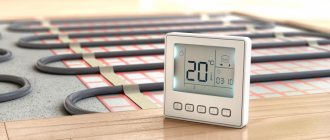
The individual parts of the film must be separated by some space. The presence of overlaps is unacceptable due to overheating of the material. This usually ends in rapid failure of the system and damage to the finish coating. It is not recommended to set the temperature controller above +30 degrees during operation of the film floor. If linoleum is laid on top of the film, then the optimal temperature in this case will be +25 degrees. It is allowed to install temperature sensors only after a complete power outage in the house. The supply of voltage is permitted upon completion of installation and connection of the device. When starting to test IR film, it is recommended to carefully inspect all areas of contact switching
It is very important that the protective insulation is not damaged. When decorating large areas with heating film, it is important to take into account the total power of the circuit. If this parameter exceeds 3.5 kW, it is better to equip it with a separate power cable to avoid network overloads. Due to the minimum film thickness, the patch areas are usually slightly raised above the surface level
To prevent this from leading to a deterioration in the overall condition of the floor covering, the insulation in these areas needs to be trimmed a little to equalize the height. The optimal location for installing the temperature sensor is those areas under the film where there are no heating elements. Scotch tape is usually used to secure this device. Testing of the system is allowed only after connecting it to the thermostat. After turning on the heated floor, you need to check the wiring connections. If defects are found, they must be eliminated. A sign of high-quality operation of a heated floor is the uniform distribution of heat over its surface. After the warm floor under the linoleum is correctly laid, a vapor barrier material is laid on top of the film: it is also fixed with tape. Then you can move on to the final design of the floor.
Laying laminate
Before laying the laminate after installing the electrical or water system, you must make sure that the assembled heated floor is functioning correctly. It is recommended to periodically start the system for 3 days, raising the temperature by 5 degrees every day.
If you created a water type of floor with your own hands, you must immediately apply maximum pressure and make sure that the pipeline is not damaged and that there are no various leaks. After checking, you need to wait until the coating has cooled to 15 degrees, then you can lay the laminate on a heated wooden floor.
When the installation is completed, the master begins laying the laminate:
- A polyethylene backing is created, it is placed end-to-end, and the seams are covered with construction tape.
- Laminate sheets are placed on the underfloor heating substrate. As a rule, sheets are not placed close to the wall; a gap of 5 mm is maintained. Otherwise, you must follow the manufacturer's recommendations.
We invite you to find out whether you need a substrate or not, which one to choose for laminate, what types there are and how to install it
I made my own heated floor
| Here is a selection of materials: IN Everything you need to know about heating and climate control Features of the selection and maintenance of boilers and burners. Comparison of fuels (gas, diesel, oil, coal, wood, electricity). Do-it-yourself ovens. Coolant, radiators, pipes, heated floors, circulation pumps. Chimney cleaning. Conditioning |
The main problem in a house with wooden floors is the inability to pour a concrete screed, which is common when laying heated floors. The concrete screed weighs so much that it bends or breaks the floors. So the heated floor has to be laid without screed.
You must understand that in a wooden floor the temperature of the heating elements should be much higher than in a concrete floor, since wood does not conduct heat well. If we want to heat the floor surface to 40 degrees, then under the floor we need to give 60 - 70. And in winter, if you want to heat yourself with a heated floor alone, you will have to maintain its temperature at about 40 degrees.
So, for a warm floor in a wooden house, special adjustment of the coolant temperature is required, which is different from the adjustment in a city apartment or a house with concrete floors.
I would not risk using an electric cable laid inside the wooden flooring to heat a wooden floor so strongly. What if overheating occurs in some local place? The water pipe heats evenly and nothing can catch fire from it. So it seems to me that in a wooden house it is safer to use a water-heated floor.
The craftsmen who undertook to make my heated floor convinced me that it would not be possible to heat the house with the floor alone. You still need to install additional batteries. But I figured that if you heat the floor to 40 degrees, it will be warm in any frost. And for the feet this temperature is quite comfortable, especially in cold weather. So I made them put it down.
But I soon realized why their floors were not heated. They laid the floor like this. A thick (40 mm) unplaned board was laid. They laid it flat, padded it, adjusted it. Using a powerful hand-held milling machine, we cut grooves for pipes in this board and placed a pipe in these grooves.
And they began to foam these grooves with polyurethane foam. I almost killed them when I saw them. Foam is an excellent heat insulator. That’s why their floors were poorly heated. He made me cover the grooves with putty. There is no load here, the filler is only needed to fill the cavities and to transfer heat. Sheets of plywood were laid on top of this floor, and then carpet.
In addition, I convinced the craftsmen to adjust the temperature of the coolant in the floor as I needed, and not as it was written in the instructions for the concrete floor.
Which glue to buy
How to glue tiles to plywood? This issue deserves detailed consideration, because you will have to glue the tiles to a base made of wood material, which is characterized by its instability.
Therefore, when choosing an adhesive composition, it is necessary to take into account some nuances:
- A sheet of plywood is made up of thin layers of brittle veneer, and if the bond is broken, the plywood will delaminate and will no longer be strong. This feature of the material is a good reason to choose an adhesive that does not penetrate deeply into the structure of the material.
- No matter how strong the base is, it can still bend slightly under load. In this case, the cement-based adhesive will not hold the tile, and it will easily come away from the plywood. Therefore, only elastic adhesive mixtures should be used.
The composition of such mixtures includes highly elastic components:
- microfiber;
- fiberglass;
- silicone;
- silane and other modifying additives.
It is important! When purchasing glue, make sure that the list of listed materials for which it is intended to work includes plywood.
We weigh all the pros and cons
So, the disadvantages of insulating walls with electric heated floors include the following:
- Poor heat transfer. Because the heating element will be located in the wall, the heat must first pass through the finishing layer (plaster or gypsum board sheets), and then only reach the heated room. Here the following picture is formed - the heating will capture only the first 15-20 cm from the surface and the heated air will rise to the ceiling. As a result, the heating will be ineffective and other electric heaters will have to be additionally installed.
- Furniture and household appliances cannot be placed against the wall. Here, too, everything is obvious - any cabinets, refrigerators, TVs and shelves will interfere with the already weak heating of the room. In addition, direct exposure to heat can negatively affect both furniture (it will begin to dry out) and electrical appliances (overheating).
- Significant heat loss. Heat will radiate not only inside the house, but also outside (to the outside of the wall). You cannot place foil thermal insulation under the infrared film, so you yourself understand how this will reduce the heating efficiency.
- Reduced versatility of vertical surfaces. If you do not provide special fastenings when installing a heated floor, then in the future, after finishing, you are unlikely to be able to hang a TV on the wall or even a picture without damaging the heating element.
- Dew point shift to the inside. One of the main disadvantages of electric wall heating. As a rule, condensation accumulates between a cold and warm surface. If under normal conditions this happens on the outside of buildings, then when laying a heating cable or film, the dew point will be approximately the middle of the wall. As a result, in winter it will freeze more strongly and collapse faster. In addition, the likelihood of mold and mildew will increase significantly.
- Increased energy costs. Electric heated walls are not the most economical heating system. Although the heating cable on a vertical surface can be laid with an increased pitch, the electricity consumption will still be significant. Why is this necessary if the heating efficiency is quite low?
- Decorative wall decoration will last less. When electrically heating a vertical surface, there is no guarantee that your wallpaper will not peel off after a few months. In addition, if you choose the wrong solution when installing a heated floor under the tiles (for example, in the bathroom), they may fall off after the first heating season. You can only not worry if the walls are covered with plasterboard.
As you can see, such a heating system has quite a lot of disadvantages and all of them are significant. We read a lot of discussions on forums and found only two main advantages of installing heated floors on the wall:
- With vertical heating, dust will not spread throughout the room.
- Since the heating cable or infrared film is placed in the wall, the rooms will become more spacious.
Now you can decide for yourself whether it is possible to install a heated floor on a wall. If you nevertheless decide to use such an electric heating system, read on to learn how to properly attach the heating cable and film.
Liquid coolant systems
enjoys well-deserved popularity based on many factors. Among others, durability, which in turn influences the formation of a low final cost of heating as a whole. Considering the performance of the system and the availability of materials, the possibility of use in unheated loggias, this option has become widespread.
Purchased
If the planned additional heating system is installed by specialists representing the interests of the manufacturing company, then the customer’s interest in terms of timing and cost is obvious.
How the tubes will be connected, or what coolants are used in a particular case, is absolutely not important. . The interests of normal manufacturers do not include work to restore the lost functionality of the heating system
A warranty for the entire service life, with periodic maintenance and mandatory explanation of operating rules - this is what the customer should count on.
The interests of normal manufacturers do not include work to restore the lost functionality of the heating system. A warranty for the entire service life, with periodic maintenance and mandatory explanation of operating rules - this is what the customer should count on.
Homemade
When independently designing a water heated floor, you should remember that the two installation options “snail” and “snake” have different technical features. For example, under the same conditions, the first option is characterized by smaller pipe footage than the second.
“Snail” ensures uniform heating; pipes laid in a “snake” somewhat lose temperature as they move away from the main circuit. The “snail” design has less resistance, which explains the temperature difference. By the way, this feature also explains the different changes in pressure in the common heating circuit.
Based on the fact that periodic maintenance of a heated floor laid under tiles is impossible, attention should initially be focused on durable materials. In the case of installing a homemade system, the optimal choice would be metal plastic and corrugated stainless steel pipe
Polyethylene and copper pipes are used less frequently, as undesirable complications are possible due to contact with the cement mixture.
Taking into account the correct calculation, for a system with its own boiler, major troubles during operation can be avoided. And by installing a water circuit “by eye” in an apartment building, it is quite possible to cause yourself a number of troubles.
Of course, the bypass (a jumper between the supply and return) will serve as a kind of fuse against problems with neighbors in the entrance, but in any case, raising the floors and redoing the circuit again is below average pleasure.
How is TP better than radiators?
During the construction phase of a new home, its owner has the opportunity to choose the appropriate heating option from a variety of available ones. But if there are already radiators in the room, then you need good reasons to refuse them. Floor heating has a number of advantages, which for many become a decisive factor when choosing:
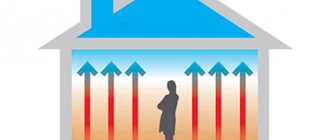
- Efficiency. Unlike radiators, which primarily heat the space under the ceiling, heated floors transfer energy from the bottom up, uniformly heating the living part of the room at a height of up to 2-2.2 m.
- Saving. More efficient energy distribution allows reducing coolant costs by 20-30%. And while radiators will generally be cheaper to purchase and install, underfloor heating provides long-term savings that look into the future.
- Inertia. Depending on the type of radiator, this figure may differ, but the floors take longer to cool down after switching off.
- Comfort. The use of radiators requires a high coolant temperature (70 degrees). The average temperature of heated floors is 45° C, which is more comfortable and safer for the inhabitants of the house.
- Practicality. Radiator heating is characterized by a large volume of coolant, which is placed along the walls and under the windows, occupying part of the room. Underfloor heating is hidden from view, so it fits into any design and does not take up the usable area of the room.
Installation of logs on the surface
The timber is laid according to the markings on the fixed linings. The logs are mounted parallel to the wall with windows, i.e. across the direction of sunlight entering the room. The first lag is installed at a distance of 30-40 mm from the wall, and all subsequent ones - 40-50 cm from each other.
When specifying the distance between the logs, you must remember that the gap between the last beam and the rear wall should also be no more than 40 mm. The distance between the lags should be the same. The logs must be fixed parallel to each other strictly at the same height (along the surface). All logs are chosen to have the same section size, except for the log located at the front door. It is advisable to install this beam from a wider beam (at least 50 mm).
The logs are attached with screws to wooden pads, previously positioned and secured with anchors according to the markings. The heads of the screws should not protrude outward (it is advisable to have them recessed into the joist by 2-3 mm). The height of the logs must be strictly the same, so during installation the height is constantly monitored using beacons (if installed) or using a level. To increase the height, a roofing felt pad of the required thickness is placed under the joist.
The beacon allows you to determine the force with which the screw is screwed in, so the height of the log is adjusted. To strengthen the lags, transverse bars (crossbars) are usually installed. Such bars are fastened across the beam in places where wooden pads are installed and are attached to them with screws.
For reliability, after installing the logs, all wooden elements are coated with parquet or other similar glue. It is advisable to fill the volume between the joists with insulation and sound insulation. For this, mineral wool, expanded clay or expanded polystyrene (foam plastic) are usually used. Before backfilling, all communications are carried out (if necessary). It is also recommended to place a layer of parchment or bitumen paper on top of the lag. Sometimes the timber is installed without the use of wooden supports. In this case, the lags are leveled by placing pieces of roofing felt. The joists are secured to the floor with anchors. The length of the anchor is selected 5-6 cm greater than the thickness of the bar.