The popularity of laminate floors is easy to explain - they are beautiful, durable, durable and easy to install. However, not everything is as good as it could be. Laminate, although it may be similar to wood in texture and color, still does not have sufficient heat capacity and may feel cold when moving on it. Therefore, many owners of apartments and houses, especially those living on the first floors, are seriously concerned about underfloor heating. Infrared heated floors under laminate can be the best solution to the problem of cold floors.
Infrared heated floor under laminate
What is infrared heating?
Infrared heated floors resemble in appearance a thick film with black stripes on it. However, heat mats are only part of a complex electrical system that allows you to heat the base in an apartment.
Infrared film floor
In this case, floor heating occurs due to infrared radiation, which appears due to the carbon paste located between the sheets of transparent film. It is applied in parallel lines and looks like those same black stripes. The emitted waves have a length of 5-20 microns. The system, thanks to additional elements, is connected to the electrical network, where the current conductor is a connection of copper and silver.
Laying sheets of film heated floors
On a note! Carbon has a fairly high thermal conductivity, due to which energy consumption can be significantly reduced. That is why infrared floors can be called a fairly economical heating option for floors. At least the utility costs in this case are much lower than when using conventional electric or water floors.
Wood floor temperature limitation
The main part of the infrared heating system is precisely those striped film heaters. They are sold in rolls and can have a width of 50 cm or 100 cm. Cutting them is convenient, since there is a cutting line approximately every 25 cm, which allows you to buy exactly as much film as you need to install a heating system in a particular room. The film is sold by the meter.
Attention! It is strictly prohibited to cut the film in a place not marked with a special marking! This will damage the canvas and it will not work.
How to cut film heated floors
The power of infrared films is 150, 200 or 440 W/m2. These indicators will be useful during calculations regarding the installation of a heated floor system, to identify the load on the electrical system of the house. For laminate, it is optimal to use mats with a power of 150 W/m2. They will allow you to heat the floors to a maximum of 40-45 degrees, and a higher temperature is not necessary. Otherwise, it will be unpleasant to walk on the floors, and higher values will have a negative effect on the surface itself. The optimal temperature for the feet is about 27 degrees.
Characteristics of infrared heated floors
Also, a heated floor system with infrared heating necessarily includes:
- thermostat;
- temperature sensor;
- special clips or clamps;
- wires for connecting the system.
The infrared floor system is highly reliable, since the individual elements are connected in parallel - if there is a problem in one of the elements, the rest will continue to work.
Infrared plate device
Connecting IR films to the regulator
All cables should converge near the temperature controller. Twisting of cables is prohibited when connecting several sections of a heated floor to the thermostat. Certified terminals must be used for connections.
To install a heating system, you need to take a flexible wire with non-flammable insulation. Its cross-section is calculated based on power (divide power by voltage).
For example, 4.1kW/230V/10 = 1.7mm, you need to round this value to a larger size that is on sale in order to have a reserve. We obtain the required wire cross-section of 2 mm.
With a total system power of 4.1 kW, a sufficient cable cross-section is 2 mm. With a power of 8.3 kW, a cable with a cross-section of 4 mm is required.
Basic steps when connecting a heated floor:
- The cables are connected to the regulator block in accordance with the technical documentation for the film insulation. L - corresponds to the phase wire, N - zero. Together with the designation of the resistor, the permissible load value is usually indicated.
- After communication, the wires are removed into special grooves, and the thermostat is fixed to a predetermined place.
- All connections are carefully checked again and a test run of the system is performed.
- Before installing the laminate, it is necessary to improve the safety of the infrared film, protect it from breaks and other damage. You also need to protect the film heater from moisture. For these purposes, polyethylene with a thickness of 200 microns is laid on top of the film sheets, through which infrared rays can pass unhindered. The film is overlapped and secured with tape to seal.
- Laminate is installed in the traditional way, depending on the recommendations for a specific type of panel.
It should be noted that when connecting, it is necessary to install a circuit breaker. It will turn off the power to the heating system if there is even the slightest current leakage.
Before laying the final floor covering, you should check how the system functions. All sheets of IR tape must be at the same temperature. Cold areas indicate a lack of contact. You should make sure that there is no overheating or noticeable sparking in the components.
Is it possible to install infrared heated floors under laminate?
The heat capacity of laminate is higher than tiles, and its thermal conductivity is lower compared to the same material. Laminate floors do not like high temperatures and therefore should not become excessively hot. If you install a water or electric heating system under the laminate, you will have to ensure a constant increase in the temperature of the heater, which will negatively affect both the material itself and the amount of utility bills.
Laminate does not like sudden temperature changes, which cannot be avoided when installing any other heating system. In case of negative temperature effects, there is a risk of cracks and cracks appearing in the material, and the floor may begin to creak. Neither a water nor an electric floor will provide optimal heating of the surface in terms of heating level and uniformity.
Laying laminate over infrared heated floors
Due to their small thickness, the lamellas heat up quickly, because IR rays will spread quite quickly throughout the material. Also, if the floors are made correctly, the radiation will not go towards the rough base on which the film lies, which means there will be no heat leakage. Thus, IR floors are the best option for heating laminate floors.
IR floor heating
First start of the heating system
Do not immediately turn on the heating at full power. First, the temperature is set at 15-20 C and increased every day by several degrees, gradually bringing it to the calculated level.
IR film is a comfortable modern heating method. With proper installation and operation, they can maintain comfort and warmth in the house for a long time and even replace central heating.
Advantages of using film heating
IR floor heating has many advantages that make it one of the best options for heating laminated floors:
- optimal and uniform temperature distribution over the entire floor area;
- economy;
- the optimal floor temperature level is within 45 degrees;
- rapid heating of the surface;
- ease of installation and repair;
- there is no need to install a screed, since the floor covering can be laid on thermal mats;
- long period of uninterrupted operation.
Infrared film heated floor Luchi
The main disadvantage of such floors is the fairly high cost of equipment and materials , but the investment will be fully justified if you take into account all the advantages of the system.
How to prepare TP for a meeting with laminate
Before laying the laminate, you need to do several important things: let the self-leveling floor dry for 1.5-2 weeks before laying the laminate, do not turn on the heating during this time; turn on the heated floor, set the regulator to a comfortable temperature - you need a week of operation in this mode, during which time the moisture will leave the screed as much as possible; bring laminate into the room and turn off the floor so that the material “gets used” to the new temperature and humidity conditions. Wait 2-3 days - now you can lay the underlay and laminate.
After installation, it must be possible to ensure stable temperature and humidity in the room.
And when the heating season begins, it is necessary to gradually increase the floor temperature by 2-3 degrees per day to the one recommended by the manufacturer (usually +27 degrees).
At the end of the heating season, the floor temperature is also reduced to +15 degrees by 2-3 degrees per day. After this, you can simply turn off the thermostat. With each new season, this entire procedure will need to be repeated: if the homeowner does not want to quickly say goodbye to the laminate, he should not make sudden movements with the thermostat - only slow warming up (and at the end of the season, a slow decrease in temperature).
It is important to limit the heating temperature of the flooring to 26-27 degrees, so it will retain all its performance characteristics for a long time.
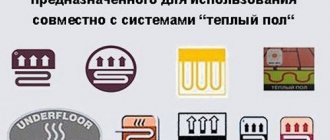
Which laminate to choose for IR heated floors?
Before you finally decide on the infrared type of floor heating, you need to study information about which laminate can be laid on top of this type of heaters without harm to itself. Suitable material must have a special marking in the form of a “snake”. It is this designation that informs the future owner of a warm laminated floor that the laminate is suitable for installing a heating system.
The process of laying laminate over IR heated floors
On a note! Experts recommend purchasing Belgian laminate from Quick-Step. Its service life is more than 25 years if treated with care.
Why do you need a thermal insulation substrate?
The substrate is a heat-insulating material that works like a “thermos”, and a waterproofing layer that protects against moisture. It is located between the base and the coolant, thereby softening the pressure that is exerted on the base. The main task of the substrate is to retain and transfer thermal energy upward, and not allow heat to escape into the floor.
The quality of heating is influenced by a well-equipped lining. The operation of the most powerful and expensive heating system will be ineffective if the insulation is incorrectly chosen, because the heat will be wasted.
Please note : according to technology, a heated floor system must transfer heat to at least 80% of the floor surface.
To achieve this result, it is necessary to use a heat-insulating material with low thermal conductivity in this layer of the cake. This quality allows you to reflect heat and direct it upward. That is, the underfloor heating, which is hidden under a concrete screed or located in the middle of the structure, is a key factor in effective heating.
Choosing a good substrate is not easy; you should pay attention to its practicality and manufacturability, it must be easy to use and have the necessary rigidity. Such a product will not be cheap, but it will last a long time and significantly increase the efficiency of the floor.
You can determine the best substrate by the presence of:
- good hydro- and thermal insulation properties;
- increased reflective properties;
- resistance to temperature changes, if it can withstand heating up to 90 degrees;
- resistance to deformation;
- fire resistance.
In addition, it must be environmentally friendly.
IR heated floor under laminate - subtleties of technology
Installation of an infrared floor system, although simple, requires attention and has certain features. Still, the work is carried out using the home’s power supply system, so mistakes should not be made here. Otherwise, the floors will either not work or simply become dangerous for the home owner.
Is it possible to lay laminate flooring on a heated floor?
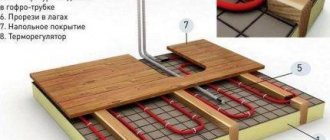
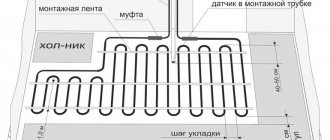
Even before installation begins, a complete and accurate floor laying diagram is drawn up, on which the IR mats themselves and all system control elements are indicated. The installation locations of thermostats, temperature sensors and other equipment must also be marked. It is important to remember that all the wires that will come from the heating system are connected directly to the thermostat.
The thermostat is usually installed on the wall, and in order to hide all the wires, it is recommended to cut a narrow groove into it, into which communications will be laid. Thus, they will not be conspicuous, because after laying the wires the cavity is sealed. In this case, the wires must be placed in a corrugated tube.
Heated floor thermostat
On a note! If you don’t want to trench the walls, then all communications can be hidden in a plastic gutter mounted on the wall.
Also, first on paper, and then on the floor itself, a diagram of the location of all infrared films is drawn. This procedure, in addition to convenience during subsequent installation, will also help to accurately calculate the consumption of all materials - wires, films, etc. The connection points of all wires are also marked on the diagram.
Nuances when working with IR film that should be taken into account before installation:
- the film is cut only along clearly marked lines;
- in order to have fewer joints between individual sections, the film should be rolled out along the long wall of the room;
- there must be a gap between the wall and the first line of the film - its width cannot be less than 25 cm;
- designations of the places where the furniture will be placed are immediately entered into the diagram (bedside tables, cabinets, sofas, etc.) - the film is not placed under them, which will reduce material consumption, and in the future the floor in this place will not overheat, which means the system will not burn out;
- each strip of IR film is placed at a distance of 5 cm from the adjacent one;
- the neutral and phase wires should not intersect when connecting, so they are connected only on opposite sides of the film;
- the temperature sensor should be located in the coolest place in the room so that it is in the middle of one IR element;
- the length of one IR strip cannot be more than 8 m;
- a suitable place for the thermostat is 15 cm from the floor level;
- Individual strips of film cannot be laid overlapping or on top of each other.
IR floor connection diagram
On a note! There is no need to worry that the floor heating will be insufficient if the film does not lie on the entire surface of the floor. The fact is that for optimal heating it is enough for the heaters to cover only 40-60% of the base of the room.
Making a diagram
Before purchasing a kit for a film floor under a laminate, you need to thoroughly think through and draw a diagram for laying the heaters and connecting them to the power supply.
When drawing up a diagram, you need to consider the following points:
- Do not completely cover the floor with film. It is not installed under furniture, as normal heat exchange is disrupted. In addition, heating will cause deformation of furniture and laminate. It will also reduce the service life and increase the cost of electrical energy.
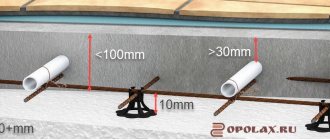
- Place heating elements at a safe distance (250 - 300 mm) from walls and heating sources.
- Rolls of film flooring should be rolled out along a large wall of the room, this will reduce the number of contact connections.
- The distance between sheets should be 50 mm. They cannot be overlapped.
- In order for the room to warm up well, it is enough to cover 60 - 70% of the area with heating elements. It is permissible to plan areas of increased comfort - this is a children's room and a place to relax.
In addition, you should consider the location of the system’s cable communications:
- Choose the optimal location on the wall for the control unit; it should be at a height of at least 500 mm from the floor, and be convenient for connecting wires.
- It is forbidden to connect a “warm floor” to an ordinary outlet, since the total power of the system is high. It is necessary to plan a separate power line of the appropriate cross-section. For maximum safety, it is recommended to provide an RCD device in the circuit for protection.
- Most thermostats can be installed in a standard outlet on the wall. It is enough to make grooves from it to the floor measuring 20 by 20.
- When planning the wiring, crossing the wires is not allowed. Connection schemes vary, but the most common is when the cable is connected to the heating elements at one end.
There are cases when it is more convenient and profitable to connect the phase and neutral cables from different sides.
- It is necessary to provide on the drawing the area where the sensor will be installed. It is placed in the center of the film heater. It is recommended to make a distance from the walls of at least 500 mm. The ideal location is the coldest area in the room.
An accurately drawn up diagram will allow you to correctly calculate the need for material and components, and will facilitate the installation of heated floors under laminate.
Preparing the foundation
The subfloor must be smooth and clean - litter and large debris are not allowed, it is also important to remove pebbles, sand, and dust. It is recommended to check the floor for strength, repair cracks and gaps, and level them to acceptable parameters.
Advice! To make the concrete base less dusty, it is recommended to treat it with a primer mixture, although this procedure is not necessary.
Also, thermal insulation material should be laid on the subfloors. It is recommended to use foil. The shiny side should be up. The strips are laid end to end. The thickness of the foil material should be about 2-3 mm. It is most convenient to secure the material using double-sided tape, and the gaps between the individual strips can be closed with ordinary tape. Then small recesses will be cut out of the material into which terminals, wires and other communications are placed. Then the base for the capricious laminate will be optimally smooth. It is also recommended to lay a layer of waterproofing material on the base of the floor.
Laying foil insulation
Heating elements are the very “heart” of a warm floor.
- Heat-reflecting material - its purpose is to reduce heat loss. A prerequisite is that it must be non-conductive. Polyethylene foam insulation or cork backing with a reflective layer is suitable.
- The base of the floor is solid and level. To do this, the concrete base can be filled with a leveling compound, and plywood can be laid on the wooden base.
Materials and tools
What may be needed to install an IR floor system? These may be the following tools and materials:
- directly the IR heating film itself;
- heat reflector;
- temperature sensor and temperature controller;
- regular and double-sided tape;
- electric wires;
- clamps and material for wire insulation;
- waterproofing material (for example, polyethylene film);
- knife, scissors, pencil, ruler, tape measure.
Installation of IR system contacts
At the beginning of the article, a description of IR film was given, but in fact, it is not only carbon.
Table. Types of heating film.
| View | Characteristic |
| Carbon or carbon fiber | The optimal option for IR film used for arranging a floor heating system. Its description was given in the article above. The heater consists of two layers of film, between which there are strips of carbon elements, due to which heating occurs. The material is environmentally friendly, effective, reliable, economical, and does not have a negative impact on human health. Service life - decades. Heat transfer is 97%. The main producing countries of such flooring are the Netherlands and South Korea. |
| Bimetallic | Such a floor is also created from two layers of polyurethane film, between which a conductor made of copper and aluminum is laid. Installation of such a system is somewhat more complicated due to the lack of a grounding wire. The material can also be used under laminate (such heating systems cannot be used under ceramic tiles and porcelain stoneware). The system is functional, distributes heat well, and is suitable for use in Russian climate conditions. |
Heating film NAOS Heatflow
Heatflow film uses carbon fiber web as the heating element, which is a mixture of carbon fiber with carbon paste
Thanks to the bonding method using a special conductive polymer, NAOS Heatflow eliminates the occurrence of electric arcs
There is also another type of IR film. It appeared relatively recently, but has already become in great demand. These are films with a continuous carbon coating. Unlike standard carbon IR film, this material practically does not fail when damaged - that is, the floors will always be warm.
On a note! If you damage one or several strips of a regular infrared floor, then it will not warm up at their location. However, when using a film with a continuous strip of carbon fiber, the floor will warm up just as evenly, even if it has been damaged. It’s just that in the place of the cut or break the material will be a little cooler, but it will continue to heat.
IR carbon-based floor
Is additional thermal insulation necessary or not?
Additional thermal insulation when installing an infrared floor is aimed at:
- Protection of the heated room from the penetration of cold air flows from outside;
- Saving heat indoors and preventing it from escaping outside.
The need for additional insulation depends on a number of factors:
- In what room is the floor installed? If it is located on the ground or above the basement, then the thermal insulation layer should be thicker.
- What kind of substrate is laid - that is, the type and its thickness. When using a thin foil product as a flooring, insulation made of expanded polystyrene foam, cork or polystyrene foam is required.
If you do not adhere to these rules, the floor will not work efficiently (heat will be wasted), and this will entail additional costs.
Film floor installation
Let's take a closer look at the process of installing IR film under laminate.
Table. Do-it-yourself installation of infrared floors - step-by-step instructions.
| Steps, photo | Description of actions |
| Step 1 | Measurements are taken from the entire floor in the room where installation will take place. It is also recommended to check the evenness of the rough base using a level. |
| Step 2 | A place is selected on the wall where the thermostat will be located. |
| Step 3 | The surface of the subfloor is covered with heat-reflecting material. Strips of material are laid joint to joint with the shiny surface facing up. Izolon can be used as a heat reflector. |
| Step 4 | The heat-reflecting layer is fixed to the base using tape or a stapler. |
| Step 5 | The joints of the heat reflector are taped. |
| Step 6 | The IR film is placed on the heat reflector so that the copper strip is at the bottom. |
| Step 7 | The film is being cut. In this case, all cuts are made with scissors along strictly marked lines. |
| Step 8 | The film strips are laid in such a way that there is a distance of at least 25 cm between them and the wall, and 5 cm between individual strips. Also, the film does not spread where large-sized furniture will be placed, so that the floors do not overheat in the future. |
| Step 9 | The places where the copper busbar was cut must be insulated with strips of bitumen insulation. It should cover the silver contacts along the entire cut. |
| Step 10 | Where the wires will be connected, contact clamps are installed on strips of copper. They are positioned in such a way that one part of them is inside the IR film, and the second is outside. |
| Step 11 | The terminal is clamped with pliers. |
| Step 12 | The film strips are fixed on the surface of the heat reflector and among themselves using tape so that the material does not move during operation. |
| Step 13 | The wires are inserted into the terminal and secured with pliers. |
| Step 14 | All places where wires are connected to the IR film are insulated. Two pieces of insulating material are used for each contact point. One is fixed on the outside of the film, the other covers the inside of the film. It is important to ensure that the silver contacts at the edges of the film are also insulated. |
| Step 15 | The temperature sensor is mounted under the IR film on the black graphite strip of the heater and fixed with a piece of insulation. |
| Step 16 | For the sensor, a small cut is made in the heat-insulating layer using a knife. The sensor must fit into it when the film is lowered. |
| Step 17 | Cutouts on the heat reflector are also made for contacts and wires. |
| Step 18 | All wires in the recesses are sealed with tape. |
| Step 19 | A temperature controller is installed on the wall surface in a selected location, to which the wires are connected according to the instructions and connection diagram attached to the thermostat. |
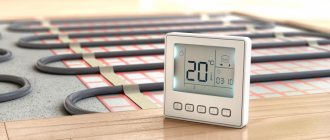
| Step 20 | The system is being tested. The heating system turns on, the floor temperature is set to a value not exceeding 30 degrees. The heating of all strips of thermal film is checked. |
| Step 21 | IR mats are covered with polyethylene film for additional protection. The installation of the heating system is complete. |
| Step 22 | The final floor covering is being laid. The laminate is laid using conventional technology on top of the film. The work is carried out carefully so as not to damage the thermal film. |
Prices for IR film heated floors
infrared heated floor
Video - Installation of heated floors under laminate
Laying laminate
The flooring is laid as usual, no additional difficulties arise. Classes 32 and 33 are more suitable for work, as they tolerate temperature changes better. There is nothing complicated in the process:
- As a backing, use foamed polyethylene with a thickness of 1 to 3 mm. Such products have suitable characteristics and transmit infrared radiation well.
- Do not glue the joints in the substrate so as not to interfere with heating. Just lay it close.
- Install only floating floor coverings with interlocking joints. Adhesive options are not suitable, as temperature changes cause the seams to begin to separate over time.
- During operation, be careful not to damage the heating mats. Start from any wall and move to the opposite one, laying row after row.
Make sure that the lock fits tightly into the groove and latches correctly. If you don't insert it all the way, you may simply break it and the panel will have to be replaced. After installation, check the operation of the system again.
Features of installation work
And finally, a few tips for installing an infrared heating system:
- humidity in the room where work is carried out should be no more than 60%;
- installation of IR floors is carried out at a temperature of 0 degrees and above;
- Thermal film, even for testing, must be connected to the network only in an unrolled state - it cannot be connected in a roll;
- if the film was damaged in the area where the graphite (black) layer lay, then the place of damage must be isolated on both sides;
- the temperature sensor must be connected so that, if necessary, it can be easily replaced;
- If there is a flood in the apartment, then it is important to immediately turn off the floors and not use them until they are dry.
Infrared heated floor
If the infrared floor heating system was connected correctly, it will last for decades. It is important to carry out all work carefully and carefully - only in this case can you get the desired result!
Step-by-step installation of the heating system
Work on installing the system should begin with the development of a detailed diagram of the arrangement of elements and wire communication paths.
Drawing up a diagram
- Measure the dimensions of the floor of the room and draw its plan, taking into account furniture, radiators and fireplaces.
- Mark on the floor plan the place where all communications are controlled. After installation, the cables can be stored in corrugated pipes or plastic boxes to avoid gating of the walls.
- Mark on the floor plan the places where the film strips will be located, indicating the dimensions and cutting lines of the film elements. It is more economical to place the roll along the room, taking into account that you need to retreat from the wall and radiators, as well as fireplaces, at least 25-30 cm. The norm for the total coverage of the heater relative to the area of the room is 50-60%.
- The floor plan indicates the places where large furniture or heavy household appliances are located. Heating elements cannot be laid in these areas.
- A gap of at least 5 cm is provided between the films. Laying strips overlapping is prohibited.
- The distance from the wall to the film should be at least 10 cm.
- The length of the laid area should not exceed 8 meters.
- Depending on the methods of connecting communications, the diagram shows the cable routes. It is necessary to ensure that there are no intersections between “phase” and “zero”.
- Provide a location for each temperature sensor, taking into account the length of the standard cable. It is better to mount the sensor in the middle of the film element in one of the cool places in the room.
After drawing up a detailed diagram, you can proceed to the installation of the heating system.
Tools and materials that will be needed for work must be prepared in advance so as not to be distracted by searching for them during work:
- estimated number of meters of IR film;
- heat-insulating material according to the size of the floor area;
- temperature sensor;
- thermostat;
- wires for communications;
- double-sided tape;
- adhesive tape;
- bitumen tape;
- waterproofing material;
- cutting tools;
- level to check the levelness of the floor.
Preparing the subfloor
It is necessary to carry out the following preparatory work - repair, level and prime the base of the floor. If necessary, additional alignment can be done:
- Sheets of plywood are laid on the wooden base of the floor.
- A cement-sand screed or self-leveling floor is poured onto the concrete base.
The evenness of the surface is checked using a building level.
Surface preparation
Step-by-step steps for performing preparatory work on the floor surface:
- To prevent damage to the film floor, the base of the floor should be thoroughly cleaned of debris and dust.
- The entire floor surface is covered with a substrate, regardless of the location of the film elements. Laying is done end-to-end with the foil facing up, the layer thickness is about 3 mm. Fixation to the base of the floor is carried out with double-sided tape, and the sheets of the substrate are fastened together with a special tape with a top foil surface.
- It is recommended to lay a layer of waterproofing material on the base of the floor.
Laying IR films
All work is carried out exactly in accordance with the previously drawn up graphic scheme. It is necessary to ensure that all conductive parts and the top coating of the film are not damaged during operation. If this does happen, then the damaged elements should be replaced. Sheets can only be cut using markers, usually marked with dotted lines. Cutting off part of the film sheet in other places may result in breakdown of the entire system.
All work on installing infrared heating can be carried out at temperatures above 0 degrees and humidity not higher than 60%. To check its functionality, the film is first unrolled and then connected to the network.
Progress:
- The film is laid with the foil side down. They are attached to the substrate using regular tape.
- Bitumen tape is used to insulate the conductive parts of the film cut that will not be used in communications. Insulation is carried out on both sides of the film.
- A hole for the temperature sensor and a groove for laying wires are cut in the substrate. The sensor body is fixed with bitumen tape in the middle of the sheet. Next, the film element is fixed to the substrate. The temperature sensor should be installed so that if it breaks, it can be quickly replaced.
- To connect the films to the electrical network, the kit includes clip-type terminals. They are attached so that the upper plate fits into the contact cut, and the lower one remains at the bottom of the film. The terminals are crimped using pliers.
- Communication cables are laid in accordance with the diagram. Before connecting to the contacts, the ends of the wires are stripped of approximately 10 mm of insulation.
- Insulate all contacts. Metal parts are sealed with bitumen tape so as to completely prevent the ingress of debris or water.
- Cuts are made in the substrate to secure the terminals and wire paths. All elements are fixed in the substrate and secured with tape.
After all the preparation work, the IR films can be connected to the electrical network.
What does saving on insulation lead to?
For example, let's take a room with an area of 50 square meters.
Usually they use polystyrene foam with bosses, the cost is 1 sq. meter on average 600 rubles, thickness - 2 cm. In most cases, this thickness is not enough for insulation, with the exception of the southern regions. Additional insulation up to 4 cm will cost another 150 rubles per square meter. The total amount will be 7,500 rubles. Saving this amount is what we are talking about when choosing insulation. The owner of the house strives to cut costs and often chooses the cheapest option - underlayment for heated floors, instead of the insulation itself. Ultimately, the thrifty home owner heats the outdoors and spends even more money to maintain a comfortable indoor temperature.
Calculation of the cost of water heated floors
We have two rooms in front of us:
- the first with normal, high-quality insulation of the required thickness;
- the second - with a substrate for a warm floor under insulation and a “thrifty” owner.
| Characteristic | House No. 1 | House No. 2 |
| Floor area | 50 | 50 |
| Pipe temperature | 40 | 40 |
| Pipe diameter | 16 | 16 |
| Insulation | 60 | 20 |
| Heat flow upward | 73,76 | 65,81 |
| Heat flow down | 18,88 | 58,72 |
| Maximum floor temperature | 26,82 | 26,18 |
In the first house, with 4 cm of insulation, the heat flow into the room exceeds the heat flow down three times. All the heat that the owner of the house pays for is used to heat the room, not the street! In the house of a “frugal” owner, the heat flow upward (to the room that needs to be heated) is almost equal to the heat flow downward (to the street, to nowhere). Forty watts per square meter go down the drain.
- On 1 square meter with underfloor heating we lose 40 W, on 50 square meters - 2000 W.
- 1 cubic meter of natural gas provides 10 kW of thermal power and costs 4.5 rubles (the price depends on the region, from 4 to 8 rubles).
- 10 00 W/2000 W = 5 hours – this is how much 1 cubic meter of natural gas is enough for heat loss.
- The boiler operates on average 12 hours a day. 12/5=2.4 cubic meters of gas are spent per day on heating the street.
- 2.4 (cubic meters) x 4.5 (rubles) x 30 (days) x 7 (months of the heating period) = 2,268 rubles per year.
They paid 7,500 rubles for the insulation / 2,268 rubles = 3.3 years - the payback period for the insulation. When using underfloor heating, heat losses will increase! These materials are not insulation!
DO NOT USE UNDERWARMING FLOOR INSTEAD OF INSULATION!
When using insulation materials with insufficient thickness for complete thermal insulation or when using foil insulation, isoline (they are also a substrate for a heated floor), the owner of the house loses a lot of heat in the lower direction. This is either unreasonable savings or a serious misconception of the homeowner. Heat losses in this case are comparable to the heat flow entering the room. The use of high-quality insulation of the required thickness pays off in an average of 3-3.5 years of operation of a heated floor, when using natural gas as an energy source. Natural gas is the cheapest source of energy. If we talk about other sources, then insulation can pay for itself in 1 heating period (i.e. in 7 months).
What materials need to be prepared
You will need a heating film, as well as wires of the required length to connect the underfloor heating strips, insulation, clamps, and a heat-reflecting substrate.
The last material is calculated based on the area of the room. Installation will be carried out using adhesive tape, and both one-sided and double-sided options will be required. It is not mandatory, but it is recommended to use liquid thermal insulation. If you plan to lay a heated floor under a laminated coating, use polyethylene film. You need to first buy a temperature sensor and thermostat.
Everything you need for installation