Infrared heated floor is a modern type heating system that effectively heats the room. The price is affordable for most consumers, although it is more expensive than a cable system. Installation is simple, which is why this type of heating is gaining popularity and is often installed in apartments.
When installing a film heater, the question arises - what flooring to use: linoleum, laminate or tile.
Today we will talk about installing laminate on a film heater. Let's consider what criteria are used to choose slats, as well as the advantages of the design - infrared floor with laminate.
Is infrared heated floor compatible with laminate?
If we compare laminate with tiles, its thermal conductivity is lower and its heat capacity is higher than that of ceramics.
The laminated coating does not like overheating and sudden temperature changes, and this is possible when using water or cable heating. Temperature effects can provoke the formation of cracks, which will lead to creaking of the boards.
The infrared system is the most suitable for parquet; it is thin, so heating with IR waves is fast and uniform. If the installation of thermal film under the laminate with your own hands is done correctly, the rays will not escape through the base, thus the heat will not leak away in vain. Even if there is a malfunction, overheating will not occur, the temperature level will not exceed 45 degrees.
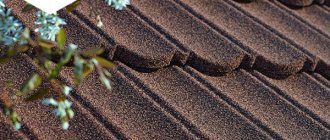
Interfloor pie in a frame house
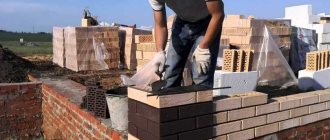
When planning to make a frame house with your own hands, as described in this article, you should not forget about the floors, even if the house is one-story. The ceilings between the rooms and the roof are made using almost the same technology as in multi-storey buildings, and that when constructing the ceiling of a house with 2 floors. The structure of a layered floor pie looks something like this:
- Ceiling decoration on the lower floor.
- Rough ceiling coating.
- Vapor barrier.
- Load-bearing beams and joists, between which a thermal insulation layer is laid.
- Rough floor.
- Waterproofing layer.
- Noise insulation.
- Floor covering.
Between floors, thermal insulation, moisture and vapor barrier materials are laid so that they protrude along the entire perimeter with a tolerance equal to the thickness of the walls.
Interfloor pie in a frame house. Kraft paper is used as a windbreak.
Design and principle of operation
The operating principle of standard heating systems is direct heat exchange. Radiators receive heat from the coolant water coming from the nearest boiler room and transfer it to the air masses.
In water or cable floors, the heat exchange process is also simple, but there the screed, which is located above the heating elements, is heated first.
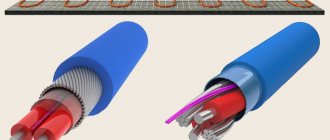
Infrared heat devices work differently; they emit heat in a similar way to the sun. In the design, a heating sheet with carbon strips is immediately placed under the planks. Each strip has a copper bus and receives voltage.
The current passing through the carbon coating emits infrared rays with a length of 5 - 20 microns, they heat the surface.
At the same time, the film and tires practically do not heat up. Longer rays pass through the coating, heating the furniture standing on it, so it cannot be installed on a heating device.
In such a warm “pie” there are no intermediate layers between the film and the laminate, that is, it receives heat first.
Film heated floors have a power from 150 to 440 W. When installed under laminate, the recommended power is 150 W/m2. The film is produced in rolls with widths of 50, 60, 80, 100 cm, the length varies. The product is equipped with special strips that can be used to cut the fabric.
There are infrared heating models, in which carbon paste is placed between lavsan sheets not in stripes, but in a continuous pattern; they are called carbon.
The infrared system kit consists of a temperature sensor, wires, clips for connecting the film and insulating material.
Installation of insulation layer
Floor insulation consists of several stages:
- plugging cold bridges near the foundation walls (these places are insulated by vertically laying insulation material to a small height);
- laying thermal insulation boards end-to-end with an overlap to eliminate free space between the sheets;
- Fastening the insulation with dowels.
As a heat insulator, you can use many materials, which are available in abundance at any hardware store. The most common materials are mineral wool, polystyrene, foam glass.
Advantages and disadvantages
Do-it-yourself apartment renovation. Comparison of heated floors.
For heating laminate floors, infrared heating systems are the best option; they have a lot of positive aspects:
- optimally and evenly distribute heat over the coating;
- economical;
- have a maximum heating of 45 degrees;
- the lamellas heat up quickly;
- installation and repair are simple, you can do it yourself;
- there is no need for a screed, the lamellas can be laid on film;
- long service life;
- retain their functionality even when exposed to sub-zero temperatures for a long time;
- if one strip fails, the entire device continues to work;
- there are no invection movements of air flows, thus dust does not chase around the house;
- They do not dry out the air and do not emit electromagnetic waves, therefore they are not harmful to health.
Infrared warm heating is easy to maintain and operate; it is controlled by a remote control.
The disadvantages include the cost - such heating will cost more than other heated floors, but it will quickly pay for itself during operation. As with any electrical appliance, there is a risk of electric shock or short circuit, but this is not significant.
In addition, the operation of the device depends on the availability of electricity. Since IR heaters do not lie under furniture, remodeling is not possible; you will have to reinstall the heating element.
Basement pie in a frame house
The basement floor requires increased attention to insulation, since it is this part of the house that is most vulnerable to cold weather. The basement ceiling borders the cold zone of the basement, while other ceilings do not have such contact.
Basement floor pie. 1 - floor joists.
The correct arrangement of the plinth overlap guarantees:
- Moderate costs for heating the premises on the first floor.
- No mold or fungal growths.
- No rotting of wooden floor elements.
The floor pie along the joists is described in detail in the section “The correct floor pie along the joists of a frame house.” The installation of a basement floor requires additional attention to detail:
- The required insulation thickness is at least 200 mm. Otherwise the floors may be cold.
- The wind barrier should be extended to the edges of the room and carefully glued.
- The mandatory use of bars along the joists ensures the presence of a ventilation gap between the floor boards and the insulation. This prevents the formation of rot and mold.
The floor of the 1st floor requires high-quality insulation in order to maintain a comfortable temperature throughout the house.
Laminate selection criteria
Having decided to make an infrared heated floor in an apartment with a finishing coating - laminate, the question arises - what type of lamellas is suitable for such a system. If you lay inappropriate parquet, when heated it will deform, may release harmful substances, and will conduct heat poorly.
The product must:
- have a special marking - “snake”, which indicates the possibility of using it with an infrared heating system;
- have good thermal conductivity - the thermal resistance coefficient should be from 0.05 to 0.10 m2 x °K/W;
- have a thickness of 8 - 9 cm;
- do not emit formaldehyde when heated to 30 degrees, that is, permissible emission class E1 or E0;
- to be wear-resistant - better than 32 or 33 wear resistance classes.
All this information can be found on the packaging.
Floor pie of a frame house on a strip foundation
With a strip foundation, you can make the floor in a frame house using joists, but it is more advisable to make a floor on the ground or a screed. Since the construction of the floor using joists is described in detail above, we will focus on the second option.
The foundation is backfilled with compaction in layers. You can use sand first, then crushed stone. Insulation is laid on the compacted layer. In such structures, backfill material, for example, expanded clay, is often used. Expanded clay is leveled and filled with a cement screed, on which the floor covering is subsequently laid. A device of this design requires certain skills.
If it is planned to install a warm electric or water floor, then heating systems are installed in the screed.
Installation of cement screed on expanded clay.
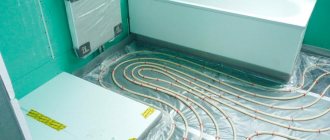
Laying scheme
The efficiency of a film warm device depends on whether it is installed and connected correctly. You need to determine the laying areas in advance; it is important not to place them under furniture.
The average thickness of infrared heated floors is 1 mm, so they are perfect for DIY installation under laminate flooring.
There are several schemes for installing infrared heating under lamellas:
- Laying an infrared product on a concrete floor, on top of old tiles, on boards. A “pie” of this gender is:
- slats;
- grounding coating;
- fixing mounting tape;
- heating element, canvas covered with a continuous layer of carbon paste;
- construction tape that secures the substrate;
- substrate with a reflective layer 3 - 4 cm thick;
- a rough base, which includes a concrete floor, old tiles, and boards.
- Installation of infrared warm film on concrete floors, on top of old tiles, on boards. “Pie” is similar to the previous one, only the heating element is an infrared film with carbon stripes.
- Laying infrared heated floors on a wooden floor (on wooden logs). The design is:
- laminate panels;
- grounding material;
- mounting tape that secures the film;
- heating element in the form of infrared film;
- mounting tape that secures the backing;
- substrate with a reflective effect 3 - 4 cm thick;
- plywood sheets 1 cm thick;
- thermal insulation material;
- wooden base (logs), placed in increments of 55 - 60 cm;
- waterproofing product;
- rough base (concrete floor, old tiles, boards).
Installing infrared heating under laminate on joists will allow you to get a better degree of insulation in the house, but the structure is heavy and will cost more.
Preparing the base
- Mark the concrete floor level.
- Remove the layer of vegetation from the ground (it can be filled back and compacted under the base, or it can be used for landscaping the site).
- Fill in a layer of river sand.
- If the soil is not rocky, it should be compacted with crushed stone (fraction from 20 to 60 mm), expanded clay, laid in a layer of 6-7 cm. On wet soils, it is not recommended to use expanded clay, which has the ability to absorb moisture from the ground. If the soil is wet, you need to use other bedding, for example, gravel.
- To further compact the bedding, pour water on a layer of crushed stone or gravel and press it into the ground.
Important! Before preparation begins (installation of the underlying layer), the part of the building that will be underground must be erected, the sinuses between the pit and the foundation must be backfilled, the soil must be leveled and compacted.
Installation of infrared heated floors under laminate
Warm flooring under laminate is easy.
It is possible to order the installation of infrared heated floors under the laminate from professional craftsmen, but the installation technology of this heating device is simple, so you can install it yourself. First, it’s better to watch a video on the Internet about how to make warm infrared heating under laminate flooring on a concrete floor.
Before starting work, you need to prepare a diagram of the location of the heating film, mark the areas where the regulator and temperature sensor are fixed. It is also necessary to calculate the device power data.
Materials and tools
To install a warm infrared floor under a laminate, you need to follow the instructions:
- infrared system kit, it includes film, fasteners, wires, insulation, contact clips;
- temperature sensor;
- thermostat;
- substrate with a foil layer;
- plastic film;
- electrical tape;
- construction tape;
- scissors;
- pliers and tape measure.
Preparing a place for a thermostat
The thermostat is attached to the wall. For its box and wires that go to the floor, it is better to drill grooves. This will hide all communications, and the design of the room will not be affected.
If you don’t want to drill holes, you can hide the wires in a plastic channel that is attached to the wall.
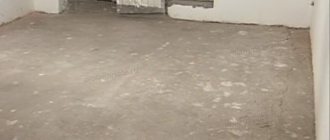
Alignment
The first step is to level the rough base. To do this, the old coating is removed and the surface is cleaned of dirt. If there are small holes on the floor slab, they can simply be filled with cement mortar, having previously primed the concrete coating.
If the differences are large, then the subfloor must be additionally filled with a self-leveling solution.
If the base is not a concrete floor, but a wooden one, and it is uneven, sheets of plywood are laid.
Installation of the substrate
As a substrate for the film, foil material 2 - 3 mm thick is used, which reflects thermal radiation. This coating significantly reduces heat loss through the base and increases the efficiency of the system.
Place the backing against the walls throughout the room, foil side up. The strips are laid end to end. To prevent the product from moving, it is attached to the base with double-sided tape.
Slots need to be made in the material to accommodate the sensor, wires and terminals; they should not stick out on the surface.
Before laying the film, it is recommended to cover the base with a waterproofing material - polyethylene.
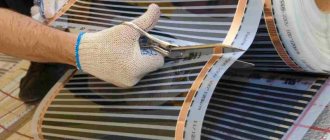
Laying thermal film
First, the locations of the film are marked on the substrate according to the drawn up diagram. Then strips of the required length are prepared; they should not be more than 8 meters. The product can only be cut along special lines.
In places of cuts, unused contacts should be insulated; bitumen tape is used for this.
The film is laid down with copper strips, although there are models that are laid the other way around, so you must first read the manufacturer’s instructions.
The canvas is placed along the length of the wall, the distance from the wall is not less than 25 cm. The strips should not overlap each other, they are placed at the joint, or with a gap of 5 cm, this installation feature is also indicated in the instructions.
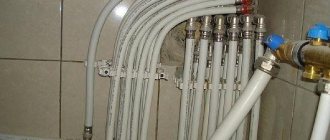
Floor connection
To connect the film to the power supply, you will need a flexible cable with non-flammable insulation. The wire cross-section is selected depending on the power of the system. The cable is connected to the thermostat according to the attached documentation, where channel L must correspond to the phase wire, and N to zero.
Step-by-step connection instructions are as follows:
- First, terminals are installed on the copper strips of the film. One part is placed inside the film, the other outside.
- Then the contact is fixed with pliers.
- Stripped wires are connected to the clips and clamped.
- The terminals are insulated with bitumen tape.
- All cables are led out to the thermostat and connected to it.
Sensor connection
The sensor is installed on a black graphite strip of film in the planned location and fixed with tape. It and the wires leading from it to the thermostat are placed in pre-made grooves in the substrate in the corrugated pipe. The cable from the sensor is also connected to the thermostat.
Connecting the thermostat
The regulator is installed at the planned location. The thermostat is powered using an RCD - a special protective device. Do not allow the wires to twist; overheating may occur in these places.
It is recommended to ground the system, this guarantees complete safety during use.
After the device is fully connected, it is necessary to check its operation.
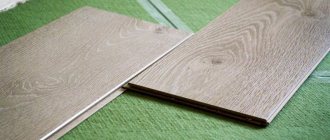
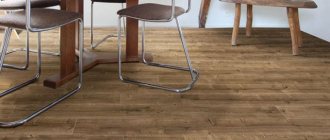
Laying laminate
Before laying the laminate, it is necessary to protect the device from water. To do this, it is covered with polyethylene, which is overlapped and overlaps the walls. The seams are taped.
The slabs of the first row have the tenons cut off on one side. This side of the lamellas is placed against the wall, with a 10 mm indentation - a technological gap into which the gasket is placed. The gap is necessary for free contraction or expansion of the material as the temperature changes.
The boards of the second and subsequent rows are applied to adjacent panels at an angle of 45 degrees and snapped into place using locks. The last plank should be mounted using a clamp,
When all the finishing material has been laid, skirting boards are installed around the perimeter of the room; they will cover the technological gaps.
Features of operation
After installing warm film heating under the laminate, you should save the layout of its placement. This will allow you to rearrange the furniture correctly.
After connecting the infrared floor and laying the laminate, you cannot immediately turn on the device at full power. You need to give the lamellas time to adapt, so first set the temperature to 15 - 20 degrees, adding a few degrees every day.
In addition, slowly increasing the heating degree will allow you to understand whether the system is working effectively and determine the optimal heating level for yourself.
Using a thermostat
A thermostat or thermostat is necessary to control the temperature and is responsible for the main tasks in the operation of the heated coating and taking into account the plus and minus values. The device sets the base temperature level, programs the heating frequency, and also controls the turn-on and turn-off times of the entire system.
Thermostats are fixed at the optimal level, most often at a height of at least 20 cm. This allows the device to operate more efficiently, which ultimately helps stabilize the entire laminate floor system.
Prices and Manufacturers
When choosing a film floor, it is better to give preference to well-proven manufacturers, such as:
- Caleo is a South Korean manufacturer. The infrared systems of this company occupy a leading position; they are suitable for installation under laminate. The products are reliable, durable, and have minimal thickness. The warranty period is 10 years. They have only one drawback - they are fragile. The average price starts from 2500 rubles per meter.
- Heat Plus - Korea, produces premium flooring. The films have a high melting point, they are safe and effective. The average price per meter is 1000 rubles.
- Daewoo is a South Korean company that offers high-quality floors at the most affordable prices, from 500 rubles per linear meter. Models are available both simple and self-regulating.
When purchasing laminate flooring, check out the ratings of manufacturers that produce products for underfloor heating systems. In the first place of the company:
- Quick-Step - Belgium. The produced range of coatings is wide, with an exclusive design. Prices start from 800 rubles.
- Tarkett - Serbia. Reliable coatings in many colors. Average price 800 rub. per m2.
- Kronostar - Germany. The film has high performance properties, looks attractive in appearance - and all this at a low cost.
Laying infrared flooring under laminate is an excellent solution. This design can create comfort in the home. At the same time, it will not be expensive, installation is simple, which you can do yourself.
Installation of infrared film heated floor Caleo Platinum
Repair Tips
The laminate structure consists of four layers:
- The bottom layer comes first for stabilization. It is designed to increase the overall rigidity of the structure and protect the board from deformation. Sometimes the manufacturer glues a backing to this layer for additional sound insulation.
- The main layer is the load-bearing layer. The most important part of the laminate, a special clutch lock is cut into it in order to secure the boards together. This layer also serves as sound insulation and thermal insulation. It is the supporting layer that determines how moisture resistant the board will be. Choose a laminate with a high level of moisture resistance, as well as with additional impregnations that repel water.
- Decorative layer. This layer is responsible for the pattern on the laminate board, usually a pattern of wood, tile, stone or another texture.
- Upper layer. Made from acrylic resin. Thanks to it, the board can withstand operational loads and impacts. The wear resistance of your flooring will depend on the top layer. Sometimes additional texture is applied to the top layer for a more believable imitation of the material.
Classification
Laminate is divided into classes that are approved by European quality standards. The main criterion is wear resistance. After inspections and tests, the laminate board is assigned a certain service class. Laminates are also divided into two main groups, based on their intended purpose - home or commercial use.
| Scope of application EN 685 | Load level | Laminate class | Graphic designation EN 685 | Abrasion resistance EN 13329 | Coeff. istir. IP, EN 13329 | Resistance impact EN 13329 |
| Living quarters: bedroom, library, office | Lightweight | 21 | AC1 | >900 | IC1 | |
| Residential premises: children's rooms, living rooms | Average | 22 | AC2 | >1800 | IC1 | |
| Living quarters: hallway, kitchen | High | 23 | AC3 | >2500 | IC1 | |
| Public spaces: small office, conference room | Lightweight | 31 | AC3 | >2500 | IC1 | |
| Public areas: classrooms, office, reception area, boutique | Average | 32 | AC4 | >4000 | IC2 | |
| Public premises: shop, gym, restaurant | High | 33 | AC5 | >6500 | IC3 |
Some experts use commercial laminate for home use. This significantly increases the service life of the floor covering. For an ordinary city apartment, lightweight laminate class 31 is suitable. At the same time, if there are animals in the house, then it is recommended to use the next class - 32. The service life of such parquet is from 10 to 15 years. But there is also one that can last more than 20 years - these are 33 and 34 classes of laminate, laid in an ordinary apartment without high operating loads.
Advantages of laminate
Flooring is quite popular and this is due to the fact that it has many advantages. Let's look at the most attractive characteristics of laminate boards.
1. Easy to assemble panels.
The boards are easily fastened together using embedded grooves. There is no need to attach the laminate to the subfloor, and when you move, for example, you can take it with you. But there is another one - adhesive laminate. It costs a little less than usual, but there are additional costs associated with the purchase of special glue and payment for the services of the workers who will install it. Of course, such a laminate is difficult to disassemble.
There are only two types of laminate board connections – Lock and Click. They differ in the installation process, namely – Click are grooves that snap together, and Lock are driven in. Here the advantage goes to the first one, the Click lock, since during assembly the probability of damaging the board is less than in the second version of the Locke lock. And assembling laminate with lock fastening is more difficult.
2. Minimal floor preparation.
Laminate is an undemanding coating, therefore it does not require additional sanding, scraping or varnishing of the floor surface. Caring for the board is also easy - each manufacturer recommends individual care methods, which are nothing complicated. Maximum - you will need to spend money on a special cleaner for laminate boards.
3. Durability.
Laminate is a high-quality and durable material. If you choose a higher-class laminate, it will not be afraid of any mechanical stress, or marks from the claws of pets, or even a cigarette butt accidentally falling on the floor.
4. Design possibilities.
Laminate floors come in a variety of colors and textures. The variety of shades produced by the manufacturer will allow you to solve the most interesting and original design problems. Imitation of natural wood of any species, natural stone and even ceramics - all this is laminate. Floors decorated with this material will fit well into any interior.
Disadvantages of laminate
The coating has few disadvantages that pale in comparison to the advantages mentioned above.
1. Low water resistance.
The main disadvantage of laminate can be considered its low water resistance. Although there are exceptions here too. Some commercial grade coatings can withstand water for several hours. In any case, contact of the laminate with water has a bad effect on its qualities and characteristics. Of course, laminate flooring can be washed; it can easily withstand small amounts of moisture. Moreover, it can be used in conditions of constant but low humidity. When caring for laminate flooring, do not forget to treat it with special liquids.
2. Boominess.
The basis of the laminate is a chipboard panel; it is a good resonator, which means that such a laminate will be quite loud. Footsteps in hard shoes, falling objects and other sharp sounds will instantly reverberate in the room. However, it's easy to get used to it. In addition, some laminate flooring has a special noise-insulating backing.
3. For some, the artificiality of the coating is one of the disadvantages.
Indeed, laminate is not a solid wooden board or parquet. But despite this, the material is absolutely environmentally friendly and safe. It can be used in any room, even in children's rooms, without fear for health.
Brands
Don’t be surprised, among laminate manufacturers, just like in the fashion industry, there are also “masters” of their own. The service life of laminate boards from a serious manufacturer is more than 20 years. Cheap coatings will wear out within five years. Some brands offer an unlimited warranty on their coverage. The service life of the laminate depends not only on the manufacturer’s brand, but also on the technology of its installation, or more precisely, compliance with this technology.
The top sellers among laminate flooring are brands such as Tarkett, Pergo, Alloc.
The first manufacturer, Tarkett , produces an incredible variety of board designs, among them there are coverings for any style in the interior - from country and ethnic to classic, strict style. For many years now, the manufacturer has been riding a wave of success, receiving positive feedback from its customers. Advantages: moisture-resistant impregnation of the laminate, surface strength, solid base, resistance to everyday abrasion.
Pergo. This is a Swedish laminate that combines not only strength and quality, but also ease of care and installation. It is rightfully considered one of the best coatings that can withstand operational loads, shocks, scratches, and are resistant to mechanical damage. They have a strong locking system, and a soundproofing substrate eliminates excessive noise from the rooms. Even after several years of use, no gaps appear between the seams. This also applies to conditions under which moisture or dirt gets into the grooves.
Alloc is one of those manufacturers that offer a lifetime guarantee on laminate flooring. They have a complex aluminum board joining system. There are no traces of animal claws or household mechanical damage left on the surface. Installation is not difficult even for non-professionals. If you compare the cost of this board and parquet, then laminate will be more economical and more profitable.
In conclusion, we would like to say a few more words about choosing a laminate. First, don’t save money so you don’t have to pay twice later. Secondly, if you have the opportunity, use the services of specialists to install laminate flooring. The durability and service life of your laminate will depend on these two factors.