SHARE ON SOCIAL NETWORKS
FacebookTwitterOkGoogle+PinterestVk
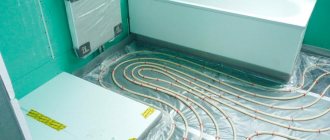
Previously, installing infrared flooring was considered a luxury, however, today this method of heating rooms has gained wide popularity. Infrared film heated floors are a modern and practical option for organizing primary or additional heating in a room. In this article we will look at the benefits of installing infrared film, its types and compatibility with floor coverings.
Thanks to infrared film heaters, an economical and efficient underfloor heating system can be built in a matter of hours
Infrared heated floor: pros and cons
Heating using IR film has many advantages over other types of similar heating. Let's consider the main advantages of this heating design:
- such a system cannot fail at the same time, since it is connected in parallel;
- possibility of installation on any type of surface - both horizontal and vertical, as well as on elements that are located at an angle;
The film does not contain components hazardous to human health, does not produce unpleasant odors or toxic fumes
- The design features of the infrared floor make it possible to achieve uniform heating of the room. This is especially important if laminate is used as a floor covering;
- another advantage of such a system is ease of installation;
- possibility of disassembly if necessary;
- this film is suitable for installation in rooms where the humidity level exceeds the permissible parameters;
- compatibility with different flooring options;
- installation of such a system is allowed not only in enclosed spaces, but also in open conditions (for example, on a veranda);
- high heat transfer coefficient, which reaches 97%;
- The efficiency of film infrared flooring is approximately 30% higher than that of other underfloor heating systems. The prices of film heated floors fully correspond to their effectiveness.
Note! When choosing IR film for organizing floor heating, you need to take into account one very important parameter - the height of the ceilings. The lower the ceiling height, the more efficient the heating of the room.
However, this design also has some disadvantages, among which are the following:
- the need to follow clear rules when connecting;
Unlike other heating systems, infrared floors act directly on the surfaces of heated objects and do not dry out the air in the room at all
- high inertia, due to which heating and cooling occur very quickly;
- poor resistance to mechanical stress in comparison with a tubular structure that uses water as a coolant.
The film system is generally not suitable for installation as the main heating system. It is recommended to use an infrared design for additional heating.
Q term
| Manufacturer: South Korea |
| Rating: 4.85 out of 5 |
| Pricing policy: from 530 rubles per linear meter |
Another great option for infrared heated floors. The manufacturer began supplying products to Russian markets in 2000. Over the short period of its existence, the company has established itself as reliable, with a responsible approach to the selection of the quality of materials used in production.
The surface of the Korean film emits infrared rays, which do not have a negative effect on human health and do not dry out the air.
Expert opinion
Afanasyev Mikhail Yurievich
Leading engineer of a company engaged in the production of energy-saving heating equipment.
Important! When installing such a heated floor, you should remember the need to install a thermostat, which will be used to control the heating system.
Types of infrared films
From a design point of view, all IR films are similar and have a common operating principle. However, for various types of premises and operating conditions, it is customary to use certain options for film heated floors. The differences between ICs are primarily due to the fact that they are produced by different companies.
Let's consider the types of IR film based on maximum heating temperature and their compatibility with various floor coverings:
- high-temperature infrared heated floors under tiles. The maximum heating temperature of such systems reaches 50°C. They are incompatible with floor coverings that are more susceptible to heat (linoleum, laminate);
In their structure and principle of operation, all infrared films are similar to each other, the main difference is the maximum heating temperature
- low-temperature infrared heated floors for linoleum and laminate. Such systems can heat up to 27°C;
- universal IR systems that are compatible with all types of floor coverings.
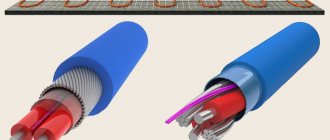
The second parameter by which IR films are classified is the type of heating element. Today, there are two main types of infrared floors, depending on the heating element:
- carbon;
- bimetallic.
The power density of the infrared floor is the last indicator, which is very important when choosing heating. Let's consider three main types of IR films, depending on this parameter:
- with low power (130–160 W/m²) - used in cases where it is necessary to organize heating of a room with a small area. Compatible with “light” floor coverings;
Infrared films from different manufacturers may differ in appearance and technical parameters
- with average power (from 170 to 220 W/m²) - installed in more spacious rooms. Perfect for the following flooring options: porcelain stoneware, tiles;
- with high power (above 220 W/m²) – installed in industrial buildings. They are also used for floor heating in saunas and various workshops.
If necessary, you can always contact specialists who will help you choose the necessary system for a particular case. It is also recommended that before purchasing, read the relevant reviews on specialized forums. Film heated floors are an innovative solution for any room, allowing you to achieve maximum comfort.
Features of carbon and bimetallic IR films
Carbon films used for underfloor heating are more expensive. The heating elements in such a system are made of a special carbon material, which has a fibrous structure. In some cases, they are equipped with a protective layer of graphite. Spraying of this material helps to increase the strength characteristics of the system and also affects the length of its service life.
The basis of the material is represented by lavsan film. Carbon infrared film flooring can be mounted on horizontal and vertical surfaces.
Scheme of bimetallic infrared film for heating
Helpful information! When installing carbon film for a heated floor, the choice of connection diagram is very important. In such a situation, experts recommend using a parallel connection option.
Bimetallic IR film differs from carbon film in that it has heating elements consisting of two metal layers (aluminum and copper). The material is based on double polyurethane film, which has good elasticity.
The installation of a bimetallic system is complicated by the fact that a ground electrode cannot be connected to the system. Also, the bimetallic structure is incompatible with ceramic flooring. It belongs to the low-temperature variety, so its recommended heating level does not exceed 27°C.
Water heating
It is difficult to do all the necessary work to install such a structure with your own hands. But, if the family budget does not allow you to hire professionals, then by trying, you can achieve the result yourself.
There are three installation options depending on the material that will cover the system:
- Installation followed by concrete pouring.
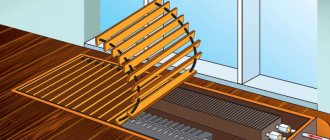
- Installation with laying parquet or tile pipes on top.
- Introduction of a heating system under old boards.
Pipe installation
- We determine a place for the collector and install a box for it.
- We measure the area that the system will cover.
- We lay thermal insulation material: penoplex, mineral wool, expanded polystyrene. Thanks to their presence, the heat will not be spent on heating the ground, but will go into the room, which will significantly increase the efficiency.
- We install damper tape around the entire perimeter of the room. It will compensate for deformations resulting from high temperatures.
- Installs a steel mesh on which the pipes will be attached.
- We lay pipes. It is convenient to do this with a snake or spiral.
- We fix them to the grille with special clamps. The distance between the fastenings is about a meter.
The distance between the turns must be 15 - 45 cm, to the wall - 10 cm.
Connection to manifold
The general connection can be from central heating, but a collector is needed to distribute water through all laid pipes.
- We fix one edge of the water pipe into the supply manifold.
- We distribute the pipes along the contours. The number of circuits must correspond to the number of collector outlets.
- We fix the last edge into the return manifold.
- We are testing the system.
That's it, the water method of heating the floor surface has been implemented.
But it also has several disadvantages:
- Large floor rise, which is unacceptable in apartments with low ceilings.
- Danger of flooding lower neighbors.
- Difficulty eliminating possible leaks.
- When connected to a common heating system, the neighbors may feel colder.
This does not negate the greater benefits, but it does encourage the desire to consider a similar system, only based on the use of electricity.
Technical characteristics and operational scope of film flooring
Before purchasing IR film, it is imperative to study all its main technical characteristics. This knowledge will help you select the required type of system and calculate it for a specific room. Let's consider the characteristics of such heating structures:
- IR film is produced and sold in rolls, the length of which reaches up to 100 m. The width of the roll can be different (from 50 to 100 cm), and its weight is approximately 55 kg;
Rolls of IR film come in different widths - from 50 cm to 1 m, their thickness can be from several microns to several millimeters
- the finished structure is powered from the electrical network, the voltage of which is standard 220V;
- per day, the IR floor consumes approximately 20 to 70 W/m²;
- the speed of heating the film to the maximum temperature is quite high (about 2 minutes);
- surface temperature can reach 50°C.
If you decide to use such a film as the main heat source, then you need to remember that it must cover at least 70% of the floor area. In regions with cold climates, film electric heated floors can only be used as additional heating.
Area of use
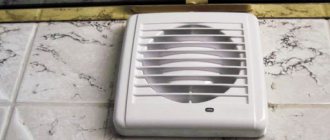
IR film is a purely domestic version of underfloor heating, which is not designed for rooms with high humidity.
IR mats are used not only for floor heating. They are mounted on walls and ceilings, creating local zones of increased comfort in the room, and the cable floor is a purpose-built structure.
Features of choosing an electric floor:
Thus, the overall picture becomes clear. Electric infrared flooring is a new technology that has already conquered a certain market segment and allows us to solve some space heating problems better than cable ones. But vast experience in using cables and the technology of its production and installation, which has been developed to perfection, allow it to confidently hold its position as a practical and effective way of arranging heated floors.
average rating
more than 0 ratings
Share link
Film heated floors Caleo
Caleo has a wide range of infrared films for underfloor heating, making it easy to choose the right system for a specific situation. The products of this brand are represented by both simple options and ultra-modern film coatings, the operation of which is as automated as possible.
Today this company produces 4 main modifications of infrared film systems.
Caleo IR film is sold complete with an installation kit: contacts and bitumen insulation, some also include connecting wires
LINE. An inexpensive system that is perfect for installation in small spaces.
GRID. A product belonging to the middle price segment. A special feature of the GRID infrared floor is the presence of an anti-spark mesh, which is made of silver.
Note! Caleo warm floors have their own characteristics. For example, their installation should be done only using the “dry” method. They are also not suitable for installation under ceramic floor coverings.
GOLD. As in the previous case, anti-spark mesh technology is used here. And also such films can self-regulate, which allows reducing energy consumption by up to 20%.
PLATINUM. The most expensive option for infrared flooring. It is distinguished by energy-saving qualities that can reduce electrical energy consumption by 5-6 times. IR flooring PLATINUM can be installed under areas that are covered by furniture, without the danger of overheating.
All of the above models have a remote control function. Installation of Caleo heated floors is carried out without the necessary organization of screed or special adhesive coating.
Caleo infrared film can be used as a main and additional heating system in almost all types of premises
FOR VINYL FANS!
VINYL FLOORS
Livyn 100% moisture-resistant PVC tiles absorb sound. The floor turns out to be very warm - it’s really nice to walk on it barefoot. “The tiles are multi-layered. The top layer is protected from scratches and stains thanks to special Scratch Guard and Stain Guard technologies, says a Quick-Step specialist. — For the decorative vinyl layer, high-quality printing is used, which realistically conveys the pattern of natural wood or stone with all the details of the natural material. The PVC tile base ensures the durability of the floor. There is also an additional stabilizing layer of dense fiberglass, which prevents the PVC tile from stretching or shrinking. The fifth layer is an impact-resistant vinyl backing: moisture-resistant and prevents deformation of the panels.”
Infrared film floors from the Rexva brand
Rexva IR films occupy second position in the ranking of heated floors. This company produces ultra-thin film communications that can be installed on various types of surfaces (vertical, horizontal and even on the ceiling). The Rexva range of heated floors is represented not only by systems with a standard power range.
For heating residential and industrial premises, this company offers infrared films, the power of which reaches 400 W/m². As a rule, such models are used to organize heating in saunas. They are characterized by a high level of water resistance, as they have a special double-sided coating located on top of the main lamination.
Products from the Rexva brand are highly durable and resistant to high pressure. Their operational scope is quite wide - from small rooms to gyms. The price of the Rexva infrared floor fully corresponds to good quality and reliability.
New film floors from RexVa have appeared on the market with a self-regulating effect, that is, with local overheating, it changes its own heat transfer in this area
Features of IR films from Heat Plus
The Heat Plus brand produces heated floors (including infrared). The peculiarity of the models manufactured by this company is that they can have different film shapes, namely:
- striped;
- solid.
Related article:
Do-it-yourself water heated floor, video and description of the process
Description of the installation process of a water heated floor. Its advantages and disadvantages are different from other types.
Features of the IR floor production technology from this company make it possible to avoid the presence of unheated zones. The production of such film systems involves uniform application of carbon material on a polyester base, which allows achieving a high level of efficiency of heating communications.
Let's look at other advantages of Heat Plus IR floors:
- ease of installation;
- wear resistance;
Infrared film Heat Plus consists of safe and environmentally friendly materials and is a coating with a thickness of 0.338-2 mm, consisting of 5-9 technological layers
- reliability.
The service life of such products can reach 15 years under normal use. If desired, organizing such a system takes no more than one day, which is very convenient.
Note! The price of IR floor Heat Plus is several times higher than the standard one. However, products from this brand pay for themselves in 1-2 years.
Warm floor infrared film Monocrystal
The Monocrystal company is located in Ukraine and is the only manufacturer of IR floors in the CIS. Thanks to South Korean technologies used in the manufacturing process of IR films, products from this brand have taken a confident position in the construction market.
The main difference between Monocrystal models is that they do not contain silver paste. To achieve the necessary electrical contact, products from the Ukrainian brand are equipped with a thicker layer of carbon paste. In this way, stabilization is achieved between the copper busbar and the heating device.
Let's look at the main technical characteristics of Monocrystal IR floors:
- film width – from 30 to 60 cm;
Special graphite film for tiles - produced by the Ukrainian company Monocrystal
- step – 20–25 cm;
- powered by an electrical network with standard voltage (220V);
- maximum power indicator – up to 200 W/m²;
- The maximum heating temperature of the material reaches 50°C.
The service life of IR film from the manufacturer Monocrystal is 10 years. The model range includes the following varieties: linear, perforated, solid. Perforation is arranged for compatibility with tile flooring. Film heated floors under tiles are widely popular among buyers.
Infrared heated floors: consumer reviews
Today, many home craftsmen refuse to install water-heated floors and give their preference to infrared floors. This is primarily due to the fact that a water system requires a longer installation time. And also its use is possible only after the screed has completely hardened. On many construction forums, consumers recommend infrared film heated floors. Reviews about these models are mostly positive.
The infrared energy emitted by carbon elements is completely identical to that emanating from the Sun, which is why it is so comfortable to be in a room with such heating
Consumers also pay attention to the efficiency that manifests itself in the process of using such heating systems. Studying various comments, you can see that many people point to savings in energy consumption with film heated floors. Reviews talk about saving electrical energy when using such systems by up to 20%.
Helpful information! Some IR systems take no more than 3 hours to install and can be used immediately after installation.
Such heating communications are considered completely safe and are repairable. If individual segments of the IR system are damaged, it does not fail completely. In addition, they can be easily replaced and continued operation of the system, which is often indicated in reviews. Warm floors under laminate are in great demand and usually cost the most.
Negative comments are much less common and, as a rule, indicate that when replacing the system, it becomes necessary to dismantle the floor covering. Most often, infrared heated floors are installed under laminate. Negative reviews in this case tell us that this floor covering cools down very quickly and the heating system cannot be used as the main one.
Laying and connecting film IR heaters does not require special training and can be done by hand
Drawing up a connection diagram for a film heated floor
In order to avoid installation errors and other surprises, experts advise choosing a connection diagram and drawing up a project plan before installing IR film. An elementary diagram will help not only to correctly calculate the amount of material needed in a particular case, but also to select the film required in terms of power.
Let's consider the points that need to be taken into account when drawing up a connection diagram:
- cutting of infrared fabric is carried out strictly in those places that were marked by the manufacturer;
- It is strictly forbidden to cut at any angles and try to form shaped elements from the canvas;
- installation of the film is carried out in parallel strips;
- the strips must be laid in such a way that they do not overlap each other;
- It is important to remember that the gap between the film sheet and the furniture should not be less than 3 cm. The same distance must be maintained between the edge of the infrared sheet and the wall;
- copper bars of adjacent panels should not touch. The minimum distance between them is 1 cm;
- the number of connection points should be kept to a minimum;
Connection diagram for infrared film heater
- the best option for locating the connection points is on the side of the wall on which the thermostat will be installed;
- the diagram must be drawn up in such a way that the main part of the wiring is hidden behind the baseboards;
- when using short film sections (up to 100 cm), it is necessary to take care of additional insulation and purchase additional terminal clamps.
Helpful information! The individual panels are joined together using adhesive tape.
The thermostat must be selected in advance, before installing the electric heated floor. Reviews about these devices can be easily studied on specialized forums on the Internet. If the area that needs to be heated is quite large, then you need to purchase additional temperature sensors.
Preparing the base for laying infrared film
After choosing a laying scheme and purchasing material, you can begin pre-installation preparatory work. A very important point is preparing the base for laying the infrared floor. If the old concrete screed is not even, then it must be dismantled. However, if everything is in order with the screed, it is enough to simply clean it of debris and remove dust.
To prevent heating towards neighbors living on the floor below, it is necessary to lay heat-reflecting material for infrared heated floors
In most cases, the base has many small cracks and chips before laying the film. Experts advise eliminating these defects using cement mortar or any other suitable composition. In some situations, owners discover that the screed has begun to peel off from the subfloor. This situation requires the removal of the old screed and the organization of a new one.
The joints that form from connecting the walls to the floor must be carefully leveled and sealed if they have cracks. If this is not done, then the film floor will lose heat through them.
After preparing the base, it is necessary to lay thermal insulation material on the screed. As a rule, a reflector made of foamed polyethylene is used for these purposes. The joints of the individual insulator sheets are glued with mounting tape, and this is where the process of preparation for installation of the infrared heated floor ends.
Ceiling repair
Putting the ceiling in order is carried out in several stages, in the following sequence:
- Removing the old coating - this is done to facilitate and better apply the new ceiling coating. The old layer of whitewash can be washed off with water. If the whitewash is laid in several layers, you will have to use a spatula.
- Leveling - includes primer and putty. Inspect the ceiling for cracks and unevenness. Minor damage can be smoothed out with a spatula and then primed.
- Whitewashing or painting the ceiling. You can use chalk, lime mortar, or water-based paint.
Features of laying film heated floors under laminate
After completing the preparation process, you can proceed directly to installing the IR film. The installation algorithm for a heated film floor under a laminate is as follows:
- First of all, it is necessary to cut the material. The length of the strip should not be more than 8 m;
Before laying the infrared film under the laminate, it must be cut correctly
- At the second stage, the strips are laid. In order to reduce the number of joints, experts recommend laying sheets of infrared material along a long wall. The distance from the edge of the film to the wall should be at least 10 cm, and the distance between adjacent panels should be at least 5 cm. Installation of film heated floors is best done using the parallel method;
- Next you need to connect the wires and insulate unused contacts. The wires are connected using special clamps - terminals. And for insulation, a special bitumen tape is used, which has a high sealing coefficient;
- then the infrared floor wires are connected under the laminate. To do this, you need to connect the wire to the terminal and insulate it;
- At this stage, the temperature sensor(s) are installed. Experts advise placing these elements under the second canvas (closer to the midpoint). The sensor is installed in this way: it must be glued to the underside of the canvas on the black strip;
- Next, the infrared heated floors are connected to the thermoregulatory device. To do this, you need to connect the wires from the film and the temperature sensor to it. The connection itself is made through an RCD;
When installing IR film, you should use only special types of laminate that are designed specifically for such systems
- Next, you need to check how the installed communication functions. To do this, a trial run is carried out;
- The last stage of installing an infrared floor involves laying the appropriate floor covering on top of it, which in this case is represented by a laminate.
Helpful information! The wire belonging to the sensor can be placed in corrugated protection. This will simplify the repair procedure if necessary.
It is recommended to keep it in the room for 2-3 days before laying the laminate flooring. This is necessary so that it acquires the appropriate temperature, which will further prevent its expansion. To become familiar with the features of using IR film in this case, it is recommended to read reviews on specialized websites. Film heated floors under laminate are the most common today.
Connection of power wires
The connection of the cut supply wires into a single system is carried out using a VVGng installation wire, connecting sleeves in a heat-shrinkable tube and insulating material (heat-shrinkable tubes or bitumen strips), which come complete with the core floor.
The wires are fastened together using sleeves in a heat-shrinkable tube and heat-shrinkable tubes as follows:
- remove the insulation from the cut wire by about 1 cm;
- put a sleeve in a heat-shrinkable tube onto the wire;
- crimp the sleeve with pliers;
- put a heat-shrinkable casing on the installation wire;
- insert the bare end of the mounting wire into the sleeve on the other side and crimp it with pliers;
- use a construction hairdryer to heat the sleeve until it shrinks completely;
- check the strength of the connection by tugging lightly;
- slide the heat-shrinkable casing onto the sleeve;
- shrink the cambric using a hair dryer.
Sometimes, instead of heat-shrinkable casing, bitumen strips are used, and instead of sleeves in a heat-shrinkable tube, metal clips/contacts are used.
After assembling all the contacts, the IR rod floor is connected to the thermostat. A temperature sensor is also connected to it, which manufacturers recommend installing inside the corrugated hose, hidden in the grooved recess of the screed. This is done to access the sensor if it needs to be replaced.
After a positive test, construction of the flooring begins.
Installation of infrared heated floors under tiles
Laying an infrared floor under ceramic tiles can be done in two ways: “dry” and “wet”. In the first case, the heating elements of the film do not come into contact with the cement screed. In turn, the “wet” method of installing IR film is done by pouring cement mortar over the system.
Two schemes for connecting film heated floors under tiles
Let's consider the algorithm of the method:
- Installation of the film sheet, which is carried out according to the same rules as in the case of organizing infrared heating under the laminate.
- Next, a protective layer is installed, which is often used as a polyethylene film.
- At this stage, it is necessary to install a base under the screed on top of the film. Plasterboard sheets (GKL) are excellent for such purposes. When fixing the sheets, special care must be taken, as there is a risk of damage to the heating elements of the infrared floor.
- Then a thin layer of screed is poured over the substrate.
- The last step is to lay the tiles. For this, standard tile adhesive is used.
In turn, laying infrared heated floors using the “wet” method is more profitable from a financial point of view. It includes the following steps:
- First of all, it is necessary to install the heating elements of the IR floor;
Laying the infrared film sheet under the tiles is carried out according to the same rules as under other coatings
- Next, a protective polyethylene film is laid. This stage is the most important in the entire procedure of the “wet” method of installing IR. Experts recommend laying protective polyethylene film in 2-3 layers;
- At the third stage, reinforcement is installed. As a rule, a metal masonry mark is used for these purposes;
- then the screed is poured;
- Finally, ceramic tiles must be laid.
Note! The thickness of the screed should not be more than 10 mm, otherwise the efficiency of such heating will be significantly reduced.
Thus, the installation of film heated floors under tiles can be done by hand. The only thing that is necessary for this is strict adherence to the sequence of work.
Two methods of laying infrared film under ceramic tiles: “dry” and “wet” methods
Last stage: finishing coat
Plastic film is spread under tiles, laminate or parquet on top of infrared floors. This will protect the heating elements from possible moisture and mechanical damage when installing the finished floor. When using laminate, you can get by with an underlay.
For tiles, glue and grout intended for heated floors are used.
The solid base under the carpet must be carefully attached to the floor with self-tapping screws. Sometimes dowels are used. It is important to be careful not to snag the electrically conductive strips.
Before laying the finishing floor, you need to make sure that it is compatible with the IR heating film and once again check the functionality of the temperature sensor.
If necessary, IR heat sources can be mounted not only on the floor. They produce models for walls and also ceilings.
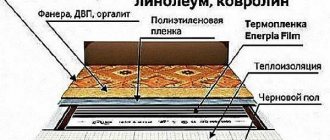
Features of installing film heated floors under linoleum
Installing an infrared floor under linoleum has its own characteristics. Let's look at this process step by step:
- First, the thermal insulation material is laid.
- Next, you need to cut the IR fabric into pieces of the required length.
- At the third stage, film heated floors are installed. It is important to remember that they must be laid with the copper elements facing down.
- Then, using pliers, clamp terminals are mounted on the copper wire elements of the film.
- At this stage, the strips are fixed with double-sided tape. This is necessary in order to avoid their free movement.
- Next, you need to complete the procedure for connecting the heated film floor to the electrical network.
- After connecting the IR floor, you need to check its functionality.
- Then a protective polyethylene film is placed on the heating elements, which is fixed with tape.
- The penultimate stage takes into account the installation of the base under the linoleum. Fiberboard sheets can be used as a base.
- At the last stage, the linoleum is laid.
The packaging with a roll of linoleum must have a pictogram indicating the possibility of using it in combination with heated floors
Thus, a film heated floor is installed under linoleum. If you are not confident in your own skills, then it is recommended to contact the masters who will do all the work efficiently and in a matter of hours.