Infrared heated floors laid under linoleum or other floor coverings are a common way to heat rooms for various purposes for those who follow the trend in the heating system.
This synthetic film material has long been used as flooring. Most often they cover the floors in kitchens and hallways. The main advantages are low cost and ease of work. Laying it on the floor does not require much experience. An additional advantage is that such a floor is easy to clean and does not allow water to pass through.
Previously, laminate or tiles were used as a finishing coating for heated floors. But the development of technology has made it possible to produce linoleum that copes with the task perfectly. It is important to know that not every linoleum is suitable for these purposes, and you will learn which one you need to choose from this article - there are special types of linoleum suitable specifically for heated floors.
It is also necessary to take into account which particular underfloor heating system interacts with linoleum. This has its own characteristics, if carefully observed, both the warm floor and linoleum will last a long time and without complaints.
Reasons for choosing infrared film
For what reasons is infrared heated flooring under linoleum better than other types of heated floors? The main reason lies in the characteristics of the coating. Linoleum should be heated evenly over the entire surface, and the heating temperature should not be higher than permitted. You should choose a heated floor with a power of up to 150 W/m2.
Using heating elements of this power will avoid some problems:
- swelling and detachment from the base;
- the appearance of stains and changes in shade;
- release of hazardous chemicals such as phenol, formaldehyde, benzene;
- softening of the vinyl layer and the possibility of tears.
In an apartment building, water-heated floors are usually not used. Most often, film types of heated floors are chosen. This flooring is also supported by its relatively low price: from 350 rubles per 1 linear meter with a width of 0.5 m. There are also larger sizes, respectively, the price for them will be higher, but for linoleum this width will be enough (more details: “Infrared film for heated floor - operating principle and installation diagram").
To accurately calculate and connect an infrared heated floor, it is worth hiring a qualified electrician. As for the rest, you can make an electric heated floor with your own hands under linoleum, thereby saving money.
Which linoleum is compatible with IR heating systems
When using incompatible brands of linoleum, it may become deformed. Linoleum can warp, stretch, or, conversely, shrink.
Also, when heated, some types release hazardous substances and toxins or have an insulating backing that prevents heat conduction.
When choosing linoleum for laying over an infrared heating system, special attention should be paid to its markings. It must have information about compatibility with warm electric floor systems.
Laying work
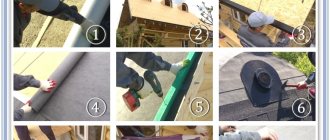
Warm floors are laid under linoleum using the following technology:
- It is necessary to select in advance a place to install the thermostat and heating foil.
- The surface is cleaned of all kinds of contaminants. Then, if necessary, the base is leveled.
- Next, heat-reflecting material is laid on the floor and fixed to the surface using double-sided tape. The entire surface must be covered without creating gaps, but the material cannot be overlapped. The strips of material are fastened together with tape.
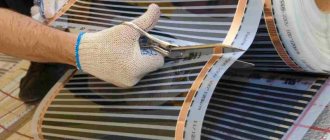
- Thermal film is cut into sheets of the required size along special cutting lines. Dimensions can be 20 cm - 8 m. To save on material, it is better to arrange the sheets so that they are longer.
- Then the film heated floor under the linoleum is laid with the copper side on a heat-reflecting substrate. The strips must be placed as close to each other as possible, this will ensure uniform heating of the surface. But the sheets of thermal film should not be placed on top of each other or intersect.
Preparation of floor covering, calculation of materials and components
To install a warm film floor, you will need the following materials and tools. In addition to the linoleum itself, you will need infrared film, electrical contacts for it, a copper wire, a thermostat with a temperature sensor, a wide polyethylene film 2 mm thick, wide durable tape, a heat-reflecting substrate, and thin plywood.
Equipment: sharp knife or large scissors, pliers, stapler, Phillips screwdriver. It is possible that some other components and equipment may be required.
First you need to calculate the amount of material needed.
Measure the length and width of the room. Calculate how many times the width of a roll of infrared film is laid. Multiply the length of the room by the number of stripes. Now it’s worth taking into account each floor element, its area and configuration.
Heating devices are not placed under cabinets, sofas and other massive objects that are constantly in one place. This is harmful to furniture and useless in terms of heating rooms. It is best to draw up a diagram on a piece of paper. Just in case, increase the desired length by about 5-10%.
You also need to consider the location where the thermostat will be located. It is placed next to the outlet. Please note that an infrared floor consumes about 200 W per 1 m2. This means that a room of 16 m2 may require up to 3.2 kW. If the consumption is more than 3 kW, a separate power line must be installed.
Installation of Caleo underfloor heating under laminate and linoleum
But, even if the consumption is less, it is necessary to check the wiring. It is advisable to replace the thin aluminum wire with high-quality copper wire. It may be necessary to change all the wiring in the apartment and it will be necessary to obtain consent to increase the power consumption from the electrical networks.
It is best to connect a film heated floor by installing separate fuses on the panel. This is done before work on the floor begins. If the power grid refuses to increase power, then the infrared film floor will have to be abandoned.
The need for underlying plywood, substrate and film is calculated in the same way. But expect that the film must be laid with overlap - this will increase the quantity by 10-15%. The elements are laid throughout the entire space of the room.
The required amount of plywood is calculated taking into account the size of the sheets. Also make a diagram of how to place it in the room. As a result, from the configuration of the room and the size of the plywood sheets, from 10 to 20% will go into waste.
Connecting the system
After the heated electric floors are laid under the linoleum, you need to connect them to the electrical network:
- The thermostat is mounted on the wall. It should be in an easily accessible place, but so that children cannot reach it.
- Power wires are connected to the thermal film. To ensure a smooth surface, they can be placed in baseboards with a cable channel, in a groove or a plastic box.
- The wires are then connected to the thermostat according to the wiring diagram supplied with it.
- A thermal sensor is installed under the film, necessary to measure the heating temperature, and connected to the thermostat.
- All power wires that fit into the thermal film should be crimped into a contact clamp. The current-carrying core must be larger than 3 mm in diameter. If wires thinner than this value are used at the point of contact with the clamp, they should be bent in two layers.
- A contact clamp is installed on the copper contact of the thermal film, which then needs to be tightly clamped using pliers. It is prohibited to connect the contact directly without using this clamp.
- To ensure that the floor surface remains level, it is necessary to cut out the backing under the contacts and the temperature sensor.
- The film cut areas must be insulated with special material. Also, the connected bare wires are covered on both sides with bitumen-based insulation.
- To prevent the heating film from moving while walking, it must be fixed to the floor with double-sided tape.
- The thermostat is connected to the mains. The system is being checked for functionality. For safety and convenience reasons, it should be connected to the mains through a separate circuit breaker. Testing is carried out at a heating temperature of no more than 30°C. You need to check every sheet.
- After the installation of the infrared heated floor is completed, a waterproofing material is laid on it, usually a polyethylene film. It should be overlapped by about 20 cm and secured with tape.
Which film floor to choose for linoleum
There are different options for film-type heating systems on the market. Installing them is a job that anyone can do. Options with large heating elements are not suitable for self-installation - they are intended for large commercial or industrial premises.
The time required for all work on installing a film floor by a home craftsman is minimal. In just 2-3 days you will be able to use it. All infrared film floors are sold in rolls of a certain length.
It is better to choose infrared mats whose heating element is small in width. They are also called striped ones. They are best suited for small living room spaces. Narrow strips make it possible to cut the film exactly along the border of the room.
Electricity is supplied to the carbon elements by two contacts in the form of tires located at the edges of the strip. The contact can be silver or copper. A silver tire is better and more reliable, but much more expensive, which is why most people buy copper ones.
The contact strip when laying can be located at the top or bottom when laying. This point is very important - be sure to look at the labeling - such a nuance is necessarily reflected by the manufacturer.
Which heated floor is better: Electric heated floor | Film heated floor | Infrared heated floor
Laying linoleum: features
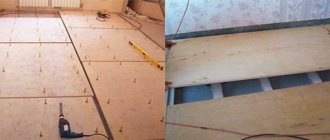
It is necessary to lay plywood or some other similar material under heated linoleum. Thanks to this, the coating will lie flat and the heating elements will not be damaged. You should not lay fiberboard as it releases formaldehyde.
The plywood is fixed to the surface with dowels or screws. This is done very carefully so as not to damage the thermal film. The thickness of the plywood sheets must be more than 6 mm. A thinner one will be more elastic, which can lead to swelling if the distance between the fasteners is large.
Thin plywood should be fixed every 15 cm, while the width of the thermal film should be from 0.5 m. Self-tapping screws are screwed in along the edges of the sheets or at the cut site, that is, in increments of 17 cm. It is quite difficult to do this without damaging the heating plates, so Therefore, it is worth choosing a thicker material, but it will warm up worse.
For heat to rise, the substrate must have greater thermal resistance than plywood.
Then the linoleum is laid using the usual method. If the room is less than 20 m2 in area, then glue may not be used.
The operating temperature of infrared floors under linoleum is 27-28°C. There will be no release of harmful substances and the performance properties will remain at the same level if this temperature regime is observed.
Finish coating for heated floors
If testing is completed successfully, installation work can continue. Thermal film must have a protective coating against exposure to water. For these purposes, you can use special modern waterproofing (expensive option) or ordinary polyethylene film (recommended option). The effect will be the same, and the savings will be significant. Spread the film with an overlap of about ten centimeters, the joints must be taped. Work carefully, do not leave gaps or loose joints.
Linoleum is a flexible coating material; it cannot be placed directly on thermal film. Manufacturers recommend protecting the heating layer with sheets of plywood approximately one centimeter thick.
Lay plywood and linoleum on top of the film
The sheets are attached to the base with small nails. They must be driven in very carefully so as not to damage the conductive elements. Check the exact location of the nail before hammering it in. Nails should be driven only along the perimeter of the sheet, this makes it possible to accurately control their position. Before fixing, it is strongly recommended to dry the plywood thoroughly in a warm, ventilated area. In this way, you can prevent the appearance of cracks during the operation of the heated floor.
Safety precautions
When installing heated floors under linoleum on a wooden floor, you must follow the safety rules:
- The thermostat can only be connected after a power outage.
- You should check the presence of insulation on all contacts and only then test the system.
- If there is no thermostat, it is prohibited to connect the heating.
- The heating temperature should not exceed 30°C. Otherwise, harmful substances will begin to be released, and the coating may completely deteriorate.
- Damage to the heating film must not be allowed, so if linoleum is used, then hard material (plywood) should be laid under it as a protective layer.
How to test the functionality of floor heating
Testing the system
Set the heating setting on the thermostat to 20–25°C, wait a few minutes. Check by hand whether all installed film heaters are warming up. Turn off the power completely, check the heating of the wiring connections. They must be at the same temperature as the film. If it is significantly higher, then the contacts are unreliable. It is necessary to check them, be sure to find and eliminate the cause of excessive heating.
Choosing the right brand of linoleum
There is an opinion that linoleum is a completely synthetic floor covering that, when heated, releases chemicals hazardous to health, such as phenol.
Linoleum is also reproached for its poor ability to withstand heat. When exposed to high temperatures, the coating may noticeably deform.
Marmoleum is a type of linoleum made from natural materials. This coating looks great and goes well with heated floors.
Finally, the material was originally created not to transfer heat, but to protect from the cold penetrating from below. All this is true, but only partly. Linoleum is easy to install and moderate in cost, which is why it remains an extremely popular floor covering.
Modern technologies and developments have allowed manufacturers to create new types of linoleum. Among them there are those that perfectly transfer heat, tolerate moderate heat without compromising their appearance and do not emit any dangerous fumes.
There are five main types of linoleum:
- alkyd or griftal;
- nitrocellulose, also known as colloxylin;
- relin or rubber;
- vinyl, or rather PVC;
- natural, known as marmoleum.
Without going into details of the production technology, we can immediately note that the first three options are categorically not suitable for use with heated floors. All of them react poorly to heat, and Relin is not at all suitable for use in residential areas.
Image gallery
Photo from
Choosing linoleum in a specialized market
Acceptable marmolium
Linoleum with thermal insulation backing
Dry screed for laying the coating
The most popular version of linoleum is its PVC version. This coating is very diverse in design and thickness, relatively safe, and has a pleasantly moderate price. After installation, vinyl covering almost always emits a not particularly pleasant characteristic odor, which dissipates over time.
However, PVC linoleum is not dangerous; it is suitable for premises where people live. When purchasing, it is recommended to study the labeling of the material; there should be a mark on the packaging stating that this coating is intended for installation on underfloor heating systems.
For example, ordinary linoleum can be equipped with an additional layer of heat-insulating material, which is completely unnecessary over a heated floor.
Not all linoleum is suitable for laying over underfloor heating systems. The markings on the flooring packaging will help you choose the right material (+)
Natural linoleum, also known as marmoleum, is a cutting-edge word in the flooring market. The material contains exclusively natural ingredients, such as crushed cork bark, pine resin and linseed oil, powdered limestone and natural dyes.
Of course, when heated, such material cannot emit any harmful substances, only natural fumes. Marmoleum is sensitive to strong heat, so the issue of choosing a temperature regime for such a coating must be approached very responsibly. However, this is also true for vinyl materials.
Marmoleum can only be blamed for its substantial price, but the high wear resistance and safety of the material fully justify such costs. Marmoleum does not change color over time and also effectively resists fire.
When choosing linoleum for a warm floor, you need to pay attention to the thickness of the material. A coating that is too thin will expose all the unevenness of the base; an excessively thick material will reduce the efficiency of heating the room.
Types of substrates
To insulate the floor under linoleum, you first need to select a substrate. There are several types of such material. Here are the most popular:
- cork;
- jute;
- linen
Let's look at each separately.
Cork backing is made from compressed crushed cork oak bark. This insulation is produced in rolls. The advantages of this material include:
- environmental friendliness - made from natural cork;
- There is a pleasant feeling when walking on this surface, as it is quite soft.
It is precisely because of the last positive quality mentioned that a problem may arise: if you place a heavy object on the coating, then after some time dents may form on it. To avoid this, you should choose the hardest cork backing.
Jute backing is a material consisting of 100% natural jute fiber. It is made as follows: jute fibers are punched with a needle, then rolled on rollers under high temperature. This substrate is fire resistant, resistant to mold and rot.
Linen backing is 100% pure natural linen. It is made by double-piercing with a needle and then impregnated with anti-fire and anti-fungal agents. Linen backing is a good material for thermal insulation under linoleum.
Heating mats
Heating mats are one of the types of cable flooring. They are easier to install, since the cable is already fixed on a special fiberglass mesh with a certain pitch. Moreover, the cable used in such mats is thinner. This system can be laid using a dry method, without pouring a concrete screed.
The installation process is as follows:
- a layer of hydro and thermal insulation is placed on the concrete floor, which has been cleaned in advance;
- then heating mats are laid;
- then sheets of plywood or gypsum fiber board;
- Linoleum is laid on top.
When using linoleum, which is intended for heated floors, the system can be installed on any type of concrete floor. Experts advise choosing methods for laying heated floors with concrete screed during major renovations, or when finishing new premises. But if you decide to equip heated floors, if there are renovations in the apartment, then it is better to opt for infrared heated floors .
The technology for installing a heated floor pie on a concrete base under linoleum is not complicated in itself. But efficient operation of the system can only be achieved if all installation rules are followed. In addition, the service life of the structure is also affected by the correct choice of material. Therefore, if you are not sure that you can do the installation yourself correctly, then you should entrust the work to professionals.
Cable electric floor
When laying a cable system, the concrete floor is first leveled, then a reinforcing mesh or special fastening tape is laid on it. The cable is placed on it, fixed, and then filled with concrete mixture. When the screed is dry, lay linoleum.
Before all this work, determine the length of the cable. If it is placed in 15 cm increments, one loop will take approximately 25 cm.
Given the known area of the room in which the heated floor is to be installed, calculate the number of turns, cable branches and its overall length. To the resulting value is added the segment running from the screed to the wall where the thermostat is located.
When calculating the area covered by a heated floor, the mandatory five-centimeter distance from the walls and the space occupied by furniture are subtracted from its total value. On a clean concrete floor, thermal insulation is applied over its entire area. Tape the joints with foil tape.
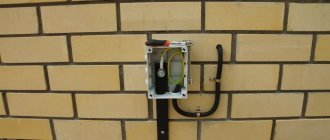
In the area reserved for the installation of heated floors, a metal tape is laid to secure the cable so that it is enough to cover the entire area. There is a place on the wall for the regulator. Then a hole is made for installing the mounting box and grooves are laid. After installing the regulator, a temperature sensor is attached to it.
The wire coming from the heating elements is laid to the temperature regulator. A temperature sensor mounted in a corrugated pipe and a cable from the main power supply are also brought here
The heating cable is laid starting from the edge of the corrugated tube, on which the cable end sleeve should be present. The electric floor is assembled by adhering to the calculated step in the form of a snake; the branches are laid evenly, excluding creases at turns. Fix the heating cable with hooks located on the previously laid metal tape.
You shouldn’t pull it too hard, but the cable should still be as straight as possible. The pitch is calculated by multiplying the heated area by 100 and then dividing the result by the length of the cable.
After briefly testing the system, a 5-centimeter layer of screed is poured. When it dries, install the finishing coat.
Concrete floor installation
You can immediately solve the problems associated with installing the “Warm Floor” system on a concrete base and choose the appropriate type of linoleum when the subfloor already exists. If instead there is only an old rotten wooden base or just soil, you need to start constructing the concrete floor itself.
The process consists of several stages:
- dismantling the old floor, if any;
- leveling the base;
- pillow devices;
- arrangement of an insulating layer;
- preparing and pouring concrete mortar.
Leveling the soil is done using a shovel. Then they begin to create a pillow. To do this, crushed stone or small pieces of brick and broken slate are poured to a height of about 50 mm. All this is lightly compacted.
The perimeter of the room is covered with sheet foam having a thickness of 20 - 50 mm. It will serve as formwork and at the same time balance the thermal expansion of the concrete base. Clean sand is poured onto this layer - 10 centimeters.
Next comes the installation of the second type of insulation. Extruded polystyrene foam is most suitable for this, preferably the Penoplex brand, which is produced in the form of rigid slabs with a thickness of at least 50 mm.
Expanded polystyrene or penoplex is resistant to temperature changes, environmentally friendly, tolerates compression loads well, moisture resistant, durable
The manufacturer has provided a locking connection on the sheets, so there are no gaps left when laying them. During installation, you need to ensure the horizontal position using a level. Waterproofing is not needed here, because... the material is extremely moisture resistant.
The next stage is preparing the solution. The optimal ratio of components is 1 part cement, twice as much sand and three times as much screenings. As a result, the solution should not be fluid, but not excessively thick.
In order not to heavily load the floor, light fillers and levelers are introduced into the concrete solution. Before pouring the solution, place beacons near the walls and stretch a cord between them. Using these marks as a guide, intermediate marker strips are placed.
A cement base of a traditional composition with a height of 10 mm weighs about 20 kg, so it can only be used when a heated floor is installed on the ground floor of a house or when there is a very durable floor underneath it
The surface is moistened and the solution is placed on it between the beacons and leveled with the rule. As it sets, the surface is leveled. At the end, apply a building level to check the horizontalness. Afterwards, the marks are removed, the resulting voids are filled with solution and everything is left until completely dry.
Helpful tips and advice
When laying film heated floors under linoleum, a number of important nuances should be taken into account:
- The layout of the infrared film is carried out in such a way that the areas located under stationary household appliances and furniture do not warm up, since this is not advisable.
- Sometimes various communications are located under the floor covering. For example, part of a home's electrical system. In this case, it is necessary to ensure a sufficient distance between the cable and the film; it should be at least 50 mm. The cable must be additionally covered with a layer of heat-insulating material.
- If in the room where the infrared floor heating system is being installed there are other heat sources (heating radiators, stoves, fireplaces, etc.), there must be a distance of at least 200 mm between them and the infrared film
- When connecting the heating elements of individual strips of film, special contact clamps should be placed so that the tip of the wire is inside the two-layer thermal film and touches the contact strip. A grommet is inserted into the resulting hole and riveted with a hammer or stapler.
- The connection of individual strips of infrared film is carried out in parallel.
- The total power of all thermoelements that are connected to one thermostat should not exceed 3.5 kW.
- If this value is exceeded (3.5 kW), it is recommended to install separate electrical wiring for the underfloor heating system, as well as use a circuit breaker.
- If it is planned to simultaneously connect not only a warm floor, but also any household appliances to the same network, the additional load on the network should be taken into account.
- To connect the heating elements, a special magnetic starter is used.
- The contacts must not touch the strips located next to them.
- In addition to tape, you can use a construction stapler or furniture nails to fix the thermal film.
- Fastening is carried out through a transparent shell located next to the heating elements.
- A plywood or fiberboard base is fixed through the same shell using screws.
- When laying the base under the linoleum, its surface must be checked using a level to ensure it is level.
- The insulation layer creates a noticeable thickening and the floor surface becomes uneven. To compensate for this difference in thickness, part of the heat-insulating substrate is cut off, and the floor surface becomes flat again.
- When checking the operation of an infrared heated floor, it is recommended to measure the resistance of each individual strip.
- It should be remembered that thermal insulation material is laid with the reflective side up to ensure maximum reflective effect.
- The thickness of the base for linoleum should not exceed 8 mm; it is better to take plywood or chipboard with a thickness of 6 mm.
- It is recommended to lay linoleum in a room with an air temperature of +18 degrees or higher.
- The humidity in the room where linoleum is being installed should not exceed 65%, otherwise the material may deteriorate and its fastening will become less durable.
- Before laying linoleum on a heated floor, the heating system must be turned off at least 24 hours before the start of work.
It is not recommended to heat linoleum to a temperature no higher than 28 degrees. Since this is below the normal body temperature of a healthy person, when the heating system is operating, the floor will feel exactly neutral warm, this is normal.
If all or part of the linoleum feels hot, the coating may be overheating. This may indicate a breakdown and the need for immediate diagnosis of the system condition.
Preparing a Wooden Floor
As with any repair, it’s worth starting with preparation; we’re interested in preparing the wood flooring before laying the heated floor system. Of course, a concrete screed, to put it mildly, is not a good solution for a concrete floor, so we will not consider this type of preparation.
There are cases when the surface is flat and then no special preparation is required, but it also happens that the preparation process takes longer than installation of the coating. The preparation process requires that the coating be even. If significant errors are allowed for a pipe, then for infrared film everything needs to be “perfectly” even.
You can level the wooden covering using scraping; again, this method is suitable if the covering is not rotten. If necessary, you need to replace boards that have rotted.
If there are not many differences, then you can use a special wood putty and eliminate all the unevenness. If the putty method is not suitable for you, for some reason you can use leveling with sheet materials such as chipboard, OSB, etc. But it is better to choose the thickness of sheet materials within 20mm, since sheets that are too thin can become deformed over time.
Recommendations and possible errors
The cake made from infrared flooring and linoleum should have five layers from the rough base:
- Izolon (heat-reflecting substrate).
- Infrared thermal film.
- Polyethylene film (waterproofing).
- Flooring made of wood or gypsum fiber boards 3–5 mm thick.
- Finish linoleum covering.
Without a heat-reflecting substrate, the high energy efficiency of an infrared underfloor heating system will be seriously compromised. And without polyethylene and protective flooring, it will sooner or later fail. The plywood layer absorbs some of the thermal radiation, but it is impossible without it.
Connection diagrams
Linoleum on top of an infrared heated floor should be laid in the form of natural marmoleum or vinyl PVC. At the same time, its marking must have a special icon. And it should go without an insulating sublayer from below. Choosing an air conditioner will require a lot of thought. With the finish, everything is simpler here. The main thing is not to take the colloxylin or rubber version, which will begin to release harmful substances when heated.
Types of materials for floor waterproofing
Paint insulation
Such compositions can be used for waterproofing when insulating wooden and concrete floors. Silicone, acrylic, rubber, polymer based mastics are applied to the surface using a brush or roller. The layer of such insulation is 3-6 millimeters.
Coating insulation
It is very common and is used to protect internal and external surfaces from moisture. When applied, it forms a monolithic layer of high density. It is a bitumen-polymer base with the addition of solvents and additives that increase plasticity. Very reliably protects the treated subfloor. Coating insulation used for floor insulation will significantly increase the efficiency of insulation.
Pasted waterproofing
It is produced in the form of rolls and is a durable fiberglass base coated with a bitumen-binding composition with the addition of polymers. Very easy to install. On one side there is a self-adhesive base. The installation of such waterproofing for insulation can be done with your own hands without the use of professional equipment and tools. Affordability complements the advantages of adhesive insulation.