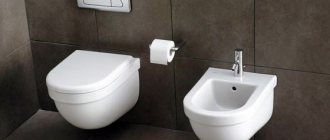
Floors in the house are not only a necessity, but also an important component of the interior. They should be smooth, neat and beautiful. An uneven floor will not even allow you to put anything on it, and an ugly base will immediately ruin the overall appearance of any room. The toilet floor is no exception. And during the renovation, it, like the base in any other room, needs to be given special attention.
Floor in the toilet
Types of bathroom flooring
In order not to be disappointed in the purchase in the first month, you should approach the choice extremely responsibly. It must be remembered that there are several requirements for the flooring in the toilet:
- Insensitive to moisture. The toilet, and especially the combined bathroom, is characterized by a high level of humidity. If the material does not meet this requirement, then in the coming months the destruction of the floor covering will begin.
- Resistance to chemical compounds. It is important to constantly maintain cleanliness in the bathroom. Numerous detergents and cleaning products are used for this purpose. It is important that the floor surface does not react with household chemicals, otherwise damage will occur.
- Appearance. This indicator is one of the most important, since many buyers are primarily guided by external parameters.
- Strength and durability. The longer the floor covering has a service life, the longer you won’t have to think about repairs.
Suitable toilet floor materials include:
- tiles;
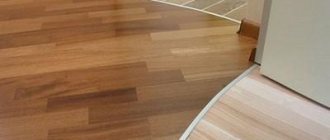
- self-leveling floor;
- linoleum.
Is it worth finishing the walls with linoleum?
Among experts in the construction industry, debates periodically arise about whether it is worth using linoleum for bathroom walls. Today, this unusual finishing option is used in rooms of various types (including those with high humidity).
This is interesting: Foam ceiling tiles
For this purpose, special wall linoleum is used, based on polyurethane, characterized by increased elasticity and strength. Its standard thickness is no more than 1.5 mm. It is sufficient to ensure the necessary margin of safety and a tight fit of the material to the wall, preventing damage and creases.
Wall linoleum is mounted using special glue on carefully leveled walls, cleaned of dust and dirt. For installation, an adhesive composition based on dispersion and acrylic bases is used. Other types of adhesives are also used for gluing walls with linoleum: Bustilat, Gumilax, etc.
Is the material suitable for laying under tiles?
The average lifespan of linoleum in a bathroom is about 5-7 years, after which the coating needs to be replaced.
Since completely replacing the floor covering with removing the old one is a labor-intensive and time-consuming task, the desire to leave linoleum as a base for tiles is understandable and justified. But this should not be done, since the tiles require a rigid and solid base: any changes in the surface, even the most insignificant ones, will lead to cracking and damage during use.
The best base for laying tiles is a concrete screed, which ensures maximum adhesion with glue.
When leaving linoleum under the tiles, it is important to inspect it to determine the quality of the base (it must be smooth and rigid).
Tiles can be laid after carrying out the following preparatory measures:
- reinforcing the surface for finishing with mesh;
- leveling the base using a concrete screed no more than 2 cm thick;
- cleaning from construction dust and priming.
Advantages and disadvantages of a design idea
Linoleum has advantages over traditional ceramic tiles:
1. Complete waterproofness due to the use of a welding method to connect the panels.
2. Ease of care. The coating can be washed with household products used for cleaning the house.
3. Original and unusual design due to colors.
4. Minimum number of joints.
Minuses:
1. Several people will be required to complete the work of covering the walls.
2. The choice of linoleum for the bathroom is limited, so the appropriate option will have to be selected individually.
3. The base for finishing with this material must be leveled, eliminating all problem areas and shortcomings.
To obtain an optimal result, before finishing a bathroom with linoleum, it is advisable to familiarize yourself with photos on the Internet. There you can choose a suitable design for yourself in accordance with the individual parameters of the room.
Advantages and disadvantages of tiles
Despite the wide variety of floor coverings, tiles are considered one of the most popular. This demand can be explained by a large list of advantages of this material:
- Easy care. Dust and dirt can be easily removed from the surface of this decorative coating, so for cleaning you will need a floor cloth and water. There are no streaks left on the tiles.
- Strength. This floor can withstand any furniture and household appliances.
- Insensitive to moisture. Even with a constant high level of moisture and frequent washing, the tiles on the floor in the toilet do not deform, maintaining their original appearance.
- Resistance to household chemicals. Ceramic tiles withstand contact with antibacterial compounds.
- Life time. With proper care, such a floor can last about 50 years.
- Fire safety.
While naming the advantages of this finishing material, one should not ignore its disadvantages:
- The tile is cold. This characteristic becomes especially noticeable in winter.
- Not impact resistant. If heavy objects fall on the floor, cracks may appear in this area.
- A flat floor is required. If the base has potholes, drops and other defects, then tiles cannot be placed on the toilet floor. Pre-leveling required.
Characteristics of linoleum for the bathroom
For laying on the floor in the bathroom, you should use only a homogeneous type of material, without a substrate, which absorbs moisture, leading to the appearance of mold and fungal organisms under the coating. It is worth paying attention to this if linoleum is laid in a wooden house, since the water accumulating under it spoils the wooden base.
Non-slip is an important parameter for linoleum that is planned to be laid in the bathroom. To determine this characteristic, a special slip resistance indicator is used, designated by the letter R. It has a value from R8 to R13 (for a bathroom it is R10).
Also, linoleum for a bathroom should be:
- with a low-porosity base;
- with a rough surface that prevents slipping on the floor;
- soft and elastic;
- heat resistant;
- not having a large number of joints.
To fix the material, it is better to choose a plinth with a soft edge, which will ensure a better fit of the sheets to the wall and prevent moisture from getting under them.
Materials and tools for laying tiles
Before laying the floor in the toilet, you should stock up on all the necessary tools and materials:
- Tile. When choosing the appropriate option in the store, you should remember: the surface should not be completely smooth. Compliance with this requirement will help avoid falls and injuries on wet floors.
- Tile adhesive.
- Plastic crosses for forming joints between tiles.
- Construction pencil for marking.
- Tile cutter or grinder.
- Building level.
- Rubber mallet.
- Metal corner ruler;
- Grout for filling tile joints.
- Spatula for applying and evenly distributing glue.
- Dry cloth.
How to lay tiles on the floor in a toilet
The final result largely depends on the quality of the base, so preparatory work is carried out before laying. The old decorative coating is removed to the screed. The base is checked for defects and differences are checked using a level. If the differences are 1-6 mm, you can use a self-leveling compound. For more pronounced differences, experts advise using a concrete screed.
After the screed has hardened (this takes 3-5 days), a primer is applied to the base. This layer prevents the development of fungus and enhances adhesion to the base. After this, you can begin laying the tiles.
Advice! First of all, the entire tile is installed and only then the cut parts are added in the remaining gaps.
- The first step is marking the base. To do this, determine the middle along one of the walls of the room and draw an even line to the middle of the opposite wall. Similarly, find the midpoints of the other two walls and connect them. The result is two lines intersecting in the center of the room. It is from this point that you should begin laying tiles on the floor. You can do the laying in the toilet with your own hands quite quickly, which is explained by the small size of the room.
- Apply glue to the first tile using a spatula. Apply the tiles in accordance with the markings. The correctness of the masonry is checked with a level, and if necessary, changes are made using a mallet.
- The second tile is also covered with a layer of adhesive and installed. In this case, special crosses are placed between two tiles. Again, check the level for differences and adjust if necessary.
- After laying all the intact tiles, use a pencil and ruler to mark the remaining tiles for cutting. These pieces will fill gaps around the toilet and in corners. The installation principle is no different.
- The next stage is filling the tile joints with grout. This is convenient to do with a rubber spatula. It is better to immediately remove excess material on the tiles with a dry cloth before drying.
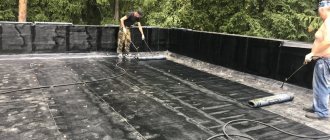
Priming and waterproofing
Waterproofing will protect against the appearance of fungus.
Situations in life are different, and in order to avoid negative consequences on the ceiling in the toilet, serious waterproofing work should be carried out.
This will protect the room from the growth of mold and mildew, and as a result the appearance of unpleasant odors. In a private house, this point is not so relevant, but owners of apartments in a multi-storey building cannot do without this process.
You can use rolled material or plastic coating mixtures. The choice is entirely yours. Rolled ones have the disadvantage of peeling off from the base over time, but are much cheaper than coating ones.
The solution may be self-adhesive waterproofing. Before laying it, it is worth treating the floor surface with bitumen mastic. Coating waterproofing is much easier to apply, and is guaranteed to penetrate into all “hard-to-reach” places.
The floor can be treated with a seamless primer material based on a polymer cement base, simultaneously strengthening the coating and increasing its service life.
Specifics of using coating primers
| № | Type of composition | Recommendations for use |
| 1 | Concreting | They are distinguished by their special strength, frost resistance, and structural density. Recommended for use in the manufacture of reinforced concrete structures. |
| 2 | Cement inorganic | Used for laying ceramic tiles and porcelain stoneware. |
| 3 | Seamless insulation | Provides a 100% water-repellent layer. Apply using a spatula, brush or roller. |
| 4 | Polymer-cement | Good level of adhesion with any type of substrate. To use, it is not necessary to wait for the base to completely dry; it can be used when wet. |
Advantages and disadvantages of self-leveling floor
Self-leveling flooring is a relatively new type of flooring, but it is already in high demand among consumers. Most often, self-leveling floors are ordered for toilets, bathrooms and kitchens. This type of flooring has several advantages:
- Easy care. No special washing or cleaning is required - all dirt can be removed in a few minutes with a cloth and water.
- Immunity to high humidity and household chemicals. This coating can be washed frequently using detergents and cleaning agents (not abrasive).
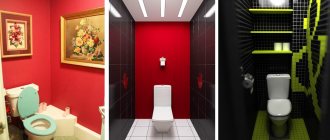
- Original appearance. With the help of coloring components it is possible to obtain absolutely any shade of the coating. Moreover, only self-leveling floors provide the opportunity for 3D design. In the next photo, the floor in the toilet is made using this technique.
- Perfectly flat surface.
- Warmer coating (compared to tiles).
This finishing technology also has serious disadvantages:
- High cost, which consists of the cost of materials and work of craftsmen.
- Duration of the process. It will take 3-4 weeks to complete the self-leveling floor in the toilet.
- It is extremely difficult to cope with such a task on your own.
Material selection
Before laying tiles on the wall in the toilet , you need to choose the right one. The tiles differ in size, appearance and material.
An example of using porcelain stoneware Source keramspb.ru
See also: Catalog of companies that specialize in finishing materials and related work
Tiles can be made from different materials:
- Tile or ceramic tiles. Up to 80% of all tiles are made from it. This is a durable, moisture-resistant coating that meets all requirements. One of its main advantages is the large selection of colors and shapes.
- Clinker or ceramic brick. It has a “brick” appearance. It differs in composition (special refractory clay is used) and manufacturing technology: first the material is fired, then baked. The shade depends on the degree of baking.
- Porcelain tiles or stone tiles. Imitates natural stone or wood. It is distinguished by increased strength and moisture resistance, and also has a high price.
- Glass tiles. It can be transparent and translucent, matte and glossy, multi-colored or with patterns.
Experts recommend using ceramics and porcelain stoneware. Clinker is mainly used for exterior decoration, but is also suitable for the bathroom.
Other parameters are no less important when choosing:
- Size . In small rooms it is better to install small tiles. Large, thick tiles look good in large bathrooms, but they require a stronger adhesive. In small rooms, you can use rectangular tiles: laying them horizontally will visually expand the room.
Black tiles in the interior Source keramobum.ru
- Color . The tile should be combined with the interior. Most often, the toilet is finished with light-colored material - it goes well with any plumbing fixtures and visually increases the space. Dark material is usually used for flooring. It is less practical and marks are more visible on it. Bright colors are better for highlighting small areas.
- Target . The tiles can be floor tiles (marked “foot” on the packaging) and wall tiles (marked “palm”). The first is characterized by increased strength and shock resistance. The second is covered with technical glaze, which makes the walls easier to maintain.
Some companies produce sets of floor and wall tiles. This makes the choice easier.
Cement mortars are most often used as glue. They are especially convenient for novice repairmen: due to the low hardening speed, the position of the coating can be adjusted. Dispersion glue is used, but this requires careful preparation of the surface. Liquid nails are only suitable for drywall. Polymer compositions are sold completely ready-made and can be used immediately.
Both glue and grout must be moisture resistant.
Installation process Source city-group161.ru
Materials and tools for self-leveling floors
Those who are planning to make a self-leveling floor in the toilet with their own hands should make sure in advance that they have all the necessary tools and materials:
- Dry mixture for self-leveling floor. It comes in polyurethane, methyl methacrylic, epoxy and epoxy-urethane. Each of the presented products has different characteristics. For home use, craftsmen recommend choosing polyurethane floors.
- Primer.
- Container for preparing the solution. It must have a volume of more than 15 liters.
- Raquel. This tool is used to regulate the thickness of the material layer.
- Shoe tips with metal spikes.
- Electric drill and special mixer attachment.
- Needle roller for uniform distribution of the composition.
- Construction level.
- Several spatulas of different sizes.
Making a screed
Do not use gypsum mixtures in the bathroom and toilet.
The installation of a floor toilet base is no different from any other screed. Due to fluctuations in humidity, it is not recommended to use mixtures containing gypsum. All work is carried out using installed beacons. For a typical toilet, it is enough to install a couple of slats.
Having secured the slats to the cement mortar, carefully check the position with a horizontal building level. To independently prepare a solution for a rough screed, you should take the material in the following proportions (sand, cement, crushed stone):
| Concrete grade | Cement grade 400 | Cement grade 500 |
| 150 | 1 / 3 / 5 | 1 / 4 / 6 |
| 200 | 1/ 2,5 / 4 | 1 / 3 / 5 |
| 250 | 1 / 1,8 / 3,3 | 1/ 2,5 / 4 |
| 300 | 1 / 1,5 / 3 | 1 / 2 / 4 |
For 10 kg of dry mixture it is usually customary to take about 1.7 liters of water. The solution consumption per 1 m2 is 9-10 kg with a layer height of 5 mm. For more information about pouring screed, watch this useful video:
For the final leveling layer, it is better to use a ready-made dry mixture of self-leveling floor mortar.
Progress of floor pouring
The installation process of a self-leveling floor consists of several stages:
- Preparing the base. This is a long and labor-intensive stage, since the result should be a smooth base without debris and dust. The slope should not be more than 4 mm. Depending on the type of old decorative coating, the progress of work varies. The tiles do not need to be dismantled, just check the reliability of the fastening. Concrete is cleaned with a wire brush or sandblaster. For wood flooring, use a sander.
- Elimination of defects. Chips, cracks, and potholes should be covered with putty (for wood), tile adhesive (for tiles) or cement mortar (for concrete).
- Thorough removal of debris and dust. The easiest way to do this job is with a construction vacuum cleaner.
- Toilet floor primer. Apply 2-3 layers of primer to the surface. A long-haired roller is useful for this. Each subsequent layer is thoroughly dried.
- Preparation of the solution. Each manufacturer of mixtures for self-leveling floors offers its own preparation scheme. For this reason, the solution must be prepared in strict accordance with the instructions. You need to stir the solution for at least 15 minutes using an electric drill with a mixer.
- The prepared solution (2-3 buckets) is poured onto the floor and spread in an even layer using a tool called a squeegee. In this way, the solution continues to be poured until the entire surface of the floor in the toilet is filled.
- To eliminate bubbles, simply move a needle roller over the solution.
- After the solution has dried a little, it is covered with paper or film to protect it from dust.
- After drying (this will take about a day), the floor is coated with polyurethane varnish to add shine.
Dismantling and cleaning
Before removing the structure, drain all the water.
If the repair does not involve replacing the toilet with a new one, then before dismantling the tiles, you must carefully remove the toilet without damaging the fasteners. Before removing the toilet, turn off the water, drain the tank and remove it, first unscrewing the supply hoses.
If the plumbing fixtures were glued to cement mortar, then it most likely will not be possible to reuse it. If dismantled using a hammer drill or chisel, it cannot be saved.
The sewer outlet is covered with a rag or a standard cover, which must be purchased in advance at a hardware store.
Once you have removed and removed all the plumbing fixtures, it is time to knock down the tiles. The toilet is usually not very large, so knock down the materials to the base of the walls and ceilings.
This should be done to ensure that the new leveling layers do not eat up too much space. If the size of the bathroom allows, then knocking it down to the ground is not necessary. As a rule, the cement base does not deteriorate over the years.
All dismantled material must be removed from the premises. Floors should be cleaned and treated with a deep penetration primer.
If cracks are found in the base, they must be “healed” by treating them with tile adhesive or concrete mortar with the addition of plasticizers.
Advantages and disadvantages of linoleum
Linoleum can give tough competition to the two previous finishing materials. The list of its advantages is worth noting:
- Resistant to water. Properly laid linoleum is impervious to moisture and prevents the growth of bacteria and fungus.
- Easy to care for. This type of floor finishing in the toilet and bathroom is easy to maintain and does not leave streaks on its surface.
- Tolerates contact with household chemicals well. Any detergent is suitable for cleaning this toilet.
- Long-term operation. To avoid having to make repairs after a few years, it is better to choose wear-resistant types of linoleum (wear resistance class - 22-23 and higher).
- Relatively warm material.
- No joints or seams.
- Relatively cheap finishing. If you choose between tiles, self-leveling flooring and linoleum, then in the latter case the costs will be significantly lower.
The disadvantage is the relative softness of the material. So, under mechanical stress, the surface of linoleum can be scratched or otherwise damaged.
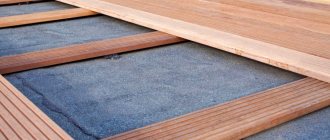
Types of coating
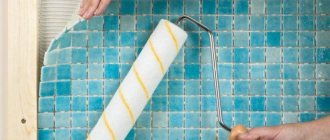
Laying linoleum in the bathroom
There are several types of linoleum:
- natural, based on oxidized linseed oil, jute fiber, ground wood and cork. Very wear-resistant, durable, but not intended for wet areas;
- nitrocellulose based on colloxylin and many mineral additives to reduce flammability. Very limited use;
- alkyd on a jute base coated with a mixture of mineral oil, alkyd polymers and mineral additives. Mainly used in transport;
- relin based on crumbs of used rubber and synthetic rubber. Mainly used for flooring of industrial buildings;
- PVC linoleum made of synthetic material. Most often used in construction. Inexpensive and practical material.
Let's focus on PVC linoleum, which is used for flooring in residential premises for various purposes. Depending on the type of room, the material is divided into several classes:
- 21-23 classes for residential premises;
- 31-34 classrooms for public spaces;
- Classes 41-43 for industrial premises.
Note: The common belief that linoleum coating is slippery indicates the wrong choice of material. The use of corundum chips during production creates a rough surface with excellent anti-slip properties. It is necessary to carefully study the properties of the material when deciding to lay linoleum in the bathroom.
The PVC material produced by the industry has four classes of abrasion, two types of structure and is distinguished by the presence or absence of a base.
This is interesting: How to glue tiles to drywall in the bathroom
Problem of choice
Choosing a bathroom coating
Taking into account such a huge variety of materials with the same name, the uninitiated person has a question about what kind of linoleum to put in the bathroom.
To decide which linoleum is best for the bathroom, you need to get the answer to just a few questions about the properties of the material, and then select the design you like from the samples presented:
- Moisture resistance and wear resistance of the upper protective layer. The higher the better;
- The porosity of the base, that is, the ability to absorb moisture like a sponge. Here, on the contrary, the less the better;
- Possibility of obtaining hermetic joints using available gluing or welding technologies;
- The thickness and softness of the material at room temperature, and the possibility of local heating without deformation or damage to the surface;
- The slip coefficient or simply the roughness of the coating for safe use in case of possible ingress of water.
These are the main criteria by which you can choose linoleum for your bathroom floor in order to obtain a high-quality, durable and safe coating.
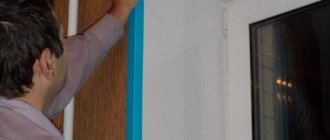
Installation features
Features of installing linoleum
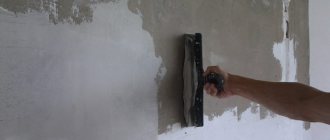
Having figured out how to choose linoleum for the bathroom, let's try to consider the procedure for preparing the surface and laying the purchased material to solve the second half of the problem:
- Having completed the rough leveling of the floor using a cement screed made from ready-made construction mixtures, it is best to continue leveling using liquid bulk mixtures for final processing. Only in this case can you obtain a well-prepared foundation;
- Now it is necessary to thoroughly dry the surface in order to minimize the amount of remaining moisture;
Keep in mind: One cubic meter of fresh concrete contains about 30 liters of water, which will be fertile ground for the development of pathogenic organisms.
- The next step will be thorough waterproofing with impregnating compounds to close any penetration paths for moisture;
- Lay out the linoleum in the bathroom being renovated and trim the edges, leaving a margin for the width of the plinth, in order to form a small side with sealed joints under the plinth, which will prevent water from getting under the covering in the event of a possible leak;
- Using high-quality adhesive materials, glue the linoleum to the base. It is better to perform the last two operations at a slightly elevated temperature in the room and maintain it until the adhesive layer has dried. PVC materials have a fairly large coefficient of linear expansion with temperature changes, and it is necessary to exclude the occurrence of possible deformations of the coating.
How to properly install linoleum
To increase the service life of the coating and reduce the risk of developing fungus and mold, builders recommend removing the old floor covering (tiles, old linoleum, paint). It is better to clean the material down to the concrete base. After this, it is necessary to eliminate cracks and potholes using cement mortar. After complete drying, the base is cleaned and dirt and dust are removed. A construction vacuum cleaner will help with this. The following is the installation of the coating:
- Layout of linoleum. To achieve a good result, there are 2 ways to do the job. Linoleum can be cut according to the exact measurements of a toilet in a spacious room, or the sheet can be rolled out directly in the toilet and cut on site. In the second case, you should strive to ensure that the joints between the material and the walls are minimal. In this form, the linoleum is left in the room for 1-2 days, allowing it to rest and straighten out.
- The next stage is trimming the sheet in those places where it is necessary. The gaps between the wall and the material should be on average 5 mm.
- Bend one half of the linoleum and apply an adhesive composition to it and return it to its original position. To eliminate bubbles, linoleum is rolled with a hard roller. Glue the second half of the sheet in a similar manner.
Video description
This video shows how to lay tiles on a wall:
The work is as follows:
- First you need to decide where the cut edge will go - top or bottom. Usually they try to leave the trimmings at the bottom so that they do not catch the eye.
- Then you need to measure the height of the wall and calculate how many whole tiles will fit in one row.
- A line is drawn along the edge of the bottom row around the perimeter of the room, along which a metal profile or flat strip is screwed. It will act as a guide during installation and additional support.
- They begin to lay out the tiles, starting from the edge of the plank upward. Every 2-3 rows you need to stop for a few minutes so that the glue has time to harden and does not spread.
- When the adhesive mixture has completely hardened, the plank is removed and the cut tiles are laid in its place.
In the corners, the tiles are laid in a butting pattern: one tile slightly overlaps the second at a right angle. The second option is to trim the side of the tile at 45 degrees. Thus, the two tiles butt together to form a right angle. The second method looks more beautiful, but requires special equipment and knowledge.
Grout
You can grout the seams only after the solution has completely dried (the exact time is indicated on the composition itself). The surface must be thoroughly cleaned with a vacuum cleaner, removing dust and glue residues. Using a rubber spatula, spread the grout along the seams.
Grouting Source birzhaplus.ru
In corners and at the junction of the wall and floor, you can additionally use silicone sealant. All this is necessary to completely protect the room and tiles from moisture.
Warm floor in the bathroom
For those who want to make the floor in the toilet at home as warm and comfortable as possible, experts recommend installing a heated floor. This system has several advantages:
- Possibility of temperature regulation using a thermostat.
- Elimination of moisture and associated unpleasant odors.
- Reducing the risk of developing fungus and mold.
- The “warm floor” system in the toilet allows you to use floor coverings that are uncomfortable under other conditions. These also include tiles.
Types of underfloor heating systems
Manufacturers offer several types of underfloor heating systems, differing in operating principles:
- heating mats (thermo);
- infrared film;
- cable floor
The characteristics of these systems vary, so experts recommend different systems for different floor coverings. If you use laminate or linoleum, you should pay attention to infrared film flooring. For tiles, cable flooring and heating mats will be the best allies.
Installation of heated floors
The installation of the system occurs during the process of laying the floor covering, so its availability should be foreseen in advance.
Heating mats are a structure that consists of rectangular sheets equipped with heating wires. When using this system, the sheets are laid under tiles with tile adhesive. An undoubted advantage is the ability to change the shape and size of the mat. This feature can be used to avoid obstacles in the bathroom.
The cable system is represented by a single-core or two-core cable. When installing the floor, the cable is laid in a cement screed. When the system operates, the screed heats up, causing the floor to reach the optimal temperature. The advantage of such a device is that it saves space. Apart from the screed, no additional layer is required.
Infrared heated floors look like a thin film divided into sections.
Its installation is carried out immediately before laying tiles or other material on the toilet floor. The main advantage of infrared floors is energy savings.
What type of heating is better: water or electric?
All types of floor heating allow you to create comfortable conditions for your feet. Thus, you can limit yourself to small rooms with heating from under the floor, using elements invisible to the eye.
Comparisons between water and electric types of deck heating are often made. And the main distinguishing feature of the electrical system is energy saving. Using an electric heating cable, you will have to spend less electricity, while the temperature on the surface will be the same over the entire area.
The water system requires more complex installation with a complex floor “pie” structure
It is worth noting other disadvantages of a water floor:
- It is impossible to use such a system in an apartment building, because it will pose a threat of flooding to the neighbors below;
- complexity of installation. Pipes must be laid taking into account many factors: material, pipe cross-section, distance between adjacent pipes, screed thickness - all this will affect the efficiency of the heating system. In addition, you need to make the right cement screed;
- cash costs are higher than with electric heating;
- breakage or leakage will require complex dismantling work;
- the efficiency of the system also depends on the choice of circulation pump, as well as on many other elements of a complex system;
- thermal regulation is more difficult to make, and if the power is calculated incorrectly, it becomes even more complicated;
- at the beginning of the circuit the temperature is higher, and closer to its end the water cools down. This causes a "thermal zebra".
When considering electric heated floors for the bathroom, it is worth noting the following features of their use:
Electric cable heating systems have a mesh structure with optimal arrangement of wires
- It is advisable to use them as an additional heating device. Heating the room completely is problematic due to overheating and the risk of breakdown;
- in apartment buildings, electrical systems can be used in cases where water systems are prohibited;
- allow for quick heating of floor coverings;
- ability to program heat supply depending on time;
- installation is simple.
Based on this, we can conclude that a water floor is more suitable for a wooden house. In addition, it allows you to organize the entire heating system without the use of radiators.