Finishing
Finishing is an essential part of completing any construction or renovation work. Attaching corners to the window frame slopes is a finishing procedure.
Corner
Material characteristics
Why choose plastic finishing elements when there are the usual metal and wood, known for durability and environmental friendliness?
Causes:
- Ease of handling. Plastic parts are easy to cut, sand, and process.
- Strength. The thickness of the element is sufficient to protect the slope from mechanical damage.
- The plastic is resistant to ultraviolet radiation, moisture, and durable - the slope will last 20 years or more.
- Ability to smooth out unevenness. The part will turn any angle into a straight line, the profile has 90 degrees in measurement.
- Ease. The weight of the parts is important. Plastic allows gluing rather than screwing - the adhesive strength is sufficient to hold the part. The weight allows you to transport a lot of plastic elements.
- "Undemanding" No need to paint the corners. You can remove stains using regular home remedies.
- Wide palette.
- Affordable price.
Disadvantages - instability to fire (when melted, harmful substances are released that poison the air), fading after the expiration of the service life. However, there are more advantages, because plastic finishing materials are in demand.
Why do you need to attach corners to slopes?
Let's start with the most important thing - why is this necessary? What role do the corners play - only decorative or do they have more serious functions? Let’s not argue with the fact that if you frame the slopes of doors or windows with special decorative elements that fit perfectly into the design of the room, then the interior will immediately change for the better.
Corners will protect slopes from damage
But besides this, they also perform a very important protective function. Sooner or later you have to carry large items through the opening, which can damage the corners, and you can simply accidentally touch the outer corner and damage it. There can be a lot of situations, the main thing is that the result is the same - a damaged surface and, accordingly, a damaged appearance. In addition, as practice shows, most often the wallpaper begins to peel off in these places. So it is best to protect the outer corner of the slope with the help of a decorative element, which will also transform the interior.
Corners are not only protection, but also a neat aesthetic appearance
Types of plastic corners
Speaking about the characteristics and use of elements in the design of a slope, it is necessary to touch upon the issue of varieties. There is no strict classification; we are talking about part of the classification branch - plastic products.
What types of plastic products are there? There are plain ones, which allow you to decorate the window in one color, and textured ones - like marble or stone.
The standard part is L-shaped. The length of the shelves is asymmetrical. They are produced at angles of 90 and 105 degrees. There are for internal and external parts. Often painted on both sides, allowing elements to be used both inside and outside. However, it is undesirable due to the difference in texture between the “front” and “back” of the plastic part).
Dimensions
Plastic is more durable when the shelves are longer.
T-shaped ones are designed to mask the gap between the slope and the wall. Removable ones “close” with a click, allowing you to carry out minor repairs without removing the corner from the window/wall.
Types of plastic corners
Before gluing a plastic corner, you need to understand its types in order to choose the right option. The product is available in a wide range of colors, including plain versions, as well as wood, marble, metal and other natural materials.
They are made in different shapes and sizes. The most popular two options are in the shape of the letter L with the same or asymmetrical width of the shelves (from 10 to 50 mm in width, from 2 m in length), and curved, which are used for similar openings (arches, etc.), from Why are they called arched corners? They are produced in two versions – for angles of 90° and 105°. Standard length – 3 m.
Plastic corners of different sizes
They are also manufactured in a T-shape, which hides the joints between the slope and the wall cladding. The most rarely used option due to the increased cost is removable. This corner is made with a latch, which allows you to carry out repair work without removing the profile. It bends easily, and at the end of the process it falls into place.
Corners are also classified by type of finish - external and internal. The latter are made with double-sided coloring.
Important! The wider the sides of the finishing material, the greater the load it can withstand, which is especially important on curved openings.
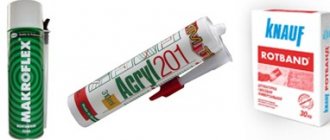
Types of adhesives
It is necessary to consider the types of glue suitable for finishing the window. They differ in characteristics and application.
- Liquid Nails.
Durable composition. Spot or zigzag application is allowed. Liquid nails will preserve the window for 20 years and will not cause chemical reactions leading to darkening or yellowing.
Liquid Nails
The composition comes in different colors, colorless is preferred.
- Silicone sealant.
Poured into joints and gaps. Contains no toxic chemicals. However, it tends to darken over time.
- Polyurethane glue.
Durable, elastic, hardens quickly.
- Liquid plastic.
Robust, durable, suitable for plastic surfaces only. It won't stick to a brick wall.
Preparatory work
The surface (window, slopes) must be cleaned of dirt and dust and degreased.
Will you need tools for installation? It is better to use a glue gun for glue. This will eliminate excess surface contamination.
To work with a corner, you will need scissors, a stationery knife, masking tape, a square, and a measuring device - a construction ruler or tape measure.
Sometimes the instructions mention a tool - a miter box. Allows you to make workpieces at an angle of 45 degrees. However, it is difficult to get. It’s possible to cope without it! You can follow these recommendations, the work will turn out to be of high quality.
Options for installing corners on walls
How to design a slope? Installation methods:
- To the wallpaper.
Suitable for non-relief, simple wallpaper. Deep embossing creates cracks that fill with dust, weakening the bond between the corner and the wall.
- Detailed.
This involves cutting out part of the wallpaper on the slope and applying glue to the wall surface. It is called “detailed” because it looks like a whole composition, but is an assembly of parts - pieces of wallpaper, corners, glue.
Detailed installation plan:
- The corner is placed in place, marks are made with drawing tools.
- The strip of wallpaper is cut according to the marks. Clean the wall at the slope.
- Apply glue to the cut plastic piece, press it to the slope, and hold until the composition sets. Press it to the wall with tape for a day.
- After 24 hours, the tape is removed and the installation is considered completed.
Installation of corners on windows or doors
How to do self-installation? There are no tricks - strict instructions, if followed, the result will be high-quality, beautiful.
Installation
How to cut correctly
The inner part of the workpiece is cut at an angle of 45 degrees, the outer part is left at 90, installed higher, overlapping. The size is double checked by measurements.
How to glue
Installation:
- An adhesive composition is applied to the part.
- The profile is pressed against the slope until the glue sets.
- Secure the part with construction tape.
- The adhesive tape is not removed throughout the day.
With tape
Even if the glue packaging says that it dries quickly, a day is the minimum for complete hardening.
How to glue a plastic corner to a door and window slope
Before placing corners on the slopes of windows or doors, you need to check the quality of the surface finish. This is done using a level, bar or rigid ruler. If the surface of the slope is severely curved, and this cannot be corrected, then it is better to install flexible plastic corners here.
There are three types of slopes:
- plasterboard;
- covered with wallpaper;
- painted after plastering.
Regardless of the choice, the installation technology is the same in each case. The only important thing is the choice of adhesive composition so that it is suitable for both the plastic and the finishing surface.
- Measure the height to make the blanks. Leave a margin at the top. The cuts are made with metal scissors. You will get an angle of 90° from the inside, and 45° from the outside.
Example of a cut
- Place the part on the glue and wait for it to set.
Press the corner firmly
- Now measure the width and cut the required size with a margin to match the side strips.
- The face blank is cut at an angle of 45° from both ends.
- Test the corner against the side slopes to make marks in place with a cutting knife.
- Take a ruler, apply it to the glued part and cut off the excess.
- Now apply glue to the top strip and attach it to the corner. Secure all elements with tape for a day.
Example of securing corners with tape
If the slopes are decorated with wallpaper with a three-dimensional relief, then you first need to cut strips on them for plastic corners. Be careful that no drops of glue or liquid nails remain on their surface.
Recommendations from the experts
Recommendations for beginners to make the task of attaching slopes less problematic.
- “Measure twice, cut once,” says the proverb. You need to take accurate measurements so that there are no gaps.
- It is not recommended to fasten joints with silicone. The composition darkens over time and stands out unattractively in relation to the plastic profile, disrupting the aesthetics of the finish.
- You need to measure the corners. An angle of 89 degrees is not straight, the joints will have to be processed differently.
- In the absence of experience, it is wise not to immediately glue the corners, but to first secure them with tape, comparing measurements, identifying gaps.
- It’s easier to make an arch using a hair dryer. The plastic profile bends well when heated.
Decorated
Gluing the corners is not difficult. No skills are required to beautifully decorate a plastic window. You need to select and install a profile according to the instructions.
Voted over 395 times, average rating 4.2
Comments
Unfortunately, there are no comments or reviews yet, but you can leave your...
Add a comment Cancel reply
We recommend reading
Finishing Modern lamination on window sills: pros and cons of the coating Most modern windows are equipped with classic window sills ...
Finishing How to putty the surface of slopes on plastic windows with your own hands High-quality putty directly depends on how exactly it was ...
Finishing How to foam all the cracks around a plastic window with polyurethane foam Sealing windows using high-quality ...
Finishing Step-by-step instructions for siding windows of various types: photos with examples of work In construction, a professional term is used - siding. IN …
Preparing the surface for gluing PVC corners
1. Remove all protruding parts: curtain nails, wallpaper, even any protrusions on the wall. To do this, knock down part of the plaster.
We cut off the wallpaper near the slope - to make it easier to tear it off if you plan a renovation
2. Remove the wallpaper from a corner of the wall. Otherwise, you will stick the plastic corner not on the wall, but on the wallpaper, which is wrong.
Cut the wallpaper to such a width that there is no gap between it and the plastic corner.
3. Degrease with a weak solvent, or so-called. white spirit that part of the window slope on which the plastic corner will be attached.
The corners are glued when the slopes are ready. See other instructions: on finishing and insulating slopes of PVC windows. How to install plastic slopes on windows? This is a separate topic.
For windows to last a long time, they need to be looked after. Rules for caring for profiles, glass and fittings can be found at the link: https://oknanagoda.com/okna/otveti/ukhod-za-plastikovymi-oknami.html