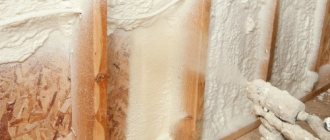
Self-expanding polyurethane is easy to apply and provides significant reduction in thermal conductivity
Foam for wall insulation is used in thermal insulation work quite often. This material is characterized by an optimal combination of ease of application and good performance characteristics.
Of course, to realize these advantages, you need to strictly follow the technology, so below we will analyze in detail both the main types of thermal insulation foam and the algorithm for working with them.
How to insulate a house and why - insulation for a house without consequences
Why do our clients order ecofoam insulation? What exactly motivates them not to use traditional insulation? The picture, as always, is very simple. An example from one of our clients (we filmed a whole video story under this post): the house was initially insulated with mineral wool. After insulation, it was discovered that the cotton wool was getting wet. This became especially noticeable when the walls were plastered. The customer decided to dismantle the mineral…
Consumer properties
Like any insulating material, Polynor has a number of advantages:
- Features excellent heat conservation. These insulation indicators are higher compared to expanded polystyrene and mineral wool.
- Non-toxic. Consumer reviews about Polinor are quite good, since it is not poisonous and does not require protective equipment when using it.
- Ease of use. When using POLYNOR, a heat-insulating layer is created, which does not require a frame for fastening. Also, no tools or auxiliary materials are required.
- Excellent grip. The composition quickly adheres to any surface - brick, wood, plastic, stone, concrete, which significantly expands the scope of its application.
Polynor insulation is very popular due to the fact that it is applied by spraying. This affects better adhesion of different surfaces, even if they are not very smooth. Very often this insulation is used to finish hard-to-reach places, for example, where pipes or cables are laid.
What is the best way to insulate an attic roof?
Roof insulation Ecopen, PPU, Polyurethane foam There is a huge selection of polyurethane foams on the market and the question often arises: which insulation for a home is better. There are two types of foams: hard foam and soft foam. Their density differs: one foam has a density from 10 to 20 kg/m3, the other has a density from 30 to 60 kg/m3. Solid foam (high-density polyurethane foam) has ...
Peculiarities
In order to insulate the walls in any home, it is best to use polyurethane foam. This type of foam hardens very quickly, which allows you to get a dense surface in a matter of hours that separates the interior of the room from external temperature changes, drafts and moisture penetration.
The main characteristics of foam include:
- heat resistance - the material can withstand heating up to eighty degrees;
- capable of letting water through if necessary;
- possibility of providing vapor barrier;
- high level of strength;
- increases in volume after application.
When using this material, you don’t have to worry that the wall structure can easily ignite, because the foam resists this in every possible way. With all the positive aspects of this material, there is also one negative aspect. It concerns the ability to freeze. If you foam something in a closed space, it will not freeze. In addition, the high cost of this product does not allow everyone to use foam to insulate walls in the house.
With constant contact with the aquatic environment, this material begins to deteriorate and eventually becomes completely unusable. Application of foam requires good ventilation, which means that certain conditions must be created for work
This material has low vapor permeability, so it is important to provide forced ventilation in the room
When applying foam with a thickness of four or more centimeters per square meter, you will need to use one balloon
In order to be able to do the work correctly and without risk to health, it is important to work using a pneumatic gun. This is special equipment that helps to spray foam evenly over a specific surface.
Such a gun mixes foam with gas and delivers it to the surface, evenly spraying where it is needed. Using such a device, you can independently adjust the intensity of the foam supply for more comfortable work. It is very convenient to use a pneumatic gun, but not everyone resorts to it due to the high cost of such equipment.
When applied to the surface, the foam does not form any seams, which is convenient and aesthetically pleasing. This material has minimal thermal conductivity. An important indicator is its environmental friendliness - when used, no harmful substances are released into the air. Any impact on the foam will be painless for it; it only reacts poorly to ultraviolet radiation.
When insulating a room, it is advisable to take care of sound insulation, which foam also does well. In addition, it has good adhesion to the surface. The foam is easily applied to uneven surfaces, while the formation of air pockets is completely eliminated. Rapid hardening allows you to continue working within 24 hours. Foam for wall insulation is a universal and convenient option, with the help of which even a non-professional can do everything well and efficiently, most importantly, follow safety precautions.
How to insulate the attic roof of your house during construction?
When you are building a house and at the same time thinking about how to insulate the attic, many additional questions arise: 1. Is a ventilated gap under the roof space necessary? 2. How to properly lay a hydrobarrier (diffusion membrane) 3. Which insulation should I choose? 4. Which vapor barrier should I choose to isolate the insulation from water vapor that tries to escape from the room during the operation of the house? Need...
Which variety to choose
In many ways, the choice will depend on the specific situation and what area needs to be treated. Using an example, we can consider the most common cases when a house needs foam insulation:
- If you need to seal cracks or eliminate any other defects on the surface, then polyurethane is suitable. But such material should not be exposed to sunlight.
- If you need to fill a large volume, then penoizol is suitable. But an ordinary cylinder will not be enough; you will need to purchase a special device with high pressure. You don’t have to buy it at all - you can rent it or borrow it from friends, because no one will use it often.
- If you need to seal small cracks and carry out thermal insulation in small areas, you can buy a cylinder with regular polyurethane foam. It does not support combustion, after hardening it is particularly hard, and it has an ecological composition.
- If defects are found on the outside of the wall, then you need to apply a composition based on polyurethane. It is applied directly using a special cylinder or apparatus.
It is worth remembering that foam insulation creates errors inside the layer that need to be eliminated. To do this, you will need a long hose to push the material inside. If it is necessary to fill air gaps inside the insulation, then holes are made in the wall with something sharp.
Polyurethane foam is not suitable for insulating the entire external facade - it does not have the appropriate characteristics necessary for this. Therefore, you should not choose it for these purposes, even despite its more economical cost.
What is penoizol scientifically and where did it come from?
The Germans are considered the creators of penoizol. It was they who, in the thirties of the last (XX) century, synthesized urea with formaldehyde and obtained liquid foam. Today it is made and used differently than ninety years ago. The technology of its production at that time was so serious, complex and problematic that thermal insulation of houses and cottages with it was out of the question. Too expensive! Two decades later, the Germans conducted a series of studies and found that it could be obtained much easier. Reducing the cost of foam insulation has made it accessible to private homeowners.
In the mid-twentieth century, more precisely in the 50s, penoizol was already widely used in the thermal insulation of private houses and cottages in France, Austria, Germany, and even Japan. For residents of the Commonwealth of Soviet Socialist Republics or simply the USSR, it was inaccessible for a number of reasons. The price tag, cosmic for an ordinary person at that time, automatically endowed it with magical, miraculous characteristics. In addition, in the post-war country, penoizol was used in the aviation and rocket industries. It was impossible to get it even for those who lived, as they say, in abundance.
At the end of the era of Secretary General Brezhnev, the military began to use liquid foam. There is a version according to which penoizol was poured between the walls of strategically important objects for conspiracy. It was used to insulate cold armored weapons depots, metal hangars for fighter aircraft, workshops, factories, and service stations for special equipment. A factor in the rapidly growing popularity of penoizol was and remains the list of technical characteristics. One of the priority properties is unsurpassed fire resistance of class “G2”, as well as compliance with the interstate Russian standard “GOST 30244-94”.
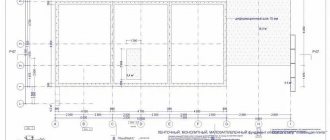
Layout
To begin, make a flowchart that makes it clear which consumer groups need to be created. Then the power on each branch is calculated.
There are two methods of load distribution:
- Interior. An introductory (basic) box is organized in each room. Power lines are laid from the base points to the input distribution board. Each line is started on a separate machine. In the case where powerful electrical equipment (boiler, air conditioner, electric stove) is installed in some rooms, a separate line of power sockets is laid. Then the basic distribution box is disconnected for each consumer in the room. For this purpose, additional junction boxes can be installed. An approximate diagram of the basic boxes looks like this:
- By consumer groups. Separate lines are laid for the lighting of all rooms, for the low-load socket network (TV, computer, table lamps), and for the power socket network. These wires are also connected to the circuit breakers of the input panel. Again, distribution boxes are installed along each line at the tapping points to individual consumers.
Next comes the dirty work: actually installing the boxes and laying the cable lines.
Hidden installation
Wiring is laid between the nodal points (where the boxes are installed). Since the installation is hidden, the walls are grooved for the cable, and the boxes are installed on alabaster. The prepared wires are removed from the installed boxes for connection. The length of the free ends should provide the possibility of connection without interference, and allow for 2-3 alterations (with cutting off the used conductors).
The method of connection does not matter (soldered twist in the illustration), the main thing is to understand the principle itself. For cables, the flush-mounted boxes have marked holes. In this case, tightness is not required; there will be a wall and plaster around it. The secret is that alabaster, diluted to a creamy consistency, when installing the box, fills all the cracks, grooves and extra holes.
The result is a monolith with dielectric walls. The planting depth is calculated taking into account the thickness of the wallpaper and the shape of the lid.
Outdoor installation
The principle of connecting the wiring is the same, but the installation is done differently. First, the junction boxes are installed, then the external cable is connected to them. Since the housing provides protection from dust and moisture, the cables are routed inside using sealing clamps.
For outdoor installation, collet clamps are used.
The wires must be color-coded: in single-phase versions, zero, phase, and protective grounding. It is not possible (especially before connecting the ends of the cable) to hang tags indicating the purpose of the wires. After final installation, it is enough to record the purpose of the wires on the diagram. You can stick short symbols on the inside of the cover for ease of further maintenance.
If the methods of how to disconnect a distribution box on a power line are clear: we simply connect the input and output wires by color, then connecting a switch is a completely different scheme.
Various ways to connect switches and lighting fixtures
- Classic connection, using a junction box. The neutral and phase wires are inserted into the box. For simplicity, we will leave protective grounding out of brackets. The neutral wire is directly connected to the lamp. The phase is supplied to the switch, then transits through the box and connects to the second input of the lamp. From an installation point of view, 3 two-core wires enter the junction box. Using the same principle, two or three-key switches are connected. Only more transit phase wires (from keys to lamps) will pass through the box. If you connect several lamps to one switch, there is no point in installing several distribution boxes. You can connect lamps in parallel, starting from the first lamp. In this case, the switch will be a group switch.
- Wiring for a luminaire without junction boxes. In this case, a power cable is inserted into the switch housing from the nearest junction box. The neutral wire is connected to the lamp directly, and the phase wire is opened by a switch. On the one hand, this saves one box. On the other hand, the cable is laid irrationally and must be inserted into the switch housing from below or from the side. While according to the standard generally accepted scheme, the main line runs along the ceiling. And from the ceiling junction boxes, the wiring goes down to the sockets or switches.
Technical characteristics of penoizol - list
- thermal conductivity coefficient according to “MCE” – from 0.028 to 0.044 W/m*Kelvin;
- compressive density at relatively weak (no more than 10%) deformation – 0.003 MPa;
- resistance to temperature changes in degrees ℃ – from +70 to 55 with a minus sign;
- the volume of suspended particles of liquid and volatile ingredients is not higher than 12%;
- tolerance to aggressive environments – mold and fungal growths;
- acoustic barrier and noise reduction potential – from 20 to 60 decibels;
- the average density of a thermal insulation cushion is from 10 to 30 kg/m3;
- compression level providing support for the initial shape - 0.07-0.55 kg.cm2;
- repels small insects, voles, rats, and other pests;
- sorption humidification during the day (24 hours) – no more than 20% (twenty);
- resource guaranteed by the manufacturer – from 75 (min.) to 120 (max.) years.
Is it possible to insulate with basalt wool?
Basalt insulation is used for floors, roofs, partitions and walls. Cotton wool is used to insulate rooms with high humidity: saunas and baths. Used for sandwich panels with layered masonry. Stone wool can withstand very high and low temperatures. Basalt material has a fibrous structure. Its density is 70-150 kg/cubic. m. When placing insulation in 2 layers, slabs with a lower density (70-80 kg/cubic m) are attached first, and cotton wool with a density of more than 120 kg/cubic m is attached second. m. The total layer of exterior finishing is at least 10 cm.
Benefits of cotton wool:
- single-component material - consists of basalt;
- high thermal insulation;
- good sound insulation;
- resistant to chemicals;
- not affected by mold, bacteria;
- tolerates temperature changes calmly;
- low weight;
- long-term operation.
The structure of the material allows you to quickly absorb and accumulate moisture. To prevent this from happening, use an additional vapor barrier lining (foil, glassine, plastic film) during installation. At high humidity, preference is given to basalt insulation with aluminum coating. The foil should not be placed on glue, but stitched with galvanized wire.
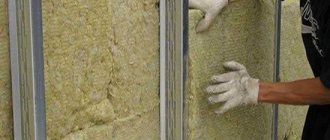
Step-by-step instructions for installing mineral wool:
- Level and prepare the surfaces and apply a primer.
- A vapor barrier material is attached vertically to the wall.
- Screw the bars or profile to the wall so that the distance between them is slightly less than the size of the basalt sheet.
- Cotton wool is inserted into the assembled cells, the wall is pre-lubricated with polymer cement glue over the entire surface and pressed with light pressure.
- You will need additional fasteners - dowels and self-tapping screws with large washers.
- The windproof film is secured on top of the mineral wool with tape.
- Before finishing, make the sheathing with thin slats, the distance for ventilation is 1.5 cm.
- The façade is finished with facing plaster.
The best option for external insulation is that wool is mounted on a load-bearing hay, and covered with facing bricks on top. The house becomes much warmer when the insulation is inside the wall.
Types of penoizol and use in thermal insulation
People who are poorly informed about it mistakenly believe that white foam, similar to a delicacy from distant childhood, is the only form of urea-formaldehyde foam. In fact, it comes in three variations. The most popular and objectively in demand is the liquid form of penoizol, which some craftsmen obtain using artisanal methods. Penoizol can indeed be prepared at home, but we categorically do not advise you to do this for reasons of basic safety. Mistakes when working with hazardous chemicals can cost you much more than you realize.
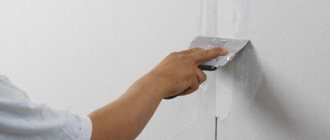
Plaster slopes
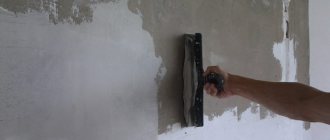
Finishing plastic windows from the outside using plaster is a traditional and inexpensive method.
Despite the apparent simplicity of working with this material, an untrained person will not be able to do a quality job, since one must have certain professional skills. But you can take a risk and make external slopes with your own hands using plaster. How to make slopes on windows in this way will be described below. High-quality plastering of external slopes requires certain skills
In order for plastered slopes on windows from the street to look neat, it is necessary to ensure their even geometric parameters. To do this, it is recommended to set beacons, focusing on which, you can achieve an even application of the plaster layer.
Preparation and execution of work
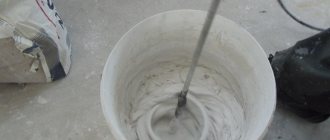
The work begins with preparing tools and purchasing plaster for exterior work.
First you need to prepare tools and buy plaster for exterior work.
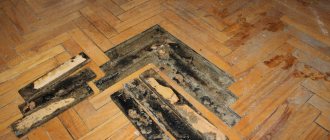
- Surface preparation involves removing excess foam using a construction knife.
Then all visible cracks and holes are cleaned in order to putty them. You can foam them, and then also cut off the excess. At the first stage, remove excess foam and seal the cracks - Then a metal casting is installed.
Excess foam from the bottom is removed, the remaining is covered with plaster mortar. The ebb is “planted” onto the mounting foam or liquid nails. Then it is secured to the frame or stand profile using self-tapping screws. The ebb is secured with self-tapping screws - They put up beacons.
To plaster the slope it is necessary to install a beacon - Using a trowel or metal spatula, spread the plaster mortar so that it is slightly higher than the beacons.
Then, using a rule or a wide spatula, work from bottom to top until a smooth surface is obtained. Distribute the solution using a rule or a wide spatula - During work, it is recommended to reinforce the corners.
When plastering corners, use reinforcing mesh - After the plaster layer has completely dried, it is sanded.
Final grinding of the surface is carried out after the plaster has dried.
Harmfulness of penoizol and impact on human health
Get straight to the point! In the United States of America, as well as Canada, it was banned for use at the official state level for a long time. Later, researchers proved that during operation, liquid foam does not emit carcinogens and is therefore safe. As a result, the ban was lifted. Russian factories, which simultaneously act as suppliers, claim that this insulation is not inferior in safety to steak sawdust and ecowool. In England, the use of urea-formaldehyde insulator in the thermal insulation of residential buildings is permissible only with a special document in the form of permission from regulatory authorities.
Algorithm for thermal insulation work
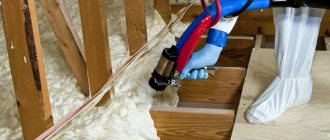
Insulating a house with polyurethane foam can be carried out either using professional generating equipment or using special kits. The kit includes:
The thermal insulation shell is applied to a large surface area using professional equipment
- Components for the formation of foam in cylinders.
- Hoses for connection.
- A gun that is used to mix reagents and spray foam.
A set of equipment for performing thermal insulation on your own
In addition, some manufacturers include personal protective equipment in the kit - gloves, goggles and a respirator. You should not forget about them: during the polymerization of even the most environmentally friendly brands of foam, volatile phenols and other toxins can be released.
You need to work in personal protective equipment
Foam insulation for walls is applied as follows:
| Illustration | Work stage |
| Preparing the kit. We open the boxes with cylinders, but do not remove the containers themselves - this makes them easier to carry. We insert the supplied hoses into the holes in the boxes. | |
| Connecting hoses. We attach hoses with union nuts to the fittings on the cylinders. We tighten the connections with a wrench, sealing the elastic sealing gaskets. | |
| Test blow. We attach the dispenser gun to the hoses. After this, we blow a small amount of foam into an empty container: we need to fill the hoses, displacing the air from them, and achieve uniform mixing. | |
| Preparing the pistol. We put a nozzle on the nozzle for pouring or spraying. We check that there is no gap between the nozzle and the body. | |
| Foam spraying. Spray the foam insulation evenly over the insulated surfaces. We apply the material in several passes, each time giving time for expansion and primary polymerization of the material. |
Comparison of penoizol with other insulation materials
The fire resistance of penoizol is superior to foamed polyurethane. It does not ignite even with prolonged contact with open flame. This is facilitated by thermosetting resin, which, when interacting with flames, forms an infusible material. As for polyurethane foam, its flammability in classes “G1” and “G4” is determined by aluminum fire retardants. Upon contact with open areas, polyurethane foam is destroyed, loses its ability to withstand flames, melts and can ignite. In terms of service life, sprayed polyurethane foam is also inferior to liquid foam made from urea-formaldehyde ingredients.
The most serious competitors of penoizol, in our opinion, are ecowool (dry cellulose) and crumbly sawdust steak. These environmentally friendly insulation products are the best on the market. They are made from wood fibers. They do not contain chemicals, except for antiseptics and fire retardants - products that are harmless to health. Meet international quality standards. They work better than any insulator, as they penetrate hard-to-reach points, crevices and depressions with a diameter of up to 0.01 millimeters. For objective reasons, they are officially approved for use in all countries of the world without any restrictions.
According to international statistics, in Europe, from 0.5 to 1.5 million residential houses, cottages and townhouses are insulated with ecowool. Americans use ecowool and sawdust every quarter to insulate 150,000 buildings and structures. As sad as it is to state, the “stupid” inhabitants of the notorious America, as Mr. Zadornov called them, have long been superior to us Russians in their knowledge of ecology. It is ecowool in the West that is considered the number 1 insulation material. Neither penoizol, nor polyurethane foam, much less basalt insulator, can compete with it. If you, as a reader, do not agree with this statement, please write your view of the situation in the comments to this article. Thank you!
Foam cost
If you buy a cylinder at retail, then on average you can pay 300-500 rubles per piece. But this type of insulation is rarely purchased separately. Usually its cost is included in the cost of work:
- polyurethane foam - about 100 rubles per linear meter;
- penoizol - 700−2000 rubles per cubic meter;
- polyurethane - 3000−5000 per cubic meter.
The price of the material also plays a big role in its selection. But you shouldn’t skimp on high-quality thermal insulation if you need to insulate your home for a long time for a comfortable stay.
Foam insulation is suitable for most walls , including panel, block and aerated concrete. Therefore, they can be safely used as insulation for apartments and private houses. What type of foam to choose is a purely personal matter for everyone. But first, it still doesn’t hurt to find out more about the selected composition, read reviews, and get advice from a salesperson at a hardware store. It is not recommended to use loose-fill insulation, which easily catches fire, unlike the foam fireproof version. And it is not the most convenient to use, the only exception being the floor surface.
Insulation with liquid foam is a better solution , because if desired, this procedure can be carried out independently, without the help of specialists.
If you do everything correctly and are careful, you will be able to quickly insulate any surface that needs it.
Parameters of sprayed insulation
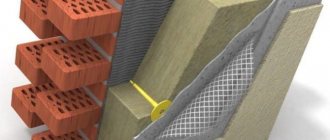
It’s worth saying right away that, as with any other insulation, it is preferable to insulate the walls of buildings from the outside. If you insulate from the inside, the outer wall will freeze. How many defrosting/freezing cycles it will withstand depends on the material, but rarely will such a house last more than 10 years.
When insulating the outside with polyurethane foam, a final exterior finish is required - the surface has a very unattractive appearance. But there are no problems with freezing of the walls, the building will last a long time.
There are no problems with the roof at all. Roofing materials are designed to withstand repeated freezing, so roof insulation with polyurethane foam can be done from the inside, spraying it directly onto the “underside” of the roofing material or onto the sheathing.
Sprayed thermal insulation can be applied to any surface, and the roof can be insulated from the inside
Whether to insulate the house from the outside or from the inside, we figured it out. Now a little about the layer thickness. Insulation with polyurethane foam is usually made of large thickness. This is not due to the fact that small is not enough. Usually, just according to thermal characteristics, an insulation thickness of 2-3 cm is required, but they make it at least 5 cm. This is so that under any conditions the dew point ends up in the thickness of the thermal insulation, and not in the wall material. Since polyurethane foam is non-hygroscopic, it cannot get wet, condensation simply does not occur, and excess moisture is removed naturally due to the vapor permeability of the material.