- Penetrating mixtures. These are compounds that deeply permeate the structure of concrete, crystallize there, clogging the smallest pores and cracks, thereby creating a waterproof shield.
- Expanding cement. This is a cement-sand mixture, which dries after application, increasing in volume and hermetically filling pores and cracks.
- Paint insulation. The most common material due to its availability, which includes various polymers or rubber. When applied to an interior wall, it forms a waterproof film that prevents the penetration of moisture.
- Injection protection. Injecting a protective solution through pre-drilled channels, providing deeper protection to the wall.
- Waterproofing membrane. Installation of a special polyethylene film on the wall that prevents condensation from penetrating the wall surface.
Insulation of brick structures from moisture ingress
To begin with, you should focus your attention on brick façade walls, since this is the material that is most popular in the construction of private houses and cottages.
It is immediately worth noting that due to its porosity, brick absorbs moisture like a sponge, which is why structures without appropriate waterproofing can quickly collapse. This is especially true for walls that are located in close proximity to the ground or are in contact with it.
As a rule, the construction of the walls of a new building begins after the foundation is prepared. A layer of bedding or waterproofing is spread along the entire perimeter of the foundation; most often, ordinary roofing material is used for this, which is glued to molten bitumen. Only after completing the foundation insulation can you begin further laying brick walls.
The part of the walls that will be in contact with the ground, after backfilling, must be reliably insulated from possible penetration of moisture, otherwise the facade wall will not last long and significant damage may occur.
Here waterproofing can be done by two different methods, namely:
- pasting the wall that will be in contact with the ground with appropriate materials;
- waterproofing walls by coating with special compounds.
In this case, with the first option everything is more or less clear, but as for the second option, you will have to use the appropriate materials. Here, bitumen, bitumen-based mastic, rubber or synthetic resins can be used as waterproofing.
Might be interesting
As a rule, the compositions are applied to the surface using a special sprayer, but renting such equipment can cost a lot of money, which is why they can be applied using a regular brush.
The application of such waterproofing is carried out in several stages, namely:
- first of all, the surface is cleaned of dust and accumulated dirt;
- Next, the brickwork is primed using a liquid solution - a mixture of gasoline and bitumen;
- After the primer layer has been applied, you can begin to apply the main waterproofing mixture using a brush or roller.
After the waterproofing work is completed, it is necessary to measure the thickness of the insulating layer, which should not be less than 2 millimeters. To do this, you can cut out a uniform piece of insulation and measure it with a micrometer; if you don’t have one, you can use a ruler.
Brickwork waterproofing work
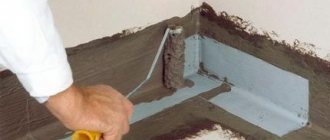
Coating technology
Commercially available liquid coating mixtures are ready for use. When applying the material to partitions, you must carefully follow the attached instructions. The solution is applied manually with brushes or mechanical sprayers.
Dry waterproofing compounds are prepared by adding water in the proportions prescribed in the work manual. After intensive mixing, cover the walls of the room with the solution for exactly as long as indicated in the instructions, in small portions.
After applying the first coating layer to the primer, you need to wait for it to partially dry and apply the next one. The first and second layers must adhere to each other and provide high protective properties.
To increase the adhesion force between layers, you can use plaster mesh, special tapes for connecting corner and protruding wall elements.
Procedure for working with roll coverings
When installing adhesive waterproofing of external facades, the protected surface is also primed with special solutions suitable for the specific roll product. The first layer of protective roll material is placed on the mastic layer by fusing or gluing.
Next, it is rolled with rollers for better contact and to get rid of air bubbles. The rolls are glued to each other with an overlap of 10-15 cm. The second rolling of the rolls is carried out in a direction perpendicular to the first.
Penetrating mixtures, advantages, applications
Roll or coating waterproofing of walls does not penetrate into the depths of the concrete structure and prevents remaining water vapor from escaping from the pores of the material.
Deep penetration insulating compounds are also available on the market. The ingredients included in their composition are absorbed into the depth of the concrete mass up to 40 cm. When interacting with the material, all microscopic cavities and cracks in the walls are filled, ensuring the durability of the protective film, comparable to the lifespan of concrete.
The main advantages of penetrating compounds are:
- application in underground and above-ground structures;
- application to wet materials;
- 100% waterproofing impermeability;
- a huge range of surface temperatures from - 30 to + 75 degrees;
- resistance of the protective layer to mechanical damage.
To spread the injection mixture, use the traditional manual method using paint brushes. More even and dense layers of waterproofing are ensured by mechanized spraying using nozzles.
How to choose a living room color
The color scheme of this room should be made in shades that promote relaxation, both emotional and physical. Psychologists recommend several primary colors:
- Mint.
- Wheat.
- Light blue.
- Lilac.
- Green.
Despite the popularity of painting walls, many people prefer to wallpaper their walls the old fashioned way.
However, among the variety of this material, it is easy to get confused and not everyone knows how to choose wallpaper for the living room. To make the right choice, several criteria must be taken into account:
- Properties of this or that type of wallpaper.
- Naturalness of the material.
- Price.
- Color (plain or printed).
In recent years, cork or bamboo wallpapers have become especially popular, as they have excellent sound and heat insulation properties and also look great in the interior.
Why is waterproofing needed?
So that the house lasts as long as possible. Dry walls are strong walls. Water makes even the most resistant materials brittle and pliable. A house without waterproofing lacks proper strength and will very soon become uninhabitable.
To make it warmer. Damp walls become cold in winter. The accumulated moisture freezes. The house becomes not a shelter from the cold, but, on the contrary, a kind of icy “ilgu”. The owners undertake to insulate the walls and additionally heat the room, spending a lot of money on it. Or you could simply protect the walls from water.
So that there are no pests. The main one is fungus. It not only destroys walls, but also harms the health of residents
Dampness in the house, together with flowers, is the cause of constant poor health, chronic runny nose and more serious problems. Black spots on the walls are not only unsightly, but also dangerous.
As you can see, waterproofing is not just about “making the house better and stronger.” This is an important stage of work, an irresponsible attitude to which is fraught with serious consequences. By correctly installing waterproofing, the owner will automatically get rid of many headaches. We'll tell you how to do this later.
Professional advice on choosing
We have prepared several useful videos for you. They contain advice from professional builders on the use of various waterproofing technologies. After getting acquainted with this material, you will better imagine the stages of work, and also get acquainted with some tricks that make it easier to apply waterproofing to walls:
Applying waterproofing indoors is an important component of finishing work. If you neglect this operation or violate technology in order to save money and time, the consequences can be extremely unpleasant. Carry out all stages of the work carefully and without unnecessary haste, and you will forget about problems with damp walls. Glad this result is worth the effort, isn’t it?
What is needed to carry out waterproofing work?
When carrying out waterproofing, it is necessary to decide on the method to be used and the materials. In each case, it will be necessary to carry out preparatory work before applying a layer of waterproofing material to the brick walls, be it mastic or liquid rubber. Before you begin, prepare the following materials and tools:
Tools used for waterproofing: a – knife for cutting rolled material, b – brushes for cleaning rolls, c, d – brush and comb for leveling mastic, e – steel comb, f – mastic tank, g – ladle, h, and – a spatula with a long and short handle.
- a protective suit, mask and gloves for the person who will do the waterproofing;
- mixture for preliminary priming of walls;
- a special tool for cleaning the external walls of a building from dust and dirt, for example, a stiff brush;
- mastic, polymer-bitumen composition or any other waterproofing material that will be used;
- tools for applying primer and waterproofing mixtures: rollers of different diameters, brushes, possibly a sprayer;
- antifungal agent for pre-treatment of walls.
So, now it is necessary to say a few words about the very stages of waterproofing walls with your own hands.
https://youtube.com/watch?v=He_BIZx1ihc
The work takes place in the following sequence:
- Cleaning the walls from dirt and dust using fluffy brushes, removing the top layer of rust, if present. This stage is relevant when carrying out both internal and external waterproofing.
- Next, waterproofing a brick wall involves impregnation with a special antifungal compound that can kill fungus and prevent mold from appearing in the future. The antifungal composition is applied to both external and internal insulation of the room, especially when it comes to the bathroom.
- Now you can apply a waterproofing solution, which not only prevents moisture from penetrating into the walls and building, but also enhances the frost resistance of reinforced concrete structures. Waterproofing also increases the resistance of the structure to external aggressive environments.
- Be sure to use waterproofing material on the seams of a brick and panel house, this will help enhance the waterproofing effect.
- At the end of the work, it is necessary to seal the seams with special solutions using suture materials, which will not only provide a more aesthetic appearance of the wall, but will also prevent the occurrence of possible cracks.
That is why waterproofing the foundation, as well as each wall of the house, must be carried out at the construction stage, when the structure has not yet been saturated with moisture from the environment. The sooner the house is treated with special compounds, the longer its service life will be. The same applies to interior wall treatment; it will protect living spaces from mold and mildew.
Pasting works
Pasted waterproofing of the external walls of the foundation of a house is carried out using rolled materials. On the glued side of the roll there is a built-up layer, which during the work is heated and melted using a gas burner and connected to the protected plane of the wall.
There are also rolled waterproofing products that are glued to the edges of structures using special adhesives, without the use of gas burners.
Types of materials for rolled waterproofing:
- Uniflex;
- Stekloizol;
- Technoelast.
Waterproofing walls in an apartment
If you notice that moisture is appearing on the walls of your apartment, you shouldn’t blame it all on the poor waterproofing. In fact, a similar phenomenon can occur, for example, in corner rooms or rooms adjacent to the landing.
The cause of humidification is the condensation of warm air vapor inside the apartment on a cold section of the stove. In order for the walls to stop “crying”, you will have to restore or improve the insulation of your home.
Before you start insulating the walls, you need to find out whether leakage occurs at the joints (seams) of the slabs or whether the entire wall gets wet due to the presence of microcracks. In the first case, the joints should be treated, and in the second, the entire walls.
Walls covered with microcracks should be treated with one of the penetrating waterproofing compounds, which will increase the performance characteristics of concrete. It is also possible to carry out internal coating waterproofing of the wall with a composition based on cement, polymer-cement or polymer.
Among the materials that allow for external work, we recommend the organosilicon water repellent "Aquastop-K", which is used to increase the moisture resistance of brick, slate, concrete and aerated concrete, stone, gypsum and other materials that absorb moisture.
This waterproofing material not only increases the moisture resistance of the walls, but also retains at least 95% of the original vapor permeability and practically does not change their appearance, which is very important when repairing facades. Aquastop-K is usually not used for interior work.
Water-based hydrophobic liquids GSK-1 and solvent-based GSK-2 are widely used. The latter can be used even at an air temperature of -5 C.
Also suitable for waterproofing walls is the elastic polymer-cement waterproofing dry mixture “Ceresit CR166” made in Germany. It can be used for interior and exterior work on concrete, brick and other permeable materials.
This material forms a common crystal lattice with the base, eliminating the possibility of peeling, and thereby significantly increases the service life of the walls.
For plastering waterproofing of walls, the Kalmatron-Economy material is used. It is applied to the surface of concrete, brick, cinder block and other building structures. Thanks to this material, the waterproofness of the walls is restored, it also gives them strength and frost resistance. The technology for using this composition is quite simple and accessible.
How long does the coating last?
Different types of waterproofing have their own service life.
The cement mixture lasts no more than 15 years on the facade of a building with periodic watering, and indoors it will last up to 20 years. Some manufacturers claim that their mixtures are ready to be used outside buildings for 25 years.
Acrylic compositions are recommended for indoor use, where they are ready to last no more than 20 years.
Penetrating waterproofing is the most durable, as it lasts as long as a concrete base.
Polyethylene and fabric membranes are used for no more than 10-15 years, after which they need to be replaced.
Bituminous waterproofing materials are considered less durable. Depending on watering, they deteriorate within five years, but in some cases they last up to 10 years.
The use of waterproofing is necessary in all cases of presence of water and moisture. Depending on the amount of excess liquid that appears, simple and cheap materials (cement, acrylic, silicone) can be used, but with greater water content, more expensive penetrating concrete insulation should be used.
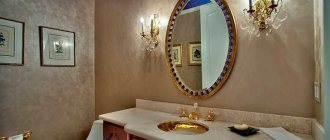
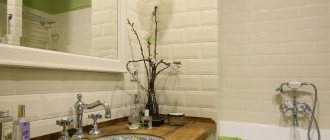
Waterproofing of bathroom and toilet
When waterproofing a bathroom and toilet, coating or pasting materials are used.
To choose the right material, you need to take into account the characteristics of the surface of the room being repaired, the timing of the repair, the degree of humidity and your financial capabilities.
Self-adhesive roll materials, unlike weld-on ones, are easier to install since they require minimal additional equipment. In addition, such materials are reliable, durable and economical.
Coating materials are universal in use because they do not require special surface preparation.
Installation of this type of waterproofing can significantly save time and does not require high qualifications and experience.
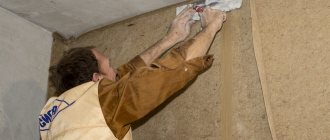
Preparatory work
Before starting work in the bathroom, it is necessary to thoroughly clean the surface of the joints, floors and walls of all kinds of debris, remove dust, treat the surface with a primer to strengthen the surface and increase its adhesive properties
It is also important to pre-moisten the concrete base to protect the waterproofing material from drying out quickly and to prevent the formation of cracks
Waterproofing joints
First of all, in the bathroom and toilet it is necessary to ensure waterproofing of the joints of horizontal and vertical surfaces, as well as the joints of pipes with the floor and ceiling.
To do this, you need to cut a fine with a cross-section of 2 x 2 cm and hermetically fill it with mastic. If there are large voids in the joints, they must first be filled with polyurethane foam, and then waterproofing must be applied, since polyurethane foam requires external protection.
As a waterproofing material, you can use a solution of penecrete, which has high adhesion (setting) to concrete and provides a tight connection at the joints between walls and floors.
For additional waterproofing of joints, you can use sealing tape.
Waterproof tape for waterproofing
First, a layer of waterproofing should be applied to the joint, and then this tape should be pressed into it, generously applying waterproofing mass to its edges.
If the tape will pass next to hot water or heating pipes, it should be noted that the material from which it is made must withstand a temperature of +70 ° C. The pipe outlets must also be covered with a layer of waterproofing compound.
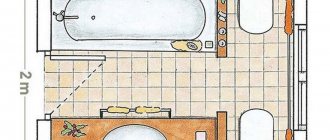
Waterproofing walls and floors in the bathroom and toilet
After waterproofing the joints, you can begin waterproofing the floor and walls.
The walls in the bathroom and toilet should be treated with waterproofing to a height of 20-30 cm, and near the bath - to the entire height from floor to ceiling.
Waterproofing scheme for bathroom and toilet
If the walls are uneven, it is recommended to use a multi-layer gasket in such areas. The first layer can be a bitumen primer, the second can be waterproofing, then quartz sand is applied in a thin layer, tile adhesive is applied on it, and finally tiles are applied. The greater the deformation of the wall, the thicker the adhesive layer should be.
After renovations in the bathroom, the floor level will be slightly higher compared to other rooms, so a smooth transition device will be required at the site of the bathroom threshold. This can be done using a descending collar.
Waterproofing the floor for installing a washing machine
The area under the washing machine must be strictly horizontal and waterproof. To do this, first waterproof the joints of the bathroom box, then apply cement mortar and screed, after which the floor is tiled.
Instead of cement mortar, you can use Dehydrol Lux mortar grade 11. This material itself levels itself “to the horizon”, simultaneously performing the functions of screed and waterproofing the floor. Floor tiles can also be glued to this solution.
Conclusions and recommendations
Living conditions in a house depend on the quality of its construction and materials. Properly protecting walls from moisture will prevent water leakage and make your home dry and warm.
When buying your own home, you need to check the presence of horizontal and vertical waterproofing of the foundation, plinth, and other structures. Repair work must be carried out taking into account the restoration of the tightness of the insulating coatings.
Did you find this article helpful? Please share it on social networks: Don't forget to bookmark the Nedvio website. We talk about construction, renovation, and country real estate in an interesting, useful and understandable way.
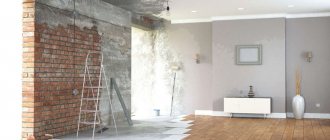
If the house has already been built
It is not recommended to carry out insulation work on the outside of an already built house yourself, because this procedure requires a professional approach and the use of special equipment. Therefore, if it is impossible to waterproof from the outside, then all work can be done from the inside, however, in this case the insulation efficiency will be lower.
Comprehensive waterproofing and insulation of the basement.
Application of penetrating compounds
Some experts consider the use of penetrating waterproofing to be the most effective method for external treatment. In the process, you will have to apply a dry mixture to the wall so that it penetrates into the concrete. A chemical reaction occurs there, thanks to which small cracks and micropores are sealed. At the same time, the wall surface retains vapor-permeable properties.
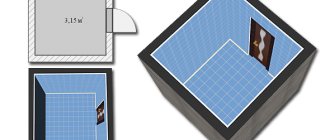
Cellar waterproofing scheme
Processing does not require any special skills or special tools:
- The plane is being cleaned.
- In a separate container, you need to dilute the chemical composition in the proportions specified by the manufacturer.
- To apply over a large area, use a roller. In the inner corners we recommend using a brush.
- The layer should be about 1 mm.
- The drying process lasts from 40 to 60 hours.
You need to know that in this way it is possible to plug microcracks at a depth of up to 30-40 cm. The period of effective protection, according to the manufacturer, is up to 50 years.
External protection from inside
This method allows moisture protection to penetrate to the outside if it is not possible to dig a pit around the constructed foundation. This injection method is labor-intensive, but quite effective and feasible to perform independently.
Injection protection on the inside
- We drill holes with a hammer drill in a convenient sequence with a certain step of 30-60 cm.
- We place a tube in the resulting cavities and pump the prepared solution through it with a pump until it comes out of the adjacent holes.
- We repeat the process around the entire perimeter.
On the outside, the composition will gradually harden and form a reliable insulator against moisture. Acrylic gels or polymer resins are used as a solution. Microcement is also used.
How to make a hydraulic seal?
Titovite Member of FORUMHOUSE
Given: reinforced concrete M350 basement wall 30 cm thick. Apart from the basement with the ceiling, nothing was built. Waterproofing done. In the fall, at a level of -1.70 from the planning ground level, a leak occurred along a threaded rod (they remained in the concrete and served as a tie for sheets of plywood formwork). Most likely, rainwater is flowing under the waterproofing from above. When there is a house, this problem should disappear. I'm thinking about how to fix the leak now.
Thoughts like this:
- Hollow out the concrete in a circle around the stud to a depth of 10 cm.
- Cut off the stud by welding.
- Dust off and prime the resulting “crater”.
- Apply a hydraulic seal.
But the question is what to make it from. I think from a mixture of Portland cement, tile adhesive and liquid glass to the desired thickness. But maybe there are other proven recipes that are more effective?
Answer from a GLIMS expert.
— Your thoughts on the work execution system are correct, but may be temporary. Let's go in order:
- Hollowing out concrete to a depth of 10 cm is overkill; 3 cm (30 mm) is enough.
- Cut off the pin.
- Dust off and prime - in your case, priming is not only not necessary, but is more harmful than useful. Since you have M350 concrete, it is a high-strength concrete with a low degree of absorption. If you also prime it, you will further reduce absorbency. It is enough to saturate the concrete base with water and it will be better than priming.
- You don’t need to invent a hydraulic seal yourself - we did it many years ago. Our cement water seal is perfect for you - just for eliminating direct water leaks and sealing holes. You can even work underwater!
Question about waterproofing (waterproofing) that is done on the foundation - if water flows along the stud, it means that the external waterproofing has already been damaged. Having sealed one stud and blocking the ability of water to pass through, without solving the problem, the water will look for another place to exit and perhaps it will be a neighboring stud.
To check the quality of waterproofing on the foundation, block the access to rainwater from above. For example, cover your foundation with a durable film around the perimeter so that water cannot only flow in from above. In this way, we will understand where the water comes from - rain or groundwater.
Basement protection
If you are building a house with your own hands, then this problem must be taken care of at the construction stage, although the basement from the inside can be made at any time.
All work can be carried out using various means, which can be divided into several types:
- Anti-pressure type of insulation. It will protect against the effects of groundwater; for this purpose it is treated with polymer-bitumen mastics.
- The non-pressure type will protect against the influence of melt water and various precipitation. The same material can be used.
- Anti-capillary insulation protects against moisture that can penetrate through the smallest pores in the floor. In this case, solutions, mastics and impregnating mixtures are used.
When choosing a material for work, it is necessary to take into account all its qualities and features of the floors.
In order for all waterproofing work to be carried out efficiently, it is necessary to follow some recommendations:
- Before applying protective coatings, the surface must be cleaned of dust and dirt.
- If there are large irregularities, it is advisable to level them.
- After all the preparatory measures, you need to dry the walls thoroughly.
- Apply primer mixture.
- The next layer should be a waterproofing material.
The instructions are not at all complicated, but all of its points are very important.
As materials for work you can take:
Liquid wall insulation
- Binding compounds.
- Dry mixes.
- Roll materials.
- Liquid solutions.
- Metal sheets.
Choosing the right material is quite important; the quality of the work performed, and, therefore, the service life of this room will depend on it.
The most suitable for work in the basement are:
- Cement based mastics. They are preferable when groundwater is close.
- Painting materials.
- Penetrating materials. To eliminate cracks that have appeared.
- Roll materials combined with insulation give excellent results.
Waterproofing the inside of the basement with a solution of sand and cement is considered the most successful option. Modified additives are also added to the mixture, which increase waterproof properties. These can be: polymers, liquid glass.
Cleaning and leveling surfaces
To ensure good adhesion of the waterproofing to the base, the surfaces are thoroughly cleaned, removing dirt, dust and greasy stains. In this case, a sandblasting machine or metal brushes are used. If there are cavities, cavities, potholes, deep cracks and other defects, they are cleaned and sealed.
When preparing plaster waterproofing for insulation of brick walls and concrete surfaces, notches are made with hand or mechanized tools for the same purpose.
To increase the service life and guarantee the quality of waterproofing of all types (excluding plaster insulation with cement-sand mortar), the surfaces are dried before applying it. This operation is performed using electric blowers, air heaters, lamps and infrared radiation units.
A primer must be applied if bitumen and paint compounds are to be applied to the insulated surfaces. It is performed with a solution of bitumen in gasoline in a ratio of 1:3. If possible, it is better to warm up this composition and the surface: the primer will then better fill the pores of the material.
Sometimes heating the base is replaced by applying two layers of primer:
- A cold solution of bitumen in kerosene or diesel fuel.
- A solution of bitumen in gasoline.
Primer for external and internal walls
The primer is applied to the insulated surface using a spray gun, spray gun or brush.
If the water pressure exceeds 1 m of the water column, then external waterproofing is used (on the water pressure side). If the pressure is less, you can install insulation from both the outside and the inside.
What it is?
To protect the structure from the destructive effects of moisture, it is necessary to take care of effective waterproofing of the walls, since water, penetrating into the material, destroys its structure. It does not matter what the structure is made of - concrete, brick or wood - they all need waterproofing.
Probably, many have experienced the appearance of an unpleasant smell of mold and dampness in a house or apartment; this unpleasant phenomenon especially often occurs in basements and basement floors. This is explained by the fact that moisture penetrates into the room in several ways:
- from groundwater;
- during spring snowmelt and flood;
- from rain and other precipitation.
Let's look at why waterproofing is needed.
- So that the building stands for as long as possible. Everyone knows that strong walls are dry walls. When exposed to moisture, even the most resistant materials become brittle and begin to crumble and crack. A house without waterproofing quickly loses its strength of retaining elements and gradually becomes unsuitable for comfortable and safe living.
- To keep it warmer in winter. The connection here is the most direct - damp walls freeze first, since the accumulated moisture freezes quite quickly. Thus, the home does not become protection from the cold, but exactly the opposite, a kind of “ice igloo.” Home owners rush to insulate the walls and spend additional money on heating, but, as a rule, this does not have the desired effect.
- To protect your home from pests. As you know, dampness is the best environment for the growth of fungus and mold, the appearance of which leads to serious allergic and bronchopulmonary diseases in adults and children.
Waterproofing is also needed to treat the main elements of the building.
- External walls of the frame frame - due to the constant influence of natural factors, the walls are gradually destroyed, an environment favorable for the proliferation of pathogenic microorganisms is formed, and in addition, moisture begins to descend down the walls and destroy the foundation and supports of the building.
- Basements - basement walls are the most susceptible to destruction, since they experience enormous load: the weight of the building, the proximity of groundwater and constant exposure to wet soil. All this makes it especially necessary to protect basements and plinths.
Insulation outside and inside
Home protection from water is better integrated . Waterproofing of walls should be carried out on the external areas of the structure and its internal surfaces. In the absence of an external waterproofing layer, mold and dampness are guaranteed in the housing. In order for the protection to be complete, the base should be treated with connections both outside and inside: on the ground floor with ground contacts on both sides.
The difficulty of implementing external waterproofing lies in the fact that this work must be carried out during the construction of the building. If it is already built, waterproofing the walls requires excavating the foundation.
If the building is surrounded by earth, it will need to be dismantled by digging trenches along the basement and waterproofing, then burying the trenches again. Therefore, waterproofing the external walls of an already constructed building will be expensive. Then it is better to insulate from the inside.
In the modern market of construction materials, there are many different means for introducing waterproofing.
The following popular types can be listed:
- bitumen mastic;
- impregnated sheet or roll material;
- cement-polymer mixtures;
- rubber-based hydrobarrier.
Do not use polyethylene-based film materials. Such materials used for waterproofing do not have sufficient vapor permeability, unlike those listed.
How to choose the right living room
Before you start purchasing the contents of the room (furniture), it is important to carefully plan the entire interior in the smallest detail. This process takes a lot of time and effort, especially for non-professionals, so to get rid of the hassle, it is better to contact a design company.
The first stage of planning will be to determine the functionality of the room. To do this, you need to draw on paper a detailed plan of the room, taking into account all window and door openings, niches, bay windows and similar elements. Then determine the purpose of the living room: will it be just a relaxation area, a study or a room for holding parties.
The filling of the room directly depends on this point, for example, for an office you will need a computer desk or a multifunctional bureau, a comfortable chair and several shelves for books and documents. Zoning of space is also quite popular in the design of the living room.
Most often, this technique is carried out by contrasting painting the walls in colors that are radically different from each other, or by light separation. It is worth noting that this technique is often used in the design of small spaces.
How to waterproof interpanel seams
If, for example, wet spots, dampness or mold form on the walls of an apartment in a panel house, this means that the waterproofing installed during the construction of the house was done poorly and now requires repair.
Waterproofing of interpanel seams should be done both inside and outside the room.
Perform it according to the following instructions:
- First of all, the old waterproofing material is removed from the problematic seam, the seam is completely cleaned of plaster, paint, old mastic, etc. This is usually done by punching or knocking out the previous sealing materials mechanically.
- Next, a special primer solution is carefully applied to the entire internal surface of the joint for subsequent application of waterproofing. The primer will significantly increase the adhesion of the material to the panels and will prevent surfaces that are prone to crumbling.
- Once the primed surface has dried, the joints of the panels are waterproofed by introducing a polyethylene foam pad into them. Ordinary polyurethane foam can also be used.
- After this, mastic or a special sealant is applied over the installed gasket. The sealing solution is applied in such a way that the surface of the seam is slightly concave inward. Under no circumstances should the interpanel seam be allowed to protrude into a hump.
Internal waterproofing of interblock joints
The mouth of the joint is filled with a spatula or a construction gun. When waterproofing an interpanel seam on the outside of a structure, a protective film will need to be glued on top of the applied sealant.
Sources of moisture
Condensation forms on the internal surfaces of the walls in the room. This occurs due to increased air humidity. In bathrooms, kitchens, basements, non-residential buildings (garage, shed, workshop), especially if they do not have a heating system, air humidity is constantly increased, so protecting the walls from the inside is mandatory.
Another reason for the appearance of condensation is insufficient quality insulation of the house.
External surfaces come into contact with precipitation and groundwater.
Waterproofing basements from the inside using injection materials using the Penetron system
Waterproofing of basements from the inside with injection materials is carried out in the presence of active water leaks, or in the event of detection of voids inside the concrete, defective areas that appeared as a result of operation or were allowed during construction. The use of injection materials requires the necessary special knowledge and the use of expensive equipment. When using injection materials of the Penetron system, you must contact specialists to receive professional recommendations.
Waterproofing of the walls and floor of the basement is carried out using injection materials of the Penetron system.
Advantages of using the Penetron system for internal waterproofing of basements:
- The Penetron system is an effective means of waterproofing against groundwater in basements and underground spaces.
- The Penetron line of waterproofing materials occupies a leading position on the market in terms of cost and quality of waterproofing with specific indicators per 1 square meter.
- The Penetron system for internal basement waterproofing is the easiest to use materials that will reliably protect the structure from water for the entire service life of the concrete. Using the Penetron system, it is possible to waterproof basements and walls made of both monolithic concrete and FBS blocks with a minimum grade of M150. The brick surface must first be plastered with a sand-cement composition and treated with Penetron. In this case, the plaster layer will act as a protective waterproofing layer that protects the brickwork.
The Penetron line of materials allows you to waterproof:
- "Penetron" waterproofs the concrete body (its structure);
- "Penekrit" waterproofs joints, abutments and communications entries;
- “Waterplug” and “Peneplug” will help stop active pressure water leaks.
At the concreting stage, the Penetron Admix waterproofing additive is used, and the Penebar waterproofing gasket is laid in the working joints of the concreting interruption (cold joints). In some cases, we perform waterproofing from the inside using Penetron injection materials.
These materials are used to identify defective, void areas in the body of concrete, which is usually observed when quality standards are not observed during concrete or monolithic work.
Waterproofing from the inside from groundwater is carried out as follows:
- Holes are drilled in the concrete body at a distance of 10-15 centimeters (the step is half the thickness of the structure) from each other in a checkerboard pattern;
- Special packers (Injectors) are inserted into the holes;
- The hopper of a special pump is filled with injection materials;
- The hose from the pump is connected in series to one of the packers;
- Materials are pumped under high pressure, both behind the structure and directly into it (depending on the chosen technology).
Despite the fact that this type of basement waterproofing from the inside is one of the most effective and is superior in its characteristics to penetrating waterproofing, because... existing voids in structures are completely filled with injection materials, and a waterproof membrane is created between the basement wall and the ground, which completely does not allow water to pass through. Injection materials, despite their super-efficiency, have a number of disadvantages:
Firstly, they require special equipment and skills to work with it. Not many companies can spend hundreds of thousands of rubles on injection pumps and hire highly qualified workers.
Secondly, the high cost of work and materials, the specifics of injection, due to which it is impossible to calculate the cost of waterproofing in advance. The price of work per square meter can fluctuate 5-10 times.
Rolled waterproofing
Rolled materials perfectly repel water and are often used during repair work. These include roofing felt. But you can accomplish the task assigned to you with the help of modern membranes. This is the most affordable method, characterized by ease and simplicity of operation. To install rolled waterproofing you will need to follow these steps.
- Spread the roll on a horizontal surface in several layers. Don't forget to overlap at the joints.
- The rolled material should extend onto the walls 15 cm from the floor.
- Carefully fold the material into the corners.
- For effective protection, the joints are coated with mastic.
Roll waterproofing is the most affordable in terms of price