In the bathroom, the level of humidity is constantly increased. We have to accept this as a given and abandon useless attempts to fight “the elements.” The only thing that can and should be done is to neutralize as much as possible the negative effects of moisture on building structures and materials.
To achieve this, the bathroom is waterproofed, the use of which is mandatory for all bathrooms. We will tell you how water protection is performed and list what materials are used to form a reliable barrier against water. To help independent home craftsmen, the article provides detailed instructions.
Where to start waterproofing a bathroom under tiles
The first thing you need to do when waterproofing a bathroom is to choose a waterproofing material. According to current construction legislation (Screed for waterproofing: clearance when checked with a 2-meter rail SNiP 3.04.01-87, clause 4.24, SP 29.13330.2011 clause 8.13) in bathrooms and shower rooms (sanitary units) it is mandatory to use waterproofing materials, in Otherwise, if there is a leak due to your fault, in addition to a huge fine for the violation, compensation for damage to neighbors for repairs is imposed.
Insulation laying technology
You can do waterproofing in the bathroom yourself. First of all, you need to decide on the method of applying the insulating material. As practice shows, the best option is the integrated use of pasting and coating materials. The result is double protection against water. Let's consider this method in more detail.
Preparing the base
The quality of waterproofing application depends on the preparation of the base. If the room is not new, you should first of all get rid of the old coatings. We remove everything, including the old screed. She is most often not in the best condition. We remove all broken fragments, oil paint residues, grease stains and dust.
Using coarse sandpaper or a spatula, we clean the lower edge of the walls from remnants of plaster or oil paint to the height of the future waterproofing. Then thoroughly clean the base from dust. Now let's examine it carefully. If we have a relatively flat surface with height differences of a maximum of 2 mm, we can proceed to priming; if not, we proceed to leveling.
If necessary, we lay a leveling screed made of gypsum-sand, cement-sand or gypsum mortar. We mount it to pre-exposed beacons in strips 2 or 3 m wide. If you can do without a screed, carefully seal all the sinks and cracks in the base.
To do this, we first embroider them and then fill them with a special repair compound. Such as Isotope. We treat the areas where the floor meets the walls and corners in a special way. We lay a groove about 1 cm deep in these places, which we fill with repair mortar or bentonite cord.
Construction of a waterproof barrier
The base, thoroughly dried after preparatory work, should be primed. This will improve the adhesion of the insulated surface to the waterproofing. The primer is applied to the surface in strict accordance with the manufacturer's instructions. For priming, you can choose any deep penetration composition.
However, you can find special solutions on sale that form partial penetrating waterproofing, which significantly improves the quality of insulation work. Apply the primer in two steps, thoroughly rubbing it into the base.
The areas where the floor and walls meet are treated especially carefully. They are coated with bitumen mastic, on which a reinforcing PVC mesh is laid. Coating waterproofing is applied on top in one or two layers.
We direct the second layer perpendicular to the first so that there are no fragments missed due to carelessness. Areas where floors are crossed by risers and other utilities are filled with liquid waterproofing.
We coat the pre-cleaned sections of the walls and the adjacent floor fragments with bitumen mastic. We lay PVC mesh tape on the wet solution, thereby reinforcing the junction of the floor and walls. Apply mastic or paste such as Hyperdesmo, Ceresit, Penetron on top. If the manufacturer recommends applying several layers, we act accordingly.
We are waiting for the material to harden. At this time, the drying mastic or paste should be protected from debris and dust, otherwise the quality of the coating will deteriorate. After the coating has completely dried, you can continue working. As a pasting material for waterproofing a bathroom floor, it is better to choose a self-adhesive coating, which is much easier to work with.
This can be Aquaizol, Isoplast, Ecoflex or their analogue. We cut the material according to the size of the room, taking into account the obligatory approach to the walls. We retreat from the top edge of the cut piece a distance equal to the size of the side of our safety pallet, and lay the material on the floor. We remove the protective film and forcefully press the coating onto the base, helping ourselves with a roller.
We lay all subsequent strips in the same way. Do not forget that installation is carried out with an obligatory overlap on the already laid canvas. The amount of overlap is about 10 cm. This creates a continuous waterproof sheet.
Seams at the junction between the wall and the floor are unacceptable. Here, over time, moisture will certainly begin to seep in, and the waterproofing will be compromised. To bypass the pipes, holes are cut in the material. Experts recommend making them slightly smaller than communications.
The edges of the holes are placed on the pipes with the side up and fit them tightly.
The lining material must be overlapped, otherwise water will seep into the joint and the coating will not be airtight. The average overlap is 10 cm
To make the coating stretch better, you can preheat it slightly with a hair dryer. Carefully coat all joints of the panels with bitumen mastic. After it has dried, we forcefully roll the resulting solid waterproof panel with a heavy roller.
All that remains is to glue the allowances on the walls. We take a hair dryer and heat up the mastic we used to treat the wall. Place an allowance of material glued to the floor onto the heated mass. Gently melt it in the hot mass, pressing the corners with a plank, and wait for it to harden. We treat the areas around the pipes again with bitumen mastic.
The waterproofing of the floor can be considered complete.
Bathroom waterproofing problems
Poor waterproofing of the bathroom can lead to:
- destruction of building materials walls, floors, ceilings
- the formation of difficult-to-remove fungi and mold, which affect the aesthetic appearance of the room and human health
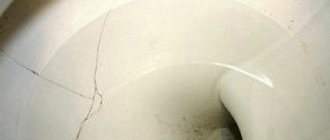
Consequences of poor bathroom waterproofing:
The appearance of mold, discoloration of tile adhesive, odor
Cracks in bathroom tile joints
Features of processing each zone
Waterproofing walls in the bathroom
Usually it is done only in certain, most dangerous areas: in corners, near the sink, pipes, bathtubs, shower stalls, and next to other plumbing equipment. Typically, polymer and cement-based coating compositions are used for this. Bitumen is not suitable because it is too fluid and flakes off quickly. Of course, if you wish, you can install water-repellent sheeting on the walls. In this case, you will have to remove all the finishing and, if possible, plumbing from them in order to stick the coating evenly.
Ceiling insulation
It is recommended to waterproof the ceiling in multi-storey buildings when there are apartments or an attic on top. An insulating coating will not save your bathroom from heavy flooding, but it will help protect the wiring and lining from small leaks. In addition, additional water protection will be needed if there is poor ventilation in the shower. A polymer or cement mixture is applied to the entire floor. The exception is the wooden ceiling in the bathroom. It is also insulated with rolled materials.
Waterproofing the bathroom floor
The floor is covered completely with the mixture - with an overlap of at least ten centimeters at the joints with the walls. If it consists of several slabs, the joints between them are sealed with water-repellent tape and also covered with mastic. Or they cut out the fiberglass fabric of the required size and lay the sections on top of each other with an overlap.
Instagram @gripset_industries
Instagram @gripset_industries
Which bathroom waterproofing for tiles should I choose?
Today (2021) there are many waterproofing coatings, but the most popular, reliable and durable are waterproofing mastics. Compared to roll and cement compositions, they are easier to install and allow you to form a continuous, seamless, non-cracking layer of protection.
Unlike cement and roll methods of waterproofing a bathroom under tiles, a layer of waterproofing mastic is highly durable and elastic.
Waterproofing walls
Of course, in this case you can use roll or sheet materials. But the walls of the bathroom are not a foundation on which groundwater presses. Here it is enough to apply one layer of coating waterproofing.
“Standard scheme” for waterproofing bathroom walls Source ettrilatspb.ru
Once again about the question “which is better”
What is good for horizontal planes is not suitable for vertical enclosing surfaces.
Bitumen mastics have good fluidity. This is a positive property for the floor - you can be sure that the pores and microcracks of the base will be filled with hydrophobic material. For walls, the fluidity of mastic is undesirable - over time, part of the mastic will begin to “slip”, and this may affect the integrity of the finishing layer. Therefore, polymer-cement compositions must be used for walls.
And this once again demonstrates that there is no clear solution when choosing which waterproofing is best for the bathroom. We can only answer that waterproofing must be comprehensive.
Surface priming
Before applying waterproofing mastic, the surface must be thoroughly primed, depending on the absorbency of the base, in 1-2 layers. An acrylic primer, for example AKTERM Acrylic primer, is evenly applied to all surfaces using a soft-pile roller.
After applying the primer you must wait, in some cases with poor ventilation, drying can take up to 3 hours.
Priming allows you to remove dust from the surface, enhance future adhesion of waterproofing mastic, and reduce the absorbency of the base, thereby reducing the consumption of waterproofing mastic.
The primer is also useful for fastening the base due to the presence of shallow cracks in it.
Floor preparation technology before waterproofing
- Plywood sheets are attached to the wood floor, having previously been cut into the required number of pieces.
- The rows are mounted “staggered”, moving the transverse seams.
- The sheets should be positioned in such a way that there are gaps of 3 to 5 mm between them. Also, the damper gap between the walls should remain about 10 mm. A pre-purchased elastic tape is placed in it, and construction sealant is applied between the plywood boards.
- The areas where the floor and walls are connected are sealed with waterproof tape.
- The next step is to apply a layer of mastic at least 2 times. The waterproofing mastic should extend onto the walls at a height of 10-20 cm.
When using coating-type plaster waterproofing, it is allowed to immediately place tiles or other finishing material on it. It is necessary to lay a little screed on top of the bitumen composition.
Waterproofing is considered necessary specifically in the bathroom, since there is a high risk of leaks. With a waterproof layer, apartment owners can rest easy.
Application of waterproofing mastic and waterproofing tape under the tiles
Before starting work, the waterproofing mastic must be thoroughly mixed. Application is best to start from the corners of the floor, then along the perimeter - apply in two layers. The composition is applied to the wall at the base in the corner - in a thin layer using a brush, crosswise. The size of the applied lines must exceed the width of the waterproofing tape by at least one centimeter on both sides.
We glue the waterproofing tape over the mastic of the first layer - cutting it and leaving it overlapping at the corners - around the perimeter. We clean off the excess mastic remaining after gluing the tape so that there are no problems when applying the tiles in the future.
It is allowed to apply a thin layer of mastic over the tape with a width of at least 1 centimeter from both sides of the tape
We also apply waterproofing mastic over the floor area using a brush or roller in two, if necessary three layers. Wait 2 hours until the first layer dries
It is permissible to apply a layer of waterproofing tape on the corners of the walls (not just the floor) to avoid the formation of cracks in the tile adhesive over time. Waterproofing mastic is applied to the walls from bottom to top.
Apply waterproofing coating to the remaining floor area.
Waterproofing mastic can be applied to walls under tiles. It must be applied at a distance from the floor to the height of the tile level (i.e., along the height of the wet area). Drying time is at least 2 hours before the first layer, apply in 2 layers.
Important 1. The total thickness of the layers previously applied on the wall at the base should be no more than 1 mm, which will avoid problems with installing wall tiles
Important 2. To speed up application work, you can use a larger roller.
Important 3. Waterproofing mastic can be applied under a layer of tile adhesive, after first waiting for it to dry completely (24 hours).
Brief overview of the main types of materials
In construction stores, the range of insulating materials is very, very wide. They can all be divided into several main types, and let’s take a closer look at each of them.
Roll type insulation
This is a large group of rolled insulation, which includes materials with a wide variety of properties. Initially, the basis for them was cardboard, onto which several layers of bitumen-containing compounds were applied.
They ensured the waterproofness of the material. Such coatings include roofing felt, glassine and the like. Their main disadvantage is their relatively short service life.
The basis for adhesive insulation is various fiberglass fabrics. Thanks to this, the material gains durability and strength.
Later, fiberglass or fiberglass was chosen as the basis for insulation. This significantly increased the service life, but slightly complicated the installation of materials. Because such coatings may crack during installation.
Roll insulation can be installed in different ways:
- Fastening. This option is used less frequently than others. Its essence lies in the fact that the panel is fixed on an insulated base with self-tapping screws with plastic telescopic devices in the form of mushrooms with wide caps. To install, the base is first drilled, which is very labor-intensive and not reliable enough.
- By fusing. In this case, special equipment is used: construction hair dryers or gas burners. With their help, workers melt the bottom layer of coating, and then lay it in the right place. A labor-intensive and rather dangerous method that is not recommended for use indoors.
- By gluing. The material is glued to a pre-prepared base. The glue can be applied to the base or, which is much more convenient, already on the insulating coating. Most manufacturers produce so-called self-adhesive insulation, for installation it is enough to remove the protective film from the back adhesive side.
Of all the methods described, gluing is considered the simplest. It is possible that fusing provides the highest quality laid insulation, but only specialists can perform such installation correctly.
When heated, the panel becomes very elastic and breaks easily. It is also important to prevent the coating from overheating, otherwise it will melt and become unsuitable for use. In addition, volatile compounds released by bitumen are very toxic. Working with it indoors is dangerous.
Laying material by fusing is complex and quite dangerous. Bitumen vapors are toxic; it is undesirable to work with it indoors
There are quite a few advantages of adhesive insulation. After installation, it forms a plastic sheet that allows the base to “breathe.”
For this reason, such materials are widely used to insulate wooden floors and protect bathrooms in a wooden house. The elastic material calmly tolerates all movements of natural wood and at the same time maintains its integrity. In addition, the insulating layer of rolled materials is held very well on the base.
Another significant plus is quick readiness for subsequent work. The adhesive insulation does not need time to dry; almost immediately after its installation, you can begin the following technological operations. The cost of such materials, which is also important, is very low.
The main disadvantage is the difficulty of installation. Even self-adhesive material is quite difficult to install correctly, given that the base will need to be carefully prepared before installation.
Coating insulating materials
Coating compositions can be considered the very first means used as protection against water. Initially, these were vegetable and animal oils and fats, which were used to coat the surfaces to be protected.
Over time, their composition has changed radically, but the principle of application has remained the same. Modern coating materials come in a variety of forms. These are mastics, various pastes or dry mixtures.
Applying coating waterproofing is very simple. An important nuance: the next layer can be laid only after the first one has completely dried
Before application, the latter must be diluted in a polymer emulsion compatible with it or in clean water. The manufacturer will definitely attach to its products instructions for preparing the working mixture, from which it is not recommended to deviate.
The composition of dry mixtures is varied, and accordingly, the properties of the insulating material also vary. For pastes and mastics, no preparation for application is required. The compositions are sold in hermetically sealed containers. However, unlike dry mixtures, their shelf life is quite limited.
You should know this and not purchase material for future use. The main characteristic of coating waterproofing is its consistency. The hiding power of the material depends on this, which affects the number of layers applied, the properties and scope of application of the coating.
Liquid solutions are applied in a layer about a millimeter thick. It is clear that at least three or four such layers will be required to obtain high-quality insulation. Important note.
When applying liquid, each subsequent layer is applied in a direction perpendicular to the previous one. This is the only way to ensure that there are no possible gaps on the surface. To apply the liquid solution, take a brush, preferably a wide one, or a brush.
Pastes or mastics are denser. It is impossible to lay them with a brush; for such coatings a notched trowel is used. The height of the insulating layer applied in this way is usually about 3 mm.
This makes it possible to reduce the number of layers; two, maximum three, will be enough. When laying mastic or paste, it is quite acceptable and even desirable to reinforce the surface with a special mesh.
Thick mastics and dense dry mixtures are very convenient to apply to the base with a spatula. It is better to choose a tool with a serrated edge
The panel is laid between two layers of coating. A significant disadvantage of coating pastes and mastics is the rather long hardening time of the coating.
Considering that each subsequent layer of material can be laid only after the previous one has hardened, the process of applying waterproofing is significantly delayed. In rare cases, the manufacturer allows the third insulating layer to be applied to the wet second one. This point needs to be clarified in the instructions.
Protective impregnating compounds
Impregnations are one of the latest achievements in the field of insulating materials. The compositions have a completely different principle of action from others. They do not cover the base with a protective layer, but react with it. The compositions penetrate into the porous base to a depth of 120 mm, after which they harden, forming needle-shaped crystals.
The base of each such crystal is turned in the direction of the expected water flow. Thus, each of the surface pores is, as it were, sealed with a solution. In this case, the base acquires a new monolithic structure that does not peel off, crumble or crack.
Impregnations are very easy to apply. They are applied to the base with a regular brush. The composition has a liquid consistency and is applied in a thin layer, so it does not affect the height of the room at all.
Penetrating waterproofing literally seals the pores of the substrate. As a result, moisture cannot get inside the material and destroy it
The manufacturer produces impregnations, which may contain not only active substances, but also cement mixtures or sand. In any case, they should be applied exclusively to a damp base. This is the main condition for the impregnation to penetrate deep into the coating.
The main disadvantage of impregnating materials is their limited scope of application. They “work” perfectly on concrete bases, gypsum and lime plaster, FSB with low water resistance. However, they are completely powerless on brick and cement plasters.
An absolute contraindication for the use of impregnating mixtures is base crack resistance group 3 and above. Before purchasing, it is important to clarify the possibility of using the composition you like on the existing foundation. Another disadvantage is the high cost of such insulating materials.
How to choose reliable bathroom waterproofing
There are many analogues on the market, but most of them have problems with the harshness of the final coating, which leads to fragility due to the fact that they contain a lot of cheap filler and when the house shrinks or vibrational temperature fluctuations, the waterproofing cracks and deforms, which leads to the appearance cracks and damage to the waterproofing layer.
At the construction stage, it is imperative to choose a waterproofing that will be elastic - we recommend using AKTERM HydroDef for this - liquid rubber for waterproofing
AKTERM waterproofing meets all the requirements of SNIP, GOST, is elastic for elongation, rupture and compression, and is a wear-resistant and durable solution.
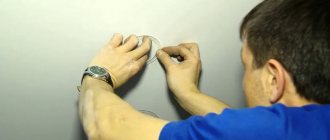
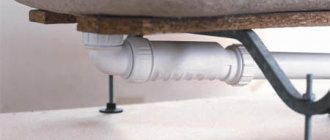
Drain installation
An important step for future waterproofing of a shower stall is the installation of a drainage drain. The drainage structure is mounted on a concrete base. Then the drainage pipe is connected to the sewer system and the entire structure is filled with a solution that fills the voids. The surface of the ladder is placed below the finished floor level. As a result, the structure drains water correctly.
After installing the drain, seal the seams using an elastic profile. The seam between it and the floor is coated with waterproof glue (sealing cloth). If the drain is located in the center of the shower stall, then a slope of 3 degrees is made to it on all four sides. When installing the ladder in a corner, it should be 2 degrees.
Areas of special attention
The shower room is completely exposed to regular moisture. However, there are areas that take on the greatest load, the so-called high-risk areas. This is, as a rule, the lower part of the walls, the location of the washbasin, the floor, the shower (without a tray or with it). As well as the places where communications enter and the pipes themselves, if we are talking about metal elements susceptible to corrosion. These vulnerable areas and elements of the shower require special attention when installing waterproofing.
Price
- Mapegum WPS, 5 kg - 2240 rub.
- Ceresit CR 65, 25 kg - 1040 rub.
- Toiler TR 500, 3 kg - 420 rub.
- MasterGood, 14 kg - 2600 rub.
- Osmoseal, 25 kg - 3800 rub.
- Nanodefens, 15 kg - 1900 rub.
- Hidroflex, 5 kg - 5300 rub.
- “Ivsil Vodostop”, 20 kg - 504 rub.
- “Glims Waterstop”, 20 kg - 1150 rub.
Waterproofing is the most important stage of finishing work in the bathroom. A waterproof barrier will protect building structures from exposure to moisture and the development of mold when tile seams are depressurized and will prevent water from entering the underlying rooms during flooding. After familiarizing yourself with the recommendations outlined, choosing and laying the material will not be difficult.
The best option for protecting floors from water
Numerous methods of installing floor waterproofing have a single goal - creating a continuous coating, shaped like a pallet with 10-20cm sides on the walls. A kind of container made using this method will collect condensation flowing down the walls in streams, spilled and splashed water. A monolithic layer of waterproofing will not allow moisture to enter the ceiling and will prevent destruction of the base. At the same time, it will get rid of rot, the spread of fungi, and the harmful aromas emitted by these unpleasant representatives of the biosphere.
There is one goal, but there are really many ways to achieve it. In fact, choosing the best option without knowing the specific technical conditions is not realistic. The choice of the most suitable waterproofing, the type of which determines the technology of its construction, depends on:
- on the condition of the rough surface being processed;
- from the materials from which the floors are made;
- from the time allotted for the complete arrangement of the floor;
- from number of storeys;
- from the ability to reduce the height of ceilings and from a number of other nuances that can only be identified while on site.
The choice can be influenced by the area of the room, the complexity of its configuration, the presence of a hair dryer or burner and the ability to use them. Such significant arguments as the cost of the material and the complexity of execution cannot be ignored.
It is highly doubtful that any technology will meet all the conditions presented, but after carefully assessing the pros and cons, the optimal method can still be selected.