One of the significant disadvantages of Khrushchev apartments is the small area of the rooms, and the bathroom is no exception. Often this room can only accommodate a bathtub and washbasin, leaving no room for other plumbing fixtures. To solve this problem, you will need to renovate the bathroom in the Khrushchev-era building.
View of a bathtub in a Khrushchev building after renovation.
The main problems of Khrushchev's construction
During the active construction of panel houses, the main goal was to quickly move people from barracks to apartments. Therefore, houses were built quickly, and the budget for the work was small. In Khrushchev's apartments there was a minimum of free space. The bathroom only contains a toilet, sink and bathtub. Today, such a layout does not meet the needs of residents, because the owners need to place a washing machine, shelves for cosmetics, a mirror, a heated towel rail and household chemicals.
The second problem is the state of engineering systems. Some of Khrushchev's buildings are already 60 years old, and the pipelines in the water supply and sewerage systems have fallen into disrepair. For modern plumbing fixtures, it is necessary to make new wiring, and for this you will have to carry out a major overhaul.
Problems in the bathroom.
The third problem is uneven walls. When installing pipes in a hidden manner, you will have to put in a lot of effort and time to level the surfaces.
The fourth problem is the inconvenient location of plumbing fixtures. To make a change, you will have to do additional wiring.
Types of utility wiring
Before designing the wiring, you should become familiar with what types of such structures exist. There are only three of them. Moreover, one, with pass-through sockets, is practically not used. Therefore, we will not consider it.
Type #1. Serial type wiring
To implement this, taps are made from the cold and hot water supply risers leading to the first consumer. Pipes are laid from it to the second and further. Each water collection point is equipped with a tee, to one of the outlets of which the consumer is connected.
Overall this is a very simple scheme. It can only be used where the number of water consumers is small.
This is due to the fact that if several water collection points are activated simultaneously, the pressure in them will weaken and may be insufficient for the correct operation of the equipment. This is the main disadvantage of series wiring.
Image gallery
Photo from
Assembling the system using tees
Simple and inexpensive type of construction
Combination of tee and collector circuits
Minimum set of fittings
However, for apartments with one bathroom and a small amount of plumbing used, this may be the best option. A significant drawback of the system is the inability to turn off one of the plumbing fixtures for replacement or repair.
Serial wiring is extremely simple to implement, but not very convenient to use. However, for small bathrooms this solution may be quite acceptable.
There are many more advantages to sequential wiring. First of all, it is simplicity in design and installation. There will be no complex schemes here, everything is done very simply.
In addition, such wiring is considered the most economical option. The consumption of pipes and other elements will be significantly lower than in other systems, and installation costs are also minimal.
Even a novice plumber can handle the design and subsequent installation of sequential, otherwise tee, wiring
Type #2. Collector type of wiring
The collector type scheme involves connecting each of the consumers to the main line. For this, a special element is used, which is called a collector - a device that distributes water flows.
In a more complex version, and this is best, each collector outlet is equipped with a shut-off valve. Collector-type wiring can be considered the most convenient option to use. There are several reasons for this.
Image gallery
Photo from
Parallel connection of devices
High consumption of pipes and fittings
Mostly hidden gasket
Collector water supply outlets
Firstly , the absence of pressure drops in the system. All consumers receive equally good water pressure, even if all water points operate simultaneously.
If the pressure in the system of an apartment or private house is too low for some reason, you can temporarily limit the water supply to one of the consumers, for example, to the toilet, thereby increasing the pressure for others.
The collector type of wiring is more convenient to use than the serial type. In this case, a separate line goes to each consumer, which guarantees no problems with pressure. However, such a system turns out to be more complex in design and installation.
Secondly , the ability to disconnect plumbing fixtures from the water supply if they need replacement or repair.
Thirdly , reliability. In fact, a single pipe goes to each consumer, without any connections or other elements. A leak can only appear in the collector area or near the device itself. Here it will be very easy to find. For this reason, pipes with manifold wiring can be safely installed using a hidden method.
Fourthly , ease of use. If there is a problem with a plumbing fixture and a leak appears, for example, at a faucet, you do not need to crawl under the sink. It is enough to close the shut-off valve on the manifold leading to the faulty device and wait for the specialists to arrive.
Even a woman or child unfamiliar with plumbing can do this. At the same time, all other equipment will work properly.
Professionals recommend using manifolds with shut-off valves for installation in water supply systems. With their help, if necessary, you can easily stop the water supply to a branch or plumbing fixture in need of repair.
However, collector wiring also has some disadvantages. First of all, it will cost the owner more than a sequential circuit. This is due to the fact that it will be necessary to lay a branch to each consumer. This will take a lot more material.
In addition, the installation of manifolds and shut-off valves will be required if the distributors are not equipped with them. And the circuit itself will be much more complicated than a sequential one.
Possible redevelopment options
Before you begin remodeling a bathroom in a Khrushchev-era building, you must obtain official permission from the relevant authorities. You need to consult with a designer to develop possible redevelopment options. There are several ready-made ideas for placing items in the bathroom.
Bath layout.
Bath or shower
Based on your preferences and the area of the room, you can put a shower or bath in the bathroom.
Reasons why you should install a shower cabin:
- The smallest bathtub is 1.5 meters long, and the shower takes up half as much space on the floor.
- On average, 50 liters of water are spent on shower procedures, while in the bathroom - 3-4 times more. This affects the size of utility bills.
- If several people live in a house, it is unhygienic to wash in the same water. In this regard, the bathtub is significantly inferior to the shower stall.
The bath has the following advantages:
- The bathtub is easier to clean. You just need to pour in the powder, pour in water and let it sit. And in the case of a shower, you will have to use various products to clean the tray and glass.
- Taking a bath can be more relaxing than taking a shower.
- If there are children in the house, it is easier to wash them in the bathroom than in the shower.
Bathroom in Khrushchev with toilet
If the apartment has a small bathroom and toilet, you can combine them. In this case, the bathroom area will expand due to the thickness of the dismantled wall and one passage into two zones.
Bathroom in the bathroom.
However, there are cases when it is better to refuse combination:
- If the family is large, you will have to wait your turn in the toilet when one of the family members is taking a bath.
- If the bathroom is adjacent to the kitchen, then the combination leads to unpleasant odors and noise from the drainage of water in the kitchen.
There are also cases when combining a bathroom and toilet is recommended:
- If the bathroom and toilet have small areas.
- If the house has a large bathroom and a small toilet. In this case, the toilet is moved to the bathroom, and the toilet is converted into a pantry or dressing room.
Place for installing a washing machine
Before choosing a location for the washing machine, you must carefully plan the placement of all other plumbing fixtures. It is recommended to purchase narrower models of washing machines, as they will be easier to place in a small bathroom.
Some owners of Khrushchev-era apartments install a sink on one side of the front door and a washing machine on the other. It can also be placed under the washbasin, only in this case the drain pipe will have to be hidden behind the lining.
Washing machine in the bathroom.
Choosing furniture for a small bathroom. Design, photo
Limited space forces designers to look for non-trivial solutions to meet the requirements of ergonomics and functionality. Even the smallest bathroom needs a certain set of furniture and fixtures. This:
- directly bathtub or shower
- wash basin
- toilet (if the bathroom is combined)
- cabinet or pencil case for storing bath textiles, detergents, etc.
- hanger
How can you fit all this into 4 m²?
Choosing finishing material
To decorate the walls of the bathroom, it is recommended to choose one of the following materials:
- Ceramic tile. This material is available in a variety of colors and with different patterns on the surface. The smallest tiles have a surface area of 225 square meters. cm, while the largest are 600 sq. cm. It is worth buying medium-sized tiles, approximately 400 square meters. cm, because tiles that are too small will make the room look cramped, and tiles that are too large will look rough.
- PVC panels. This material is inferior to ceramic tiles in terms of variety of shades, but its price is lower. PVC panels are easy to clean, are not afraid of moisture and are resistant to wear.
The ceiling of a bathroom in a Khrushchev-era building is often finished with the same materials as the walls, but for a special effect you can choose:
- Glossy films. This material visually expands the space due to its ability to reflect light.
- Drywall with aluminum frame. Allows you to organize spot lighting.
When choosing a material for finishing the ceiling, you should pay attention to moisture resistance.
Finishing the floor should begin after completing the work on laying the sewer systems. It is recommended to choose a material with a high anti-slip index.
Options:
- A natural stone. It has a high durability and looks unusual. But not all owners can afford this material due to its high cost.
- Agglomerate. Its characteristics are similar to ceramic tiles. This material can change shape under the influence of special heating tools.
Bathroom finishing material.
The right place for a shower stall
The main limitation that is imposed on the location for installing a shower stall is the size of the room and, naturally, the presence of communications for drainage and water supply.
First of all, before you start making your dream come true, you need to carry out preparatory work:
Check the water supply and sewer system. Make sure there are no leaks or rusty areas. Evaluate the quality of connections and seals. If something is of poor quality, these elements should be updated. It is imperative to check the condition of the partitions: walls, ceiling and floor
Particular attention should be paid to the part of the floor in the place where you plan to install the booth. If necessary, level the floor and ensure good waterproofing.
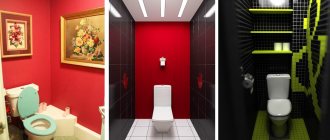
Color scheme and style solutions
When arranging a bathroom, you must remember that light colors visually increase the space. In many cases, preference should be given to shades of white, beige, pink and bright green.
Styles that will make your bathroom unusual:
- Oriental. The cladding of walls, floors and ceilings is made mainly of tiles. In this case, preference is given to materials in gold, yellow and lilac shades. It is allowed to decorate the room with homemade elements made in oriental style: knitted rugs, jugs and vases.
- Japanese. A combination of red or white with black, pink with lilac and the presence of mint shades. The room is often decorated with orchids. Elements of Japanese symbols can be applied to the walls.
- Modern. Suitable for spacious bathrooms, since this style involves placing the bath in the middle of the room, as well as zoning the space, which cannot be done in a small room.
- Minimalism. Another style that is only suitable for spacious rooms. The walls are decorated with small mosaic tiles in beige shades. Minimalism does not tolerate the presence of a large number of elements in the room; even coat hooks are hidden behind the panel.
Design and color scheme in the bathroom.
Preparation for repair
Preparatory work should begin with planning and creating a sketch of the room. The drawing should show the location of the bathtub, sink, toilet, bidet, cabinet, washing machine, shower cabin, as well as the placement of all elements of utilities: water meters, sewer pipes, power supply systems, etc. Based on the diagram, you need to make a list of necessary materials and tools. With the right approach to repairs, all work can be done with your own hands.
Removing an old bathtub and sink
After completing the preparatory stage, you can begin dismantling the old sink and bathtub. Removing the bathtub is more difficult, since during the Soviet period they were made of cast iron.
The following recommendations must be followed during dismantling:
- The cast iron siphon with which the bathtub is connected to the sewer cannot be unscrewed. It is better to carefully cut it with a grinder.
- Old bathtubs in Khrushchev-era buildings often grow together with the surrounding thick tiles due to the cement and salts that are constantly deposited there. To move such a bathtub from its place, it is necessary to knock down the tiles.
- It will not be possible to carry out the dismantled bathtub alone, because its width is larger than the doorway. Therefore, first they take out the front pair of legs of the bathtub, wrap it behind the doorway, and then take out the back pair.
Removing old wall and ceiling coverings
In old bathrooms, the walls and ceilings are whitewashed with lime mortar. The whitewash is removed with a spatula, but it must first be moistened with a spray, as dust is released during cleaning. It is recommended to moisten the surface with water every 10 minutes.
Preparing for a bathroom renovation.
Do-it-yourself shower cabin stages of creation
It's time to get started with the creative process of creating the shower stall of your dreams. As mentioned above, you can make a pallet yourself, or you can purchase a ready-made one in a store. The second option is easier to install, so let's start with it.
We use waterproof plasterboard as a fencing material. Before you start, you need to stock up on the necessary building materials. You will need:
- sheet silicate glass;
- expanded clay concrete blocks;
- brick for laying sides;
- facing tiles;
- moisture-resistant tile adhesive;
- cement mortar;
- waterproof screed;
- waterproofing.
Naturally, you will need to purchase a drain and a siphon. The water must somehow get into the sewer system.
Installing the factory pan
To install the purchased pallet, you need to make a frame. It may take the form of a metal frame or be assembled from timber, which must be treated with a moisture-proofing compound.
The sequence of work will be as follows:
- We secure the frame to the pallet with metal pins. We attach one end to the frame supports, and the other to the holes on the edges of the pallet.
- We attach metal beams to the studs using nuts. After their position has been adjusted, they need to be locked.
- We install the pallet, adjust its height and inclination. It should have a slope towards the drain.
After this, we install a drain with a siphon, if they are not already installed at the factory. We treat the joints and joints with sealant.
Making your own pallet
Creating your own pallet has the advantage of allowing you to make a cabin of any size and shape. This is especially true for a small bathroom. We adhere to the following work plan:
- First of all, prepare the solution. The mixture must be diluted following the proportions specified by the manufacturer. It would be better to use a large bucket and a mixer. Instead of a mixer, a drill with a special attachment will do.
- We place the blocks on a prepared and waterproofed base. Between the blocks we lay communications and a ladder for draining water. To facilitate further maintenance, free space should be left between the blocks and communications.
- Along the edge we build sides from bricks laid on their sides. This will be the basis for the fence.
- The pallet is filled with waterproof screed. Filling layer, up to about five millimeters.
We are building a corner
We use brick as a material for building walls:
- We will apply mortar to the sides and lay bricks horizontally in a row on it - you need to lay it edgewise;
- In order for the masonry to be monolithic, proper dressing should be ensured - for this, the longitudinal seams lying in adjacent rows should be shifted by half of the brick;
- the corner is erected to a height of seven rows - the thickness of the seam should be twelve millimeters;
- The brick is attached to the wall using steel rods - the rods are laid in the seams between the bricks and driven into the main wall.
Installing a fence
Once the corner is laid out to the desired level, you can begin to install the fence. For example, consider a silicate glass fence six millimeters thick:
- We attach a plastic corner profile to the walls of the corner and to its upper edge. Dowel plugs and impact screws will help securely fasten it.
- The glass in the profile is secured with sealant. To ensure safety, the edges of the glass that remain exposed are chamfered.
- A curtain will be installed as a booth door. It will be supported by a frame made of stainless pipe. The pipe will be secured to the wall with flanges.
As you can see, everything is quite simple. With due diligence, patience and dexterity, the task can be completed quite easily and quickly. However, we have considered the simplest options; if the task is to create a shower stall of a more complex shape and with additional functions, this will require more time and work experience. In any case, if you do nothing, then nothing will happen!
Replacement of pipes and wiring
Replacement of electrical wiring should begin before finishing work begins, since channels will need to be made for the wires. It is recommended to purchase double sockets and place the switch outside the bathroom.
Pipelines can be laid using both closed and open methods, attaching them with clips. In Soviet times, only cast iron pipes were used, but it is recommended to replace them with plastic ones, since the latter are easier to install and are not inferior in strength to cast iron.
Working with ceramic tiles
For finishing work, you need a building level and a plumb line, with the help of which lines are drawn on the surface for the correct laying of tiles. The glue is applied in a thin layer only to the area of the surface on which the tiles will now be laid. Then you need to lightly press it against the wall.
Tiled bathroom.
How to choose plumbing
If the choice was made in favor of a bathtub, then it is better to purchase a corner option, this way you can save a lot of space. It is recommended to install a glass sink - these models have a bowl-shaped shape, which allows you to place a washing machine next to it.
If you don’t want to install a glass washbasin, then you can install a ceramic one and hide the wiring behind the wall. A washing machine is installed in the vacant space.
Plumbing in the bathroom.
Some design tricks
If the room area is small, it is recommended to install a corner bath and place the washing machine under the washbasin.
The following design ideas will make your bathroom bright and airy:
- Install a heated towel rail instead of a radiator.
- Place a cabinet for household chemicals in the space under the bathroom.
- Finish the walls and ceiling with glossy material, which will visually expand the space.
- Install a toilet with installation. This design looks compact and can withstand weight up to 200 kg.
Any design solution in Khrushchev-era bathrooms is aimed at wisely using free space and creating the visual effect of increasing space.
↑ Room cladding
Again, in the evening I primed all the walls and the screen under the bathroom with Ceresit ST19 primer-paint. When working with it, I strongly recommend that you carefully cover the bathtub with an old blanket or sheet and immediately wipe off the primer if it gets on the enamel or tiles - it will be too difficult to remove it later, after it has dried.
At the stage of preparatory work, I compiled a layout of tiles from the collections Keramin “Manhattan” and the Italian Alta Ceramica (collection “La Petra di Volta”. The apron in the kitchen was laid with Italian tiles and we are delighted with it.
The tiling of the bathroom took two and a half working days. The most difficult job was in the diagonal laying of Italian tiles, but our tiler successfully completed the task.
Ultimately, the niche was made not dark, as in the layout diagram, but light. The frame already shows a new Wassercraft faucet with a short spout, located not at the end of the bathtub, as usual, but on the side, so that it is convenient to regulate the flow of water without getting up from the bathtub.
And here is the shelf above the front door, already tiled. Made from two sheets of thin plasterboard (6mm) screwed with self-tapping screws to a wooden frame (boards 100x18 mm). Basins and containers with clean towels are now stored on this shelf.
The wiring for the fan and hanging cabinet was pre-installed.
Well, that’s how it happened somehow. Upon completion of the work, even the skeptical uncle of the wife melted - he really liked the result of our idea and his work. On the right under the bathroom there is space for access to communications.