Today, the secondary housing market offers many apartments in old Soviet urban buildings. They are often called “Khrushchevka” (series launched into mass construction in the fifties and sixties) and “Brezhnevka” (late sixties - seventies). They were built in huge numbers, with the hope of relieving the tension of the acute housing problem to the maximum. So the “at the forefront” was not the comfort of housing, but the “shaft” - millions of square meters put into operation annually.
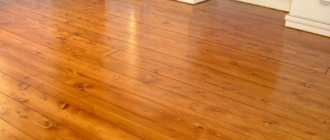
Repair of floors in Khrushchev
A feature of most houses of this type is not only the small area of the rooms (the people were incredibly happy about this), but also plank floors. Interestingly, some of these coatings have survived even to this day. Naturally, during operation they have become seriously worn out, and most often require replacement or “deep restoration”. Such repairs to floors in Khrushchev can be done in different ways. They will be discussed in this publication.
Some design features of floors in Khrushchev
To begin with, it makes sense to say a few words about the structure of the floors in Khrushchev buildings. It’s just that some owners are afraid to decide on repair work only out of ignorance of what can await them after dismantling the plank covering.
As a base for wooden floors, one of two options can be found - these are wooden interfloor beams, sheathed underneath with subfloor boards, or a concrete slab. It must be said that the floor on beams is still a phenomenon in “Khrushchev” buildings - an extremely rare one, characteristic of the earliest series, and there are practically no such houses left. So in the overwhelming majority of cases, you should expect to see the floor slab under the removed flooring.
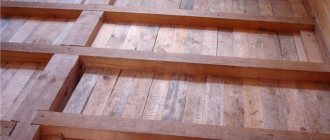
Traditional layout of wooden floors
- On the rough plank floor, logs are fixed, between which insulation is laid or poured - it could be mineral wool, slag, and sometimes expanded clay.
- If the basis for a plank floor is a reinforced concrete floor slab, then a screed was usually made on it, on which sand was sometimes added between the joists.
This is the picture that may appear before your eyes after removing the plank flooring in a Khrushchev building.
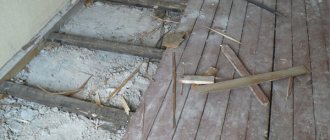
- For greater stability and protection of the logs along their entire length, fiberboard strips can be secured from below.
- Between the joists, just as in the case of a wooden floor, insulation was laid or poured. However, quite often they managed without it. Sometimes, when dismantling wooden flooring, apartment owners find only construction waste in this space.
- A finishing board covering is fixed on top of the joists, or plywood (plank) flooring for installation of parquet - in some series of "Khrushchev" buildings such a covering was also practiced.
The design of floors on joists is a fairly rational option, as it allows for sound insulation or the installation of modern insulating material. That is why the owners of “Khrushchev” buildings are in no hurry to abandon old plank floors in favor of concrete screeds, of course, if the former are not subject to complete dismantling due to complete disrepair. In some cases, floor boards are dismantled only in order to lay sound and/or heat insulating material between the joists and solve the problem with squeaks. That is, even old floorboards sometimes return to their place.
How much can you reduce noise?
There are different types of noise. There is, for example, the aerial type - these are sounds transmitted through the air. These may include talking, shouting, laughing, etc. These sounds enter the room through windows, cracks and doors. But the impact sound passes through the walls. This type of sound includes the noise of a drill and other tools. There is also a structural type that appears due to vibrations. It also goes through walls. Its sources can be tools used in construction. Typically, structural and shock types occur simultaneously.
Loudness can be measured in decibels. There are acceptable levels considered optimal for humans. They are somewhere between 40 and 45 decibels. This sound level is not harmful. An example of such a sound is a simple conversation between people. But this norm is permissible only from 07 am to 11.00 pm. Then the person can only perceive a whisper, which is approximately 20 decibels.
Working workshops produce sounds up to 85 decibels. At the same time, people often work inside such premises for 8 hours a day. But during this time the noise will not harm the body. If the sound is stronger, then it will be necessary to use protective equipment. The critical level can be considered 110 decibels. If the level rises to 130, then the discomfort will be noticeable even on human skin. Therefore, shouting from neighbors can be a nuisance. But soundproofing will help solve the problem.
Methods for restoring wooden floors in Khrushchev
Let us immediately outline the possible methods of repairing old plank floors so that you can decide which one is suitable for a particular case.
Note that in some cases it is not at all necessary to completely dismantle the plank covering. Very often, really high-quality lumber was used for flooring, well-processed and able to withstand decades of use. Of course, it is important to take into account the regularity of maintenance of the floors during their long service life.
Recycled wooden floors in Khrushchev
- If the plank covering does not sag or creak, but the boards in it are slightly deformed, then it can simply be scraped, puttyed, sanded and painted or varnished again.
Partial replacement of boards in plank floors.
- If the floorboards have lost their former strength or sag, they may have to be completely or partially replaced. After dismantling several boards, they should be checked for thickness and strength. Sometimes it is enough to simply add a few joists and then lay the old boards in place, thus strengthening the covering. Then all that remains is to put them in order, as described in the previous case.
- If the flooring has become unusable, but upon dismantling it it is discovered that the joists are in perfect order, then they can continue to be used to attach new boards or plywood.
Laying plywood on top of an old plank floor
- If the floors do not creak or sag, but wide gaps have formed between the boards, then the coating can be leveled using sanding, and then plywood can be laid over the floorboards, which will become the basis for any finishing floor covering.
- If you plan to get rid of old odors that have accumulated during the life of your home in the plank floor, then the covering should be completely dismantled and new floors installed. They can be made in the form:
Plywood floors on joists
- plywood covering on the joists, which can then be covered with linoleum, laminate, parquet board or parquet;
— concrete screed followed by coating with any materials;
Dry screed can be very useful when it is necessary to level floors over old floors
- dry screeds using expanded clay mixture and gypsum fiber (GVL) floor slabs, which can then also be covered with almost any floor finishing coatings.
Design ideas
By properly planning the design, you can save square footage of the kitchen and arrange everything you need.
In the event that you undertake the repair and furnishing of the Khrushchev-era premises, you need to take into account a few simple tips:
- Use materials that are well resistant to moisture (modern artificial materials are more practical and serve as an excellent alternative to natural ones).
- A fairly durable floor that can withstand heavy loads (it is more appropriate to give preference not to beauty, but to practicality).
When drawing up the design, arrange the furniture in the Khrushchev-era kitchen so that it does not interfere with movement and can be transformed.
For this, built-in equipment is appropriate, only the most necessary and functional. The window sill (with a small offset) can serve as a small kitchen table.
This necessary device, which supplies the home with the necessary hot water, also significantly worsens the interior. It needs to be beaten so that it grows from a disadvantage into an advantage of the small-sized Khrushchev kitchen:
The geyser will not attract attention if it is hidden behind furniture facades. Build a built-in hanging element (the column is located in the closet).
When placing any of the options, make sure that access to the gas water heater must be open!
Another problem: where to place a refrigerator in a Khrushchev-era kitchen to take up a minimum of space?
Several installation options:
- We put the refrigerator by the window.
- Move the refrigerator into the niche created after dismantling the wall in the bathroom. The only BUT is that you will have to sacrifice the bathroom and replace it with a shower stall and the repair will become more expensive financially.
Cosmetic (surface) repair of plank coverings
This section will look at some of the ways to repair wood floors without completely dismantling them. Perhaps it will be discovered after an audit. that you are lucky, and, most likely, you will be able to get by with minimal financial investments and physical effort.
Surface scraping and damage repair
If the floors are strong and do not creak, but are covered with numerous layers of paint, and the boards are somewhat deformed, that is, they have bent or sagged along their length, then the situation can be corrected with the help of sanding.
If scraping is carried out using a tool specially designed for this purpose - a scraping machine, then the work of an experienced craftsman will take one day. This procedure will help get rid not only of old layers of paint, but also of uneven boards.
Floors after the first stage of sanding
After the floors are leveled, they should be thoroughly cleaned with a vacuum cleaner. The clean surface should be carefully inspected for cracks in the boards and excessively wide gaps between the floorboards. If any are found, they need to be repaired using ready-made wood putty or a self-made composition of PVA glue and small sawdust. Homemade putty should have the consistency of thick porridge.
Applying putty mixture to surface defects found on the floor.
The putty is applied using a metal or rubber spatula, so that the recesses in the wood are filled to the level of the main floor, and the surface is as level as possible.
Sealing wide gaps between boards
If wide gaps have formed between the boards, you cannot fill them with putty, as it will simply fall down. But to close them, you can use narrow slats or silicone tape.
Installing tape in the gap between the boards
Silicone is elastic, and the tape needs to be bent in half so that it forms a kind of channel in the gap, thanks to which the putty will stay at the desired level. The edges of the tape should be recessed into the gap and rest against its walls.
Filling gaps between floorboards with silicone
If the cracks have an average width, for example, 4÷5 mm, then silicone can be used to close them. To use it, you will need to purchase a special construction gun that will help squeeze the mass out of the tube.
After the material used for repair has dried, you can move on to the next stage of work. If putty was used for sealing, it should be sanded - this can be done with an electric hand sander - belt or eccentric.
Installation of plywood on plank floors
Sturdy plank floors with wide gaps can be used as a subfloor under plywood. There will be no problems with this if the floor surface is smooth, but most often during operation it becomes somewhat deformed and therefore requires leveling. On an uneven surface, plywood will creak and sag.
Wide gaps between the boards in a wooden floor will help heat escape quickly from the room
An important preparatory step before attaching plywood, in addition to leveling the surface, is to check the boards for reliability of their attachment to the joists, otherwise they will creak under the new coating.
If the boards “play”, then they should be securely fixed to the joists with wood screws, but so that the fastener heads “sink” into the wood and do not interfere with surface treatment. . After this, you can proceed to sanding the floors. In this case, it is not necessary to completely remove the paint from the boards, since the main task is to level the surface.
Sanding planks for plywood installation
It is recommended to treat the scraped plank covering with an antiseptic wood primer, which will protect it from rotting and from insects that destroy wood.
For flooring, plywood sheets measuring 500x500 (600) mm are most often used. If you plan to lay two layers of material, then a thickness of 10 mm is sufficient. For one layer of flooring, you should choose sheets with a thickness of 18÷20 mm. However, experienced craftsmen still recommend installing two layers, as the design is more reliable.
Attaching the first layer of plywood
It is best to use double fastening of sheets. That is, they are first fixed with glue for plywood or parquet, and then additionally secured with self-tapping screws. Each sheet is fixed along its perimeter and diagonally. Plywood rows are laid relative to each other with the seams offset by ½ of their width, tied together, that is, according to the principle of brickwork.
Laying the second layer of plywood.
The sheets laid as the second layer must be laid so that not one of the joints between the sheets of the lower layer coincides with the joints of the upper one. It is also recommended to attach the second layer with glue and screws.
When fixing plywood with self-tapping screws, their heads must be recessed into the wood. To do this, it is very convenient to use a special bit for a screwdriver - with a “skirt” limiter. If you plan to make the top layer decorative by covering it with varnish or paint, then the caps should be below the level of the main floor surface so that they can be covered with putty. If a laminate or other hard covering will be laid on top of the plywood, it is enough to recess the caps to the level of the main surface.
Sanding plywood covering
The edges of adjacent sheets of plywood should be at the same level. In case of small differences, the floors are leveled to perfection using a scraper or grinder.
The joints of the sheets of the top layer, which will become decorative, must be covered with putty, which can also be made from PVA and sawdust left over from cutting plywood.
When the putty dries, the joints are sanded so that they are almost invisible.
Before coating plywood with varnish or paint, its surface must be primed by applying two or three layers of primer. This stage is necessary to ensure that the paint layer lies evenly on the surface.
If you plan to lay one of the finishing decorative coatings on top of the plywood, the work is carried out according to the recommended technologies for the selected material. These processes can be found in detail on our website in separate publications.
Eliminating squeaks
Another common problem that occurs with old plank flooring is squeaking, which negatively affects the mood of the residents. To get rid of unpleasant sounds, it is not necessary to dismantle the boards and replace the flooring with a new covering. If the floors are durable, but squeak, there may be several reasons for this:
- loosening the fastenings of the boards to the joists;
- the wood has dried out;
- the boards have increased in volume due to increased humidity;
- in certain areas the boards “play”, touching each other;
- the fastening of the joist to the base has weakened;
To decide on the repair method, it is necessary to inspect the coating, which will help identify the areas of the floors where creaking sounds occur. To do this, you should clear the surface of carpets and furniture and walk along it along and across the flooring. If several zones are found, it is best to mark them by outlining them with chalk, after which each of them will have to be examined more carefully.
Fixing boards to joists when the fastening is loose
- Loosening of fasteners leads to the fact that the board is not firmly fixed to the support. Therefore, when you press it, a squeak may be produced from the friction of the board against the log beam or against a nail or self-tapping screw. In this case, it will be enough to remove the old fasteners and fix the board to the beam in another place. In this case, the head of the nail or screw should be recessed into the wood.
- If the board at the fastening point has dried out, and therefore the head of the fastening element falls into the wood, and therefore does not fix it on the joist, then this part (or even the entire board) should be replaced.
When you lift up a damp board, you can sometimes discover more serious problems underneath it; for weeks it’s just a creaking sound.
- If the floorboards are too moistened, causing them to swell and there are no gaps left between them, then squeaking may also occur due to friction of the parts. In this case, minor repairs are not enough, as the problem will appear again. Therefore, you will have to eliminate the source of the problem. To do this, you need to dismantle the covering, dry the base, provide it with reliable waterproofing, and only then install new floor parts. It should be taken into account that damp wood creates a favorable microclimate for the development of mold colonies and the activity of various insects, which can seriously harm the health of apartment residents.
Pouring talcum powder into the seams between boards
- If the covering boards are thin and the joists underneath them are spaced too far apart, the boards can “play”, creating a squeak. In this case, ideally, the covering should be dismantled and reinforced with additional supports. However, if this is not yet possible, then to temporarily eliminate the squeak, you can use regular talc, which is sold in any pharmacy. Powder poured into the gaps will soften friction and eliminate unpleasant sounds.
Instead of talc, you can use graphite powder, as it also softens the mutual friction of two hard objects in the floor structure.
This option is suitable if the gaps between the boards are small, otherwise the talc simply will not stay in them. This technique will temporarily solve the squeaking problem, but in the future it is recommended to carry out a complete repair of the coating, possibly with replacement of parts.
- If the floors are fastened in only one place, then unwanted sounds can be removed using polyurethane foam with a slight expansion.
Filling cracks with polyurethane foam with slight expansion
Narrow gaps are slightly widened using a spatula, and the length of the repair area is limited by drilling small-diameter holes. The seam is then filled with foam. Its excess can be removed immediately with a damp cloth, or after hardening, the mass can be carefully cut off with a sharp knife.
Strengthening the plank flooring with an anchor bolt
- If the boards are securely held on the joists, but creaking is still created, then it is possible that the fixation of the joists to the base has weakened. In order to remove the load from the log, you can make additional support for the board using an anchor bolt.
A through hole is drilled in the board next to the joist. The hole at the top of the board widens to accommodate the bolt head, as it must be recessed into the wood. Through the same hole, a hammer drill drills a channel in the base (ceiling) to the diameter of the anchor.
Then the anchor is inserted and the fasteners are screwed in, which will attract the board to the base and joist. Another option is a through hole drilled through the board and joist into the base. In this case, the bolt will attract the entire structure, that is, both the board and the joist, to the concrete base.
Is it possible to improve Brezhnevka
Despite all the advantages of Brezhnevka, many people are tired of the disadvantages that have not been eradicated. And first of all, this is a small kitchen area. Still, 6-7 square meters is not the figure that many housewives dream of.
Therefore, often even people who have at their disposal a luxurious four-room Brezhnevka seriously ask themselves the question: is it possible to make it even better?
simple small kitchen remodeling options in Brezhnevka that you can do yourself
The fact is that in panel Brezhnevkas almost all walls are load-bearing
Therefore, it is not advisable to touch them during repairs, and if you still have to, then this should be done as carefully as possible. Moreover, in some cases you can do without it
So what options are there?
- Built-in wardrobe.
Often there is a built-in wardrobe between the kitchen and the adjacent living room. Its area is quite large - from 1 to 1.5 square meters. By carrying out a simple remodel (removing a cabinet whose walls are made of wood), you can enlarge your kitchen. Of course, 1 square meter is not too much, but for a kitchen with an area of 6 square meters, such an increase is quite noticeable. In addition, additional partitions and corners will be removed, which will allow you to gain a little more free space, which can be used much more rationally. - Balcony. Often in Brezhnevka apartments the exit to the balcony is located in the kitchen. After carrying out certain redevelopment work, you can attach a balcony to the kitchen. Of course, you will have to pay a considerable amount for the complex of work performed: demolition of the wall, strengthening the opening, glazing, insulation and heating of the balcony. But as a result, you will get an additional 2-3 square meters for the kitchen. It turns out that its area will increase almost one and a half times! Very good.
example of interior design of a kitchen combined with a balcony
If you want to visually increase the kitchen area, but there are no cabinets or a balcony in the kitchen, and your one-room apartment does not allow you to carve out a few extra meters to attach them to the kitchen, you can make an opening in the wall separating the kitchen from the room.
This is very convenient functionally and at the same time allows you to make the area of both rooms visually larger.
Sometimes it will be justified to completely demolish the wall between the kitchen and the room. As a result, you get a studio apartment. Quite a lot of space is freed up.
The kitchen remains a kitchen, the living room remains a living room, and on their border you can place a dining room - the owners of a 1-room apartment in most cases can only dream of such luxury.
The only way to fix this, which the layout of a 2-room Brezhnevka apartment will allow, is to combine the bathroom. Of course, this can cause certain difficulties, especially if 3-4 people live in the apartment. But as a result, you get enough free space to install the necessary equipment, saving space in the kitchen and at the same time making life more comfortable.
Example of a combined bathroom
Sometimes, after combining a bathroom, its complete redevelopment is justified - the toilet and bathtub are swapped or turned around in order to make maximum use of the available space. In general, by critically approaching the design of an apartment, you can almost always make it optimal and suitable just for you. Sometimes it is justified to demolish or move built-in cabinets or demolish partitions. Then you can create a real work of art from any 3-room apartment.
Major renovation of floors in Khrushchev
The overhaul of floors in a Khrushchev-era building includes all its types associated with the complete dismantling of the wooden covering and the creation of another one from new materials. It could be:
- pouring a cement-sand screed followed by laying a decorative coating on top of it;
- installation of new wooden floors on joists with or without insulation;
- laying dry screed.
Cement-sand screed in Khrushchev
On our website, many publications are devoted to the arrangement of cement-sand screed , where the process is described in detail.
Installation of floors on joists
The technology for creating wooden floors on joists is also described in detail in the corresponding article.
And in our article we will further discuss in detail the option of repairing floors in a Khrushchev-era building using a “dry screed”.
But first, we recommend watching a video that showed the very difficult process of dismantling the old floor in a Khrushchev building. A wide variety of “surprises” may await you there.
Video: Dismantling an old wooden floor in a Khrushchev building
Major floor repairs in a Khrushchev-era building using a dry screed
In the example demonstrated, the craftsmen perform work in a small apartment, from the rooms of which it is difficult to remove large furniture, for example, a wardrobe. Therefore, we have to adapt to these circumstances. It took one working day to repair the floor in each room of the apartment.
The advantage of this technology is the following:
- The relative simplicity of arranging floors, the ability to do it yourself.
- Lack of dampness in the apartment, which inevitably occurs when installing a “classic” cement screed.
- Less weight of building materials, that is, less load on the floor.
- There is no need to use a concrete mixer - saving energy and keeping the premises as clean as possible during major repairs.
- There is no need to use additional material for insulation and soundproofing of floors, since this function is performed by expanded clay backfill.
- Expanded clay does not rot or decompose, rodents and insects do not live in it.
- All board materials are environmentally friendly.
To work you will need to purchase the following materials:
Instead of expanded clay, granulated foam glass backfill can also be used. True, it is much more expensive.
- Special expanded clay backfill of fine fraction (4÷10 mm).
- Gypsum fiber sheet floor elements, e.g. They are made in two layers, with 50 mm mounting locking lamellas along the edges.
GVL - floor elements for laying a covering over dry backfill
- If the floors are to be installed on a concrete base, then a waterproofing material (200 micron thick polyethylene film) should be laid under the expanded clay backfill, extending it onto the walls, creating a kind of “container” with a sealed bottom;
- Self-tapping screws for fastening slabs to mounting lamellas.
- PVA glue or similar.
- Elastic tape to create a deformation layer around the perimeter
- Polyurethane foam for sealing holes in the base.
- A backing for a decorative coating; in this case, foamed polyethylene under a laminate is used.
The online calculator below will help you calculate the amount of materials for a dry screed.
Calculator for calculating materials for dry floor screed
Go to calculations
A few nuances regarding the calculation of materials.
The maximum thickness of dry backfill is 80 mm. That is, taking into account the thickness of the GVL slabs, the floor rise is allowed up to 100 mm.
If more is needed, then an intermediate layer of gypsum fiber board is made, approximately in the center of the thickness of the backfill. For this layer there is no particular need to use the same floor elements with a thickness of 20 mm - just a sheet of gypsum fiber board with a thickness of 10 mm is enough.
gvl floor element knauf
When specifying the required dry screed thickness, the program will evaluate whether an additional layer is required and, if necessary, include it in the calculation. In this case, an additional data entry field will appear - for choosing the material for this layer. This will affect not only the amount of GVL, but also the total volume of backfill.
dry backfill compevit
All materials are calculated taking into account a reserve of 10%.
Renewing the floor with dry screed - step by step
So, let’s look at an example of converting an old wooden floor in a “Khrushchev” into a “dry screed”
| Illustration | Brief description of the operations performed |
| Craftsmen will have to dismantle the old plank covering, on top of which parquet is laid, replacing it with “dry screed” and laminate. | |
| Materials and tools for performing work are brought into the apartment and placed in a free place. The storage area must be accessible for transporting materials to the repair site. | |
| The first step is dismantling the old coating. To do this, four holes are drilled in the floor, forming a quadrangle. The holes should have a diameter that the electric jigsaw file will easily fit into. Then cuts are made between the holes. After removing the cut piece of covering, it will be possible to determine where the joists are located to which the boards are attached. Now it will be easier to navigate in which direction to make the next cuts. | |
| If you do not plan to use the logs to install a new coating, they should also be cut so that large fragments of the coating can be completely removed. If you want to preserve the timber in its entirety, the covering will have to be removed from it using a pry bar and a nail puller. | |
| By dividing the wooden covering into separate panels, it can be easily removed from the room, freeing the base. All wood chips and debris found in the former crawl space should also be removed from the surface. | |
| If there is bulky furniture in the room that there is simply nowhere to take it out, and there is no way to disassemble it, then you can temporarily leave an “island” of the old covering for it. This area should be located as close to the exit from the room as possible. At this point, new floors will be installed last, when a piece of furniture, in this case a cabinet, can be moved to the new flooring. This is one of the obvious advantages of this technology. | |
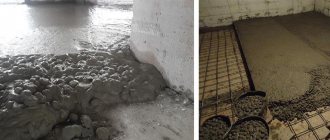
| After opening the wooden floors in this case, a concrete floor slab with a small layer of sand was discovered underneath. Before moving on to the next stage of work, the surface of the base must be thoroughly inspected, as holes of various sizes may be found there. They must be filled with foam. After the foam has dried, its excess must be removed, otherwise it will interfere with the leveling of the backfill. Next, the thickness of the sand layer can be increased to approximately 30÷35 mm and evenly distributed over the surface. Only for the reasons that simple sand is still cheaper than backfill. But this is optional. You can also backfill expanded clay directly over the ceiling, having previously covered it with polyethylene. Using a laser or hydraulic level, a zero line is drawn, from which you can dance further. | |
| A line is drawn on which the dry backfill will be placed, taking into account the planned rise in the floor level and the thickness of the coatings - gypsum fiber board and finishing. An elastic damper tape is rolled out along the walls, which can be simply pressed with heaps of dry backfill. | |
| Beacons are installed, for which galvanized profiles can be used, for example CD 60×27. It is very important - according to the “dry screed” technology, the beacons are exclusively temporary, and must be removed after leveling - before laying the hard surface. The beacons are initially installed on backfill scattered in long slides, and are leveled by adding or removing excess material. | |
| Next, between the beacons, starting from the far wall, expanded clay is backfilled. It is filled with a slight excess, just above the profiles of the beacons. Having poured the composition at a distance of approximately 500÷600 mm from the wall so that you can reach it with your hands, you can begin leveling. | |
| A rule is taken, installed on the wall on two adjacent beacons and leveling of the expanded clay begins. This process is carried out by movements first in one direction and then in the other direction. Leveling is carried out until the surface of the backfill is level with the plane of the beacons. Excess expanded clay is poured onto a free area. Next, expanded clay is backfilled, and the process is repeated. | |
| The surface of the expanded clay between the beacons should be as smooth as possible. In the same way, the entire surface is filled and leveled. If necessary, the beacons are removed from the leveled area and moved further. The small groove remaining behind them is carefully leveled with backfill. | |
| Laying of gypsum fiber floor elements begins. They should be placed from the farthest corner from the entrance to the premises. To get through the backfill to the place where the first slabs are installed, a “path” is laid there using peculiar islands made of the same slabs. The slabs are laid along the wall against the damper tape or leaving a gap of about 5÷10 mm. The panels are mounted with the lower slats facing the room. In this case, the lamellas on the starting panels are cut off from the wall side. | |
| Having laid a row of slabs along the wall, the second row is installed. If the first row was started with a whole slab, then the second should be started with half a panel, that is, using the “brickwork” principle, in which the seams of the first row should not coincide with the joints of the second. | |
| Glue is used to hold two joined panels together. It is applied to the locking lamella, onto which the next slab is then immediately laid. | |
| This photo shows how the laid slab is interlocked with two already laid panels. There should be no gaps along the lines of their connection. Leveling the backfill and laying the floor elements in this example is carried out in sections, so the beacons have not yet been removed - they will be needed for the next section. | |
| Having covered part of the surface with a gypsum fiber coating, the joined and glued panel locks are additionally secured to each other with self-tapping screws, screwed in in increments of 100÷150 mm. Thanks to this double fastening, the slabs form an almost monolithic coating. | |
| In this case, the craftsmen immediately bring the covered area to full readiness, right up to the installation of the finishing coating. The surface of the gypsum plasterboard must be cleaned with a vacuum cleaner from dust and small fragments of expanded clay that accidentally fall on them. | |
| Since in this case, a laminate is chosen as a decorative covering, a substrate is laid under it - foamed polyethylene. | |
| The laminate is installed on top of the substrate in the designated area. We will not focus on this operation - many publications on our portal are devoted to it. | |
| When a part of the floor surface sufficient for installing a cabinet is lined with laminate, it is covered with cardboard to avoid damage. Then they carefully move the cabinet onto it. | |
| Next, the remains of the old coating are dismantled, and then the beacons are installed (one, as can be seen in the illustration, still remains from leveling the previous section. Then the work continues in the order already described above. | |
| The floor is completely covered with dry screed - cleaning is being done to install the finishing coating. | |
| Laminate flooring is being laid. The plinth is installed along those walls where the cabinet will be installed, which cannot be removed. After which it is carefully moved to its permanent place. | |
| Skirting boards are being installed in the remaining areas of the room perimeter. Fastening is carried out only to the wall - it is prohibited to fix the plinth to the floor. | |
| The joining line of two floor coverings in the doorway is closed using a special threshold, which will add neatness. |
* * * * * * *
So, we got acquainted with the most common defects of old floors in Khrushchev-era buildings, and with various ways to correct them. As you can see, sometimes you can get by with “little blood”, but sometimes radical measures are required. By the way, if possible, it is better to immediately plan a major overhaul. What seems acceptable today may turn into a serious problem in a year or two, which will still require large-scale reconstruction. Don’t forget that the “original” floors in Khrushchev buildings are no less than fifty years old.
Furnishings
Many owners do not know how to beautifully arrange a small kitchen in a Khrushchev-era building, as in the photo. When choosing furniture for a small kitchen, you need to consider several indicators:
- Dimensions - it should be compact and easily fit into a small area, leaving space for free movement around the kitchen;
- Convenience - it should evoke a desire to use it, creating comfortable conditions for preparing and eating food;
- Appearance - kitchen furniture for a small kitchen in a Khrushchev-era building, as in the photo, it is recommended to select light colors: white, cream, peach, beige, sand, pink, blue, mint.
In a small kitchen, you should think through every centimeter in order to use it to the fullest.
For kitchens with windows facing south, cold tones are suitable, and for those facing north, warm tones. A universal option is a white kitchen. Moreover, not only furniture, but also decoration can be pure white. This interior looks clean, fresh, airy. Small bright spots, for example, living greenery, paintings, will help to dilute the sterile environment. The design of a small white kitchen in Khrushchev can be seen in the photo.
White furniture and walls create an airy, fresh kitchen interior
Work zone
An area intended for cooking is impossible without three main elements: a stove, a refrigerator and a work table. Together they form a triangle. The closer the triangle elements are located to each other, the more convenient and faster the cooking process is.
Corner kitchen set is best suited for small kitchens
There are several ways to arrange kitchen furniture:
- Straightforward. The kitchen set is installed along one of the long walls. This method is the most popular. A photo of a straightforward kitchen set for a small kitchen in Khrushchev can be seen below.
- Angular. Kitchen furniture occupies a corner and space along two adjacent walls. This layout is considered the most optimal for small spaces.
- Parallel. Elements of the kitchen set are placed along two walls located opposite each other. This layout option is not very suitable for kitchens in Khrushchev-era apartment buildings. However, it can be brought to life if you move the dining room to another room.
- U-shaped. In this situation, kitchen furniture occupies space along three walls. If the legs of the letter “P” are short, a dining group will fit at the opposite end of the room.
- Ostrovny. Cabinets for storing dishes, a refrigerator, and appliances are placed along the wall, and the work table is installed in the center of the kitchen. This type of layout is more suitable for combined rooms. In such a situation, the island part will become a space delimiter. A photo of a kitchen design in a Khrushchev-era building with built-in appliances can be seen below.
A corner kitchen with a bar counter will be an excellent solution for a kitchen in Khrushchev combined with a balcony
The window sill can be used as a work surface. This option is convenient when arranging the headset in a corner shape or in the shape of the letter “P”. If the kitchen wall has a rectilinear shape, then it can be placed near the window. In such a situation, you will have to completely abandon wall cabinets. Photos of the design of small corner kitchens in Khrushchev can be seen below.
Dinner Zone
Main elements of the dining area:
Dinner table. In a small-sized kitchen, you can abandon a large table and replace it with a compact bar counter, retractable or folding design. Photos of the bar counter in a small kitchen in Khrushchev are presented below. For rational use of space, you can convert the window sill into a dining table or bar counter. To do this, install a long tabletop and a pair of support legs. Seating
When thinking about how to beautifully furnish a small kitchen in a Khrushchev-era building so that it looks like in the photo, special attention should be paid to planning the seating areas. These could be chairs, stools, a kitchen corner, a compact bench or even a small sofa
All these pieces of furniture should create comfort and look compatible with the table.
Laying
When both the floor and linoleum are prepared, you can proceed directly to the installation process.
Cutting linoleum
The first step is to cut the linoleum. To do this, lay a corner of linoleum in one of the corners of the room so that its edges fit snugly against two adjacent walls. If excess material forms near other walls, then it must be cut off using a linoleum cutting knife with replaceable blades.
First of all, the linoleum needs to be cut
When cutting linoleum, you need to remember that this material shrinks, so it’s a good idea to leave about 1-2 centimeters of material on each side.
If linoleum is laid in a small room (10-12 square meters), then it is quite possible to do without additional fastening, but simply lay it on the floor and fix it with a wall plinth. If the room is larger, then the linoleum will need to be glued to the wooden floor. You can do this in two different ways.
Fixation method using glue
The well-known PVA glue is perfect as a glue for linoleum, although you can also use special compounds specially designed for these purposes.
The linoleum laid on the floor is folded in half, revealing one half of the floor. After that, using a brush or roller, glue is applied to it, on which the previously raised linoleum is laid. After this, a similar procedure is done with the second half of the room.
Please note that some brands of glue are not designed for “instant” laying of linoleum on them. First, they need to “breathe” for 15-20 minutes. Therefore, before using any glue, carefully read its instructions.
Method of fixation using double-sided tape
You can also use double-sided tape as a fixative for linoleum. Strips of adhesive tape must be glued around the perimeter of the room, and several strips must be placed in its center at a distance of about half a meter from each other.
You can also use double-sided tape as a fixative for linoleum.
You can stick linoleum onto tape in the same way as described above, or after gluing all the strips on the floor in advance, lay linoleum on them, rolling it from one wall to another.
Soundproofing the floor: getting rid of excess noise and worries with your own hands
Soundproofing floors, walls and even ceilings is important for those people who suffer from unbearably noisy or musically gifted neighbors. And when a child is born in the house, in order not to create problems and inconveniences, the residents below have to soundproof the floor in their own home. In some cases, the problem of unpleasant sounds does not arise due to the human factor: the floors simply physically wear out and even simple walking on them creates noise throughout the apartment. A properly noise-free floor absorbs not only sounds from the outside, but also those created directly in the apartment or private house.
Panel buildings
They are much newer than Khrushchev and Stalin buildings. But the floor in them also has to be replaced and repaired.
In a panel house, the floor base is concrete. There is no such complex structure here. Therefore, if replacement is necessary, we remove the old coating and thoroughly clean the base.
Usually we create a screed here: dry, semi-dry or wet.
In the first option, expanded clay is used. We cover it with slabs with gypsum fibers.
In the second case, we mix the composition so that the proportions of water in it are very small.
In the third option, we use sand, cement and plasticizers, as well as insulation - expanded clay.
This is a popular method. But we don’t use it when the floor slabs are already heavily loaded.
Today, people are increasingly ordering self-leveling floors. They are easy to prepare and sell, both in panel houses and in older ones.
You might be interested
What floor to install in an apartment Warm floor in an apartment: a modern choice How to fill the floor in an apartment
Preparation of linoleum
Before laying, linoleum must be rolled out and left for 24 hours.
Before laying linoleum on a wooden floor, it must be laid out on the prepared surface and left for several days. During this time, the material will acquire room temperature and straighten out for convenient work with it in the future. In places where linoleum does not adhere well to the floor, you can lay heavy objects with a flat base, such as books or boards.
Important. Make sure that during the purchase and transportation of linoleum, strong bends of the canvas are not allowed. If there are kinks on the purchased material, then it is better to return such material back to the store and ask for a replacement.
If it is not possible to return the product, then before laying linoleum on a wooden floor with bends, it is recommended to straighten the broken area as much as possible and press it with a heavy object. PVC-based linoleum can be heated with a hairdryer to remove the break . However, the coating on a natural basis will most likely not be able to be leveled and the bend will have to be cut out to create a joint.
After the material has straightened and acquired room temperature, you can begin cutting the canvas, having first removed the baseboards. To do this, you need a ruler, at least two meters long, and a construction knife with a retractable blade. When cutting PVC linoleum, leave an allowance at the edges for shrinkage, which at high temperatures can be up to 2% of the area .
Substrate
When deciding what to lay linoleum on, sometimes they use a backing in cases where it is necessary to provide additional insulation and sound insulation, vapor permeability to avoid mold, or to eliminate minor unevenness in the base when other methods are ineffective or economically unprofitable (scraping). It should be understood that usually the substrate is a soft material, and after installation, strong dents from heavy furniture, a refrigerator, or a washing machine may remain on the surface of the linoleum. The backing for linoleum is similar to that used when laying laminate flooring; its main types are:
Cork. An environmentally friendly product with a thickness of 2 - 5 mm, made from pressed crushed oak bark, it is durable, strong and rigid, thanks to which it perfectly hides floor unevenness. In some cases, a cork underlay can replace plywood, which is laid on a floor that is too uneven; its disadvantages include high cost and low moisture resistance.
Polyethylene. Foamed polyethylene with a thickness of 2 - 3 mm is used more often than other materials when laying laminate flooring; its distinctive features are: low cost, biological and chemical resistance, low weight, high moisture resistance, ease of installation. Its other variety, Penolon, has similar properties, having greater thickness, density and a relief surface.
Since polyethylene is too soft a material and loses its shape when squeezed, it is not very suitable for leveling floors and can be used to level out minor defects or additional insulation of floors in wet rooms (kitchen, rooms on the ground floor).
Expanded polystyrene and hardboard substrates
Expanded polystyrene . Extruded polystyrene foam (foam) is perhaps the best choice for a consumer who does not know what to lay under linoleum. Unlike conventional foam plastic, it has higher strength and hardness, and the best thermal insulation properties among all types of insulation. In addition to insulation, the material is used to level the subfloor; it is laid with corrugated sheets 2-6 mm thick on the reverse side on the subfloor and glued with tape.
Hardboard . As a leveling and heat-insulating substrate, you can use thin pressed fibreboard (fibreboard) - hardboard with a thickness of 2.5 or 3.2 mm of various hardness classes. Hardboard is cheaper than plywood and is effective at covering small irregularities.
Surface grinding
Sanding of wooden surfaces is carried out using a sanding machine. This treatment will make the floor perfectly smooth and give the board an attractive appearance. For processing you will need two machines. One is for grinding the main surface, the other is for use in hard-to-reach places.
Grinding takes place in several stages:
- the room is cleared of furniture;
- curtain doorways with wet cloth;
- remove the baseboard;
- if necessary, repair the coating;
- hammer in visible nail heads;
- spray the surface with water;
- Rough scraping is carried out 2-4 times with abrasive No. 40;
- sequentially treated with abrasives No. 60 and No. 120;
- treat hard-to-reach places;
- remove remaining debris.
Commonly used soundproofing materials
Nowadays, you can find on sale various types of soundproofing materials made on different bases. Therefore, they may have different levels of capabilities.
Below is a table of a kind of rating of the most popular soundproofing materials that can be found in specialized construction stores in Russia:
| Name of soundproofing material | Manufacturing form | Noise reduction level (air/impact), dB | Material rating |
| "Rock Wool Acoustic Butts" | slabs | 60/38 | 9.5 |
| "Tecsound" | rolls, slabs | 60/28 | 9.4 |
| "ThermoSoundIsol Light" | mats | 60/28 | 9.3 |
| "Zvukoizol" | roll | 28/23 | 9.2 |
| "Shumanet ECO" | slabs | 35 | 9 |
| "ZIPS" | sandwich panels | 11÷13 | 8.5 |
| "SoundGuard" | slabs | 7÷10 | 8.2 |
Next, we will consider more detailed characteristics of the soundproofing materials presented in the table.
"RockWool Acoustic Butts"
Perhaps the most popular among users are the Acoustic Butts slabs, which has been developing and producing materials based on basalt fiber for thermal and sound insulation for more than seventy years.
RockWool Acoustic Butts are designed specifically for soundproofing applications. But at the same time they are also a very effective insulation material.
The positive qualities of “RockWool Acoustic Butts” include the following material parameters:
The disadvantages of this material include its rather high cost. In addition, there is a very high probability of running into a fake. Therefore, it is recommended to buy this material in specialized stores, where it is possible to document the originality of the product.
"Tecsound"
"Tecsound" was developed by Spanish technologists. There it began to be produced on an industrial scale. The raw material for this sound insulator is the mineral aragonite, a large deposit of which is located in this country. Environmentally friendly polymers act as binders for the mineral component.
Today, several types of Tecsound are produced, which include other components. Finished materials differ in structure and purpose:
| Appearance of the material | Short description |
| "Tecsound FT" - slabs consisting of porous felt and a composite membrane. They are designed to insulate walls, ceilings and roofs from airborne noise. | |
| “Tecsound 2FT” and “Tecsound 2FT-80” are slabs and sheets in rolls, consisting of two layers of felt and a composite polymer layer between them. Used to insulate walls, ceilings and floors. | |
| "Tecsound FT-55 AL" - felt boards with synthetic and aluminum coating. The material can be used for internal insulation of any surfaces. | |
| "Tecsound FT-75" - slabs consisting of felt and a thick composite-mineral layer covered with a polymer membrane. The material is used for any internal surfaces. | |
| "Tecsound S" is a self-adhesive version of the insulating material. It is used for sound and vibration insulation and effectively dampens the propagation of low-frequency vibrations. | |
| "Tecsound SY 100" is an elastic roll material with high strength. The insulator is made of mineral composite material, coated with a polymer and aluminum layer, and has a self-adhesive base. The material is used to protect against sound and vibration insulation of any surfaces. | |
| "Tecsound 70" is a mineral soundproofing membrane that can provide the required level of silence in a living space. The material is fixed to the walls and ceiling, and is also laid on floors under screeds or floors on joists. |
Despite the emergence of various variants of this material, the original insulator, made on a composite mineral basis, is most popular among consumers.
The advantages of Tecsound can be considered the following:
The disadvantages of such sound insulation include the following points:
"ThermoSoundIsol Light"
"ThermoZvukoIzol Light" is a multifunctional and universal insulating material that has a high level of noise absorption. The mats have a size of 10000x1500x10 mm and are made of fiberglass canvas, which is laid in several layers pressed together. Fiberglass is sealed into a protective shell made of non-woven material - spunbond.
Soundproofing mats "ThermoZvukoIzol Light"
“ThermoZvukoIzol Light” can be used for laying on floors under “wet” concrete and dry screed, under floors on joists. Can be used above suspended ceilings, or attached to walls for further cladding.
The advantages of this soundproofing material include the following qualities:
The disadvantages of this sound insulator include the following:
"Zvukoizol"
This is a roll bitumen-polymer membrane-type sound insulation. By the way, it also has thermal insulation and waterproofing properties. The material is used to insulate floors, including when installing a “warm floor” system, ceilings and walls. There are no restrictions on the level of room humidity.
“Zvukoizol” is a successful combination of sound insulation, insulation and waterproofing qualities
The advantages of this material include the following qualities:
Disadvantages of "Zvukoizol":
"Shumanet ECO"
"Shumanet ECO" are glass staple fiber slabs designed for sound insulation of walls, ceilings, and floors on joists.
Effective sound insulation - slabs made of staple fiberglass, as their name already says - “Shumanet”.
The advantages of this material include its following characteristics:
Schumanet also has certain disadvantages :
ZIPS panels
"ZIPS" are multilayer panels. They have been produced since the 90s of the last century. The composition of the slabs may vary depending on the purpose of the products.
ZIPS slabs are a combination of a soundproofing layer and a rigid base suitable for subsequent finishing
For example, for flooring, gypsum-fiber tongue-and-groove sheets are used as a base in slabs, and plasterboard for walls and ceilings. A layer of basalt or fiberglass wool is fixed to the base.
The positive qualities of this material include the following:
The disadvantages of the insulating material are as follows:
SoundGuard plates
Rigid SoundGuard boards show very good sound insulation efficiency.
These soundproofing panels differ from other analogues in the materials of manufacture and the method of performing installation work. The structure of the slabs includes the following materials:
- a layer of interwoven cellulose fibers.
The structure of SoundGuard slabs is fundamentally different from other soundproofing materials.
The positive characteristics of these products include:
The disadvantages of the material include the following characteristic features:
Popular materials are discussed in general terms. Now it’s worth understanding how they are used in practice.
Choice of color and lighting
Walls painted or pasted over in light pastel colors will visually increase the size of the room. Glass or mirror surfaces, chrome and shiny accessories will visually make the area larger.
In small-sized kitchens, it is better to individually illuminate each zone with recessed lamps, which will advantageously “raise” the Khrushchev-era ceilings visually; multi-level lighting looks organic.
These are the simple measures you can take to maximize the area and make it as comfortable and cozy as possible.
How profitable and beautiful a kitchen in a Khrushchev-era building can look is confirmed by the photos provided as an example!
Installation of new boards
Before this stage we treat them with varnish. After complete drying, we install them on the joists. We fasten them tightly to each other.
When we re-lay the floors, we use dowels with parameters 10 x 1000. To improve the strength under the joists, we arrange supports every 50 cm. For this we use bars.
The positions of the lags in relation to the boards are perpendicular. The interval between adjacent logs is 50 cm.
Next, we check them for evenness using threads. We stretch each thread. There should be a millimeter gap between it and the lag.
We fasten the boards with self-tapping screws 6 cm long if the material density is 3.5 cm.
At the joint areas between the boards we keep tiny gaps. This prevents squeaking.
The final stage is laying the flooring. Its choice is made by clients based on their preferences.
When we carry out the indicated operations to re-lay the floors in a Khrushchev-type apartment, we usually end up laying linoleum. This option is chosen most often.