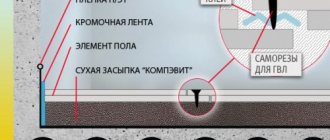
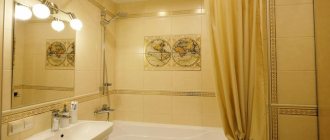
Many owners of private houses and apartments on the ground floor additionally want to insulate the flooring, which is located above the cold basement. Expanded clay concrete screed, which is also a good soundproofing material, helps to effectively solve this problem.
Concrete floor screed with expanded clay is excellent for insulating floors in apartments.
Methods of insulation with expanded clay
In construction, 3 methods of laying expanded clay are used - dry, wet and combined. To choose the right option, you should first familiarize yourself with each in detail.
Dry insulation
Dry insulation
With the dry method of thermal insulation, the material is simply poured between the joists or beacons, and a subfloor is mounted on top - boards, chipboard, plywood. To protect from moisture, the base under the insulation must be covered with waterproofing material. To increase the density of the thermal insulation layer, it is recommended to take expanded clay of different fractions and mix it before backfilling. This insulation is done very quickly and does not require much effort.
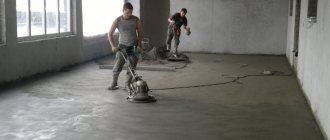
Wet styling
Expanded clay concrete screed
When insulating using this method, expanded clay is mixed with liquid concrete and the space between the beacons is filled. This option is excellent for floors with large differences in height, where a thick leveling screed is required. Due to the lightness of expanded clay, the load on the base is significantly reduced; The screed itself dries faster and does not crack as much. When choosing a wet method, you should take into account that the thermal conductivity of the material increases sharply, which means that its efficiency will be much less than with dry installation.
Combined method
Combined method
With combined insulation, dry expanded clay is poured between the beacons, leveled, then the top layer is spilled with a liquid cement solution and, after drying, a standard screed is made. Cement mortar makes it possible to strengthen the expanded clay layer and avoid its deformation when pouring the screed. Additionally, reinforcing mesh is used if a large load on the floor is expected during operation.
Expanded clay: pros and cons
Insulating expanded clay - granules made by foaming and subsequent firing of clay.
Scheme for the production of expanded clay granules
It has a number of advantages when used as thermal insulation.
- Low thermal conductivity. The clay itself from which it is made is considered a good heat insulator. And the pores created inside, filled with air, further reduce thermal conductivity. As a heat insulator, it is several times more effective than clay bricks and twice as effective as wood.
- Light weight. Increasing the thickness of the expanded clay layer does not lead to a significant load on the floors.
- Cheapness. Despite the fact that it is inferior in thermal conductivity to many modern materials, its use allows you to save money, losing slightly in the quality of insulation.
- Fire safety. This material not only does not burn, but also does not emit any toxic substances when heated strongly.
- Resistance to temperature changes. Thermal insulating properties do not change in heat or cold.
- Resistant to household chemicals and humidity. Even when wet, mold does not form on it.
- Completely environmentally friendly. Made from natural material, it is not completely harmless.
- In addition to thermal insulation properties, it is also a good sound insulator.
- Convenient to use. To work with it, you do not need to have special skills, and no special tools and devices are required. The fact that expanded clay is a bulk material eliminates any requirements for maintaining exact dimensions when laying.
- Long term of use. It is believed that it retains its properties for decades.
Flaws
Expanded clay also has disadvantages. But their list is incomparable with their advantages:
- Large volume of heat-insulating layer. To create high-quality thermal insulation, the thickness of the expanded clay cushion must be at least 10 cm. But in practice, the expanded clay layer is usually 20–30 cm, rarely 40 cm. In some wooden floor designs, such insulation leads to a decrease in the space between the floor and the ceiling.
- Low moisture resistance. When a large amount of water hits it, it absorbs it. This leads to an increase in the weight of the thermal insulation. Over time, moisture will evaporate from expanded clay granules, but this is a long process.
- Laying expanded clay, despite its simplicity, is a tedious task. Spreading a thick layer, leveling with obligatory care so as not to destroy the shell of the granules - all this takes a lot of time.
Varieties of expanded clay
The quality of expanded clay as insulation also depends on the options for its production. Depending on the size, there are three main groups of expanded clay granules. And although for each group there are recommendations for its use, they usually use a mixture of granules of different sizes in one layer.
Expanded clay fractions
- Crushed stone – granules with a diameter of 20 to 40 mm. Recommended for backfilling the main layer of thermal insulation.
- Gravel - from 10 to 20 mm. Used to create thin layers.
- Sand is the smallest granules with a diameter of 5 – 10 mm. Suitable for insulating small voids in floor structures. When mixed with large fractions, it allows you to fill the gaps between granules. Used to create a “wet” concrete heat-insulating screed.
In addition to size, expanded clay insulation varies in density. Industrially produced expanded clay is divided into several categories with a density from 200 to 800 kg/cub.m.
Types of filler filling
Expanded clay screed is carried out using granules of all fractions. Pebbles have different sizes, volumes and weights.
| View | Fraction, mm | Weight, m3/kg |
| Expanded clay sand | up to 5 | 500-600 |
| Expanded clay fine gravel | 5-20 | 300-450 |
| Expanded clay crushed stone | 20-40 | 200-350 |
It is recommended to use several types of filler for the screed. This will ensure high performance properties of the coating. In stores, the material is packaged in bags weighing no more than 20 kg, which greatly simplifies transportation. The higher the density, the more the filler weighs. The prices for lifting the pillow depend on this.
How to insulate a floor in a wooden house with expanded clay
Wooden construction is mainly country houses. Moreover, both new construction and those that were erected long ago as summer cottages. Today, these buildings are increasingly used for year-round living. Therefore, the issue of insulating all parts of the house becomes urgent.
The floor in wooden buildings is one of the coldest parts of the entire structure. According to various estimates, up to 20% of the internal heat in the premises is lost through the floors in wooden houses. It makes sense not only to design good insulation when building a new house, but also to take care of remodeling the floor in an already built one, but without floor insulation. Moreover, usually a residential wooden house is installed on a relatively high foundation. And this allows you to carry out insulation from below, without changing the level of the finished floor and without reducing the height of the room.
When constructing ancillary wooden buildings, the floors can be located close to the ground or even laid directly on the ground. In this case, an insulating layer is still necessary, but it will have to be laid deep into the ground.
Any insulation of wooden floors must be carried out in compliance with the following rules:
- Mandatory installation of waterproofing in two layers. The bottom layer protects the insulation from moisture from the ground. The top layer protects against water penetration through the finished floor boards.
- Rough and finishing wooden floor elements are treated with special anti-rotting agents.
- For insulation, a material is selected that does not change its properties when in contact with wood.
Despite the recent emergence of modern insulating materials, expanded clay insulation of wooden floors still finds its application. And there are reasons for this.
Filling methods
There are three methods of screeding using expanded clay. It is necessary to analyze the method of use and the advantages of each of them in more detail.
Semi-dry screed with expanded clay
This method is used in cases where it is necessary to both raise and insulate the floors in the room. To achieve thermal insulation, the expanded clay layer must be at least 10 cm
Here it is important to take a large fraction of the backfill - at least 20 mm. If it is important for you only to raise the floor to the required level, you can use smaller particles
In this case, waterproofing is necessary in order to protect the expanded clay layer from moisture. Beacons are set to the required height, and expanded clay is backfilled. Walk over it with a rule to compact and level the layer.
After this, you should proceed to pouring the concrete screed. Cement-sand mortar or a special mixture can be used. For ease of work, it is better to first spill the expanded clay layer with a concrete mixture highly diluted with water - cement laitance. This will prevent the expanded clay grains from floating and make it easier to fill with the main solution. Laying a layer of granules with film may also be suitable for these purposes. Only in this case, installation must be done very carefully so that the film does not tear.
Expanded clay concrete
This is the so-called wet screed. In this case, it is necessary to carefully measure all the unevenness of the base and decide how thick the screed layer will be. This method is advantageous to use if you have to raise the floor level to a significant height, as well as to save concrete mixture. Expanded clay is combined with sand concrete, the resulting composition is carefully stirred and distributed over the floor. It is better to first soak the expanded clay granules with water so that later the consistency of the mixture does not turn out to be too dry. It is better to mix using a construction mixer, because no amount of spatulas or sticks can achieve a uniform consistency without clots and lumps.
To strengthen the expanded clay concrete screed, you can use a reinforcing mesh, and any slats that are easiest to obtain can be used as beacons. The mesh should be a couple of centimeters short of the required height level. Next, distribute the solution evenly over the grid, leveling it with the rule. After finishing laying the mixture, do not wait for it to dry. Prepare a solution for the top leveling layer. This can be a cement-sand screed or self-leveling floor. It is applied to the zero mark, leveled with the rule and left to dry.
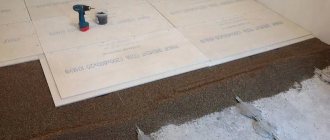
Dry floor screed with expanded clay
If the semi-dry method is a combined screed, then filling with expanded clay granules does not require subsequent filling with any solutions. The base is prepared as usual, but it is necessary to exclude any possibility of moisture getting on the waterproofing layer. Beacons are set to the required level. The minimum thickness of the expanded clay layer with this technique is 5 cm. Granules need to be selected in small or medium sizes; it is advisable to combine different sizes to distribute the layer more evenly with fewer voids. There is no point in using small waste, because a huge amount of it will be required, but it will not create the desired thermal insulation effect.
It is better to divide the surface into strips using wooden slats - this will make it easier to level the granular layer and lay the following materials. Do not compact the expanded clay, but carefully roll it out. Next, a layer of moisture-resistant drywall should be laid. If the sheets are thin, it is better to lay them in two layers, gluing them together, and the seams must be coated with putty. You can also use waterproofing mixtures. After completing the installation of drywall, it is necessary to cut off any protruding pieces of tape or film.
This type of screed has many advantages:
- The smooth surface is suitable for applying any type of finishing coating.
- The layer can withstand high loads.
- The floor covering is quite light, so it can be used on old, dilapidated floors without any risk.
- Thermal insulation is excellent. There is no need to install heated floors on an expanded clay cushion.
- The work can be completed very quickly, and immediately upon completion, proceed to the next stages of repair.
- Dry screed provides excellent sound insulation.
- The coating is not deformed.
Sometimes builders suggest using expanded clay for adding to the rough screed directly on the ground instead of sand or crushed stone. This can only be done if the groundwater level is low, otherwise increased humidity will lead to negative consequences for the entire climate in the house, and good heat conservation will no longer play a role here.
Installation
Covering the floor with expanded clay does not require much effort and time, but first you need to correctly make all the necessary calculations and prepare the foundation to arrange the future “pie”.
First of all, it is important to calculate the pressure on the surface, since the floor bears the main load
Before starting work, you should repair all existing cracks and chips in the old floor, and then apply a layer of waterproofing material, as a rule, roofing felt or polyethylene film is used for this.
It is very important that the coating is cross-coated, that is, its sections are laid overlapping, and also extend onto the walls at least 10 cm above the level of the future filling. Upon completion of the installation work, all excess can be removed fairly quickly
These works take very little time, and after they are completed, you can proceed directly to filling the expanded clay.
The technology of work depends on the type of floor structure. Let's look at each of the options in more detail.
On the ground
Floors on the ground are made in garages and sheds. If all the work is done correctly, then in winter it will not be too frosty there.
In order to pour expanded clay onto the ground, you first need to remove the top fertile layer of soil, level the area and compact it thoroughly. Then pour a mixture of sand and crushed stone onto the compacted soil, thus pre-leveling the surface.
To protect expanded clay from groundwater, a layer of waterproofing is laid, and only then the expanded clay is filled in
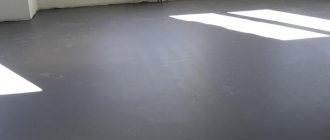
It is very important that the entire surface is the same in height. At the final stage, the top layer is impregnated with cement mortar, which gives the insulation the required fixation.
The top of the screed is covered with a vapor barrier material, and the work is completed by applying a reinforced cement screed.
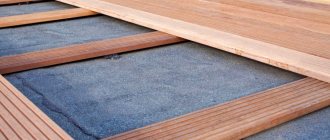
By lags
When using expanded clay as insulation, logs perform several functions at once. Firstly, they help level the backfill, and secondly, they are used as a base for the subfloor.
This method is used to insulate concrete surfaces. First, you need to completely clear the application area and eliminate all deformations and cracks in the coating; the logs themselves must be treated with fungicides. Then, using corners, they are attached to the base so that the upper edges of the guides extend into a single horizontal plane.
Typically, roll coatings or film are used as a waterproofing material, but bitumen mastics, polymer mixtures or rubber water barriers can be laid, and, as a rule, the base itself, the joists, and part of the wall around the perimeter are subject to treatment.
If mastics are used, then first the base is primed; if a film is used, then it is attached to the bars with a construction stapler.
Expanded clay is poured into the sinuses so that there are no empty spaces left, otherwise the thermal insulation properties of such a coating will be significantly reduced.
At the final stage, everything is covered with a vapor barrier material, and a subfloor is formed.
On the balcony and loggia
At its core, a balcony is a protruding slab of reinforced concrete, so standing on it even in the summer heat is quite uncomfortable, which is why many apartment owners decide on the need to insulate their balconies and loggias.
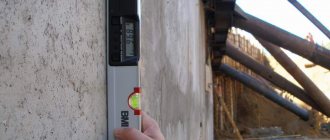
It is not necessary to level such a base; the only thing worth paying attention to is that the surface should not have a slope; for this, beacon slats are attached over the entire area, which are fixed with gypsum mortar. The smaller the step between the beacons, the easier further work will be, since it is by them that the height of the expanded clay layer is equalized
Preparation of beacons for expanded clay concrete screed
A very important point: the quality of the screed largely depends on the accuracy of the preparation of the beacons. It is better to make beacons under a laser level; if you don’t have one, you can use a water level. The work in this case will take more time, but will almost eliminate the possibility of error. Why? Each mark is placed separately on the wall using a water level; if there was an error on the first one, then it is leveled out by the others. The laser level works differently; it gives marks immediately along the entire perimeter of the room. Initially, an incorrectly positioned device causes the entire screed to be not horizontal, but with a slope. Keep this in mind, correcting the error later is time-consuming, difficult and expensive.
How to choose a self-leveling laser level
How to place beacons under a screed?
Step 1. Remove construction debris from the room and inspect the base. If there are large cracks on it, then they will have to be sealed, and work will continue only after the repair solutions have hardened.
The base must be cleared of debris and dust free
Step 2. Cover the ceiling with plastic film or other waterproofing material. If the screed is done in non-residential premises on a concrete floor, then waterproofing is not necessary.
Waterproofing polyethylene film
Step 3 : Install the laser level. We have already said that this operation must be approached very carefully; all actions must be performed in strict accordance with the device manufacturer’s instructions.
Using a laser level for marking
Step 4. Check the distances from the floor surface to the laser lines. The minimum thickness of expanded clay concrete screed is approximately 5 cm. If it is made thinner, the strength will not meet current standards. The maximum thickness of the screed depends on the parameters of the room and the planned heat saving indicators. The thicker the expanded clay screed, the better the body is preserved indoors. It is recommended to cut down small protrusions on the surface of the ceiling. This is much more profitable than significantly increasing the thickness of the screed due to such problems.
Practical advice. The process of installing beacons will be much faster if you do not constantly check the distance between the guides and the laser beam with a tape measure or a simple template, but make a corresponding mark on the rule. This way you will simultaneously adjust the metal profile to the horizon level and adjust the thickness of the expanded clay concrete screed. This device allows you to set beacons without a bubble level; all the necessary functions are performed by a laser beam.
Step 5. Decide on the specific location of the beacons. The distance between the lines should be 15–20 cm less than the length of the rule. There is a gap of 30–40 cm between the outer beacons and the walls of the room. The lines should be directed towards the exit from the room. The distance between the stops for metal profiles is approximately 20–40 cm, specific values depend on the parameters of the elements. One main condition must be met: the profiles should not bend under the rule during leveling of the screed, and during this process quite large forces can be applied to them.
The distance between the lines should be 15–20 cm less than the length of the rule
Rule level, length 240 cm
Step 6. Prepare the metal slats, if necessary, cut off the missing pieces. Make a solution to fix the beacons. To speed up hardening, increase the amount of cement; the solution for beacons can be prepared in a ratio of 1:2. There is another way to speed up the hardening of the solution for slats. After placing the beacons, carefully sprinkle the surface of the mounds with dry cement; it will quickly absorb moisture. Remove the wet cement with a trowel or staple and repeat the operation. Thanks to these actions, you can start making the screed 15–20 minutes after installing the beacons.
Beacon installation
To speed up the work, you can first prepare pads for the slats from various available materials. It is advisable to use pieces of bricks or pebbles of appropriate sizes. It is not recommended to use sections of plasterboard boards due to very low physical strength and moisture resistance.
Lining under the profile when placing beacons
Step 7. Place the pads in place, sprinkle some mortar on them and place the metal strip on top. Pay attention to the previously made beacon markings.
Checking the position of the beacon
Step 8. Place a metal strip on a hill and a rule with marked marks on top.
Step 9. Gently press the metal profile until it is in the desired position. Constantly monitor the position of the laser beam on the rule using the marks. Hold the tool horizontally and, with little force, press the beacons to the desired level. If during work the profile sinks too much, then it should be raised, an additional portion of solution should be placed below and re-adjusted.
Step 10. Using a spatula or trowel, remove excess mortar from the surface of the planks. Use the same algorithm to place all remaining beacons. If you have the slightest suspicion of correctness, check the position of the slats again. To guarantee, it is recommended to apply the rule to the adjacent slats; the laser beam should be positioned exactly according to the marks previously made on it.
At this point, the work with the beacons is completed, after a short pause you can begin making expanded clay concrete screed.
Beacon. The solution has dried within a day, you can proceed to pouring the screed
Basic properties and functions of floor screed with expanded clay backfill
In addition to the main problem that a screed with expanded clay solves - high-quality leveling of any, even problematic base, adding filler performs the following tasks:
- leveling;
- sound insulation increases;
- Such screeds provide excellent thermal insulation, which, in turn, reduces space heating costs. Therefore, insulating the floor with expanded clay under a screed is not only the simplest, but also the most profitable choice;
- Thanks to its porous structure, expanded clay prevents the room from overheating during the hot season.
Amorphous aggregate has a relatively low weight and density. But at the same time, the concrete layer provides good strength. The tandem of such building materials results in an excellent floor base, which not only puts minimal load on the floor, but also does not lose its characteristics during operation.
If we take a closer look at expanded clay and its properties, we can conclude that the porous structure gives the granules not only heat-saving characteristics, but also water-repellent properties. In addition, it is inert and has rare qualities - compatibility with any building material and ensuring a high level of adhesion.
Do-it-yourself floor screed with expanded clay is relevant in the following cases:
- when the base is made of reinforced concrete slabs;
- leveling the floors to the same level, provided their difference is more than 10 mm;
- if communications are hidden below;
- minimizing the concrete mixture;
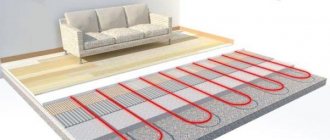
- if heating is carried out electrically or infrared;
- low noise permeability.
Expanded clay
The screed is indispensable for obvious defects in the base, which can not only appear on the finishing coating, but also ruin it.
Under what circumstances is this technology effective and in demand?
In modern construction, when arranging floors, this technology is simply irreplaceable. It is also often used in the case of:
- If there is a need to fill a space that exceeds the threshold of 15 centimeters. In such cases, you cannot pour only one cement mixture. Indeed, in most cases, building floors are designed for a certain strength, so with additional load there is a high risk of damage to the structure.
- If there is a need to reduce the weight of the concrete screed itself. This mainly applies to wooden floors. In such cases, you can use a foam screed, which will significantly lighten the weighty part of the structure.
This technology is an integral attribute of modern construction. It allows you not only to significantly save your family budget, but also to improve the quality of housing. For more successful mastery of this material, you can additionally watch the video expanded clay concrete screed.
We recommend reading an article about expanded clay concrete building blocks, their sizes and characteristics.