Sooner or later, all of us have to face such a problem as renovating a toilet room. Unlike other premises, high-quality repairs may require replacement of sanitary ware, water pipes, and installation of meters. And the cost of finishing can vary significantly, depending on the chosen material. In this article we will look at how to do high-quality work at minimal cost and where to start renovating a toilet.
For convenience, the entire process of repairing a toilet can be divided into separate stages.
Attention! Before starting all work, it is necessary to work out the design and layout of the bathroom, select the expected type of finishing materials and plumbing fixtures, and draw up an estimate taking into account unforeseen expenses.
Do-it-yourself toilet renovation
You can repair virtually any room in a house or apartment with your own hands. It is important to correctly draw up a preliminary project, as well as evaluate your own skills and abilities. You can find various instructions on the Internet that help you visualize the intricacies of repair work.
Before you start making toilet repairs with your own hands, you need to:
Choose a suitable design concept. It should be based not only on personal preferences, but also on the characteristics of the room itself;
Select suitable materials. Taking into account the characteristics of operation and the premises itself, you cannot choose any materials; you must focus on reliable, durable, not subject to the negative effects of moisture and chemicals;
Select suitable plumbing fixtures (if you do not plan to do major repairs, do without this item, since they leave the old plumbing fixtures).
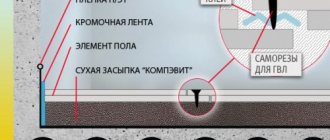
Flooring
Materials for finishing the floors of restrooms and bathrooms in panel buildings must simultaneously meet several criteria. They must be durable and not afraid of moisture, and also not be subject to deformation due to the combined influence of the specific microclimate of small bathrooms.
Today, floor finishing with natural wood or waterproof laminate is very popular. However, in tiny rooms it is better to refrain from such a decision. Firstly, these coatings, despite their characteristics, are still not suitable for rooms with a high content of wet steam. Secondly, often the cost of these quality materials is too high and is comparable to the price of floor tiles.
Laying tiles diagonally in a checkerboard pattern creates the illusion of expanding space
An inexpensive and fairly simple solution would be to lay linoleum. However, such a coating is highly susceptible to mechanical stress and will lose its aesthetic characteristics over time.
Given the modest area, the best option would be to cover the floor with tiles or porcelain stoneware. Only this material guarantees long-term use while maintaining its original appearance.
In general, repairing a toilet in a panel house, photographs of examples of which you will see below, should be done as functionally and simply as possible.
Photos, design and ideas for toilet renovation
First, you need to clearly define the requirements. The most important thing is that the chosen design concept must comply with sanitary and hygienic standards, taking into account the specifics of the toilet room. It is also necessary to focus on space; if there is a lot of space, then there are also more options for design.
- Not enough space. When there is not enough space, you cannot waste it on designer delights. Every square cm should be used productively. We need to think through the optimal concept. It is available to view photographs from the Internet, where experienced designers demonstrate exactly how they solve the problem of limited space.
- Average area. You can put a small cabinet here to store cleaning products, toilet paper supplies, magazines and other things.
- Lots of space. When you have 2-3 sq.m. or more, then in the toilet they put a sink, a small table, and hang a towel.
The combined bathroom deserves special attention. It is the most difficult to work with, since you need to adhere to the functionality of two rooms at the same time. In this case, it is better to trust the specialists, or take ready-made projects on the Internet as a basis.
What materials are best to use?
Tile is the undisputed leader in the design of bathrooms. At the same time, interior plaster and putty are quite appropriate in the toilet, because... there is no abundance of splashes here, as in a bathroom or a shared toilet.
Washable wallpaper can also be used. You just need to choose the right texture and print. Paintable wallpaper is affordable in price. In addition, they can be easily given a new look using a can of paint and a regular stencil.
Plastic is easy to install, hygienic and comes in a wide range of colors. With its help, it is easy to disguise pipes and achieve ideal contours of the room.
Interior paints also have their advantage. Especially when the interior is done in an ethnic or environmental style.
Do-it-yourself toilet repair: where to start?
First, they determine how large the work will be. If you plan to simply update the renovation, then little time and money will be required. But when the decision is made to make a major overhaul, you will have to invest a lot, both time and effort.
There are a few things you need to do first:
- Determine the scope of repairs. You need to roughly calculate the estimate and the time spent, and then make a final decision.
- Create a design project. This takes into account the functionality, features and style of the room.
- Remove old plumbing fixtures. This is carried out provided that capital work is planned.
- Remove old coverings from walls, ceilings and floors.
When the room is completely clean and ready for further actions, you can begin the main work. Preparing a toilet room for renovation takes about 1-2 days. It all depends on how easy it is to remove the old decorative trim. For example, with tiles things are more complicated than with wallpaper, and several times more.
Decoration of walls
Of course, the first thing the eye stops at is the walls. Here, perhaps, the best solution would be to veneer them with ceramics. This is the most practical and win-win option from a design point of view. This coating will last a long time without losing its aesthetic properties. The only disadvantage of this type of finishing will be the fairly high cost and the need to call an experienced tile-maker. However, the resulting result will be impressive.
The best finishing material for the walls of such a bathroom would be tiles.
Examples of bathroom renovations in a panel house using other materials will only confirm the correct choice of tiles. Painted and wallpapered walls require periodic restoration, although the range of possible colors is superior to ceramics. Wall panels cannot withstand significant loads and are subject to mechanical damage, but their low cost and ease of installation captivate many.
If you still need to save on wall decoration, you can use a combined option, where the areas adjacent to the bath or shower will be finished with tiles, and the rest of the walls - in any other way. This technique often only enhances the aesthetics of the room.
It would be useful to use mirrors in such an interior. Even a large number of them can only improve the design of the bathroom, since the ability of such surfaces to reflect surrounding objects will create the illusion of increased space.
Toilet floor repair. Screed and tiles. Step-by-step instruction
Repairing the floor in any room is the most expensive. Physical/time costs are also taken into account, especially if it is necessary to carry out not only finishing, but also screeding. Although there are many different types of screeds, it is recommended to choose the cement-sand format in the toilet, as it is excellent for subsequent installation of tiles.
Work is carried out according to the instructions:
- Preparing the base. It needs to be cleaned and leveled. The cracks are filled with cement composition. It is also advisable to prepare the right conditions. It is necessary that there is no draft in the room, and a suitable temperature should not exceed 25 degrees.
- Primer. Required for waterproofing and reducing the load from the base. This allows you to extend the service life of all materials used in the repair process. But some people prefer not to carry out waterproofing, which is considered by experts to be a serious mistake.
- Installation of beacons. This is required to ensure that the floor is level, without slopes or serious defects.
- Preparing the solution. Subsequently, it must be laid on the floor to the level of the pendulums in several layers. It is advisable to fill the screed within one day, or better yet, several hours. Then the cement will dry evenly, which will have a positive effect on the quality of the work performed.
- Drying out. The upper part must be constantly sprayed with water to ensure even drying.
- Laying tiles. It can be fixed with special tile adhesive. Some people prefer to work with cement compounds, since this option is a little more economical. But the savings are felt only if the work is carried out on a large room; in small rooms the financial difference is almost not felt.
Preparing surfaces for finishing
As a result of this point, all surfaces should be smooth and even. The easiest thing to do is with the floor. For leveling you will need to use a quick-drying self-leveling screed. For 1 m2, with a thickness of 1 cm, 13-14 kg of dry mixture will be required. For a toilet, 1 bag is enough, weighing 25 kg and costing 400 rubles.
The floors are first primed. We recommend immediately priming the walls and ceiling . The mixture is diluted according to the instructions on the package and poured. To avoid making too thick a layer, spread it out a little with a spatula. The complete hardening process takes 24 hours.
Leveling the walls in the toilet is a relative task. The fact is that in such a small area, littered walls are extremely rare. Therefore, if the walls of the toilet are concrete, then a primer is enough, and if they are plastered brick, then putty will be required.
For putty you need:
- Working spatula 30 cm long;
- Auxiliary spatula 5 cm long;
- Putty mixture 20 kg (Weber: Vetonit 310 r);
- Drill with attachment and container.
The setting time for cement-based putty is ≈ 90-120 minutes. Dilute 2-3 kg of dry mixture, following the instructions on the package. Then, using a short spatula, apply a small amount of solution to the long spatula. Applying the working tool at an angle of 20-30˚, spread the mixture along the wall from bottom to top. Consistently apply new portions of the mixture.
By adjusting the angle between the wall and the spatula, you can achieve different effects. With an acute angle, cracks and depressions are filled, with an angle close to straight, the applied composition is leveled.
Excess material spreading to the edges of the tool is collected with a short spatula and applied again to a long spatula.
Don't try to achieve a perfectly smooth surface in one pass. After treating all the walls and waiting 3-4 hours, you can go over the problem areas again.
Pay special attention to the corners. Sagging and rounding are not allowed on them. It is not necessary to achieve geometric accuracy in all corners; they will be covered with finishing materials, but excess in them should be removed.
After a day, the walls can be sanded to obtain a high-quality coating for further work.
The final chord of this stage is priming the prepared walls and floor.
There is almost always a slab on the ceiling, so other than priming, no preparation is required.
Repair of toilet walls. Tiles, PVC and MDF panels. Step-by-step instruction
You need to repair the walls according to almost the same instructions as the floor. You should:
- Clean the walls down to the ground.
- Level the surface. To do this, you can no longer use cement mortar, but ready-made plaster compositions. It is advisable to make a perfectly flat surface.
- Prepare the base for finishing.
Further actions depend on which finish was chosen. If you plan to lay tiles, then you should buy tile adhesive. It is most convenient to work with him. But you can also use cement mortar.
For plastic or MDF panels you need to make a lath. It is made of wood or metal. It is advisable to measure the room, since individual panels will probably need to be cut. Laying the panels is convenient; there are special grooves. After installing the first panel, all subsequent panels are placed in the grooves. Also, after the work is completed, it is necessary to secure the corners.
Cleaning the premises
Complete renovation, declares absolute cleaning of the room. There should be nothing left in it except the pipes of the common riser.
The sequence must also be observed. First, they knock off the tiles from the walls. Depending on the quality of the connection, this can be done with a hammer drill in the “chisel” mode or with a simple ax, using it as a spatula. They go along bare walls with a drill with a brush attachment.
It is recommended to remove the floor tiles too. This operation must be carried out with a jackhammer. There is no need to go too deep; usually there is a screed under the tile. The surface is also leveled using a metal brush.
Explanation: it is quite possible to lay new tiles over old flooring. But in this case, it will subtract 3-5 cm from the height of the room .
Only after this the whitewash is washed off from the ceiling. At the same time, wash away dust from the walls and floor.
The plumbing is dismantled last. To do this, turn off the water supply to the toilet tank, unscrew the fastener and remove the toilet drain outlet from the sewer pipe. If the toilet is very old, then you will have to break it out, since the drain was sealed with cement mortar. The entrance to the sewer pipe is cleared of pieces of sanitary ware and cement.
Before finishing work, put a plastic bag over the hole and tie it with a rope.
Explanation: Dismantling the toilet allows you to create a solid floor covering, without painstaking cutting and fitting of tiles. In addition, the toilet can be easily replaced later .
Ceiling repair. PVC panels, suspended ceiling. Step-by-step instruction
To repair the ceiling, you need:
- Clean all trim down to the base.
- Level the surface. It is better to use only special compounds, since the cement mortar does not stay well on such a surface, so the work will be done less efficiently.
- Solve issues with electrical wiring and lighting. This is thought out before the ceiling work is completed. It is necessary to bring out the wires to all lighting fixtures that are planned to be installed in the toilet room.
- Prepare the surface for the final stage.
Then again you need to act in accordance with the final coating that needs to be used. For plastic panels, a lathing is prepared, onto which they are subsequently fixed. Working with a stretch ceiling is quite difficult. This requires a special frame. Moreover, it is almost impossible to carry out all the work on installing suspended ceilings without the appropriate knowledge and at least minimal experience. Therefore, it is recommended to contact specialists if the choice was made in favor of a stretch ceiling. And PVC panels can be installed independently.
Reasons for choosing a separate bathroom in an apartment
There are a number of factors that influence the practicality of a separate room with a bathroom. Here are the main ones.
- Hygienic and sanitary standards are met.
- The layout divides the space with an individual character.
- The chance of a queue forming in the morning and evening is much less (if there is more than one resident).
There are numerous debates about whether it is worth having a combined bathroom in an apartment or not.
Note! Almost always, these two small rooms cannot be combined due to the presence of a load-bearing wall (its deformation, demolition is prohibited).
When combining rooms, a person will have the opportunity to increase the usable area, but the convenience of visiting will be lost.
If several people live in a family at the same time, using a shared bathroom is not so convenient.
Installation of sewer pipes and water supply. Step-by-step instruction
To install water supply and sewerage pipes, a wiring diagram is first developed. You can watch various video instructions available on the Internet. You can choose a ready-made project or create one yourself. The following are the instructions:
- The sketch is carefully worked out in full accordance with the dimensions of the room.
- Choose the method of placing pipes (hidden or open). Recently, mainly the first option has been considered, because it allows you to maintain the aesthetics of the room.
- They purchase materials.
- Installing pipes. If modern communications are used, there will be no problems with installation, since they are installed without the use of special tools. If these are old-style metal or plastic pipes, it is better to hire specialists.
What you should absolutely not do!
- Use deep, dark shades as the main color. They will “eat up” the remaining space and have a detrimental effect on the nervous system. Yes, such interiors look cool in magazines. However, in life they quickly become boring.
- Brick up communications. If they need to be closed, carefully consider how you can quickly access the leaking pipe in the event of an emergency.
- All surfaces should be decorated with relief tiles. A large texture will visually reduce an already compact room. If you want something unusual, decorate one wall or strip with relief material. Even better, make an imitation of a painting or poster.
Installing a box on sewer pipes in a toilet. Hiding the pipes
To install the box, you can use ready-made options on the construction market, or make it yourself. If you plan to work independently, you must:
- Draw up a project, take measurements and draw a sketch.
- Buy the required amount of materials.
- Assemble the box. Tools may be required, but fasteners are a must.
Next, you need to install the box and secure it to the wall. If you plan to install a wall-hung toilet, then you will not need to hide the pipes separately; in this case, the tank and other plumbing communications will be initially closed behind the wall.
If you purchase a box, you need to buy a model that fits the size, then mount it on the wall.
Plumbing installation
This article discussed the renovation of a toilet step by step. If you strictly adhere to the instructions described in it, then you will certainly be able to do everything at a high level. However, this is not the end, since you still need to install and connect the plumbing equipment, and this is also a very labor-intensive process.
It is performed according to the following algorithm:
- The toilet is installed in the designated place. At the same time, to prevent it from fidgeting on the tiles, it is recommended to place it on a special rubber lining.
- We make marks for the holes for the fixing bolts and drill them.
- We install the plumbing fixtures and fasten them with anchors, after which we connect them to the drain using a corrugated pipe.
- Next, screw the flush cistern to the toilet. The kit includes all the necessary fasteners, so you don’t have to buy anything extra.
- We connect the equipment to the water supply system.
- If you also planned to install a sink in the restroom and supplied hot and cold water for this purpose in advance, then there should not be any special problems with this. The sink is simply mounted on the wall and secured with anchor bolts. It is recommended to use an additional bracket, which will give the sink more stability.
- We connect it to the sewer drain through a siphon and install taps for hot and cold water.
When all work on the installation of plumbing equipment is completed, it is recommended to check the quality of all connections so that there are no leaks anywhere. After this, you can begin to install lamps in the ceiling and start using the bathroom. This, in fact, is the entire turnkey renovation, which you can handle yourself without the involvement of professional builders.
Toilet installation. Step-by-step instruction
Experts do not recommend installing the toilet yourself, especially if it is a complex wall-mounted plumbing device. To do this, it is better to hire specialists who are well versed in the matter, as well as use professional tools. If you have to install it yourself, follow the instructions:
- Preparing the toilet and materials
- Removing an old toilet
- Assembling the toilet structure in the right place
- Connection to sewerage
- Water connection
Installation of lockers. Step-by-step instruction
It is advisable to install cabinets in the toilet room. Here you can store various toilet cleaners, toilet paper, air fresheners and other household supplies. To install lockers you will need:
- Drill holes in the wall (if this is the fastening method).
- Hang cabinets (or place them on the floor).
- Adjust the location. The doors need to be easy to open. If they open with difficulty, this indicates a crooked installation.
If you plan not to buy a cabinet, but to assemble it yourself, then measurements are first taken, after which a sketch is drawn up. Then the materials and tools for installation are prepared and the guide discussed above is used.
Ideas from designers
Since the room is tiny, it is advisable to use as many ways as possible to visually expand the space.
- Lines of perspective . Photo wallpaper or obliquely laid tiles can “dissolve” the walls and allow the gaze to glide into the distance.
- Contrast of variegated and monochromatic . If your soul asks for bright colors, then bring them into the interior. Still, the excess of colorful prints should be diluted with a balanced monochromatic wall color. An excellent option is when only one surface is decorated brightly. In this case, it is compensated by other design elements.
- You can combine the toilet with the classic interior of the entire apartment using small paintings against the background of a smoothly painted light wall. Remember that. that such a design requires perfectly smooth walls. Yes, you can cover them with plasterboard. But this will steal 5 cm on each side. This is an unforgivable waste in such a small area. It is better to properly plaster the walls. If you want to use drywall. Then just stick it on the base. Avoid frame installation.
- The combination of vertical and horizontal lines works wonders. It makes sense to “expand” the back wall with horizontal stripes. This could be a panel of a contrasting color, shelves, cabinet fronts. The interior is given dynamism by the alternation of wide light areas and thin dark lines.
- Mirror and glossy surfaces can “erase” the boundaries of a room and make it more spacious. There is no need to arrange mirrored corridors. It is better to hang one large mirror near the washbasin on the side wall or on the cabinet behind the toilet.
- Small elegant racks can accommodate many items. The space around the cistern will be used to maximum advantage.
- Roller blinds are a simple solution for those who do not want to wall up pipes in inconvenient boxes. In addition, there is quite a lot of space around the pipes for storing household chemicals and cleaning tools. And if you don’t like ordinary white curtains, there is always the opportunity to apply photo printing on them and turn them into the main attraction of the interior.
- A good, beautiful, well-made cabinet can not only accommodate your entire library, but also serve as an aristocratic decoration for such an intimate corner. This is a great move for interiors in a classic style.
- A toilet and sink combination not only saves space, but also reduces your utility bills. Water from the washbasin goes into the tank. It makes sense to use liquid soap so that the water container does not become overgrown with soap deposits. Futuristic models look elegant, but they also cost a fortune. However, there are also simpler forms that have a more reasonable cost.