Is it possible to finish screeding the floors in one day and begin laying the finishing coating the next day? Not so long ago, this seemed unrealistic, because a “wet” cement screed requires at least 28 days for final drying. But about 15 years ago, the revolutionary technology of Knauf loose floors appeared, which changed the understanding of this process. One of the names assigned to it for this reason is “superfloor Knauf”.
Knauf floor screed diagram
Today, there is probably no person, one way or another connected with the construction industry, who has not heard of this company, which produces a variety of finishing and building materials, as well as paint and varnish products, components of suspended ceiling systems, hydro, heat and sound insulating materials, fasteners, various tools.
But most of all, this company is known for its technology of plasterboard facing materials, perfected to the smallest detail, being its ancestor. Founded by the two Knauf brothers in 1932 as a manufacturer of gypsum building mixtures, already in the 50s the company began producing the first plasterboard materials, soon becoming the undisputed leader in this technology. And today we can confidently say that “Knauf” and drywall are two inextricably linked concepts.
Do-it-yourself Knauf bulk floor
Basics of Knauf dry screed technology
The Knauf screed method is essentially a long-known technology of semi-dry or dry prefabricated screed, when sheet panels of the rough coating are installed on a substrate made of a thin layer of finely dispersed material. The soft and seemingly loose backfill pressed by them becomes strong and hard, capable of withstanding quite large loads.
Backfill
In the Knauf company method, expanded clay sand of a very fine fraction with a granule size not exceeding the standard 4 mm is used for this. After leveling the backfill using the “beacon” rule, it is covered with sheets of gypsum fiber material. The backfill thickness should be in the range from 30 to 100 mm.
Gypsum fiber sheets (GVL) differ from plasterboard in the absence of a top paper coating and are a uniform mixture of gypsum and cellulose fibers reinforcing it. Possessing high strength and fire resistance, they are also quite environmentally friendly and chemically safe.
GVL floor element 1500x500x20 mm KNAUF
Structural elements of the Knauf superfloor are produced in the form of panels glued together from two GVL sheets with dimensions of 1200 × 600 × 10 mm, offset relative to each other to form folds 50 mm wide along the perimeter, along which they are fastened when laid together using adhesive mastic and self-tapping screws . The total thickness of the resulting superfloor coating is 20 mm.
General diagram of the structure of the bulk floor
The design of this screed is extremely simple. Several layers of materials are laid sequentially, according to established technology.
General diagram of the structure of the bulk floor
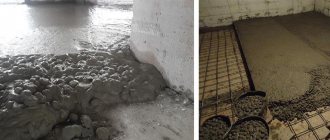
The base is carefully leveled and cleared of household or construction debris. Next, the waterproofing film is spread. It is important to prevent its ruptures, cracks and holes. The film extends 15-20 centimeters onto the walls. To fix the substrate, tape and damper tape are used.
The next step is to pour fine-grained expanded clay onto the film. Perlite sand, slag, and pumice can replace it. The layer is leveled. You can additionally put foam boards or mineral wool on it. This will provide auxiliary sound, moisture and thermal insulation. However, this step is not required. At the final stage, the sheet layer of the selected coating is installed.
The thickness of the entire floor must be at least 4 centimeters. At the same time, at least half of them are allocated to the upper sheet layer. Compliance with this rule is mandatory, because otherwise the insulating properties of the coating will not be ideal. The maximum thickness is not limited.
Flaws
KNAUF-superfloor is a factory-made floor element glued together from two small-format moisture-resistant sheets
If we talk about the disadvantages of Knauf technology, then there are practically none, although many here call this material “phobia of water”, but leaks and flooding can thoroughly ruin any type of flooring. Even if the consequences of such accidents do not appear immediately, after some time they will certainly make themselves felt in the form of fungus, mold and rot. But the ease of dismantling Knauf floors allows you to replace them with the least labor costs compared to other types of coatings.
Many homeowners and master installers, for reasons of economy, believe that on the upper floors of buildings and structures, laying a moisture-proof film under the base of a dry screed can be neglected. This is a serious mistake, since moisture can enter through the floor slabs from adjacent rooms. In addition, such a film also serves as a vapor barrier, protecting materials from condensation.
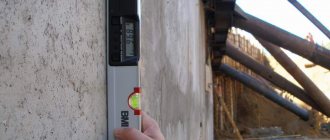
Minimum and maximum surface deviation
Gypsum fiber sheets are used to protect and cover a layer of dry material
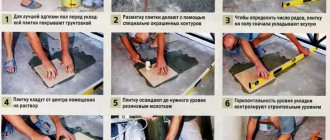
To carry out more accurate calculations, the “MIN and MAX surface deviations” fields were included in the Knauf dry screed online calculator. The values entered allow you to understand how badly the base is damaged and what the maximum/minimum depth of each of them is.
To measure these values, you will need to prepare a laser or bubble level, nylon thread and tape measure.
Settlement operations are performed in the following sequence:
- The building level is applied to the surface of the base near the plane of the wall. One end of the level is placed on the floor plane, the other is found in the ideal position relative to the horizon line. Next, either fix the level, placing something from available materials under it, or immediately draw a line on the plane of the wall;
- Next, along the resulting line, markings are drawn on the surface of all walls. According to the markings, the nylon cord is stretched in several places in the room - along, across, diagonally or every 50-100 cm;
- The distance from the stretched cord to the floor surface is measured. The maximum and minimum values are located at each end of the room.
The found values will be the input data that will indicate the presence of certain deviations. This method can be used both for heavily damaged foundations with strong distortions on one side of the room, and for rooms with minor differences.
It is important to remember that the dry screed calculator provides approximate results that should be used as a guide when preparing components and additional materials. During the procurement process, it should be taken into account that in practice the consumption of dry aggregate can increase up to 10-15%.
Laying method
In the simplest method of constructive dry screed technology discussed here, which has the designation “Alpha” in Knauf company terminology, a single-layer installation of gypsum fiber board is used, but there are other options that involve a more complex “pie” using additional layers of polystyrene foam or porous fiber sound and heat insulating materials this company.
Required materials:
- Knauf superfloor panels of the required total area with a small margin. One sheet of material covers ¾ m²;
- expanded clay backfill "Knauf Compavit" at a rate of approximately 20 l/m². It can also be replaced with domestic expanded clay of good quality with a fraction size of no more than 5 mm;
- Knauf self-tapping screws - approximately 12 pcs/m²;
Self-tapping screws Knauf
- edge tape with a length equal to the perimeter of the room;
- Knauf adhesive mastic - 50 g/m². You can also use PVA glue;
- Knauf putty - 150~200 g/m²;
puttyputty Knauf
- Knauf deep penetration primer;
- vapor barrier polyethylene film with a total area 20% larger than the size of the room.
Required tools:
- drill, screwdriver;
- jigsaw;
- drywall knife;
- measuring instruments: tape measure, meter, square, level;
- metal profile for installing “beacons”;
- rule for leveling the backfill layer along the beacons.
What kind of material?
Expanded clay is understood as porous granules of fired mineral material. Such granules are obtained by sharply heating the raw material - clay. When quickly heated, the moisture and dissolved gases contained in the clay expand sharply, creating a foaming effect. As they harden, pieces of pore-filled clay acquire a kind of crust, which reduces the hygroscopicity of the material.
The advantages of expanded clay include:
- low cost due to cheap raw materials and simple manufacturing technology;
- light weight, which is extremely important when installing screeds on floors with weak load-bearing capacity;
- ability to use on floors with significant height differences;
- high thermal insulation properties;
- fire safety;
- durability;
- environmental friendliness.
In addition, expanded clay floor screed perfectly cuts off extraneous sounds.
The only disadvantage noted is the need to backfill with a thick layer of expanded clay filler. This leads to the need to raise the floor level.
Expanded clay
The most common material for dry backfilling of floors is expanded clay. It consists of porous clay granules fired in a kiln at high temperature. Expanded clay has a low weight, affordable price and excellent resistance to rodents in private homes. To backfill the floor, it is recommended to use expanded clay of fraction 5-10 mm. When using larger fractions, the quality of the backfill decreases and the technology is disrupted. The difference between the granules should be minimal to prevent subsidence of small grains between large ones. It is best to use homogeneous granules. We recommend buying expanded clay in bags; it will be convenient for you to transport the material and backfill.
Advice: do not use sand together with expanded clay, this will cause the floor to creak. The thickness of the backfill layer should be at least 3-4 cm.
| Indicators | 10-20 mm | 5-10 mm | 0-5 mm |
| Bulk density, kg/m3 | 280-370 | 300-400 | 500-700 |
| Crushing strength, N/mm2 (MPa) | 1-1,8 | 1,2-2 | 3-4 |
| Grading, % | 4 | 8 | 0 |
| Frost resistance 20 cycles, gravel weight loss, % | 0,4-2 | 0,2-1,2 | not regulated |
| Percentage of crushed particles, % | 3-10 | 3-10 | No |
| Thermal conductivity, W/m*K | 0,0912 | 0,0912 | 0,1099 |
| Water absorption, mm | 250 | 250 | 290 |
| Specific effective activity of natural radionuclides, Bq/kg | 270 | 270 | 290 |
Vermiculite
Vermiculite is a material from the group of hydromicas with a layered structure. When heated, the plates form worm-shaped columns of golden or silver color. The material is of natural origin and has a layered structure. The advantage of the material is its light weight, which reduces the load on the floor and ceilings. One cube of vermiculite weighs 150-160 kg. Expanded clay in the same volume will weigh 600 kg. For dry screed, only expanded vermiculite can be used.
| Properties | Expanded perlite | Expanded vermiculite |
| Bulk density, kg/m3 | 60-200 | 95-150 |
| True density, g/cm3 | 2,35 | 2,40 |
| Porosity, including intergranular voids, % | 90-98 | 84-95 |
| Firing temperature, degrees Celsius | 800-1020 | 1000-1150 |
| Firing time, s | 12-30 | 2-7 |
| SiO2 | 65-80 | 36-41,2 |
| Al2O3 | 10,8-15 | 10,1-15,7 |
| Fe2O3 + FeO | 0,3-12 | 3,9-29 |
| CaO | 0,4-0,5 | 0,4-5,8 |
| MgO | 0,3-2,8 | 5,1-27,8 |
| K2O + Na2O | 1,9-9,9 | 1,2-11,8 |
| Loss on ignition | 1-3 | 1,2-11,8 |
Cheap doesn't mean bad
Expanded clay is an inexpensive material. In order for repairs using it to be as cheap as possible, you should take care of purchasing the required quantity at once, since calculating the amount of expanded clay for the floor is not difficult. To do this, calculate the area of the room (length x width) and multiply by the thickness of the layer. The result is obtained in m3, and manufacturers often sell expanded clay in bags marked l (liters). Conventionally, we can assume that 1 liter is 1 dm3.
If the thickness of the screed is not uniform, then its average value is taken: the smallest and largest heights are summed up and divided by two. You should buy 10% more material than the amount received. Those who do not want to do calculations can use a special calculator, which is available on almost every construction site. By entering the numbers for the area of the room and the thickness of the screed, you can get the result in liters, bags or m3.
You can make expanded clay floors with your own hands, which will further reduce costs.
Preparatory stage of work
Before starting work on the screed, it is necessary to dismantle the old existing floor covering - it can be parquet, wooden flooring, old tiles. If this is an overlap, it is necessary to repair large dents and holes with mortar or putty. After the solution has dried, it is necessary to vacuum the floor surface, remove all construction debris, and in some cases it is necessary to prime the surface. By this time, all materials must be purchased and delivered to the site. After this, you can begin installing a vapor barrier.
Fourth step. Backfill
Backfilling process
The thickness of the backfill layer, as noted, depends on the nature of the existing irregularities and laid utilities. In most situations, a screed thickness of 30-40 mm is sufficient. With a greater thickness, the structure, as noted, will require reinforcement with an additional layer of sheet material.
Leveling the backfill using the rule
Do not cover the entire base area with dry mixture at once. Sprinkle in enough material so that you can conveniently cover it with several sheets later. Calculate the area to be filled so that you do not have to walk on the material - your feet will get buried, which is very inconvenient. In addition, the quality of fastening sheets in the event of contact of backfill crumbs with glue will significantly deteriorate. The backfill is leveled along the beacons.
Leveled backfill
Fifth step. Installation of sheet material
Uncover
Sheets of moisture-resistant plasterboard, chipboard or moisture-resistant plywood are laid on top of the leveled backfill. Sheets of material are alternately placed on top of the backfill and fastened to each other. Your task is to mount the first element as evenly and correctly as possible, because... it is along it that all subsequent plates will be oriented. Try not to submerge the leaf in the dry mixture. Excessively moving the material along the surface is also not recommended.
Laying sheets and fixing edges with glue
Lay the flooring from the door into the room - this will ensure maximum evenness of the screed. The slabs are mounted in 1 or 2 layers - the quantity depends on the thickness and other significant characteristics of the material. When using gypsum fiber elements, the first sheets must be removed from the fold. Each sheet laid along the walls is subjected to similar processing. Thanks to this, a double layer of sheets will be provided over the entire base area. If you do not remove the folds from the sheets, the backfill material will fall into the voids, the flooring elements will gradually begin to dig into the screed and after an indefinite period of time the floor will fail.
Laying sheets and fixing edges with glue
Install sheet elements like brickwork, maintaining the displacement of the seams. This will ensure maximum stability and high strength of the base. At the stage of laying the flooring elements, you may need outside help.
Fastening sheets with self-tapping screws
Fasten the sheets through the folds using self-tapping screws, screwing them in every 100-150 mm. For additional fixation of the decking, use construction adhesive.
Fastening the last sheets
After laying the flooring, you only have to do the following:
- seal seams, fastening points and, in general, any irregularities using putty;
- sand the areas treated in the previous step;
- treat the surface of the flooring with bitumen or other insulation with similar properties.
Finally, a finishing coating is applied at the owner’s discretion. At this point, the arrangement of the dry backfill is considered complete. By following the above recommendations, you will independently cope with all stages of the event considered, save money on the services of third-party specialists and receive backfill of the highest quality, because every step of its arrangement will be controlled by you personally.
Good luck!
Video - Dry backfill for the floor
Rules for choosing glue
The problem of how to glue polymer products seems easy to solve only at first glance. In order for the parts to be securely and permanently fixed, several nuances need to be taken into account.
Types of plastics
Today, various synthetic materials are used to produce various types of products.
There are different types of plastic
- PET - polyethylene terephthalate today is in great demand for the manufacture of packaging, including for food products.
- HDPE - high-density polyethylene is used for the production of containers, pipes, film materials, toys, etc.
- PVC - construction and finishing materials, pipes and films are produced from polyvinyl chloride.
- LDPE - low-density polyethylene is used in the production of injection molded products, films, pipes, and cable insulation.
- PP - polypropylene is in demand today in electrical engineering, mechanical engineering, construction, and also in the production of food packaging.
- PS - a wide range of products are made from polystyrene: from toys and dishes to building materials.
A separate group includes other types of plastics: polyamide, polyurethane, polycarbonate, composite materials containing polymers.
Cellular polycarbonate
To understand which composition will be the optimal solution for gluing products, you need to find markings indicating the type of plastic. If it is not possible to accurately determine the material, you have to use universal means.
Types of adhesives
The main problem when gluing plastic is its smooth surface, which impairs the adhesion of materials. Therefore, the glue must contain a component capable of dissolving the synthetic base. As a result of changes in the molecular structure of the surface layer of plastic, reliable fixation of products is ensured.
The types of glue for plastic are given below.
- Hot melt adhesive. It is produced in a solid state, in the form of rods. They are installed in special guns, in which the heating necessary to melt the material is carried out. In liquid form, the glue is applied to the plastic product. Fixation with this composition is not very strong, so it is better to use hot melt adhesive for connecting small parts. Hot melt adhesive is also available, which can be applied without a gun.
- Contact.
This product is toxic, but is capable of creating a highly durable connection. Typically, contact adhesive comes in the form of two components (base and hardener), which are mixed before use. A thin layer of applied product softens the surface of the plastic. After tightly compressing the glued products, a reliable seam is formed. Universal contact adhesive - Liquid. The water-based composition is not highly resistant to mechanical stress. It takes a long time to dry. But due to the fact that after its use the surface of the fastened elements is not deformed, it is convenient to use for working with small-sized parts. Most often, such compounds are used to repair plastic with a porous structure.
- Reactionary.
This glue is distinguished by its reliable connection and accessibility. Single-component and two-component formulations are available. Depending on the expected operating conditions of the product being glued, you can select the optimal solution with different resistance to certain types of influences (water, ultraviolet radiation, temperatures, etc.). Bonding plastic
What it is recommended to pay attention to when choosing glue:
- drying time;
- seam strength;
- resistance to climatic influences;
- packaging volume;
- ease of application;
- price.
Today, a large number of compounds are produced for gluing plastic objects that have proven themselves to be excellent among consumers.
Installation of GVL slabs from Knauf
The next stage is the actual laying of the dry screed slabs. The sizes of gypsum board sheets for dry floors are: 1500x800x12.5 mm; 1200x600x20 mm; 2500x1200x12 mm, other sizes available. Typically, gypsum fiber boards are made by gluing two gypsum fiber boards together. Installation of slabs usually begins from the doorway from left to right. In the first slab adjacent to the wall, cut out the outermost joining quarter with a jigsaw. The second plate is laid on the first after coating the joint quarter with PVA glue. The third and fourth are laid in the same way. All sides that are adjacent to the walls are cut off from the connecting quarters. The last slab in the first row is cut to the remaining size. The second row begins with the cut tiles remaining from the first row. In this way, maximum savings are achieved and the seams of adjacent rows are shifted by at least 250 mm. After laying three rows, all connecting joints are fastened with self-tapping screws using a screwdriver with a pitch of about 300 mm.
The self-tapping screws are screwed strictly vertically with a slight recess of the head by about 1 mm. If the screw goes in at an angle, you must unscrew it and screw in a new one next to it.
After all the slabs are laid and secured with self-tapping screws, remove dust and debris using a vacuum cleaner. Depending on the type of finishing decorative coating, such as linoleum or carpet, all joints and recesses from self-tapping screws are sealed with Knauf putty. After this, it is advisable to let the screed dry for about a day and you can begin to finish the floor. You can use a knife to cut off the protruding edges of the plastic film and edging tape around the perimeter of the room.