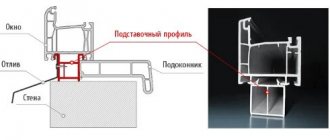
With a minimum budget for finishing work, laying porcelain tiles on the floor should provide the highest possible decorative value to the interior. To do this, it is necessary to select the best option from several layout methods, technologies for applying the adhesive mixture, and methods for controlling the flatness of the facing layer of cladding.
Laying porcelain tiles on your own includes the following sequence of actions:
- leveling the concrete slab with screed, self-leveling floor (if necessary);
- treatment of the base with deep penetration soil;
- choosing a layout scheme and counting the number of tiles;
- tool preparation;
- determining the method of applying glue;
- calculation of seam width;
- choosing a method for controlling the plane of the front surface;
- laying with trimming in places adjacent to the walls;
- seam design.
There is no single, universal technology for finishing floors with porcelain stoneware for any conditions. Even in neighboring rooms of an apartment, different techniques may be used to reduce the labor intensity of work, the repair budget, increase productivity, and the artistic value of the interior.
Preparation and calculations
First, establish the sequence of work and draw a diagram.
At the moment, there are several options for how to lay porcelain tiles on the floor. You can lay out a mosaic, place it in a checkerboard pattern, or create a pattern using products of different colors. It all depends on your ideas and imagination.
As soon as you draw up a diagram, you will understand what quantity of tiles and adhesive to purchase in the store. You can use online calculators for calculating finishing materials.
- Decoration Materials
How to glue tiles: a detailed guide that will leave no questions
Grout for joints
Just as important as choosing the adhesive is choosing the right grout mixture. Grout for joints is divided into two main types:
- Cement grouts are made from sand cement, chemical additives and dyes. Pros: affordable price, wide variety of colors and shades. Cons: poor resistance to water, low strength.
- Grouts based on epoxy and furan resin are more elastic and waterproof grouts compared to cement grouts. Pros: good resistance to water, high strength. Cons: high price, poor miscibility with dyes.
Just like when choosing an adhesive, when buying grout, you should take into account the effect of water on the tiles.
Selection of materials
Nowadays there is a huge selection of porcelain stoneware in stores. It differs in color, structure, purpose and is divided into several types.
Choosing a tile
Technical
This material is not suitable for interior decoration of apartments or houses, and therefore has a very unsightly appearance. However, it differs from all others in its increased strength and wear resistance.
Polished
The name of this product speaks for itself. To achieve an absolute mirror shine, manufacturers not only polish the surface, but also coat it with a special varnish. Its main disadvantage is that it is very traumatic.
Matte
It did not go through the polishing stage, which gives it some advantage in price and operation: unlike the polished look, it is much cheaper and stronger.
Structured
Its surface imitates the structure of various materials, from leather to wood.
Lapped
In other words, not completely polished. On it you can find both matte and shiny areas. A very non-standard option that is suitable for bold design solutions.
Glazed
It is covered with a layer of colored glaze. However, despite its attractiveness, such a coating quickly wears off or chips, so this option is best glued in places where it will not be subjected to strong mechanical stress.
Satin
To make it, wax and mineral salts are used, which give it shine, but do not make the surface slippery.
Choosing glue
Depending on what product you have chosen and where you are going to do the masonry, you need to select an adhesive composition.
Polyurethane adhesive that can be used for finishing work both outdoors and at home. Its versatility and good grip fully justify the high price.
Dispersion adhesive - it contains special hardening agents and epoxy resin. It is well suited for rooms with high humidity, including the bathroom.
Cement glue - its advantage is that it is the most affordable of all mixtures, but after dilution it dries quickly and causes a lot of trouble. In addition, it is destroyed when exposed to moisture, so you should immediately purchase moisture-resistant grout for it.
Choosing grout
Don’t forget to choose grout, which also comes in two types.
- Cement - the name immediately reveals its composition. Such mixtures have a very affordable price and a huge range, but they are susceptible to moisture and have low strength.
- On the contrary, grouts based on epoxy resin are very resistant to water, but they do not mix well with dyes and are expensive.
Pexels
Craftsmen advise buying gray grout, since it is not so easily soiled. In any case, select a mixture that will match the color of the floor you have in mind. But you can also choose a contrasting option.
How to work with porcelain stoneware
Before we begin to describe the work, let’s consider the material itself in order to better understand what we will have to face.
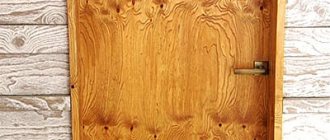
Wood-look porcelain tiles
Porcelain stoneware is a modern finishing material that belongs to ceramic products . What distinguishes it from ordinary tiles is a different production technology and the raw materials used, which results in the following.
- The material turns out to be incredibly durable, capable of withstanding large static loads.
- It has a very low level of water absorption, making it an excellent solution for outdoor installations.
- Porcelain tile has a cast structure and is colored in most cases throughout its mass, which indicates its high resistance to abrasion. There are models that are coated in the same way as regular ceramic tiles with glaze, but this is very rare.
- The surface of the material can have any texture and imitate other materials, for example, wood or natural stone.
Preparing the base for the tiles
If you roughly imagine how to lay porcelain tiles on the floor with your own hands, then this work may seem quite simple and easy. However, it requires a special approach and careful preparation of the floor.
Pixabay
First, use a level to check the floor. If there are many bulges, protrusions or depressions in it, then it will have to be filled with cement screed. If it is already smooth, then all that remains is to clean it and degrease it.
After it has dried, fill the floor with self-leveling mixture and let it dry too. This way you will achieve a perfectly even coating.
After this, apply the markings. If you have a laser level, then this will save your time. Determine the center of the room, put a point in this place, and draw four lines through it: two diagonal, which diverge at the corners, and two perpendicular, abutting the walls.
Next, following the instructions on the package, mix the glue solution and begin installation.
Mixture parameters
Within each of the considered classes there is a smaller division according to operational characteristics. Compositions marked with the number 1 are called basic. They are suitable for laying porcelain tiles if the further use of the coating does not involve any difficult conditions. Improved adhesives have the designation 2 and are intended for heavy weight tiles, for example, large-format porcelain stoneware, and are characterized by increased adhesion rates, which means they can withstand high loads.
Compositions marked F (fast) set quickly. This glue is suitable for an experienced craftsman if the work needs to be completed in the shortest possible time. In this case, the tiles can be grouted after 4 hours, and the coating can be used after another 3-5. The antipode is adhesives marked E. They begin to set only after 30-40 minutes. Therefore, this glue is very convenient for a beginner: you can have time to correct all the flaws. Mixtures S1 and S2 have high elasticity, which is good when laying porcelain stoneware on a heated floor, or simply if the house gets a lot of traffic in the off-season. The list can be completed with T adhesives. They are designed specifically for use on vertical surfaces. Their unique properties prevent the tiles from sliding under the influence of gravity.
How to lay porcelain tiles on the floor: all the steps
[email protected] _master
Installation begins from the center of the room. Glue is applied and spread over the surface with a notched trowel. The thicker the tile, the larger the adhesive layer should be. However, it should not exceed five millimeters.
[email protected] _master
The product must be lubricated with adhesive on the back side, then laid and tapped with a rubber hammer. Repeat these steps with other parts, not forgetting to put dividing crosses between them.
[email protected] _master
Constantly check the evenness of the laying with a level. If you notice that the stacked items do not match in height, tap the protruding surface with a rubber mallet. Excess glue that comes out through the joints can be removed with a rag or sponge. Tiles laid about an hour ago may become lower. This causes the coating to shrink.
Pixabay
When laying near walls, you may need to trim the flooring. You can find information on the Internet that a glass cutter can handle this task, but such information is erroneous. Such a tool cannot cope with the thickness of porcelain stoneware, so use a grinder to cut it.
After completing the installation work, let the glue dry for 24 hours. Next, you can dilute the grout and begin processing the seams. It is most convenient to fill the grooves and remove excess mixture with a rubber spatula. After the grout has dried, remove any excess with a sponge or damp cloth.
When looking for tips on how to lay porcelain tiles on the floor, you may come across information about a seamless laying method, which supposedly will help save on materials. However, it is worth considering that it can lead to displacement of products and curvature of the masonry completely.
Tools
Porcelain tiles are laid on the floor using standard and special tools:
- mortar container - usually a plastic bucket 15-20 l;
- trowel or spatula - for laying the adhesive mixture;
- notched spatula - for uniform distribution of glue;
- mixer or attachment for a drill/hammer – for stirring the glue;
- roller, brush - for applying primer;
- level – for horizontal control;
- crosses - to create seams of the required size;
- tile cutter - manual, electric or angle grinder (“grinder”) with a diamond blade;
- primer;
- tile adhesive - any domestic/foreign brand.
When using SVP tile leveling systems, experts recommend “3D crosses” with green “fungi”.
The wedge here is double, which prevents the cladding from warping.
The lower element, embedded under the tile, firstly, has a soft ring on top, which allows you to level out errors of excessive tightening force, and secondly, it is guaranteed to break off in the middle of the height of the tile, as in the bottom photo.
This facilitates the grouting process, since the master does not need to additionally trim the body of the plastic element that sticks out too much from the seam.
Rules for laying porcelain tiles on a heated floor
Separately, it is worth considering the question of how to properly lay porcelain stoneware on a heated floor. Although the process is not very different from conventional masonry, there are still several features.
First, check the functionality of the heating system. If you have water heating, then all the pipes need to be covered with a cement screed; if the heating is electric, then you don’t have to make a screed and lay the material directly on the rubber backing.
When laying glue, keep in mind that the degree of heating of the surface depends on its layer. The larger it is, the less heating will be. The same principle applies to the thickness of the porcelain stoneware product itself.
The glue must be distributed over the entire surface, avoiding damage to the heating elements. Do not turn on the heating itself until the glue and grout have completely dried, and after installation is completed, the temperature should be increased in stages so that cracks do not form under the coating.
To improve the thermal conductivity of the laid floor, we recommend leaving a distance of at least two millimeters in the seams.
The whole process can be seen in the video.
Stages of work
An important criterion for the quality of finishing work is compliance with the correct sequence of stages. Step-by-step instructions will help with this:
- Prepare all necessary materials and tools.
- Start preparing the surfaces. This stage includes several more: elimination of cracks and chips, dust removal and priming.
- Choose a laying option depending on the type and pattern of the tile.
- Mark the surface.
- Prepare the masonry mixture using a mixer and drill.
- Laying tiles.
- The facing is grouted.
Laying porcelain stoneware on the floor can only be done after preliminary leveling and waterproofing of the base surface. Floor tiles are heavy and larger in size than wall tiles. They will be under a lot of stress. If the base surface is not leveled, cracks may appear on the facing coating. Installation on walls does not require such careful preparation of the base.
Preparation
When renovating an apartment yourself, it is important to first read the manufacturer’s instructions for preparing laying and grout mixtures and strictly follow them. The quality of finishing work is ensured by the correct marking of the base. This is best done using a laser level.
Laying porcelain tiles on the wall and floor is possible in two ways:
- with preliminary soaking of the tiles;
- by moistening their back side by spraying from a spray bottle or by hand.
The option for performing the work is chosen depending on the degree of hygroscopicity of the base surface. If it absorbs a lot of moisture, as is the case with wood, the tiles are soaked. This will prevent the masonry mixture from drying out too quickly due to water being absorbed by the base.
Laying on floors and walls
At the initial stage of work, they become familiar with the different methods of laying porcelain stoneware. Manufacturers offer a wide range of tile colors and geometric shapes. There are collections with and without inserts, consisting of square and rectangular products. In order for the cladding to be beautiful, its correct layout is important. Manufacturers always give recommendations regarding it, but you can choose another solution.
Most often, two-color porcelain tiles are laid in a checkerboard pattern. Plain slabs or with the same pattern can be laid out in several ways:
- with rows shifted horizontally (like brickwork);
- with offset rows horizontally and vertically;
- diagonally;
- in a spiral;
- herringbone
Any porcelain tile has almost zero water absorption. Therefore, special requirements are placed on the application of glue. Thin ceramic tiles can be laid by applying the masonry mixture one-sidedly: on the back side of the product. Porcelain tiles require double-sided application: both on the tile and on the base. This will ensure the absence of cavities in the dried mixture and the strength of the facing coating.
When calculating and purchasing glue and grout for finishing with porcelain stoneware, the distance between the tiles is also taken into account. Seamless installation requires more materials.
Stages of masonry work:
- prepare the base;
- using a level, tape measure and marker, mark the base surface;
- prepare glue;
- Using a notched trowel, apply the mixture to the wall and back surface of the porcelain stoneware;
- gently press the tile to the surface;
- apply the mixture to the second tile and place it next to it;
- place a cross between them;
- check with a level the evenness of the resulting surface;
- if necessary, beat the porcelain tiles with a mallet (this work requires special care).
Sawing and drilling
Porcelain stoneware can be processed in several ways. The best choice for cutting slabs is a tile cutter. But since porcelain stoneware has increased strength, it is recommended to use professional or semi-professional. A manual tile cutter is suitable for processing thin tiles: thickness from 3 to 6 mm.
You can cut porcelain tiles with a grinder. To complete the task, you will need a stone or diamond-coated disc. This method of cutting is complicated by the fact that a large amount of dust will be generated during the cut. Therefore, it is necessary to have a respirator. You will also need safety glasses to prevent small particles of porcelain stoneware from getting into your eyes.
Completion of work
After the glue has set, begin grouting the joints. The mixture is prepared in small portions and applied with a rubber spatula, trying to completely fill the gap with it. When laying, the seams are left clean: excess glue is removed from them in a timely manner.
After applying the grout and setting it lightly, wipe the entire treated surface with a damp sponge. This removes excess mixture and smoothes the seams. Thorough washing of porcelain tiles to remove grout residues is not required. After the mixture has hardened further, take a grout float and smooth the seams. Their surface must be perfectly flat.
Laying porcelain tiles on a wooden floor
This material can also be placed on a wooden surface. However, you need to carefully prepare for such work and study all the details of this process. Check out our instructions with photos.
First, you need to install wooden logs on the surface, which must first be treated with an antiseptic. It is better to leave a gap of 15-20 cm between them, so you can avoid bending down in the future.
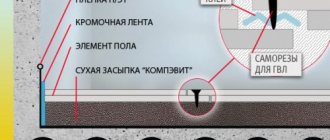
Expanded clay is poured between them to the very top, after which the structure is covered from above with a board and secured with self-tapping screws. It is important to use waterproofing materials to prevent moisture from the glue from saturating the wood. Otherwise, it will become deformed in the future, which will affect the quality of the tile covering. Then you have two installation options.
[email protected] _stygka
A metal mesh is attached to the prepared wooden base with self-tapping screws, then beacons are placed and a cement screed is poured, which will be the base for installation.
In the second option, you can resort to a dry screed. Here, moisture-resistant plasterboard is laid on top of the waterproofing in several layers. After fixing it, you can start laying tiles. However, pay attention to the properties of the glue. He must be suitable for working with such material.
There has also been a long-standing debate among craftsmen about whether it is possible to lay porcelain stoneware on plywood. If you follow all the techniques and follow all the recommendations, then there will be no problems. As in the first case, first you need to install the logs at a small distance from each other.
Then a sheet of plywood with a thickness of at least three centimeters is fixed on them. Fix it well on the joists, then remove all debris and grout the joints if there are several sheets.
Then the plywood must be coated with two layers of primer, and only after it has dried can you begin laying. Please note that in this case it is better to choose adhesive for installing parquet.
Options and installation methods
At the initial stage, a porcelain stoneware layout scheme is selected from the following options:
- diagonal;
- staggered by analogy with brickwork;
- joint to joint;
- "herringbone";
- mosaic.
Next, a decision is made on the presence and width of the seams. The seamless method is usually used to install large-format porcelain tiles in bathrooms and toilets. In other cases, a seam 1–5 mm wide is used by installing special crosses.
Then you need to decide on the technology for controlling the plane of the newly created coating. The first tile is always installed horizontally in two directions at right angles to each other. Then the options are:
- each subsequent tile is checked by level;
- The short 1m rule applies;
- SVP system is used.
The classic installation method is to fill the subfloor space with solid elements on the first day, trimming and gluing all the pieces of porcelain tile the next day. However, for small volumes of work, trimming can be done for each row.
Tips for use
If you want to extend the life of your flooring, you need to know a few simple rules for its use.
If any acidic composition gets in, try to remove it from the seams as quickly as possible, since in such cases they are the first to suffer. Just be sure not to over-water them or soak them.
Pexels
Alkaline compounds can be used to remove stubborn stains. They also work great on grease and wine stains. Sticky and hard substances such as wax or resin can be removed with gasoline or acetone.
When cleaning such a floor, you can use acid-based products, but not in particular. Because of them, again, the seams can change color and collapse. Don't overdo it with hard brushes either. It is better to use mops with soft bristles.
Calculation of the number of tiles
To determine the amount of cladding, it is necessary to take into account the layout pattern and the width of the seams:
- in rooms without furniture (corridor) and with a minimum amount of furniture (hallway), the size of the cut tiles near the walls should be more than ½ of its original format;
- if there are plumbing fixtures in the bathrooms, furniture in the rooms, only the visible part of the floor is taken into account; any size of trimming near the walls is allowed;
- laying diagonally allows you to partially hide the non-parallelism of opposite walls, but the amount of trimming, the consumption of finishing material and the labor intensity of the work are maximum here;
- if the work needs to be completed in one day, finishing the floor should begin from the far corner towards the doorway;
- with a perfectly level screed, porcelain stoneware can be laid out dry, trimmed, then all rows can be laid as a whole;
- if the cladding is used in several rooms, the seams must be continuous;
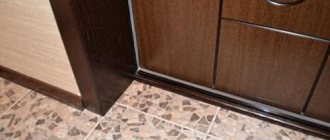
- when tiling one room, the joint is located in the middle of the doorway under the threshold or the lower element of the interior door frame;
- Porcelain tiles of a rectangular elongated shape, usually imitating a parquet board, are laid, if possible, perpendicular to the wall with a window opening, so that the natural light flux falls along the seams.
For the “seam to seam” layout pattern and with offset transverse seams, the amount of porcelain stoneware is determined as follows in stages:
- the length of one wall is divided by the size of the tile along with the width of the seam, for example, 360 cm / (60 cm + 0.2 cm) = 5.98;
- for the second wall, similar calculations are made, for example, 173 cm/(40 cm + 0.2 cm) = 4.3;
- both values are rounded up and multiplied - 6 x 5 = 30 pieces.
The video below shows the main nuances of flooring layout:
This will allow you to perform symmetrical trimming on four sides of the room, gluing the tiles from one wall, and not from the middle, which is more convenient for non-professionals. When choosing a herringbone pattern and a diagonal layout, the area of the room is calculated, and porcelain stoneware is purchased with a margin of 15 - 30%.
Preparing the surface for installation
Laying porcelain tiles begins with preparing the base. The surface must be smooth and dry, free from dirt and dust. Minor surface irregularities can be smoothed out using glue. If the base being prepared for cladding has significant level differences, you cannot do without a self-leveling mixture. It should be remembered that complete drying of the screed takes at least 25-28 days. Before laying porcelain stoneware, the surface is primed (the most suitable primer emulsions for your substrate are used) in an even layer with a paint roller or a wide wallpaper brush. It is recommended to apply the primer several times.
Preparing porcelain tiles for installation
Porcelain stoneware is a very fragile material, so it is protected from breakage during transportation. Technical wax or paraffin is applied to the front side of the panels. Before installation, the protective layer must be removed.
It is better to remove wax by washing the slabs using a fat solvent and other cleaning agents. The paraffin will have to be carefully cleaned with a spatula.
Photo examples of finishing premises with porcelain stoneware
Kitchen apron - convenient, beautiful, reliable
An interesting way of laying with an offset
Finally, wood can be in the bathroom too, albeit made of ceramics
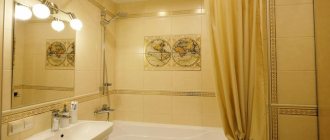
Chic bathroom interior using polished porcelain tiles
Practical kitchen floor
Interesting collection for walls
A staircase with laid porcelain tiles will be beautiful, comfortable, and easy to care for.
Variations on the theme of natural stone in the bathroom
Wide contrasting seams are a design element
Tile layout diagram
Much attention should be paid to selecting the most suitable tile laying scheme. Due to the fact that there are many options for sizes and colors, if desired, it is possible to obtain a completely individual interior.
Professional designers highlight a number of subtleties that allow you to achieve the best effect:
- When using large parts, it is important to know that they contribute to a visual reduction in space. Accordingly, small ones, on the contrary, increase it.
- In order to visually lengthen the room, elements are laid lengthwise and not across.
- If you plan to use small fragments that are mounted between larger parts, then a scheme for their uniform distribution is drawn up in advance.
Small fragments of the pattern are often the most noticeable, so they are laid at the end - Large drawings look more appropriate in the center, taking into account the creation of equal sized edges.
Of course, personal preference plays a primary role in determining the final design.
Installing tiles similar to a chessboard is outdated and now many are trying to create a more original pattern
The best way to cut porcelain tiles and how to do it
Home craftsmen often think about the question of what tools can be used to cut porcelain tiles, since this is a fairly durable material, and an ordinary glass cutter cannot cope with such work. Will help solve the problem:
- professional mechanical tile cutter;
- Bulgarian;
- machine with water-cooled disk.
A tile cutter with a platform and guides is used for cutting even pieces. Draw a cutting line on the tile with a pencil. The porcelain tiles are then laid on the platform in such a way that the diamond roller located on the carriage can follow the drawn line evenly without any stops. This will ensure a clean cut. Cheaper tile cutters hold the tiles with your hand, while expensive models are equipped with clamps and rulers, which allows you to cut at any angle.
The simplest and most common option for cutting porcelain tiles yourself is a grinder, which is found in home workshops much more often than a tile cutter. But in this case, the cut turns out to be of less quality, since chips appear on it. In order to have fewer of them, you must try to make a cut in one pass, which, moreover, should not be made along the marked line, but with an indentation of 2-3 mm. Subsequently, the edge is ground to the desired size. The advantages of the grinder include the ability to obtain lines of various shapes. But do not forget that you should work with this tool very carefully, following safety rules. The work process itself is quite dusty.
The best quality cut is obtained with a water-cooled electric tile cutter. Working with it is safer and less dirty. The design consists of a table on which porcelain tiles are fixed and a cutting element driven by an electric motor. Moreover, some models are notable for the fact that the disk moves along the cutting line, while in others it remains stationary.
Holes in porcelain stoneware are made with special cutters with diamond tips or using an electric drill with drill bits for stone.
Laying technology
Installing tiles is a complex procedure that requires care and precision from the performer. The width of the gaps between the elements is controlled by crosses. To avoid mistakes, let's look at the main points.
Installation methods
Tiles with remote beacons are installed in two ways. When installing horizontally, the parts are placed in the area where the lines of 4 slabs intersect (in the corners). As a result, you get a smooth, beautiful surface on which there are no traces of the solution. The disadvantages of the method include the difficulty of extracting crosses. To facilitate the procedure, professionals use a special tool.
When installed vertically, there are 8 spacer elements per tile. The bottom row is placed first, placing 2 parts in the corners. As a result, the consumable material is inserted into the wall and floor. If the work is not done carefully, the seam will begin to “walk” along the width of the tile, so the procedure is carried out slowly. The advantages of the method include the ease of extracting crosses.
Laying methods Source fathouse.com.ua
Choosing a mixture
Which mixture to choose from all the variety is a serious question. The answer to this is individual in each specific case. Here everything depends on the characteristics of the base, the format and weight of the tiles, on whether the work is being done externally or internally (and the season also plays a role here). Do not forget about the time allotted for cladding, as well as the qualifications of the tiler. In general, if in doubt, it is better to get advice from a specialist - searching on the Internet is good, but there is always a risk of receiving “bad advice”.
Let's go to the store - how not to make a mistake in choosing
When you come to the store to buy porcelain stoneware floor tiles, arm yourself with a pen and a notepad in which you write down:
It’s better not to buy the option you like right away. Return home, think everything over, and calculate the required number of tiles with a 10% margin and taking into account the format.
Consider what components you will need - grout, baseboards, corners, thresholds. If you want to save money, look for the tiles you like in other stores and online stores by article number or simply by brand name, collection, etc.