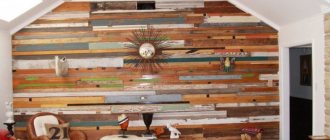
You can have a garage without being a car enthusiast. Often, a garage is a place to communicate with friends, a workshop, even a production workshop that requires heating in the cold season. Garages are not equipped with central heating. Therefore, heating a garage space is important both for the person working in it and for the room itself. Maintaining temperature conditions in the warm range and maintaining room humidity at the proper level have a positive effect on the durability of the garage. Buying a boiler and installing a heating system in a garage is quite an expensive proposition. It is much more economical and practical to equip it with a stove - a potbelly stove, made by yourself. Moreover, in the friendly garage team you can always find the necessary materials, tools and equipment.
- 2 Design and principle of operation
- 3 Drawing and diagram: calculation of basic parameters
- 4 Required materials and tools
- 5 Preparatory work
5.1 Photo gallery: where is the best place to put a potbelly stove in the garage
- 6.1 Video: how to make a garage stove yourself
Recommendations for safe installation of a potbelly stove
The use of homemade potbelly stoves, as well as any other heating units, requires compliance with a number of safety regulations.
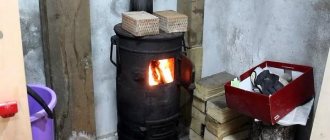
First of all, choose a suitable place to place the stove. It is best to install a potbelly stove in a corner, near the walls opposite the garage door.
How to install a potbelly stove
You cannot install a potbelly stove closer than 1.5-2 m to the location of the car. Any flammable products and materials must be removed from the stove at a similar distance.
It is recommended to lay brick walls on the sides and front of the stove. They will not only protect against accidental touches to a hot unit, but will also accumulate the generated heat, which will significantly increase the efficiency of the potbelly stove.
Potbelly stove in the garage
If the garage walls are made of wood, there must be at least 100 cm of free space between them and the potbelly stove. Cover the walls themselves with asbestos sheets, cover them with bricks or protect them with other fireproof materials.
Potbelly stove in the garage
Place a steel sheet 1-2 cm thick under the potbelly stove or pour a concrete screed - this will prevent the spread of fire if sparks, coals, etc. fall out of the furnace firebox.
The potbelly stove can only be used in a room with good ventilation. Fresh air must enter the garage in normal volumes, otherwise the fire in the stove simply will not burn. Usually, to ensure the necessary air flow, it is enough to leave a small gap between the ground and the garage door. If there is no such gap, you will either have to make one or install a supply ventilation duct.
Do not leave any flammable materials near the stove. Wood, gasoline cans, all kinds of oils and lubricants and other similar materials can all catch fire, leading to catastrophic consequences.
Potbelly stove for garage
Additionally, you can use your potbelly stove for cooking and heating water by equipping it with a cast iron stove with burners and a water tank.
Thus, there is absolutely nothing complicated in making a potbelly stove for your garage yourself. With proper skill, all work is completed in less than a day. Follow the instructions, and very soon your garage will be warm and comfortable.
Good luck!
How to increase draft in a potbelly stove using a chimney
The design of a high-efficiency potbelly stove chimney should have the following features:
- The chimney should be made high enough. So, the optimal distance from the furnace itself to the top of the pipe is about 5-6 m.
- There should be no horizontal or inclined sections of less than 45 degrees in the pipe shape, or their number should be kept to a minimum.
An increase in the efficiency of a potbelly stove will also be facilitated by the creation of thermal insulation on the pipe, which will significantly reduce the damage from the formation of condensation.
- When establishing the cross-section of the chimney, you need to choose the optimal size. If at the time of establishing the efficiency of the potbelly stove there is already a too narrow chimney, you can put a deflector on top, which will protect the structure from precipitation and increase draft.
- The height of the pipe should also be affected by the level of the ridge. If the chimney is lower than it, you need to extend the pipe.
↓ Be sure to study the recommended material on the topic ↓
How to make an economical stove-stove with your own hands with increased heat transfer
Tip: The draft force in the stove is determined by the color of the flame: if there is not enough air, it is red with dark stripes, if there is too much air, it is bright white, and the chimney often makes a hum. If the color of the flame is golden-orange, then the potbelly stove’s draft is normal.
Nuances of insulation and diagrams of wood-burning stoves for the garage
To maintain a comfortable household temperature inside a single garage, you will need to install a furnace capable of producing 2-2.5 kW of thermal energy; for an operating temperature of 16-18 degrees, 1.8-2 kW will be sufficient.
Wall insulation helps to significantly increase heating efficiency. Usually the thermal insulation layer is placed on the outside, but this is expensive and technically impossible when the garages are wall to wall.
For internal insulation, self-extinguishing types of fiberboard and chipboard are suitable, but not plastic - when heated, it can emit toxic gases, which means this material is incompatible with wood-burning stoves.
Brick garage wood stoves
Brick stoves are rarely installed in garages due to their bulky design. The devices take up a lot of space, and the large internal heat capacity increases the loss of time for heating the oven to operating temperature by 1-1.5 hours. However, in some cases, installing a brick kiln is justified. Here are the most common ones:
- the garage is used as a workshop or semi-residential space;
- the building has sufficient area and high ceilings;
- there are no other garages, residential or household buildings nearby;
- there is no excess moisture in the garage that could harm the solution if the stove is left idle for a long time.
For laying a wood-burning stove, fire-resistant and fireclay bricks are used, and fire-resistant clay is added to the binding solution.
The fuel chamber is equipped at the bottom, usually at the level of the third row; if necessary, windows for the cleaning and ash chamber are provided
Particular attention should be paid to the chimney - its design must ensure effective removal of smoke and soot into the external environment
The design of a classic wood-burning stove made of brick with a cleaning window and without a blower ensures long-term burning of wood and high heat transfer. Due to the relative ease of installation, the devices are often found in practice.
Sheet metal products
Metal wood-burning stoves are popularly known as “potbelly stoves”.
They are a single-chamber structure made of sheet steel, equipped with a chimney pipe and an ash pan in which solid combustion products accumulate.
Often a potbelly stove is supplemented with a platform for cooking. Compared to brick stoves, metal devices have the following advantages:
- compactness and mobility;
- low cost of raw materials;
- high rate of room heating;
- ease of implementation of the chimney, removal of ash and ashes.
To make a potbelly stove yourself, it is enough to have basic skills in working with a welding machine and plumbing tools. Designs designed for installation in single garages are very simple.
In modern hypermarkets of construction and household goods you can find industrial-made potbelly stoves. Obviously, their price will be higher than homemade devices, but such products are reliable and durable.
Use of waste cylinders, device drawings
Empty gas cylinders can be used to make a very convenient wood stove in just a few days. This design combines the advantages of brick stoves and potbelly stoves, allowing you to create a not too bulky, convenient device with long-lasting and intense heat transfer.
Photo 1. Drawing of a stove-stove for a garage from a gas cylinder. Represents the horizontal design type.
If assembled correctly, such a stove provides a thermal power of more than 5 kW, which is enough to heat a large garage. One full load of firewood guarantees 3-4 hours of stable combustion - this indicates the efficiency of the stove. The structure can be easily equipped with a cooking area if desired. Among the types of wood stoves considered, it is the balloon stove that has the optimal ratio of price of materials, efficiency of use and ease of manufacture.
Photo 2. Drawing of a wood-burning stove from a gas cylinder. The design is vertical, the dimensions of the device are indicated.
Manufacturing options
Craftsmen learned how to weld homemade potbelly stoves using improvised materials that can be found at home.
From the can
A barrel or can can be used as the basis for a future stove. Such options are easy to manufacture, because The master practically does not need to carry out welding work or cut metal. The assembly process is divided into several stages:
- To organize the blower, you need to cut a hole in the neck area.
- An opening is made in the bottom of the container for installing a chimney pipe.
- The grate is given a lattice or serpentine shape so that it fits freely with the can without additional fasteners.
- The parameters of all parts of the future potbelly stove are indicated in the drawings. The finished stove is placed on brickwork or iron racks.
You can make a stove from a metal can.
From a barrel
Homemade garage stoves made from a barrel look simple. At the same time, they effectively solve the problem of heating the surrounding space and do not take up much space.
To obtain a potbelly stove, a cylinder with a capacity of 50 liters is suitable. It has thick walls that retain heat longer. To increase efficiency, you can decorate the structure with bricks.
A potbelly stove from a barrel will generate quite a lot of ash.
The device is fixed vertically, because in this position there is a lot of space for adding fuel.
From scratch from steel sheets
The classic version of the potbelly stove involves the use of steel sheets. It demonstrates high efficiency and reliability.
For self-assembly you will need to prepare a number of materials and tools. Among them:
- Sheet metal 4 mm thick.
- Reinforced elements up to 15 mm thick.
- Metal corners.
- Chimney pipe.
- Welding equipment.
All the parts of the potbelly stove are marked on a sheet of metal.
Following the drawings, you should cut the steel sheet into several sections for the furnace walls, and then weld the corners to them. At the top of the back wall there is a piece of metal for convenient laying of bricks.
The efficiency of solid fuel combustion in a potbelly stove depends on the design of the grate. If the grate is made correctly, the wood will be able to burn for a long time, releasing a lot of heat.
A homemade stove requires 2 doors:
- For the combustion space.
- For the ash pit.
Features of creating a horizontal apparatus
The horizontal design provides for the installation of a blower with a door at the bottom. The grate can be replaced with holes at the bottom of the apparatus, which are drilled in 3-5 rows. If a lattice option is used, an opening is made in the wall of the cylinder or other container where it will be installed.
You can make a horizontal version of the potbelly stove.
After completing the main assembly work, the horizontal potbelly stove is equipped with legs from the corners of the pipe or a stand for convenient operation.
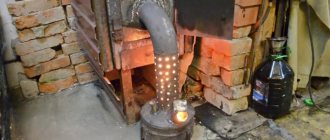
Potbelly stove using waste oil
The manufacture of a garage stove that operates on waste has some unique features. It is made both compact for small spaces and large-sized with increased efficiency. The operating principle and internal structure remain identical.
Used oil is burned completely and without residue in a potbelly stove.
The oven consists of 2 compartments. The lower one is used for refueling and igniting fuel. The steam flow moves through a perforated pipe to supply oxygen, where they are burned. Then the process of oxidation and combustion of vapors occurs in the upper compartment. It heats up to the maximum, transferring thermal potential to the surrounding space.
Wood stove
Solid fuel equipment has gained popularity among car enthusiasts because... it is distinguished by its compactness, high efficiency and low cost. Such stoves are sold in various stores and are easily made from improvised materials.
The optimal thickness of metal walls should be at least 3 mm, because thinner materials are subject to burning. Firewood is used as fuel, but the unit can also be adapted for other types of solid fuel raw materials.
The key advantage of the wood-burning model is good heat transfer.
A wood-burning potbelly stove is made from bricks and metal sheets. The highest heat transfer is characteristic of the first material.
Ways to increase efficiency
Potbelly stoves are made in various shapes and sizes. But they have one drawback in common - low efficiency. More than half of the thermal energy, in the literal sense of the word, flies out into the chimney. The irrational use of heat has led to the fact that the owners of these heating devices began to think about possible changes in the design of the furnace to increase its efficiency. The solution to this problem could be a partial modernization of the potbelly stove. There was no single concept for solving this issue, and each stove owner began to solve the problem independently, by trial and error.
Increasing the efficiency of a potbelly stove means receiving additional heat from the heating device while maintaining a constant amount of burned fuel. This can be achieved in several ways:
- changing the heat transfer surface,
- increase in heat removal;
- using more high-calorie fuel;
- increasing the heat capacity of the furnace.
The potbelly stove gives off heat to the surrounding space not only with its body, but also with its metal chimney. You can increase the heat transfer surface of the device by revising its dimensions upward. This option is possible when creating a stove with your own hands. Having already made a potbelly stove, you can do it in another way. Usually a corner is welded to a chimney made of a metal pipe. Position it with its apex facing the element along its entire length. The angle is installed around the pipe. Thus, the area of the heat transfer surface can be increased by 3-4 times, depending on the size of the corner.
Another option for increasing the heat transfer surface is to make a chimney running inside a large area. For this purpose, a chimney with turns is made. They are performed in the form of smooth transitions. It is undesirable to create turns at right angles, as the potbelly stove may start to smoke. The last section of the chimney is installed vertically. A pocket is made on it with a hatch for cleaning soot.
If it is impossible to lengthen the pipe, its design is changed. Cylinders made of pipes with a diameter of 300-400 mm are welded onto the pipe coming out of the furnace body. They are connected to each other by pipe sections with a diameter no less than that of the smoke pipe. They are welded out of alignment to increase the smoke path.
Manufacturing a horizontal heater
If you lay a standard propane cylinder horizontally and install a door at the end, you will get a fairly spacious firebox that can accommodate meter-long logs. For better heat transfer and afterburning of the resulting pyrolysis gases, you need to make a secondary chamber with partitions, as shown in the drawing.
The afterburning of combustible gases in this potbelly stove is combined with the extraction of heat from combustion products that flow around hemispherical partitions (cut out from the cylinder body). Well, an indispensable attribute of intense heat exchange - external ribs made of steel strips - are required. Practice shows that such a stove heats a garage of up to 50 m² in medium combustion mode, as described in the next video:
The heating unit is simple to manufacture: doors are installed in the front part, and a hole is cut in the back part, into which a secondary chamber from a pipe or a second cylinder is welded. In order not to take away the useful volume of the firebox, the ash pan is made hinged. If necessary, a hob is installed on top of the horizontal part.
Potbelly stoves - proven and simple designs
Potbelly stoves were a hit of the 20s of the last century. At that time, these stoves competed with brick stoves and were installed everywhere, even in apartments. Later, with the advent of centralized heating, they lost their relevance, but are used in garages, dachas, and for heating utility or outbuildings.
Sheet metal
Potbelly stoves from a cylinder, barrel or pipe
The most suitable material for making a potbelly stove for a garage is propane cylinders or a pipe with a thick wall. Barrels are also suitable, but you need to look for ones that are not very large in volume and have a thick wall. In any option, the minimum wall thickness is 2-3 mm, the optimal is 5 mm. Such a stove will serve for many years.
By design they are vertical and horizontal. It is more convenient to burn horizontally with firewood - longer logs will fit. It’s easier to make one extended upward, but the firebox is small in size, so you’ll have to cut the wood finely.
A potbelly stove for a garage can be made from a cylinder or pipe with a thick wall
Vertical
First, how to make a vertical stove for a garage from a cylinder or pipe. Divide the selected segment into two unequal parts. Below is a smaller one for collecting ash, above is the main one for storing firewood. The following is the order of work:
- Cut out the doors. Small at the bottom, solid at the top. We use the cut pieces as doors, so we don’t throw them away.
- We weld the grates in the chosen place. Usually this is steel reinforcement cut into pieces of the required length with a thickness of 12-16 mm. The reinforcement installation step is about 2 cm.
- Weld the bottom if there is none.
- We cut out a hole in the lid for the chimney, weld a strip of metal about 7-10 cm high. It is better to make the outer diameter of the resulting pipe fit standard chimneys. Then there will be no problems with the installation of the chimney.
- We weld the lid with the welded pipe into place.
- Using welding, we attach the locks and hinges to the cut-out door pieces and install it all in place. As a rule, potbelly stoves are not airtight, so there is no need to make seals. But if desired, you can weld a strip of metal 1.5-2 cm wide around the perimeter of the doors. Its protruding part will cover a small gap around the perimeter.
Overall, that's it. All that remains is to assemble the chimney and you can test a new stove for the garage.
Horizontal
If the housing is located horizontally, the ash box is usually welded from below. It can be welded to the required dimensions from sheet steel or a piece of channel of a suitable size can be used. Holes are made in the part of the body that will be directed downwards. It’s better to cut something like grate bars.
How to make a potbelly stove for a garage from a gas cylinder
Then in the upper part of the body we make a pipe for the chimney. To do this, you can weld a cut piece from a pipe of a suitable diameter. After the piece of pipe is installed and the seam is checked, the metal inside the ring is cut out.
Next you can make the legs. The best fit is pieces of a corner, to which small pieces of metal are attached from below so that they stand stable.
The next step is installing the doors. You can cut a piece of metal onto the ash pan, attach hinges and a lock. There are no special problems here. The gaps around the edges do not interfere - combustion air will flow through them.
There will be no difficulties if you are making a door from metal - welding the hinges is not a problem. Only here, in order to be able to at least slightly regulate the combustion, the door needs to be made a little larger - so that the perimeter of the opening is closed.
How to install stove casting on a metal stove
It is problematic to install furnace casting. Suddenly someone wants to have not a steel door, but a cast iron one. Then you need to weld a frame from a steel corner, attach the casting to it with bolts, and weld this entire structure to the body.
From two barrels
Anyone who has used a potbelly stove knows that very hard radiation comes from its body. Often the walls become heated to a red glow. Then it is impossible to be near her. The problem is solved with an interesting design: two barrels of different diameters, inserted one into the other. The gaps between the walls are filled with pebbles, clay mixed with sand (calcined over a fire, then filled in only after it has cooled). The inner barrel acts as a firebox, and the outer one is just the body.
This stove will take longer to heat up. It will not immediately begin to give off heat, but it will be more comfortable in the garage and after the fuel burns out, it will warm the room for another couple of hours - releasing the heat accumulated in the bookmark.
https://youtube.com/watch?v=PEWZxL2ebXE
Ensuring heat removal
It is possible to increase heat removal by creating devices that promote natural and forced convection. To ensure natural air circulation, screens are made with a guide device that allows you to create a powerful convection flow and distribute it throughout the room. The guide apparatus is made in the form of curved strips of metal, welded to the screen and directing warm air not only upwards, but also to the sides. The prepared device is attached to the oven.
The heat removal device can also be made from scraps of water supply and profile pipes. The distance from the floor to the bottom edge of the elements must be at least 15-20 cm. The pipes are welded to the stove body and covered with a screen on the sides to protect against accidental contact. A traditional potbelly stove heats the air around it by 0.5-1.0 m, and the use of such a design allows you to increase not only the radius, but also the rate of temperature rise in the room. When the body of the heating device is heated above 60 °C, a stable convection draft appears in the device, the power of which increases as the temperature of the furnace increases.
Heat removal can be increased by using fans to blow over the heat transfer surface. Both household and old car fans are used. Devices with variable rotation speeds have proven themselves especially well. They allow you to regulate the temperature and heating time of the room in various oven operating modes.
For more efficient blowing of the furnace elements, special casings are installed that allow cold air to be directed to the hottest areas of the heating device, while it can be taken from various places in the room. A potbelly stove with pipes welded into the firebox for heating air has proven itself well. A multi-speed car fan installed on a common discharge manifold allows you to effectively heat the room.
Advantages and disadvantages
Like any heating device, a wood stove has its advantages and disadvantages.
Let's look at some of the benefits:
- Relatively low price of fuel.
- The versatility of the device during operation. You can use the heater to heat the room, cook and heat food.
- Installation and installation of a garage stove is very simple and does not require large expenses.
- For the manufacture of the unit, scrap materials can be used.
- During operation, the use of additional installations and devices is not required.
- The small overall dimensions of the unit make it universal for use in garages.
- The operation of such a device does not require the use of an additional type of energy (electricity).
The disadvantages of this design include:
- Such furnaces have a high heat output, as a result of which they heat up quickly and cool down quickly.
- To maintain a high temperature in the oven, it is necessary to periodically add firewood.
- Constant monitoring of the heating process is necessary to ensure safety.
Step-by-step instructions for making a potbelly stove for your garage with your own hands
There are a lot of different options for homemade potbelly stoves: from a gas cylinder, from an iron barrel, from a can, from mining. We present to your attention the easiest one to design yourself - a classic model made from sheet metal.
Let's look at its creation step by step:
We make the body. We weld sheet metal blanks: first the side walls, then the back and bottom.
It is important that all elements are strictly perpendicular
- We determine the combustion chamber, ash pan and smoke circulation.
- We install the grate. We cut holes for it in the sheet steel (up to 2 cm). We fix it at a level of 10-15 cm.
- Cut out the holes.
In the rear part - for the chimney (round), in the front - for the firebox and ash pan (rectangular). The distance between the walls and the side edges of the holes is 5 cm. The bottom of the ash pan should coincide with the bottom of the oven.
We weld the doors.
Drawing of a simple stove for heating a garage.
We recommend making them the entire width of the oven. We equip doors with bolts and handles.
- We weld the front wall.
- We attach the legs (minimum length - 12 cm). They can be equipped with bolts to subsequently adjust the height.
- We weld the top cover to the body.
- We install the potbelly stove in the place chosen for it.
- We install a chimney.
We mount the pipe to the hole in the back wall. The easiest way is to choose a straight line, but it is not as energy efficient. We secure the top of the pipe with rods, mounting them into the wall.
Take care of the tightness during assembly so that soot and smoke do not enter your garage.
In the future, the potbelly stove can be equipped with a stove for cooking.
When constructing the structures described, adhere to fire safety rules.
The main thing is to approach the process responsibly and systematically, then this will pay off with heat transfer and saving the budget.
Did our article help? Share it to help others!
Warm brick
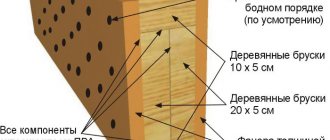
A potbelly stove using wood, coal and other types of fuel can significantly increase its efficiency. To do this, it is enough to build a screen of baked clay bricks around it with your own hands. If you look carefully at the drawings of such a mini-building, you will see that the bricks are laid at a short distance from the walls of the stove (about 10-15 cm), and, if desired, around the chimney.
Brick screen for potbelly stove
Bricks require a foundation. Do you want the masonry to last a long time? Then fill the base one at a time to form a monolith. It is better to take concrete as the material for the foundation, which should be reinforced with steel reinforcement yourself. It is advisable to place the reinforcement layer at a distance of approximately 5 cm from the surface of the concrete pad.
Ventilation holes are made at the bottom and top of the brickwork, which will ensure air movement (heated masses will go up, cold air flows will come from below). Ventilation also prolongs the life of the metal walls of the potbelly stove, delaying the moment of their burning due to cooling by circulating air.
Bricks laid around the stove accumulate heat and then release it for a long time, warming the air in the room even after the stove goes out. In addition, brickwork additionally protects objects surrounding the stove from fire.
If desired, you can completely lay out the stove from brick. Such a structure is advantageous in that it will last for many years without additional effort on the part of the owner. However, there are also certain disadvantages. The disadvantages of this option include the following:
- the process of laying out such a stove is quite labor-intensive and is suitable only for those people who have experience in masonry with their own hands;
- a brick stove is quite expensive, as it requires the use of fireproof materials, including fireclay bricks and special clay for mortar.
In order to get a small potbelly stove with wood, it is enough to lay out a cone measuring 2 by 2.5 bricks, 9 bricks high. In the combustion chamber, rows 2-4 are laid out of fireclay bricks. An ordinary fired clay brick is suitable for a chimney, into which you must remember to insert a stainless steel sleeve.
Whatever the method of making a miniature stove or potbelly fireplace with your own hands, whether you make them according to a drawing or by eye, the main thing is that at the end you get an effective heating device, and in an expanded configuration also a hob for cooking. Look around for suitable materials (barrels, sheet iron, etc.) and go ahead to your own homemade stove or even a potbelly stove!
Potbelly stove - the simplest device for heating a garage
The simplest and most convenient option for a garage heating device is the well-known potbelly stove. This is a small metal stove. A potbelly stove is made from sheet metal or from an old barrel. Any large diameter pipe will do. In any case, the main criterion in choosing should be the thickness of the metal. It should not be less than 5 mm.
To make a potbelly stove you will need a grinder and a welding machine. To build a stove from sheet metal, it is cut using a grinder according to a template. In order for the size to be optimal for using full-fledged firewood, it is better to take the length of the parts 70 cm and the width 30 cm. A parallelepiped is welded from four elements of the indicated sizes. The back wall is welded into a 30x30 cm square, and in the front wall of the same size an opening for the firebox is cut out, 25x25 cm. For this opening, a door is made with a locking device and hung on hinges, which are secured by welding. Several holes are drilled in the door to create traction.
Legs from a channel or angle of the required length are welded from below, and a round hole with a diameter of 100 mm is cut from above in the rear part. A piece of 110 mm pipe, 15–20 cm long, is welded on top of it. A chimney will be placed on it, which must be well insulated from the ceilings and roof. It can also be placed into a wall, but the angle of rotation should be no more than 30 degrees.
A more effective version of a potbelly stove is obtained if you install an ash pit and an ash pan in it. To do this, a small compartment is made in the lower part of the firebox, which is separated from the firebox by a grate or a homemade plate with slots. This compartment has a separate door through which ash can be removed.
Rectangular metal stove for the garage.
Making a potbelly stove from a barrel or cutting a pipe is even easier. In the case of a barrel, you only need to arrange the door, chimney and legs. If you have a piece of pipe with a diameter of at least 300 mm, then you can make the back of the stove and the door from sheet metal. Everything else is constructed similarly to the previous options. Some craftsmen make good potbelly stoves from old gas cylinders. To cut them, you must first carefully drill a hole, pouring water on the drill. Then drain the condensate from the cylinder and fill it with water. Only after complete rinsing can you begin to cut the balloon with a grinder.
Round potbelly stove made from a barrel for the garage.
A potbelly stove has all the necessary qualities: it runs on wood or coal, heats up very quickly, is easy to manufacture and maintain, and costs practically nothing if made from waste material. The disadvantage is that it cools quite quickly when the wood burns. Due to the strong heat, the metal stove must be well insulated from the walls of the garage if they are wooden. To increase the efficiency of such a unit, you can weld perpendicular plates 5 cm wide to the surface of the potbelly stove. This will increase the heating area with a slight increase in dimensions.
Operating rules
Once a year it is necessary to clean the chimney.
Theoretically, you can light the stove with anything that burns. But the best option is firewood, which can often be collected for free in sufficient quantities.
The following rocks burn with minimal fuel release:
- birch;
- cherry;
- acacia;
- apricot;
- willow;
- aspen;
- oak.
It is recommended to avoid conifers such as spruce, pine and larch. When they burn, creosote is formed on the walls of the chimney, which can ignite under high heat.
Cleaning must be carried out in the firebox and chimney. This should be done monthly for constant use, and every 20 fires for periodic use. The best option is a plastic, copper or brass brush. You need to start cleaning from the top, gradually moving down as the lumen becomes clearer. If complications arise with the mechanical option, the carbon deposits can be burned off with potato peelings or aspen firewood. It’s even easier to use specialized household chemicals.
Assembling an effective potbelly stove
It is well known that ordinary iron stoves are characterized by low efficiency (about 45%), since a significant part of the heat goes into the chimney along with the flue gases. Our design implements a modern technical solution used in solid fuel boilers - installing two partitions in the path of combustion products. By bending around them, the gases transfer thermal energy to the walls, which makes the efficiency higher (55-60%), and the potbelly stove more economical. The principle of operation of the unit is reflected in the drawing - diagram:
For manufacturing you will need low-carbon steel sheet 4 mm thick, a piece of pipe Ø100 mm and rolled metal for the legs and grate. Now about how to make an economical potbelly stove:
- Cut metal blanks according to the drawing and make openings for the doors of the firebox and ash pan.
- Weld a grate from corners or fittings.
- Make doors with locks from the cut out parts.
- Assemble the unit using tacks, and then weld the seams completely. Install the chimney pipe and legs.
Advice. The lower partition, which is highly heated by the flame, is better made of thicker iron - 5 or 6 mm.
For better heat transfer, craftsmen practice welding additional external ribs to the body, as is done in the photo.
Asbestos chimney size
When selecting asbestos chimney pipes, you need to be guided by the following considerations:
- The use of this material is only possible for gas boilers and pyrolysis heating units, which are characterized by a low flue gas temperature. It should be taken into account that the smoke of pyrolysis furnaces is oversaturated with products that contribute to the formation of condensation, and therefore soot.
- The diameter of the asbestos chimney pipe should not be less than the outlet pipe of the heating unit.
- The total length of the chimney must be at least 5 meters, while the excess above the roof ridge must be at least 0.5 meters.
- Significantly exceeding this indicator will also lead to undesirable consequences due to a decrease in the speed of gas movement in the pipe.
This will increase the amount of condensate formed. The effectiveness of a chimney made of any material depends on its correct installation on the roof of the house
Making an exhaust furnace from a gas cylinder
A gas cylinder is ideal for making a stove from it, that is, its shape and thickness. This design is especially often used in a bathhouse. For this you need the following materials:
- A standard type gas cylinder: 50 liters, its walls should be about 1.5 cm thick, since if the wall is thicker, the device will take longer to heat up.
- Sheets of steel. This is necessary to make a container from which the oil will flow.
- Galvanized chimney pipe.
- Burner pipes.
- Steel corners for legs.
To make a waste oil furnace, you need a drill, an angle grinder, a welding machine, as well as a set of plumbing tools, a tape measure, and a level.
A drawing of a furnace using a gas cylinder is very important during design. To begin with, the gas cylinder must be empty; it must be opened, since the remaining gas still remains. You also need to drain all condensate. Clean the bottle with water several times. Cleaning should only be done outdoors, and never indoors.
Rice. 6 Option of a testing unit made from a cylinder
Next you need to cut off the top. In order to make exactly the marks for the cut, you can fill a balloon with water and bury it halfway into the ground. The cut is made with an angle grinder, that is, an angle grinder, along with water inside. Next, water will begin to flow through the cut, you should wait until the excess water flows out, after which the top is completely cut off.
According to the drawing of the waste oil stove, you should then make a hole for the chimney with your own hands. It is done on the body of the cylinder at a distance of 10 cm from the top. The diameter of this hole must be the same as the chimney pipe. A horizontal pipe (about 40 cm) is welded to the cylinder with a welding machine, and a vertical part is attached to it, which should reach at least 3.5 m.
Rice. 7 Chimney pipe of the unit during development. Finishing the ceiling above the stove in the bathhouse
You need to cut a hole in the housing above the bottom for ventilation. It has a rectangular shape. And then a door is attached to it to adjust the combustion intensity. A waste container is installed at the bottom of the cylinder. It can be made from a pipe with a diameter of 17 cm, the height can be taken about 10 cm. The bottom must be welded to this pipe with a sealed seam. You need to cut a lid for a container with oil from a sheet of steel. There should be 2 holes on it: one for the burner pipe - 10 cm, the second for supplying fuel and air 4 cm. In this design, as well as in other drawings and assemblies of waste oil furnaces, a damper is needed for the fuel supply hole.
The burner pipe should be as tall as a gas cylinder. One end needs to be welded to the lower combustion chamber, and to the second a round piece cut from a sheet of steel. The diameter of this part is equal to the diameter of the cylinder.
You should also drill holes on the pipe with a diameter of 1 cm; there should be about 40 of them, they are arranged in rows. Next, the entire resulting structure is placed in a cylinder. The hole for the chimney should be located above the top round piece. The cylinder cap, which was previously cut off, is welded to the top of the resulting structure.
You also need to weld the legs from the prepared corner to the cylinder. Now you can pour waste into the finished structure, made by yourself, through the blowing door.
Often, when making waste oil furnaces, a different method of supplying oil is used. For example, a pipe is launched through a burner pipe with a diameter of about 2 cm, into which another one is cut at an angle. A container with oil can be connected to the second pipe. This design is made by hand.
Rice. 8 Diagram of a stove from a cylinder with fuel supplied through a pipe
Preparatory work
Preparatory work involves:
- determining the dimensions of the future device;
- choice of material;
- location of the device.
Only after this the main work begins.
Drawings and dimensions
Each structural element is pre-thought out, determining the dimensions:
- It is important to choose the correct pipe diameter. The drawings note that its diameter should be 2.5 times the volume of the firebox. The volume of the firebox is measured in liters, and the volume of the pipe is measured in millimeters.
- It is advisable to install a metal screen around the stove at a distance of 60 mm. As a result, the heat will remain longer. In addition, such a design will protect against fire.
- The floor under the stove must be finished. Install a metal sheet that should protrude 50 cm from all sides of the heating device. This stage should not be neglected. A sheet of metal will protect against fire and retain heat.
- The chimney consists of two parts: vertical (1 meter) and inclined or completely horizontal (3-4 meters).
Given these dimensions, it will be possible to build a safe and useful heating structure for the garage.
Metal furnaces
Metal stoves are the most popular option for heating a garage. This is because these units have many advantages:
- Compactness;
- Light weight;
- High heating level;
- Easy to install (does not require foundation preparation);
- Suitability for cooking.
Potbelly stoves are also distinguished by their simplicity of design:
- Firebox for storing firewood;
- Grate bars (grid for creating traction);
- Ash pan for collecting ash;
- Chimney for removing smoke.
You will have to make such a stove for a wood-burning garage with your own hands from worn out tin or cast iron structures. However, the market offers ready-made and used potbelly stoves at attractive prices.
The only drawback of a potbelly stove is its heating using solid fuel. The latter is not always easy to obtain; it burns quickly and produces exhaust.
What to drown with
In general, a potbelly stove can be heated with anything, wood, oil, coal, etc. When considering tree species, many prefer oak. Dry wood from this tree can add about two more degrees of heat when burning.
If you're worried about cleaning up the ash, you're in vain. The resulting bedding at the bottom of the stove from coals and ash will not only protect the bottom from burnout, but also what remains as coals during the first fire will burn out the next time. Accordingly, the combustion percentage increases.
Using simple ways to modernize a potbelly stove that you made with your own hands or bought in a store, you can achieve its maximum, but at the same time correct operation. To improve the device and increase efficiency, you do not need special skills or large financial costs.
Rocket stoves
These garage heating systems consist of two pipes - horizontal and vertical.
Both elements are welded to each other, but you can limit yourself to one curved pipe. The horizontal pipe is used to store fuel, the vertical pipe is used to exhaust smoke.
The rocket stove has several positive features:
- Simplicity of design;
- Can be used as a stove for heating food;
- One bookmark burns for 5-6 hours.
However, if you are planning to make a rocket stove by hand, you must also know its disadvantages:
- The need to use thick-walled metal during manufacturing (if the rocket stove will be used in the garage);
- Inability to regulate combustion;
- Strong heating of metal walls;
- Powerful fiery exhaust;
- Impossibility of installation in certain places.
Regarding the last point, it is worth noting that the rocket stove can be small in size. This design is easy to weld from channels, profile pipes or round pipes.
Chimney outlet through the roof
Diagram of the outlet of a stove chimney for a garage through the ceiling/roof:
As in the case of installing a chimney through a wall, when installing through a ceiling, preliminary assembly is first done in order to accurately mark the future passage through the roof. Once the installation hole is made, the steel penetration through the roof is installed.
Next, in the same sequence, the pipe is assembled and the passage through the roof is laid with non-combustible material. The passage of the chimney through the roof requires reliable waterproofing so as not to encounter leaks in the future. As in the first option, you should protect the pipe from moisture getting into it and insulate the outer part of the pipe to reduce the formation of condensation.