The advantages of a stone fence are difficult to dispute - aesthetics, durability, strength - these are not all positive qualities. The construction of a fence made of cobblestones can be maintained in any style, because... The fundamental building fits harmoniously into different landscape interiors.
A stone fence has only one minus sign – the high cost of materials and a complex operating algorithm that requires skills and experience. This article will be useful to you if you are not a professional builder, but want to build a stone fence with your own hands and save a little money. Let's figure out what features this material has and the work involved in constructing such a fence.
Pros and cons of stone fencing
An original and at the same time incredibly popular stone fence is always in fashion. Such a fence simultaneously serves as both a decorative element and a reliable fortress. The building can be raised to any reasonable height - for its strength you only need strict adherence to construction technology.
pros
- High strength. The structure has excellent stability indicators, withstands almost any adverse natural factors, and tolerates mechanical stress well.
- There are several types of stones for building fences. Many of them are affordable, but at the same time have excellent physical characteristics;
- The stone always looks expensive, so it can decorate any, even the most modest area.
- The high decorative properties of cobblestone allow it to be harmoniously combined with other building materials, thereby increasing the attractiveness and originality of the structure.
- A stone fence will not require complicated maintenance, systematic finishing, or renovations. It will retain its beautiful appearance for its entire service life.
- The design is fireproof.
- Environmentally friendly, natural materials always look advantageous.
Minuses
There are few disadvantages to stone fencing. Rather, these are characteristic features associated with labor costs. Constructing a fence from cobblestones yourself is a complex, labor-intensive process that requires special skills and financial investments in foundation and material.
Photo gallery of finished fences
The photo shows various types of fencing using popular methods of laying stones. Both solid stone sections and successful combinations with other materials are depicted.
Despite the fact that creating a stone fence requires a lot of effort, time and money, the result obtained will justify the efforts. The reliable design will become a decoration and excellent protection for the site for many years.
Preparation for work and calculations
The beginning of construction work on the construction of any fence begins with marking its boundaries on the ground. First, draw a plan for the future fence, find out where the boundary lines are, then choose the type of stone. This sequence will allow you to move on to drawing up cost estimates and purchasing construction and consumables. At the same time, purchase and prepare the necessary tools.
marking
Combining stones with other materials
The stone fence is attractive in itself. However, adding other materials when designing will give it originality and help distinguish the fence from a number of others.
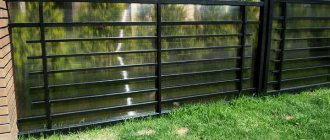
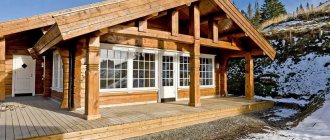
Fence made of wood and stone
A fence formed on the basis of wood and stone loses its protective functions, but is particularly attractive. This is a classic that fits harmoniously into any landscape. The standard design consists of stone pillars about 2 m high with a concrete cap and wooden sections. Before laying, a foundation is formed, the depth of which must be at least 1 m and the width - 0.5 m. The process of building such a fence is not easy, so it is impossible to do without drawing up a project, appropriate knowledge and skills.
The advantages of this type of fence are ventilation of the area and lack of shading. The negative side is the fragility of the wooden part of the fence and, as a result, the need for its constant renewal.
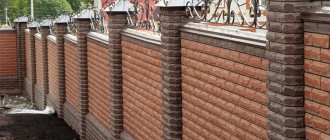
Stone and brick fencing
The combination of brick and stone is widespread in the formation of fences for summer houses and country cottages. This combination is distinguished by its presentability and reliability. The fence has good protection against weather disasters and mechanical damage. In addition, it provides security from outside interference. Today, on sites you can often find fences made of brick and French stone.
To construct such a fence, a foundation is poured, after which brick pillars and a low base are laid out. The formed sections are filled with decorative stone of the selected type. The final design looks expensive and solid.
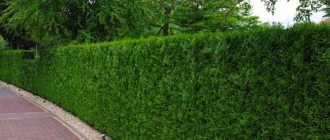
Stone fence in mesh
Gabions, or caged stones, are a new approach to fence formation. They are a metal mesh made of large-diameter wire, filled with small crushed stone, pebbles and similar medium- or fine-grained raw materials. The combination of steel and stone results in a durable and reliable structure that does not require much effort in terms of maintenance. The shape of the fence can be arbitrary. Gabion structures are often used as a frame for hedges.
How to determine the boundaries of a territory
Before you make a stone fence, be sure to find out where the boundaries of your property are. Perhaps they are not where you thought, which is fraught with the demolition of a new building, or disagreements with neighbors.
Note! In the future, it will no longer be possible to change the trajectory of the fence without its complete destruction. Invited surveyors can help you in this matter. Border delineation is one of the services they provide.
Have you already clarified the boundaries of your site? Now you can start measuring the length of the sides, as well as sketching the future structure. Do not forget to mark on your sketch the height of the fence, the places where you will have entrances (wicket, swing or other gates). The height of the fence is selected individually. If you want a high fence, then the optimal length in height is from 2 m to 2,200 cm. Next, proceed to marking the required number of pillars for support. To maintain the strength of the structure, a certain length of spans per number of supports is required: approximately 1 pillar per 2.5-3 meters of length. The maximum length of 3.2 meters is no longer recommended.
A few simple design rules
- A fence is part of the landscape or landscaping that surrounds your home. It should be in harmony with the house, flowers, trees, garden furniture, and the design of ponds. If you have a designer house, then the main fence and small house fences should have the same design solution.
- It is advisable to choose a type of stone that is typical for the area where your house is located. Firstly, logistics will be simpler and cheaper. Secondly, there are probably many buildings in the area made of the same stone, and your fence will look organic.
- It is believed that the color scheme of both the house and the fence should not contain more than three colors.
- High opaque fences are good if the house is located in a crowded place or near the road. The height should be such that only the first floor of your house is not visible.
- There should be a single style solution for the roof of your house - both for the canopy of the gate and the roof (drip) of the fence.
- A wicket and gate are a very important accent in a fence. They must also fit into the unified style of the estate.
- Greenery planted inside and outside the fence will decorate it and visually lighten the structure. For a stone fence, ivy or tall plants, climbing roses or wild roses are good.
- Inside, along the perimeter of the site, it is good to design a walking path along the fence, planting it with flowers and bushes.
- If the area is large and the path is long, it is good to place gazebos or benches there.
Which stone to choose for building a fence
If you are finished with the calculations, you can proceed to the next, most enjoyable stage - choosing a stone. There are several types of natural stone widely available on the market with different decorative and physical qualities.
Most used
A fence made of wild stone can have any color and shades. This material is not specially manufactured. With the help of the sun and wind, nature itself processes it. Despite the angular and jagged edges that jut out over each other, wild stone makes an excellent decoration. You can use it to create a beautiful fence in Western European style. The material is mined from natural deposits in the form of large slabs and split into small pieces.
A fence made of French stone is called so not because the material was delivered from France. This is the name given to hollow concrete blocks, the production of which is based on the French pressing method. Like natural stone, French has a natural color and different surface structure. The structure is durable, and the surface of the material is treated with special compounds that protect it from moisture.
The beauty of a cobblestone fence is not inferior to other stones. This is a very strong stone that is extremely difficult to split. Mostly cobblestones are round in shape and are small parts of rocks such as granite or basalt. A basalt structure can last for centuries, and the low cost of the material is another plus.
Fences made of natural stone are some of the most beautiful. They resemble a work of art and can be constructed from many types of stones. These include pebbles, limestone, sandstone, cobblestone, marble, rubble and dolomite. In construction, each of these materials behaves differently, which is not a problem for professional masons. If you are a beginner and are going to build a natural stone fence yourself, then the best option is limestone with hewn edges or sandstone plates. This raw material has the correct lamellar shape and is easier to stack. It will not be difficult to build even rows of them. If your main priority is the aesthetic side, then the best fence stone is cobblestone or rubble of various types.
Advantages and disadvantages
By choosing this type of fence, owners receive a number of advantages:
- Its long service life is at least 50 years. And when using high-quality masonry mortar, this period can reach hundreds of years.
- Possibility of choosing shapes, colors, textures of raw materials.
- Environmental friendliness. Does not pose a threat to the environment.
- Natural stone is resistant to moisture, temperature changes, and does not burn.
- The ability to create unique hedges on different themes (mosaics, patterns).
- A wide price range of natural and artificial raw materials makes them accessible to owners with different financial capabilities.
- Stone goes well with other materials and fits into many styles.
Photo: a stylish option for fencing made of natural stone in the landscape design of the local area
. Of the minuses:
- The need to build a reliable foundation. Will incur additional costs.
- Laying a stone fence is quite difficult and time-consuming.
The services of masters will not be cheap. If you want to save money, you will have to lay out the fence around a private house yourself.
Preparing tools and consumables
If the stone has already been selected and purchased, begin preparing your work equipment:
- cement grade M300-400;
- crushed stone - fractions measuring 20-30 mm;
- sand - the optimal grain size is from 0.15 to 5 mm;
- fittings (rods) with a diameter of 8 to 12 mm;
- pipes made of thick steel: length - from 3.5 to 4 meters;
- semi-edged board for formwork construction;
- materials for decorative finishing of columns, bases.
To mix concrete, you will need a concrete mixer, which can be rented from special organizations. You can’t do without a welding machine, as well as other tools:
- wooden stakes;
- construction cord (at least 5 skeins);
- corded plumb line;
- building level - spirit level;
- hacksaw for metal and cutting wood;
- roulette;
- tamper for driving in soil (can be rented);
- “scoop” and “bayonet” type shovels;
- Master OK;
- guillemot;
- brush with metal bristles;
- 4-5 large volume buckets.
Preparation
So, there is a goal to build a stone fence, it remains to find out what is required for this. First of all, you need to worry about the materials. Let's assume that the stone has already been purchased, then all that remains is to have a concrete mixer or a tank for mixing cement mortar. This mixture will also require crushed stone and sand, the volume of which depends on the length and height of the fence. It is better to choose cement marked 300, as it is better suited for such construction. By the way, you will need a shovel (scoop) to dose the components, and a construction trowel to lay out the finished mixture.
Next, you definitely need boards and nails for constructing the formwork, as well as reinforcement to give the structure good rigidity. If the fence is high, you will also need a welding machine. With its help, steel rods can be lengthened to the required size. It is definitely worth purchasing a pipe with a diameter of 50 - 80 mm. It will be the “heart” of future pillars.
For marking work, you need a tape measure, small stakes and regular twine. Once the location of the fence is determined, you can move on to the next stage.
Attention! Before starting any work, you need to take care of safety precautions. Perform all actions wearing gloves and boots. If the stone breaks right on the spot, it is better to wear safety glasses. Just in case, you can prepare a first aid kit with bandages and disinfectants.
Making the foundation
Next, you should clear the construction area of plants, debris and other objects, and level the soil. Then drive wooden stakes into the outer corners of the future fence and connect them with a cord stretched close to the ground line. Mark the support locations with small sticks. For the construction of a stone fence, a strip foundation is optimal. Properly constructed, it will not allow the fence to tilt or sag, i.e. because its width should be at least 20 cm greater than the thickness of the fence.
Ground structures can be destroyed by water, so your fence will need a base 15 cm high above the ground surface. In the future, the height of the formwork should also be oriented according to the height of the plinth.
Sequence of work:
- We dig a trench 70 cm deep;
- Pour 5 cm of sand into the bottom of the hole and compact it;
- Next, we install the formwork assembled from edged boards;
- The next stage is laying the reinforcement cage on the sand bed. To strengthen a stone fence, you need to lay at least 2 nets of rods. Measure 50 mm from the surface of the sand layer and lay the first mesh. Lay the second layer half a meter below ground level. Both grids need to be securely strengthened, thereby making the foundation stronger. To do this, steel pipes are driven into the ground.
- Next, the formwork is filled with concrete and kept in this condition for 2 weeks.
Important! After removing the formwork, the process of concrete hardening will continue for at least 30 days. Only after this time can you install the fence.
The concrete solution is prepared as follows. It is necessary to place the required proportions of crushed stone, cement, water, sand and plasticizer into the concrete mixer, and then pour the mixture into the formwork. The finished mass that has spread over the surface must be made denser using a shovel or vibrator. Level the surface and place PET film on it. The coating will retain moisture in the concrete. In hot weather, you can additionally water the formwork with water.
Tools
When erecting a fence, a number of different operations are performed in turn, each of which requires a specific set of different tools. The main tools are listed in the table.
Table: basic tools for pouring a foundation
| Stage of work | Contents of operation | Tools | Notes |
| 1. Clearing the construction site | Removing vegetation and soil layer | Bayonet and shovel shovels | |
| 2. Marking the foundation | Taking measurements and stretching cords along the contour of the support base | Construction cord, wooden pegs, axe, hammer | |
| 3. Digging a trench | Excavation | Bayonet and shovel shovels | |
| 4. Tamping the bottom of the trench with a vibrating plate | Compacting the soil base along the bottom of the trench | Vibrating plate | Possible to rent |
| 5. Installation of drainage along the bottom of the trench | Pour a layer of gravel 30 centimeters thick and sand 15 centimeters thick, tamping by hand, watering | Bayonet and shovel shovels, garden wheelbarrow, tamper, garden hose | |
| 6. Installation of formwork | Installing timber foundation fencing and faceplates: sawing lumber and boards, sharpening stakes and dowels, assembling frame with nails, installing faceplates and spacers with screws | Hacksaw, axe, hammer, screwdriver | |
| 7. Installation of fittings | Cutting rods to the required length. Laying rods in a trench, knitting reinforcing mesh | Grinder, side cutters, pliers | |
| 8. Preparation of concrete solution | Dosing of components, mixing and mixing of the solution | Scoop shovel, concrete mixer, bucket | Concrete mixer rental possible |
| 9. Pouring the foundation | Supplying solution into the trench, tamping | Scoop shovel, manual rammer, vibrator | Vibrator rental possible |
| 10. Control of horizontal foundation | Checking the filling using an instrumental method | Construction laser level | |
| 11. Dismantling of formwork | Dismantling the foundation fence | Crowbar, crowbar with nail puller, hammer |
We erect pillars
Stone pillars for a fence are laid out using the “Sliding Formwork” method. To strengthen the spans as best as possible, the pillars are laid with steel. The overheads, in turn, are cut from reinforcing bars and attached by welding to the metal frames of the risers. Place the parts of the rods parallel to the base, fixing the overhead ones one above the other with a distance of 30 to 50 cm.
The pillars also require the construction of plank formwork, which is a wooden box without a top or bottom, 30 cm high.
Sequence of work:
- The formwork is placed for the first layer of stones;
- Now you should lay out a temporary stone pillar, not secured with mortar. The masonry must be laid without gaps, tightly adjacent to the wooden boxes;
- Select and lay stones for the first row using mortar. Use prepared thick cement as a fastener. It is easiest to lay out even stones. In the case of uneven edges of the stones, pour additional cement mortar into the gaps. The remaining rows are laid out in the same way.
- Rows of formwork are filled one above the other, moved and filled further. This method is called sliding.
- Once you have built the first tier of stone and waited 24 hours, remove the bottom boxes but leave the formwork at the top of the structure. This step will allow you to place the following wooden levels.
After removing the formwork, you need to treat all the cracks between the cobblestones with cement to ensure a finished appearance and neat finishing of the supports, which you will also do yourself.
Remember that the masonry must gain strength, and for this it needs to be given time - at least a day.
Laying the fence walls
Making walls can be done in different ways. Experienced builders simply pull a string, which becomes a guideline for the height and deviation of the fence. They lay one layer of stones along the entire perimeter of the fence, after which all voids are filled with mortar. After a day, a second layer is laid out, etc. But in this case, there is a high risk of getting a wall that is too uneven, so it is better to use formwork.
Tip: If large round stones are used for the fence, then formwork will not help. It’s better to lay them out “by eye”!
The formwork is done similarly to the pillars, but here it is no longer necessary to place the stones tightly against the boards. Some irregularities are acceptable; they give the fence an asymmetrical appearance. After laying out the first layer, the stones are covered with mortar and left for one or two days.
Important: It is better not to make the formwork too high, as this will lead to voids in the mortar and poor quality of the entire structure. All seams must be hammered using a trowel!
In order for the fence spans to be the same in height, closer to completion they need to be measured with a tape measure. By varying the size of the stones, you can achieve a uniform level for the entire wall. After completing the installation and dismantling of the formwork, it is important to carry out jointing in a timely manner, otherwise the mixture will harden greatly.
Laying out spans
After the construction of the pillars and foundation, the next stage of work is the spans. To lay the sections you need to select stones ranging in size from 20 to 25 cm in diameter. Such elements weigh a little, so it is easier to work with them. If you don't find enough material, you can use a punch or hammer to break large rocks into fragments.
To prepare the solution, mix cement and sand in a ratio of 1 to 3. To obtain a beautiful color of the fastener, you can add paint to the solution.
Work like this:
- A cement-sand mortar is laid on the base.
- Stones are placed on both sides of the span. To ensure that the masonry is even, connect the edges of the section with a white thread and then use it as a guide.
- Fill the internal space of the edges of the span with stones, and tightly fill the resulting gaps with a cement mixture. Stones should be laid with the smooth side facing up.
- 24 hours must pass before the laid rad acquires the required degree of strength. Only after this can the construction of the next row begin. To build a stone fence with your own hands, proceed in this way until you reach the desired height.
Video: mistakes when laying stone
For laying next to each other, be sure to use any type of dressing that is convenient for you. To work with the top row, save stones of the same shape and diameter. Clean up any solution that accidentally falls on the front part of the span as quickly as possible.
Construction process
Before you start laying a stone fence, you need to think about personal safety. Work should be done in protective boots and thick gloves. If you need to split a stone, you should wear special glasses. You can prepare antibacterial agents and bandages in advance.
A stone fence will serve you for many years
Creating a foundation
First you need to dig a trench. Its size should be equal to the length and width of the future stone fence. To do this, you may need a shovel, and in some cases even a crowbar. The depth of the trench is selected individually, but it makes no sense to do it more than 700 mm. There is no need to throw away the earth from the dug hole; it will be useful for filling the edges of the finished foundation.
Next, you need to put together the boards to fit the desired structure. The rods are welded in the same shape and placed in a trench. You need to drive stakes along the entire size. From above, after 1.5-2 meters, transverse beams should be nailed. This action is necessary to ensure that the boards do not diverge when pouring.
Concrete is poured into the finished structure. To prepare the solution, you need to follow this ratio: for 1 part cement you will need 2 parts sand and 4 parts crushed stone. The components are placed in a concrete mixer and mixed.
After the composition has already been prepared, you can pour it into a container and distribute it around the perimeter of the fence in buckets. But you can do it much simpler and pour the mixture into the formwork using a gutter. Each time you mix, you need to move the concrete mixer.
You also need to mark the points for the pillars. In each, a pipe should be welded to the fittings. It is worth paying attention to the fact that the height must be made “in reserve”.
After all work with concrete is completed, the finished structure should be left to dry for 15-20 days. In order for the hardening to take place efficiently and evenly, you need to place a film (insulator) on top of the formwork. If this is not done, the top will dry out too quickly and the foundation will be less effective.
Often, novice builders make the same mistake at this stage of construction. The foundation cannot be poured flush with the ground. Melted snow and rain will accumulate along the fence and erode the soil. Mold may form. The foundation should be made slightly above ground level, after which the edges should be sprinkled with a small layer of decorative crushed stone (earth) or the concrete should be decorated.
Construction of pillars
Construction begins with determining the distance between the pillars. If it differs, you can carefully stretch or tighten the pipes using a rope. The pillars need to be made a little more spans so that the wall is externally divided into separate sections.
The formwork is made in the shape of a square with the required width of the column. Its height should not be more than 40-50 cm. When everything is ready, you should lay out a layer of stones parallel to the plane of the boards. Then the cavities need to be filled with a thick composition. The solution directly for fencing is made according to the following recipe: 1 part cement and 1.7 parts sand and gravel. It is important to ensure that all the holes between the stones are filled with the mixture, but the composition itself should not flow down the column.
This procedure must be performed with each pillar and the structure must be allowed to harden, leaving it for a day or two. With formwork you can significantly simplify your work. In order not to assemble a new square each time, you can simply nail another one to the bottom row. When the height reaches the desired level, you need to start laying the walls.
Laying fence walls
The wall can be erected using different technologies. Many experts pull the string. It serves as a guide to the deflection and height of the fence. First, one layer of stones is laid along the entire perimeter of the fence, and all the cracks are filled with the composition. A day later, a second layer is made, etc. This is quite convenient, but there is a possibility of laying a crooked wall, so it is best to use formwork.
If large rounded stones are laid out, the use of formwork will not give the desired result. In this case, it is necessary to apply elements to the “eye”.
The formwork should be similar to the pillars, but you don’t have to put stones as close to the boards as possible. Small irregularities are acceptable - they give the fence a natural look. After the first layer is laid out, the stones need to be covered with the composition and left to dry for 1-2 days.
You should not make excessively high formwork, this will lead to the formation of voids. The design will not be durable and of high quality. The seams should be hammered using a trowel.
To ensure that the height of the spans is identical, closer to the end of the work they should be measured with a tape measure. If there is any inaccuracy, you need to vary the volume of stones. After completing the procedure for laying and dismantling the formwork, it is worth doing the jointing so that the composition does not harden more than necessary.
Joining the fence
After the filling has been done, you need to take a break for about 5 hours, and then start undoing the seams. Use a hard brush to remove all residue. Then you will need a scraper - a tool that looks like a rectangle and has a protrusion equal to the required width of the seam.
To make the fence look natural and voluminous, it is better to make deep seams. If the effect of an entire space is required, then the recesses should be made no more than 2 cm. The jointing is done simply, the most important thing is precise recesses. Professionals advise that after jointing, treat the stones and seams with a solution of hydrochloric acid (maximum 30%).
This is interesting: corrugated board under the stone.
Final details
The stone fence is already ready. However, the result still looks unfinished. It's all about the small details that should decorate the fence. To make your wall look attractive and well-groomed, you should follow just two steps:
- A cap must be installed on each post. They can be purchased in a store or made to order from a blacksmith.
- The seams can be treated with a waterproof coating, then the fence will be visually divided into spans.
Building a fence is not easy, but it is absolutely possible. Even a person who has not previously engaged in manual labor can do such work.
If you lack finances, you can find stones on your own and lay the foundation together with your friends. The most important thing is to take your time. Then the new fence will delight the eye for many years.
Finishing a stone fence
Beautiful stone fences are complemented by the final touch - finishing. To increase the attractiveness of the appearance, the seams are unstitched. To do this, a colored or simple mortar is added between the stones, which makes the masonry more voluminous. Here you can use your own creative ideas, the main thing is to prepare the solution correctly.
You will need:
- guillemot;
- foam;
- brush with metal wire.
To finish the seams between the cobblestones, you should wait at least 3 and no more than 4 hours after finishing the laying of the spans. It is not recommended to wait longer as the cement mixture hardens.
Joining algorithm:
- Clean the seams between the stones with a wire brush.
- You need a scraper to create small depressions in the seams - no more than 20 mm.
- Next, you need to wash the finished fence with foam rubber using a 30% concentration of hydrochloric acid solution. Be sure to use protective gloves for your hands; if possible, try to cover your face and eyes with a transparent plastic mask, and your body with clothing.
Advice! For decorative finishing of the fence, you can use wood, as well as plaster with a beautiful finishing texture.
To remove moisture, special linings are installed on the pillars, which can also have a decorative value. Other types of decorations (lighting elements, forged figures) are installed by the owner of the site at his own discretion.
How to make a fence from gabions
A gabion fence is a durable and original design that will protect and decorate your garden plot
The advantage of such simplified gabion fences is their high aesthetic characteristics.
In addition, a gabion fence will fit perfectly into any interior and will give a great start to arranging your patio
Gabions
Typical sizes Mesh characteristics
Welded mesh gabions
Gabions
For gabions, a standard monolithic strip foundation is installed
The process of making a fence from gabions. Installation of gabions does not require special preparatory work. The walls of the boxes and the lids are connected to each other with special spirals or strapping wire. The boxes are then filled with natural material. It is allowed to place smaller stones in the central part, and large ones at the edges. When laying stones, it is necessary to reduce the formation of voids. The gabion is filled gradually, first by one third, after which the box is fixed from the inside, then the procedure is repeated
| Length x Width x Height, meter | Cell, cm | Weight of 1 mesh, kg |
| 1x0.5x0.5 (Zn 240g/sq.m.) | 6x10 | 6,8 |
| 1x0.5x1 (Zn 240g/sq.m.) | 6x10 | 13 |
| 2x0.5x0.5 (Zn 240g/sq.m.) | 6x10 | 12 |
| 2x0.5x1 (Zn 240g/sq.m.) | 6x10 | 18,5 |
Beautiful gabion fence
. Good luck!
Video - Installation of a gabion fence
Video - Construction of a fence from gabions
Types of artificial stone
Depending on the manufacturing method and constituent substances, artificial stone is divided into the following types:
- Synthetic. It consists of fine chips of natural stone mixed in a certain proportion with polyester resins. It is characterized by high strength and aesthetic appearance;
- Concrete. Made from high-quality concrete with the addition of a coloring agent. The surface structure and color of this artificial stone are as close as possible to natural material. This type is widely used for finishing fences and posts;
- Acrylic. Synthetically obtained from acrylic resins.
Special conditions for constructing a fence foundation
Any, even the highest quality fencing made of corrugated sheets suffers from a serious flaw. If a metal sheet can be easily torn from the support posts by a strong gust of wind, then a stone fence will withstand almost any atmospheric disaster. Except for one thing - there is a high risk of flooding and heaving of the soil at high water levels, which means that with a weak foundation, the fence will simply be squeezed out of the top layer of soil.
Therefore, the foundation of a stone fence requires additional measures to ensure the strength of the masonry even in unfavorable conditions:
- If possible, protect the base of a stone fence from groundwater and flood waters, plan a site on the ground with a slope for the discharge of ground water flows;
- Taking the perimeter line of the fence to the maximum distance from the walls of the building, the weight of one linear meter of a stone fence can be from 600 to 1100 kg, so strong pressure on adjacent areas can change the behavior of the backfill and waterproofing of the building.
Before making a stone fence, it is necessary to conduct a reconnaissance of the soil on the ground and choose the right foundation option. If the perimeter of the fence construction passes through complex folded terrain, and under the fertile layer there is a thick layer of clay or loam, then it is best to use a shallow tape with bored piles or ready-made FBS blocks laid out in steps.
For your information! According to the standard, the depth of laying the concrete strip is taken to be equal to 1/3 of the height of the fence made of lightweight materials. For a heavy stone fence, for example, made of rubble stone, the depth of the foundation is taken to be at least 2/5 of the height.