Requirements for a homemade fence
Any fence requires pouring a foundation. In most cases, a pillar type of foundation is used, where frame pillars are poured into trenches. The exception is brick and stone fences, which require pouring a strip base.
In addition, DIY fences for a private home must meet a number of requirements:
- Strength.
- Reliability of fastenings.
- Sufficient foundation pouring depth.
- Durability.
- Ease of repair work.
- Sufficient height of the structure.
Among all the available options, it is better to give preference to sectional buildings, which makes it possible to replace a separate section if damaged.
How to make a fence: general points
Option for a brick fence
Fencing a summer cottage performs several functions:
- Marks the boundaries of private territory;
- Shows the status of the owners;
- Plays an aesthetic role.
To build a fence, it is not necessary to use expensive materials. It is enough to choose a simple, inexpensive variety. If the plot is not corner, then its 3 lines are the boundaries between neighbors. In this case, it is necessary to erect a fence for a dacha in accordance with the legislation of the Russian Federation, which requires the use of a certain type of construction products.
Even the cheapest fence option can tell a positive story about the owner if it is made from simple blanks but contains an interesting design idea. The author's development itself is expensive. The original fence evokes admiration for its unusualness.
From an aesthetic point of view, often an inexpensive fence looks more attractive than one made from expensive materials. If the owner creates it with his own hands, puts his soul into it, the structure turns out interesting.
There is no need to compare the concepts of cheap fence and quality. It is a mistake to think that a fence made of simple structures will not last long. Often, a fence made of reinforcement or wood lasts for decades without damage.
Types of fences
Depending on the material used in the work, the following types of fences are distinguished:
- Wooden model.
- Chain-link fence.
- Masonry.
- Brick version of the fence.
- Fence made of corrugated board.
- Sheet iron fence.
Each of the presented options differs in a number of parameters and has its own pros and cons in practice. In all cases, before purchasing working material, you should pay attention to such characteristics as:
- Exterior design and the need for additional decor.
- Resistant to moisture.
- Ease of installation work.
Separately, the calculation of the required material for constructing a fence of the required length is carried out.
Pencil fence
If you are going to assemble a fence from vertical pickets, then try transforming the components into colored pencils. They can be easily shaped into both boards and logs. It is enough to cut their upper end in the form of a cone and give it the appearance of a rod. Each element can be painted in its own color. The fence will turn out bright and colorful.
Bright decorative fence made of pencils of different heights
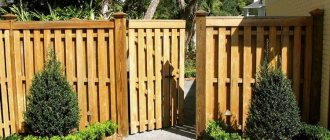
Wooden fences
In practice, they are made of wooden picket fence. First of all, a rigid frame (metal or wood) is mounted, onto which individual elements are attached. The advantages of choosing this material include:
- Ease and convenience of working with wood. The master only needs skills in handling a jigsaw, a plane and a screwdriver for attaching the picket fence.
- Environmentally friendly material that does not emit toxins, harmful resins, and does not cause allergic reactions.
- A fence made from picket fences is easy to replace if it breaks. An individual element is much easier to remove than a whole section.
- A very beautiful decorative design. Even without additional processing (painting, opening with acrylic varnish), the fence has a pleasant natural shade, complementing the overall style of the garden interior.
There are a number of features of working with wood. Due to its natural origin, the material requires pre-treatment.
All parts are impregnated with an antiseptic, antipyretic, moisture-resistant and antifungal compounds, or check with the seller for the availability of production treatment.
Using ready-made projects and drawings, you can build a wooden fence with your own hands cheaply and beautifully, without significant financial investments.
Fence for flower beds
It happens that scraps of corrugated sheeting that remain from the construction of the main fence or roof are used as a fence material for a flower bed. The pieces are driven into the ground around the flower bed. This type of fencing is very durable.
In principle, for small fences you can use any available material. The main thing is that the existing material fits harmoniously into the overall design of the site.
Chain-link fence
For fencing a garden and vegetable plot, a cheaper option would be a chain-link mesh. Pre-calculate the required amount of consumables.
Mark the area using pegs and a stretched rope. Holes are dug along the contour, located at regular intervals, and support pillars are poured.
Today, special poles with soldered hooks for mesh of various diameters are available for sale. If such accessories are not available, you can solder the hooks yourself.
This approach will greatly facilitate the work of the site owner when attaching the mesh to the supports. The mesh is mounted either as a continuous sheet (fixed on poles) or in the form of equal sections.
Note!
- DIY birdhouse: step-by-step diagrams and drawings for making it yourself. Types of birdhouses and materials + design ideas
Do-it-yourself landscape design: planning and zoning of the site, selection of decorative elements. New products and design ideas (photo + video)
Do-it-yourself sliding gates at the dacha: options for construction materials, preparation of the territory + step-by-step instructions for doing it yourself
The mesh is a universal material for the construction of country fences, but is used exclusively for fencing the economic zone on the site.
Construction of pillars
A popular solution is to install stone pillars instead of posts, which give the fence a monumental look.
Construction is carried out as follows:
- a hole is made in the ground with dimensions in plan slightly larger than the pillar, preferably slightly deeper than the freezing mark of the soil. The pillar is usually placed in 1.5x1.5 bricks (380x380 mm);
- a sand and gravel cushion is laid on the bottom;
- install formwork. For better stability, it is recommended to make the foundation for the pillar in the form of a truncated pyramid;
- lay a reinforcement frame and a piece of pipe with a diameter of 50 mm of such length that its lower part is embedded in the foundation, and the upper part penetrates the pillar;
- pour concrete into the formwork and wait 28 days until it is completely mature;
- cover the pipe protruding from the foundation with bricks, erecting a pillar measuring 1.5x1.5 bricks. At the required height, steel brackets are welded to the post to secure the fence sections so that they pass through the brickwork. The cavity around the pipe is filled with concrete mixture;
- the finished pole is topped with a cap made of tin, concrete or plastic, which drains rain moisture. You can make a tin cap yourself by cutting out a pyramid pattern from a sheet and connecting its edges with rivets. Such a cap is attached to the post with dowels.
Finally, the pillar is plastered. When erecting a stone fence, there is no need to install brackets in the post.
Masonry fence
Very beautiful and stylish fences for enclosing a house are obtained by using natural stone. Stone masonry has certain difficulties in practical implementation, but the invested effort and finances make it possible to obtain a fence with a unique external design.
In addition, these types of construction are distinguished by special strength and massive weight. Therefore, great attention is paid to pouring the foundation.
Inexpensive ways to paint a fence
Option for painting a wooden fence
If the fence has an unpresentable appearance, you can update it with the help of pigmenting compounds. There are simple painting methods for this.
- Before finishing, metal structures are sanded with sandpaper, coated with a layer of anti-corrosion agent and a composition intended for external finishing of steel and iron products is applied.
- Glazing or covering liquids are applied to the tree. The first ones have a transparent texture. After processing, the natural pattern is preserved. The latter contain a pigment that colors the wood a certain color.
If these products do not contain antiseptic components, the boards and slats are additionally disinfected before using them.
Painting can be done using a brush, roller or by spraying the composition from a can. The main thing is to choose a product with good coverage.
Step-by-step construction of a fence
Setting up a fence on a site is quite simple; you just need to follow a certain sequence of actions. Instructions on how to make a fence with your own hands:
- Pouring the foundation and support pillars.
- Fastening sections or laying materials (brick, natural stone).
- Installation of wickets and gates.
If necessary, additional decorative finishing is carried out: painting, varnishing, artistic painting of surfaces.
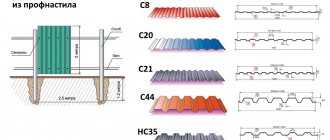
Corrugated fencing
If your personal plot is located in close proximity to the roadway, it makes sense to think about building a fence from profiled sheets. This fence looks impressive and solid. But its installation requires the manufacture of a foundation, and this can seriously harm the homeowner’s wallet.
A fence constructed from corrugated sheets provides the homeowner with the following advantages:
- the site will be protected from the effects of street noise and dust and debris entering the territory;
- this cheap design does not require any special care;
- Manufacturers offer consumers corrugated sheets painted in a variety of colors;
- this type of fence is not afraid of fire;
- This is a cheap building.
Useful How to properly build a fence, install and assemble fencing with your own hands
At the same time, a fence made of corrugated sheets:
- characterized by windage, that is, low resistance to the load created by the wind;
- During operation, rust stains form on the surface of the frame, which should be removed as quickly as possible;
- such a structure looks bulky and, under some conditions, limits the access of fresh air to the site.
But despite the above, such designs are very popular among owners of country houses and summer cottages. Because the manufacturing quality of the profiled sheet and its cost clearly outweigh all the indicated disadvantages.
Mounting features
The assembly of such a structure is quite simple. Work begins with arranging the foundation and only then transverse joists are attached to them, onto which sheets of profiled steel will subsequently be installed.
If the height of the fence exceeds 2 meters, then it makes sense to lay three rows of transverse joists.
For fastening it is permissible to use welding or bolted connections or rivets.
Tools and materials for work
Before starting construction work, it is necessary to prepare a drawing of the future structure, calculate the amount of consumables: cement, gravel, sand for pouring the foundation, mesh, brick (depending on the selected type of fence).
Note!
DIY branch chopper: how to make it from A to Z. 175 photos and step-by-step instructions- DIY garden paths - varieties of materials. Step-by-step instructions for DIY installation and decoration
Do-it-yourself sauna stove: types of structures and manufacturing materials, technology and stages of work + do-it-yourself construction instructions
Also during the work you may need the following tools:
- Grinder for cutting metal and profiles.
- Welding for attaching hooks to support posts.
- Wire cutters.
- Fasteners for mounting sections.
- Containers for mixing cement mortar or concrete mixer.
- Trowels.
- Building level.
- Compositions for wood treatment (antipyretic, antiseptic, moisture-resistant and antifungal solutions).
- Decoration materials (paint, acrylic varnish).
- Anti-corrosion coating is required for metal surfaces.
Additionally, a plane and sandpaper can be useful for processing wooden parts yourself.
Preparing to install the fence
Carrying out a set of preparatory measures during the construction of a new fence will allow you to achieve the desired result within the planned time frame. In addition, the analysis will reduce the costs of solving “suddenly arisen difficulties” and eliminate the need for “emergency” work.
The fence will not only protect, but also give overall completeness to the garden plot
The preparation is presented as follows:
- The choice of material, as well as the method by which the fence will be made. This will determine the type of future fencing and technological features of the work. Then an estimate of the funds needed to purchase materials should be drawn up. It is also important whether the fencing is expensive or cheap.
- Removing the old fence. It is not difficult to demolish a fence where wooden supports and a picket fence were used, but you will have to tinker with reinforced concrete structures (RCS) and cemented metal posts. The best option is to use an excavator. The cost of renting it will more than pay for the time spent doing the work manually.
- Preparing the perimeter. This involves removing grass, trees, debris accumulation, and the like. It is important to pre-prepare the routes for supplying consumables and fence structural elements.
- Land planning. If the site is located on a hilly area, but there are no plans to level the slope, then it should be taken into account that then the fence will be built as a “ladder”. For correct visual perception of such a design, it is necessary that the step has the same height difference throughout the entire perimeter or a corresponding slope.
- Marking. The marking of a private plot should be strictly guided by cadastral documents duly registered by government agencies. If the dacha has boundary signs, then it is necessary to check their relevance.
Before installation, it is necessary to draw up a detailed plan for each element
Before starting work, you should draw up a very simple plan where the gate, entrance gate and supporting structures will be fixed.
Pouring the foundation and supports
Before starting repair work, be sure to assess the condition of the soil in the selected area. Parameters for assessment: the presence of groundwater and karst voids, which can lead to premature destruction or subsidence of the fence.
Pegs are installed along the perimeter of the future fence, and a rope or twine is pulled. Next, they begin digging holes for the support pillars.
A continuous trench of proper depth is prepared under the strip foundation (depending on the expected weight and size of the structure). First of all, prepare a sand cushion in each pit.
The next step is to fill in crushed stone, broken brick, gravel, and then pour in the prepared cement mortar. The support pillars are installed exactly in the center of the trench at the moment when the hole is half filled with solution.
Holding the support strictly vertically, carefully pour in the remaining cement composition. Leave the base to dry, periodically moistening it with warm water.
Installation norms and rules
The parameters of the fence and other nuances associated with its construction are regulated by regulatory documents:
- Town Planning Code of the Russian Federation;
- SNiP 30-02-97 “Planning and development of the territory.”
According to the standards, the fence between two adjacent areas must be light-transmitting (grid or mesh).
Height - no more than 1.5 m. A blind fence can only be erected from the street side. Minimum distance from the fence to:
- residential building: 3 m;
- outbuildings for keeping animals: 4 m;
- other buildings, garages: 1 m.
The minimum distance from the fence to the trees is:
- high - 4 m;
- medium - 2 m.
The distance from the fence to the bushes must be at least 1 m.
A specific locality may set its own standards regarding the height of the fence between adjacent areas. It is recommended to clarify them before starting construction.
Fastening sections or masonry
The supporting pillars for brick and stone fences are covered with material, and only then do they begin laying the intermediate sections. To stretch the mesh, measure the distances between adjacent supporting structures.
Hooks for fastening are mounted on the poles. The mesh roll is rolled out onto a flat surface, the section size is measured, and cut using wire cutters. The section is pulled between two support posts using hooks for fastening.
There is also a method of laying the mesh as a continuous sheet, where a roll of chain-link is rolled out, attaching it to the underlying structures. The first method is more practical due to the possibility of replacing a section without dismantling the entire fence.
The wooden picket fence is attached to a rigid frame using self-tapping screws or self-tapping screws.
Interesting ideas
Decorative fence posts are made from various materials: wood, stone, concrete, plastic. They are used to achieve additional strength of the fence and protection from natural phenomena.
To make a mesh or lattice fence look more original, you can use vertical landscaping. Plants and shrubs such as hedges can be used as fencing material.
Fence materials can be combined to create unique compositions. For example, build a wooden picket fence into a brick fence or cover a wooden fence with iron.
Installation of wickets and gates
Even at the project preparation stage, the location of the future gates and gates is marked on the drawing. For fastening, you need to purchase rotating fittings or grooves with a movable roller (for sliding gates). It can also be a gate with an electric drive, but this option requires the assistance of a specialist in installing the equipment.
There are a huge number of options for making fences on a summer cottage. A rarer model, but very popular among fans of stylish decor, is forged fences.
Such structures are made strictly to order, carried out according to original designs. And the installation work can be carried out directly by the owner of the site.
Types of decorative fences made from scrap materials for cottages and country houses
There are a lot of them, and you can use almost any available material: plastic, brick, wood, stone, rubber.
Plastic
The most popular material for a decorative fence is a plastic bottle, which we often simply throw away. It can be placed both vertically and horizontally, thanks to which entire compositions can be created on a personal plot.
Another decoration option is horizontal lines made from plastic bottles. The only important thing here is the selection of bottles of the same color
It is one of the available and practically free building materials. The simplest type of decorative fencing is bottles of mineral water, carbonated drinks or beer buried upside down to the base of the neck.
Another option for using bottles - this time as fences for seedlings
This material can be painted or filled with colored sand, which will significantly transform the area near the country house.
Plastic bottles came in handy here too: in the spring at the dacha, when there are still no markings for the beds and flower beds, the dacha paths have to be “trodden down” again. And here the bottles act as a border
Perhaps the only thing you need to consider when choosing this type of fencing is the same shape of the bottles. But you can choose the color yourself.
Advice: in order to prevent such a fence from being blown away by the first strong wind, the bottles need to be filled with any bulk material - sand, small crushed stone, earth.
In addition, plastic bottles can be used to delimit the direction of garden paths.
If you use such a design at the beginning of the summer season, you can hope that the fence will last almost the entire summer - until the first heavy rains
Rubber
This “building material” is considered the second most accessible. And all because old car tires are used as fencing!
They will look good as borders for flower beds - whitewashed, painted, painted. And if you have a lot of tires, you can use them to build a real high fence for your local area.
Tires stacked on top of each other can also be used as a “green” wall if small holes are made in them and planted with annual flowers
The advantage of such fences is their durability, moisture and frost resistance, accessibility and the ability to be used as a “green fence”. However, if there are not so many tires, then instead of a whole fence you can make separate flower beds or even beds.
Advice: the lower crowns should be tightly packed with soil so that the fence does not sag or fall to one side over time.
Not a very original idea, but it looks interesting, emphasizing the beauty of flowering plants
Wood: picket fence, fence
To make a wooden fence, it is not necessary to purchase lumber; it is enough to use boards, slats and even branches that are on hand.
Tip: wood deteriorates faster than plastic, so before installing the fence you need to coat the wood with a special antiseptic to prevent rot and insect pests. The treatment can also be done with hot bitumen, covering the part of the tree that will be buried in the ground.
The remains of the timber after the construction of a bathhouse or a wooden log house can not be disposed of in a furnace, but can be built like this nice little fence
In addition to a decorative picket fence, you can make a fence from slats, simulating a mesh or a decorative fence with your own hands, for example, from a grapevine.
Brick
It is another inexpensive material for building a fence. If brick and its fragments remain after construction, then the problem with fencing the flower bed area will be solved.
Tip: a flower bed laid diagonally with bricks looks best.
However, such a fence serves only as a decorative fence - it cannot provide protection against intrusion by domestic animals.
White brick looks no less interesting than red. And in combination with a white picket fence it creates complete harmony of landscape design in a summer cottage
Glass
Glass bottles can also be used as decorative fencing for flower beds and flower beds. It looks neat, doesn’t require any special expenses, and will last longer than plastic and rubber.
Glass bottles can also be used as border tiles: the main thing is to choose all the bottles of the same size and color
One of the advantages of this material is the availability of a wide range of bottles in color and shape.
Selecting a landing zone using bottles buried upside down is similar to the same solution as with plastic
Stone
Fences made of natural stone, such as granite, fit into any landscape design because the material itself is natural. Pieces of material can be laid out in flower beds, to mark garden paths with them, in addition, the path itself is laid out with it, which creates a unity of design style.
Advice: to increase its performance characteristics, a stone fence should be fastened with cement mortar, and luminescent paint should be used as decoration, with the help of which an ordinary fence will turn into a luminous one after dark. This idea will be an excellent solution for decorating borders along garden paths.
One of the most “serious” due to its design. Natural stone brings the territory of a country house even closer to nature, combining architectural solutions with garden design
Among the advantages of stone fencing, it is worth noting the possibility of erecting a fence of completely different heights, the strength of the fence and the durability of the structure.
Metal
For those who have a welding machine in their working arsenal, building metal fences on the site will not be difficult. You can weld scraps of pipe or reinforcing rod onto a pre-prepared frame. True, this option cannot be classified as a budget option; here you will have to fork out for cooking material and high-quality fasteners so that the fence lasts a long time.
It looks beautiful, but installing such a fence will be quite expensive
There is also a more budget-friendly option for a metal fence - a DIY decorative wire fence.
Here two pieces of wire are used, intertwined with each other. A few simple movements - and the flower garden fence is ready!
In addition to the above fences, you can also use a hedge - the bush grows quickly, serves both as a decorative decoration and as a fence for the area from the prying eyes of passers-by.
Photos of DIY fences
Material selection, what to pay attention to
Decide what function you assign to the fence and what role it will perform.
- Protecting property and setting the boundaries of your possessions. The fence will limit the number of visitors; if you wish, you can simply not let a person into your site; it will eliminate the desire of those passing by to take a shortcut; passing through your site, you will not feel prying glances from outsiders.
- Protection of property - the ripe crop and the location of the beds are not visible through the fence; you can safely leave your equipment and personal belongings during your vacation or a trip to the store. Through the fence it is more difficult for animals to get into the local area, which cause significant damage to green spaces, beds and crops.
- Decorative function - the fence serves as an element of landscape design, creating the uniqueness and originality of a single ensemble of the entire local area. This is an opportunity to express your taste, demonstrate a sense of style and show wealth.
By hiding behind a fence, you subconsciously protect yourself from the influence of others, leaving your worries and problems outside your comfort zone.
Ways to protect wood
Natural raw materials used outdoors are subject to constant exposure to moisture and therefore require mandatory care.
On the building materials market there are a lot of impregnations, primers, and antiseptics that penetrate deep into the structure or create a protective film on the surface. It is important to treat wood against damage by insects and exposure to fire.
Tips for choosing and the procedure for applying the product can be found in the article: “Protecting wood from rotting and moisture.”
The procedure must be repeated every 2-3 years in dry, sunny weather. Drying time is a day.
Fence
This is a traditional option for a garden or cottage. Two base boards are attached horizontally to the load-bearing posts, and the fence boards are directly placed on them vertically at certain intervals.