A cellar at the dacha is a necessary element of arranging a garden plot, intended for storing the grown crop. In order for agricultural products to remain fresh for as long as possible, the optimal temperature and humidity conditions must be maintained in the room. This article will tell you how to make a cellar with your own hands and equip it with everything you need.
Types of cellars
Storage for supplies is organized taking into account the conditions of the site. The main task during construction is to protect the structure from groundwater and high water, so it is recommended to choose the highest place and use a construction option that provides better insulation from soil moisture.
Ground
Building a cellar on the surface of the ground is the best choice for a summer house located near a reservoir or on clay soils. As a rule, there is a high groundwater level and accumulation of water when snow melts.
Types of above-ground cellars:
- free-standing bulk;
- wall-mounted, adjacent to an existing building.
Features of the construction of above-ground storage:
- The pit is deepened no more than 50 cm.
- To prevent moisture from penetrating through the floor, a crushed stone-sand mixture is laid on the bottom, compacted, filled with bitumen, or rolled waterproofing materials are laid.
- The walls are erected from materials that can resist rotting - bricks, blocks, wood treated with antiseptics.
- The structures are protected with waterproofing from the outside and inside, gluing it in 2 layers.
- The necessary thermal insulation is provided by multi-layer insulation with clay, expanded polystyrene, expanded clay and a layer of earth 0.7-1.2 m thick.
- The structure is given the shape of a hill, which is most resistant to erosion during rains and floods.
- To enter the storage room, an insulated door is installed on the north side for minimal heating in summer.
Wall-mounted
This is the most economical and simple solution for high groundwater levels in the country. The cellar does not need to be deepened, and the walls of the house or barn act as a ready-made external structure.
Features of the technology for constructing wall storage:
- The pit is dug to a depth of no more than 0.5 m. In the immediate vicinity of the building, the soil near the foundation of the main building must not be weakened or loosened. This causes uneven deformation of the soil under the sole and provokes the formation of cracks in the structures of the house.
- Floors are made on a preparation made of sand, crushed stone, broken brick, which provides drainage and reduces the level of melt or rain water.
- The walls are laid out from rot-resistant foam blocks, bricks, or a wooden frame is constructed, filling the internal space between the sheathing with a heat insulator.
- The wall building is insulated with synthetic materials with additional earthen embankment. If you line the outside of the cellar with decorative finishing, it will not spoil the modern appearance of the country house.
Zemlyanoy
It is advisable to build a cellar completely buried in the ground at a low ground level, when the water does not rise above -3 m.
Features of underground structures:
- During construction, you need to select a sufficiently large volume of land.
- It is necessary to reinforce the masonry walls from blocks or bricks so that the structures do not lose stability under lateral soil pressure.
- Reliable thermal insulation of a buried building is created by a layer of earth.
- Even with low groundwater levels, it is advisable to provide drainage to protect against seasonal precipitation and melt water.
- To enter the basement, an insulated hatch and ladder are installed.
- Particular attention is required to the organization of a ventilation system, which, in addition to reducing air humidity, cleans it of harmful gases.
Semi-recessed
This type of storage differs from the above-ground storage depth - the structure is immersed in the ground to half or a third of its height. Free-standing cellars are covered with earth, built-in undergrounds are placed under the house or in the basement.
The semi-buried building combines two types of cellars—ground and earthen. Characterized by features:
- Unlike a completely buried basement, the volume of excavation work is smaller, but reliable insulation of the upper part is required.
- When laying a pit, the groundwater level should not be closer than 0.5 m to prevent the penetration of water due to capillary suction from the soil.
- To protect against accidental runoff, install drainage
- To enter, a door is installed at ground level and a staircase is installed.
Caisson
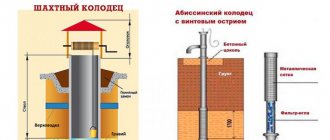
The most reliable cellar at high groundwater levels is a caisson. The design of the metal or plastic box has no joints from where water could leak inside.
The caisson is immersed in a pit and secured with anchors that prevent it from floating up when the groundwater level rises. A pump is installed to pump out excess liquid from under the bottom. The construction of such a storage facility is more expensive than traditional methods of constructing cellars, but the design has a very high degree of protection from moisture.
Types and features of cellars
Do not confuse the cellar and the basement. Building a cellar at your dacha with your own hands can come down to simply digging a hole and minimally arranging it. The choice of the type of structure depends on many parameters, for example, on its intended purpose, on the climatic conditions of the region, financial capabilities, etc. Also, when choosing the type and materials for building a cellar in a country house with your own hands, you need to take into account its location.
It is easier to build a separate building than, for example, to build a cellar under the house, but this option will require more materials, and therefore more finance. Making storage under a residential building or outbuilding will be cheaper, but this option is limited in space.
Arranging a cellar will allow you to preserve preserved food and other products for a long time
One of the most popular options is an ice cellar. It copes well with the function of long-term storage of food even in the hot season and is especially in demand in the southern regions. It is quite difficult and expensive to build this type of cellar in a private house with your own hands, but the result is characterized by high performance characteristics, durability and reliability.
Another good option for this building is a storage unit with two sections. As a rule, this type is used when it is necessary to avoid mixing the odors of various vegetables and fruits that are simultaneously stored in the cellar. To build such a storage facility, you need less materials than for a glacier.
A separate type of cellar is a wine cellar. It is used for storing wine products and has its own design features and nuances that must be taken into account in order to properly build the cellar. As a rule, in such storage you can store not only wine, but also various preserves.
A wine cellar has design features that must be taken into account at the construction planning stage
How to choose the right place
A cellar is an engineering structure, the construction of which must be approached responsibly. It is permissible to locate underground storage facilities on the site in accordance with SNiP 30-02-97, which provides recommendations on safe distances from sources of pollution:
- toilet with cesspool - 12 m;
- barn for livestock - 12 m;
- compost heap - 8 m;
- bathhouse, sauna or summer shower - 8 m.
If the dacha plot is not overloaded with buildings, the cellar is located at the highest point of the relief without any restrictions. To avoid unforeseen difficulties during operation, experienced summer residents advise:
- Underground storage facilities should be built no closer than 7 m to a private house - a source of heat transmitted through the ground.
- Take into account the location of potentially dangerous objects not only on your site, but also on neighboring ones.
- If you draw a diagram in advance and indicate the distances, choosing the optimal location for the cellar will be much easier.
Advantages of a semi-buried cellar
Such designs have a number of advantages in comparison with other cellars for storing pickled vegetables and other vegetables. Let's take a closer look at the positive aspects:
- Quite rarely the question arises of how to make such a structure yourself, since everything is extremely simple and clear.
- There is no need to deepen the structure much and at the same time make a steep descent into the room.
- Slight dependence of the design on the location and presence of groundwater on the site;
- Significant savings when constructing such a cellar with a semi-buried construction scheme.
- You can do all the work yourself without involving specialists.
It is worth noting that, despite the large number of advantages of such storage facilities, there is also a significant drawback, namely a fairly large temperature fluctuation.
Don't forget to prepare all the tools
What to pay attention to when the groundwater level is high
High groundwater level is the main enemy of underground structures. Determine the depth of groundwater in the following ways:
- drilling a hole to a depth of 3 m;
- according to information from neighbors;
- in organizations engaged in hydrogeological research;
- observation of growing moisture-loving plants.
The latter method, although related to folk methods, is confirmed by botanical science. Willow and alder love water the most. Where they grow luxuriantly, the groundwater level lies no further than 1 m. Cultivated species of apple or plum trees do poorly on such soils and often get sick.
Choosing a location on the site
Semi-buried pit pits, among other advantages, are extremely popular in areas with groundwater close to the surface, since a minimum depth of one meter is sufficient for this outbuilding. It is necessary to measure or otherwise find out the maximum level of groundwater in the spring, during the flood period, and construction, taking these data into account, of course, must be started in late spring or summer.
Half the battle is choosing the right location for a semi-buried basement. And the main thing in this is not its invisibility, but a place that allows it to perform its function as a “room” - to ensure proper storage of agricultural products. The place should be dry and elevated, at least slightly above the surface of the site. If there is nothing like this, it needs to be built specially.
In this video we will look at building a cellar with our own hands:
Construction of the pit
Excavation work is carried out in dry weather in the middle or end of summer, when the groundwater level reaches its lowest level. The minimum pit area is 8 m. An underground cellar is dug below the freezing level in a particular area. The optimal depth is 1.8-2.5 m.
If the soil holds its shape well, a hole is dug according to the size of the cellar. As a rule, the area of the structure does not exceed 6-18 m². If the walls are prone to crumbling, the pit is made wider and the side slopes are strengthened with shields with spacers.
A small cellar is dug by hand, loading soil into buckets and pulling it up. If the volume of excavation work is considerable, it is advisable to use an excavator, and after excavating the bulk of the soil, finish the last half meter with a shovel.
Video description
Digging a pit for an underground storage facility using special equipment:
Note! When working with a pit, it is imperative to secure the walls of the excavated excavation. This is done to prevent the soil from sliding down. Working with loose walls is life-threatening.
After the pit is ready, it is left for at least one day. This is how they check for high moisture in the soil. If they appear in the pit, then the depth of the excavation should be increased by half a meter and the floor should be compacted with a layer of clay. In “dry” pits, they immediately make a clay bedding and fill it with construction sand.
Construction of the foundation
It is simply impossible to support walls made of brick or concrete on the bottom of the pit. The foundation is prepared in two ways - pouring a monolithic strip foundation or slab.
On dry, dense soils with low groundwater level, it is enough to dig a groove measuring 20x30 cm around the perimeter of the cellar, pour a 10 cm layer of sand on the bottom, lay frames made of reinforcement with a diameter of 10 mm and fill it with concrete. After hardening, they begin laying the walls.
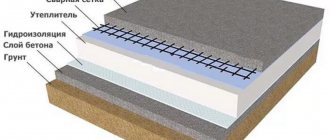
The foundation slab provides good waterproofing of the cellar floor in water-saturated soils. To install it, a cushion of sand and crushed stone is prepared at the bottom of the pit, thoroughly compacted, and thin concrete 50-100 mm thick is laid. After hardening, pour hot bitumen and glue 2 layers of roofing felt. A reinforcing mesh is installed and the top is concreted with a mortar of at least M250 grade.
What kind of brick to lay the cellar with?
It took 4 pallets of bricks, each containing around 400 pieces. Total 1600 bricks. The brick is, of course, red, the same as the one used for the base of the house. The floor of the cellar is filled with concrete - 15 cm. No insulation or waterproofing was thrown under the floor. In this case it is not needed. Firstly, we’re not on the street, and secondly, there’s really no point in it there. The main thing is that when pouring the floor, a masonry mesh was laid. The cells are 10 by 10 cm. It is used precisely for these purposes, in case anyone didn’t know. You guessed it, you need the floor to turn out to be a solid slab, and suddenly not burst anywhere. Although, again in this case, it’s a safety net.
The solution was mixed manually using a concrete mixer. Because if you serve it from a mixer at once, it might not turn out neatly. And the volume of concrete on the floor was not so large. Around 1.5 cubic meters.
So it turned out that the solution was carefully poured down the gutter in buckets (seen in the photo below), and then gradually a perfectly flat floor was obtained. It’s good that there are friends who are specialists in this matter who understand the intricacies:
Construction of walls
Wall materials are selected from the range available in a particular area. The most suitable materials for the construction of underground cellars are clay bricks, prefabricated or monolithic concrete, rubble stone, and concrete rings. Do not use fillers or structures with large pores that freeze due to high water absorption.
For above-ground storage facilities, blocks of foam, gas or slag concrete with low thermal conductivity are used. It is not recommended to use sand-lime brick. It is unstable to moisture and does not retain heat well.
Walls made from piece materials are laid with bandaged seams and must be reinforced. Monolithic structures are poured into panel formwork, after placing steel frames there.
The need to line the walls of the cellar
An important point is the process of covering the walls of the room. In most cases, concrete or brick is used. In this case, the solution is usually poured between the formwork and foundation pit.
Each of the methods can be done independently, provided that all the details are thought out in advance. For bricklaying you will need mortar and brick, and for a monolithic wall you will need to prepare material for spacers and formwork.
Floor installation
For the ceiling, rot-treated lumber, monolithic or prefabricated reinforced concrete slabs are laid on the walls of the cellar. Wooden beams are sheathed with boards, and the joints between the panels are carefully sealed.
The top of the ceiling is coated with clay, bitumen mastic or covered with roll waterproofing. Install thermal insulation with a thickness of at least 300 mm. These can be slabs of polystyrene foam, expanded polystyrene, expanded clay, slag wool, peat, sawdust. The structure is covered with earth, giving a slight slope to the side to allow water to drain.
Covering and backfilling with earth
The ceilings of a semi-buried cellar structure are, in most cases, built from slabs. In addition, the floor is usually covered with several layers of soft clay, after which roofing felt is additionally laid to ensure the maximum level of insulation of the room. A layer of soil is poured on top, which remains from digging a pit. It is important that the slopes are 45 degrees.
It is worth noting that the minimum backfill thickness should be 60 cm.
The entire structure could potentially be washed away by rain. And to prevent this from happening, it is covered with turf on top. This will ensure protection of the cellar itself and the earthen layer from getting wet and flooding after rains.
It is not difficult to build a semi-buried cellar, but experts note that, if possible, it is best to make the traditional option.
DIY floor
The floors in the cellar perform several functions - they serve as a base, a water barrier from soil moisture and a covering to maintain the hygiene of the room.
The most common flooring materials are:
- concrete;
- clay;
- bricks;
- tree.
On dry, dense soils, use an uncoated earthen floor.
Zemlyanoy
This option for floor installation requires almost no material and labor costs. The base is leveled, the mounds are cut off, covered with a layer of crushed stone and compacted. Despite its simplicity, this floor is not resistant to loads, is easily deformed, and does not protect against the penetration of moisture from the soil. During the rainy season or melting snow, water will freely flow into the cellar, causing spoilage of supplies, rusting of metal surfaces, and rotting of wood.
Concrete
This base can withstand heavy loads and is easy to care for. They are made of concrete laid on a bed of non-metallic materials. Waterproofing and reinforcing mesh are laid inside for strength and tightness. The coating protects well from water, especially when impregnated with penetrating compounds such as Penetron.
Clay
For such a floor, fatty clay is used, which is elastic when wet and durable after hardening. A layer of crushed stone with clay or bitumen 10-15 cm high is laid on a flat surface. Rolled waterproofing is placed on top with an overlap on the walls. The flooring is completed with a 5 cm thick coating of pure clay or clay mixed with crushed stone. After hardening, the cracks are sealed with lime-clay mortar.
Brick
Only red clay bricks are used for flooring. It is not destroyed by moisture and additionally protects the cellar from freezing. A mixture of gravel and sand is poured and compacted onto the leveled base. Liquid clay or bitumen is poured on top, and 2 layers of roll waterproofing are glued on. The brick is laid on cement or clay mortar and the seams are filled with it. Brick floors last a long time and maintain a favorable microclimate in the storage area.
Wood
If the cellar is dry and there is no risk of flooding, you can lay wooden floors. A protective layer of crushed stone with clay or bitumen, roll waterproofing, and a thick film are first installed. Logs are mounted from timber with a cross-section of 10x10 cm, boards are nailed onto them or screwed with self-tapping screws. Lumber must be treated with antiseptics.
Construction of a cellar on a slope or slope
For the basement, natural unevenness is used, where the soil has a slope. This allows you to significantly save on the purchase of material, as well as on excavation work, but the cellar will have a smaller area. The stages of work during such construction are no different from the two previous cases, since any option can be used, but there are a number of features:
- Along the top of the slope it is necessary to dig a drainage ditch at a distance of 3 or 5 meters.
- The floor of such a basement must be made of clay and sand so that it is completely impermeable to moisture.
- The ceiling of the cellar can be made from any available material, including thin logs.
- To keep the structure cool inside, a 30-centimeter thick mound of soil is made.
- The door structure should be light, but at the same time sufficiently insulated, and also have a vestibule.
It is worth noting that this is the least expensive option for making a cellar for a summer house, however, to use it, you will need to select the appropriate slope or bevel (natural unevenness of the ground).
Ventilation system
To ensure normal storage conditions for vegetables, as well as to clear the air of radon and excess carbon dioxide, ventilation is installed in storage facilities. In rooms up to 50 m², a supply and exhaust system with natural induction is installed, over 50 m² - with a forced one. In specialized cellars, for example for aging wine, the regime is maintained using climate control equipment.
The simplest supply and exhaust ventilation consists of 2 channels located in different, preferably opposite, parts of the cellar. The supply air is placed near the floor at a height of 15-30 cm, the exhaust - under the ceiling. Asbestos-cement, polymer or galvanized pipes are used. To protect against precipitation, debris and rodents, nets and caps are installed. To prevent freezing, they are wrapped in glass wool or put on special insulating shells.
Making an underground cellar step by step
It is right to start the construction of an underground cellar with geological surveys, as our user with the nickname Evgeniy G. did. Before starting to dig a pit, he ordered a study and found out that the groundwater is very far away, there is no high water, the soil is 2 meters of loam, then sand . In these conditions, you can get by with earthen walls, but Evgeniy decided to “make waterproofing, like in a swamp,” designed the formwork and filled the monolithic cellar.
You can get by with much less effort and financial costs: a FORUMHOUSE user with the nickname Zagrebin built the structure from materials that were at hand.
It is worth considering this technology step by step. To make such a storage, you need:
- Dig a pit 2x2 m (but this depends on the depth of soil freezing; if it is large, you will have to dig with an excavator;
- Weld a frame from metal pipes (these were purchased at a scrap metal collection point). In this case, the vertical pipes are not dug in and no foundation is made for them - the lower perimeter of the pipes protects them from subsidence. The pipe, which is made in the middle for fastening the shelves, stands on a metal plate 12x12 cm.
- Protect the hole by lining the inside with old sheets of slate;
- Weld the shelves. For safety, it is important to do this immediately, in an open space;
- Cover the hole with a sheet of iron, insulate it with polystyrene foam (layer thickness 50 mm), cover it with earth;
- Be sure to cover the pipes and metal ceiling with mastic to protect against rust.
- In such a cellar it is easy to arrange supply and exhaust ventilation. To do this, it is necessary to drill holes in the opposite pipes of the frame: in one near the ceiling, in the other at ceiling level. Take the ventilation outside the pit and insulate it outside - in winter this will save you from the formation of frost in the cellar.
- At the stage of backfilling the cellar, lay a corrugated cable duct for lighting wiring.
- Make a hole: weld the box and weld it to the sheet to create additional rigidity. But here you need to remember that the metal box and hatch are an excellent bridge of cold, so for the winter the hatch is insulated from above with hay or warm trash. It is better to make the box and hole out of wood.
To keep such a cellar always dry, you need to properly insulate it.
EfhFORUMHOUSE user
Either the hole had to be made deeper, or the thickness of the insulation layer had to be increased, not only in the ceiling, but also in the upper part of the side walls.
The optimal shelf sizes were determined experimentally.
- Width 50 cm (or a multiple of three-liter jars)
- The height of the first tier is such that plastic boxes of vegetables can easily fit in; the next tier is the height of a three-liter jar + 10 cm.
- The shelves are made either from boards, pre-dried and treated with antiseptics and sauna varnish, or you buy ready-made plastic modules. Life hack - hardware stores often have discounts on them.
If you need a very small cellar in the country, you can simply dig a cast-iron bathtub into the floor in the garage and insulate it well with polystyrene foam. This is what a user of our portal with the nickname ami did.
Stairs and doors
To go down to the cellar, the stairs must be safe. If space allows, it is advisable to make a stationary version from concrete, metal or wood. Otherwise, use sliding, folding or portable structures.
Diagram of a wooden staircase to the cellar.
Doors must reliably protect the interior of the storage space from cold air. The canvases are insulated with foam plastic, expanded polystyrene, and a sealing cord is laid along the contour of the box. If winters are frosty, it is optimal to install double structures.
Hatches
The minimum dimensions of the hatch for descending into the cellar are 80x60 cm. The installation location and design of the hatch must comply with safety requirements during operation. You can buy it ready-made or make it yourself. Factory products are equipped with gas shock absorbers or electric drives for convenient lifting.
Main elements of the hatch:
- support frame;
- lid;
- loops;
- lifting mechanism;
- insulation;
- seal;
- external and internal finishing.
If the entrance to the cellar is located in the house, the hatch should be invisible or, conversely, designed in an original way. It is decorated with materials in accordance with the finishing of the floor and room.
How to properly lay out a brick cellar
Next, mark the dimensions of the room on the floor, and lay out the corners. They literally laid out 3 rows of bricks in the corners, and went through a span, then again through the corners and a span. The main thing is to be friends with the level and thread. This is how action after action turns out, and the walls slowly rise...
The bricks went down in batches, also along the chute. And at that moment, closing my eyes, a thought arose - it would be great if instead of bricks there were gold bars, and there was such a stack in the cellar, pleasing to the eyes) ... But when I opened my eyes, there was this brick again, devastation.
The walls were raised. The height turned out to be 2.5 meters, but with the overlap it will be even higher. They decided to stop in this form so that the brick would not interfere with the floor joists.
Initially, the idea was to make a large hatch, and the main goal was for the descent to be smooth at full height. It was at full height that I wanted to avoid touching the floor or any lag when descending. But here a problem arose: if you make a smooth descent of the stairs, then it will take up so much space that it will be critical in a small cellar. Therefore, it was decided to dig a separate room specifically for the stairs, and make the descent into it first, and then into the storage room.
Wiring
Due to the high humidity, cellars are considered dangerous objects in terms of the degree of electric shock. There are special requirements for electrical wiring. Before starting work, it is recommended to complete a drawing and consult with a specialist.
It is recommended to place switches outside the cellar and use sealed lamps. The wiring is installed in an open way. If the structures are combustible, the cable is laid in corrugated tubes or plastic boxes, lined with asbestos. PUE rules prohibit the use of metal channels.
Waterproofing
Cellar waterproofing protects structures from moisture and seals the internal space.
Waterproofing compounds and materials are used:
- coating - bitumen mastics or pastes;
- liquid glass - sodium or calcium silicate;
- penetrating - MaSt, Hydrohit, Penetron;
- roll - TechnoNIKOL, Bikrost, Gidroizol, roofing felt;
- waterproofing dry mixtures;
- profiled membranes.
The most effective way is to install a hydraulic barrier on both sides of the enclosing structures - external and internal. If the cellar has already been built, the best results are achieved by using penetrating agents. When installing waterproofing, ensure the tightness of the joints, achieving their complete impermeability.
Cellar waterproofing device.
To eliminate possible contact of the walls and foundation with water, as well as to remove wastewater, drainage is installed. Perforated pipes are laid around the perimeter in a groove filled with crushed stone. Create a slope towards the well. When the liquid level rises, it is pumped out with a pump.
Video recommendations from experts on waterproofing cellars
Shelves in the cellar
Racks for storing supplies are operated in conditions of high humidity. In addition to the destructive effect of water, they are subject to invasion by mold fungi. Therefore, the material of the shelves must be moisture-resistant and rot-resistant. To do this, it is treated with anti-corrosion or antiseptic compounds.
For the manufacture of racks the following is used:
- steel profile;
- timber, board;
- concrete;
- plastic.
To ensure that shelves last longer and are not a source of fungi, they are regularly dried, disinfected, and the protective coating is renewed.
Wall decoration
The traditional finishing method is to whitewash the walls with slaked lime. It has antiseptic and fire retardant properties, dries surfaces well, and destroys fungal spores. Chalk, which is sometimes used for coloring, does not have this effect.
To make the coating decorative, blue or pigment is added. The composition is applied with a paintbrush in 2 steps, drying each layer.
Basement walls can be covered with moisture-resistant plaster, lined with plastic panels and tiles. It is desirable that the surface be smooth, without pores in which fungi like to settle and multiply.
Ceiling insulation
The cold enters the cellar from the street through the roof, doors or hatches. If the entrance area is reliably insulated, but the ceiling and corners are periodically covered with frost, then the thermal insulation is not doing its job.
To insulate internal surfaces, polystyrene foam, polystyrene foam, and sprayed polyurethane foam are used. The slabs are glued or fixed to the ceiling with dowel mushrooms; special equipment is used for spraying. To protect against rodents, it is recommended to lay a mesh with a mesh size of 0.5-0.8 cm.
Video about cellar insulation
Things to remember
Everyone theoretically knows how to build a cellar. To avoid unforeseen circumstances, you should listen to the following advice:
- when choosing a location, pay attention to surrounding sources of possible flooding or pollution;
- It is advisable to draw up a project in advance indicating all the necessary elements;
- do not bury the structure below 0.5 m to the groundwater level;
- use moisture-resistant materials;
- do not neglect the drainage system;
- reinforce masonry walls;
- treat wooden elements with antiseptics and fire retardants;
- Electrical wiring must be carried out only in accordance with safety requirements.
Proper ventilation, reliable insulation of walls and ceilings, and durable waterproofing will help preserve vegetable supplies in the cellar.
Fighting condensation
The formation of condensation in the cellar is very often caused by poor ventilation or poor ceiling insulation. It is necessary to combat this harmful phenomenon immediately, since both the room itself and the products stored in it suffer from the presence of condensation.
First of all, measures are taken to insulate the ceiling. To do this, you can use any material that has moisture-absorbing ability and dries quickly. Such materials include forest moss or artificial expanded clay material. Sometimes you have to insulate the walls as well. If this does not help, then condensation and drops from the ceiling are removed using umbrellas made of galvanized iron or plastic film. You can also use drainage plywood. Special gutters are attached to them to drain water and divert it into water intake wells. If the cellar design does not provide for these, you can use a regular bucket. In this case, in the summer the cellar must be carefully examined and repaired.