A wooden house (dacha), not connected to central heating, needs a heat source that allows it to be lived in at any time of the year. Traditionally, fireplaces or stoves are used for these purposes, which can have a variety of designs.
The order of arrangement of stoves in a wooden house is regulated by current standards (SNiP), and is also specifically stipulated by fire safety requirements.
Location of the stove in a wooden house
The specific location for installing a metal stove in a wooden house is chosen taking into account the characteristics of its operation. In this case, it is important to provide for the possibility of installing a chimney and access to the stove for further maintenance. Don’t forget about fire safety clearances - the hot surface should be located at some distance from flammable materials.
Based on which stove to install in a wooden house, work is carried out as follows:
- The iron stove that heats the air (Russian “potbelly stove” or Canadian “buleryan”) is located so as to ensure the free movement of convection currents. In particular, to heat two adjacent rooms, a metal stove in a wooden house can be built into an interior partition or air ducts connected to it.
- If a water heat exchanger is built into the furnace, then its section passing through the heater should be the lowest point of the system. Where exactly the stove will be installed is not so important. The main thing is to follow fire safety precautions.
The installation of a fireplace stove in a wooden house must be carried out in such a way that the chimney can be freely connected. In this case, it is very important to carry out all work in accordance with the safety regulations.
During the further operation of the iron stove, it will need to be serviced - cleaning the combustion chamber, removing ash, and periodically removing soot from the chimney. Therefore, you need to leave enough distance in the direction of opening the firebox door. Please note that if the stove is equipped with panoramic glass, then its installation is carried out taking this feature into account.
Fire gaps, that is, distances from heating surfaces to wooden walls, must be at least 110-125 cm. On the side of the combustion chamber door, a gap of 125 cm is left.
In addition, when installing a stove in a wooden house, it is important to choose a location in such a way as to ensure maximum heat transfer, ease of operation and maintenance of the equipment, as well as safety.
The need for a foundation for a metal furnace
As a rule, an iron stove is lightweight and easy to install, which is why it enjoys well-deserved popularity.
However, according to SNiP standards, there are a number of conditions under which a foundation is necessary:
- If the total weight of a metal furnace does not exceed 80 kg, there is no need to pour a foundation for it. However, in this case, the fireplace in the country house is installed on a solid, non-combustible base.
- Heat-generating equipment with a total weight of up to 750 kg, in particular, medium-weight cast iron stoves, in accordance with SNiP, is allowed to be placed on a concrete pad. Although there are no strict requirements for the need for a foundation, it is still recommended due to the fairly large weight of the stove.
- Furnace equipment heavier than 750 kg - in this case we are talking about cast iron units weighing about 300-400 kg. If such a furnace is installed without cladding, then a foundation for it is not required. However, in cases where a decision is made to cover the heat generator with brick or natural stone, the weight of the entire structure increases significantly. Thus, 1 m3 of brick increases the weight of the structure by approximately 1350 kg. Therefore, the need for a foundation is calculated based on the volume of facing material.
In general, installing a stove in a wooden house with your own hands is not difficult. However, in order to provide for all the details, it is worth consulting with a specialist.
Types of foundations for a furnace
The choice of the type of foundation for further installation of an iron furnace is carried out taking into account its characteristics and installation features.
Selection factors:
- Estimate of construction work - price of materials and prices of contractors.
- Features of the soil and foundation - the total weight of the structure and the type of soil matter.
- The area of the foundation for the furnace - it affects the type and total weight of the structure.
In addition, when choosing the type of base for the furnace, you need to take into account the climatic characteristics of the region and the time of pouring, the qualifications and speed of the specialist, as well as a number of other initial conditions.
All types of foundations belong to two large groups:
- On pillars and stilts.
- Concrete bases.
In some cases, furnace equipment can be mounted directly on the floor, while not forgetting about safety rules.
Criterias of choice
Having put together all the requirements, you will have to make a choice in favor of a specific device that can be used in the country. In order not to introduce a complex and multi-level classification of all devices, we will decide on the parameters that satisfy us.
- It is necessary to choose a device that would heat all rooms.
- This device must be equipped with a fireplace, since the presence of this addition affects the efficiency of relaxation.
- It is necessary to evaluate the performance of ready-made factory models and consider options for self-construction.
After the introduction of such restrictions, the range of available models has narrowed significantly, which will allow you to quickly determine the appropriate option.
Column and pile foundation
The need for a columnar foundation first arose in those regions where there is a high probability of flooding or where there is no dense layer of soil close to the surface. Piles are in demand in the construction of multi-storey buildings.
There are three options for arranging a pile foundation:
- Screw pile foundation
. This is a rather expensive option, which, however, is characterized by high installation speed. In this case, steel screws are used that are screwed into the ground. They will be the basis of the foundation. At the top, steel piles are tied together and then a concrete pad is poured. The whole process takes 1-2 days.
Screw piles can withstand even heavy cast iron stoves with brick lining. True, after 50-60 years, the steel rods rot.
- Bored pile foundation
. First, using a drill, a hole of a given cross-section and depth is drilled in the ground. Its walls are reinforced with mesh, a reinforcing structure is installed and concrete mixture is poured. - Columnar pile foundation
. The preliminary stage of work is similar to the drilled base. However, in this case, ready-made wooden or concrete pillars are driven into the hole. This type of foundation is used for the construction of multi-story buildings and placement of structures with a large mass.
To install a stove in a wooden house with your own hands, it will be easiest to equip a pile foundation. It will not require significant financial costs and is quite feasible for the owner of a country cottage, even if he does not have the skills of a builder.
Please note that the foundation for the stove in the house needs to be insulated to prevent the formation of condensation on its walls for cladding. Uninsulated piles are “cold bridges” and shorten the service life of the furnace.
Heating options for a country house or bathhouse
You can heat a country house in different ways, for example, with electricity, gas or wood. The most expensive heating option is electricity, but if you use the dacha only in the summer, then electric appliances may well be suitable, since in hot weather you will not need to warm up the house much.
Gas appliances for heating are suitable only for those owners who have gas supplied to their property, otherwise they will have to stock up on gas cylinders. But this option is not always convenient. To store cylinders, you need a specially equipped room, and the gas in them can run out at the most inopportune moment.
Concrete base
Before installing a metal stove in a wooden house, they most often prefer to pour a concrete foundation with reinforcement.
Among its undoubted advantages are high load-bearing capacity, ease of independent implementation and low cost.
The disadvantages of a concrete foundation include the long time it takes to arrange it.
The base for a concrete stove can be made in two ways:
- Strip foundation
. According to the size of the future furnace, a trench is dug along its perimeter, deepening it below the freezing point. After installing the reinforcing mesh, concrete is poured.
Please note that such a strip base should not be connected to the general foundation of the building, since in winter it can be squeezed out of the ground. Sometimes the height of the walls raised from the ground can reach 20-30 cm, so if there is one solid foundation, the facing masonry on the stove may crack. In some cases, the metal furnace itself is subject to deformation. Be that as it may, SNiP prohibits pouring a common foundation under the stove and, in fact, the building.
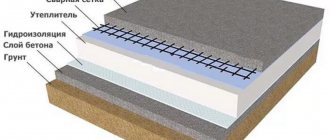
- Monolithic concrete slab
. To install a fireplace stove in a country house, this method is used quite often. The thickness of the slab reaches 15-20 cm, which is enough to obtain a strong base designed for high loads.
A cushion of a mixture of sand and gravel is first poured onto the pre-cleaned area. It is watered with water and compacted thoroughly. Then a waterproofing layer is laid and beacons are placed for further pouring of the screed. At the end of the work, the concrete is covered with film and watered with water for the next two weeks. This is necessary so that the screed does not crack.
Any of the described types of concrete foundation dries and hardens very slowly. Installation of the furnace with subsequent cladding on such a base can begin no earlier than 28-30 days after pouring.
Installing the stove on the floor
As already mentioned, a metal or cast iron stove can be installed in a wooden house without first pouring the foundation, if its weight together with the facing material does not exceed 750 kg.
According to building regulations, it is allowed to install a fireplace on a wooden floor if it is not lined. For installation on the second floor of a building, load-bearing structures must first be strengthened with a channel or metal corners.
To protect the wood from fire, a metal sheet or a layer of brick is placed under the stove. This process does not present any additional difficulties.
The instructions for heating devices always describe in detail the technology for their installation and provide recommendations for connecting to the chimney.
Brick cladding
To get rid of the harsh radiation of the metal, the stove can be lined with brick. The work is carried out in the following order:
- A power calculation of the floor is required. The weight of the structure reaches 0.5 tons.
- The distance between the metal wall and the brickwork is up to 8 cm.
- If the floor is wooden, an iron sheet 4 mm thick and asbestos are laid on it.
- Concrete floors do not require additional preparation.
- The wall thickness is half a brick. It is placed on a mixture of cement and sand.
- In each row, holes are left at the height of the brick for air exchange.
Installation of a chimney in a wooden house
When fuel burns inside the fuel chamber of the stove, a temperature of 450-550 ℃ is reached, while the chimney heats up to 300 ℃. If a fire occurs as a result of soot accumulation, the temperature inside the chimney may briefly reach 800-1000 ℃. In this regard, when installing steel chimney pipes, fire breaks must be observed.
To understand how to properly install a stove in a wooden house, you should be guided by the following PPB:
- It is recommended to use a ceramic and stainless steel sandwich pipe with a layer of thermal insulation as a chimney.
- Near walls, the pipe should pass at a distance of 25 cm from them. The walls themselves should be covered with basalt cardboard with galvanized or stainless steel sheathing.
- The hole in the ceiling for the chimney to pass through the floor slabs must be sufficient to leave 25 cm on each side from the pipe to the combustible material. The resulting gap must be filled with basalt insulation. If desired, you can install a factory-made ceiling trim.
The chimney can pass both inside the building and along its external wall. Inside the house, it is necessary to ensure high-quality insulation of the pipe where it passes through the ceiling and roof. From the outside, the pipe must be carefully fixed to the wall of the building so that it does not blow away by the wind.
Features of operation of potbelly stoves
To assemble an efficient and fireproof chimney duct for a metal stove, the following nuances must be taken into account:
- The efficiency of the stove is extremely low - no more than 50%. Accordingly, half of the heat generated by burning wood is lost through the chimney.
- The walls of the flue heat up considerably - up to a maximum of 400 °C, the average temperature is about 200 °C.
- Contact with cold outside air causes condensation to form inside. Its quantity depends on the temperature difference between the exhaust gases and the environment.
- Soot settles on the channel walls. The more condensate is released, the faster the soot layer grows.
- With periodic firing, an ice plug gradually freezes in the area of the head, blocking the passage and reducing the force of natural draft. With each subsequent ignition, the stove works worse and begins to smoke into the room.
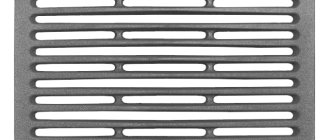
Examples of incorrect stove chimneys - burnt-out galvanization and a pipe clogged with soot
Abundant moisture condensation is promoted by operating a solid fuel heater in smoldering mode. Closer to the head, the pipe warms up weakly, which is why the water released from the air does not have time to evaporate. The problem is aggravated by humidity and low quality fuel burned in garage and country stoves, which produce a lot of soot.
The correct chimney pipe for a potbelly stove minimizes the following problems:
- reducing the amount of condensation and soot is achieved through external insulation of the area running along the street and unheated rooms;
- thermal insulation also prevents the upper part of the flue from freezing;
- installing a chimney in a wooden house involves protecting structures from fire;
- The efficiency of the stove can be increased and the temperature of the pipe reduced by organizing heat removal in various ways.
These measures are taken as a whole. Removing heat from the iron chimney increases the efficiency of the furnace and reduces heating of the exhaust channel, and the insulation resists moisture condensation and soot deposition.
Fire safety rules when installing a stove
According to fire safety standards, before installing an iron stove in a wooden house, care must be taken to protect the floor and walls made of flammable materials from fire.
For this use:
- fire-resistant heat-insulating materials mounted on the walls and ceiling in the area where the stove is located;
- flame retardant impregnations and mastics.
Compliance with fire safety standards and the use of fire protection equipment is the main condition for the safe operation of solid fuel equipment.
Preparing for installation
Equipping a dacha with stove heating with your own hands begins with preparation:
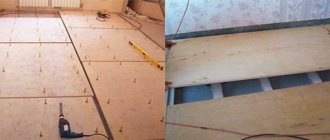
- The walls and floor closest to the device are covered with ceramic tiles.
- If the floor is wooden, then at the first stage drywall is placed on it. Then the ceramic tiles are attached with self-tapping screws. A layer of primer is applied on top, and it dries within 24 hours.
- If the base is concrete, then the tiles are laid directly on the glue.
- When using tile adhesive, use a notched trowel. The ceramic layer is laid out using a level.
- The tiles are laid end-to-end or with a gap using construction crosses.
- After the solution has hardened, the crosses are removed and the joints are rubbed.
- Wall tiles are laid using the same technology.
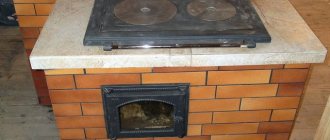
Diagram of an example of installing a stove in a bathhouse
Protective cladding for walls and ceilings
The walls directly adjacent to the stove, as well as part of the ceiling along the passage of the chimney, are subject to significant thermal loads.
Therefore, before installing a stove in a wooden house, you need to fulfill a number of prerequisites:
- The ceiling lining is made of non-combustible material. Wooden or plastic panels are not used. It is best to purchase gypsum fiber boards treated with gypsum putty for painting.
- The walls must be protected with a layer of basalt cardboard and covered with a sheet of steel. As an option, you can use ready-made decorative stainless steel screens. These products are able to provide safety and are distinguished by external beauty. In addition, the walls can be plastered with a layer of 3 cm or more, and also lined with brick (read: “How to line a metal stove with brick in a house - a step-by-step guide”).
Fire safety rules for installing iron stoves in wooden houses are described in more detail in SNiP 05/31/2003 and SP 118.13330.2012.
Treatment of wood against fire
Additional means of protecting wooden structures located in the immediate vicinity of an iron stove are fire-retardant impregnations and mastics. Beams, load-bearing structures, floors and walls adjacent to the furnace are subjected to this treatment. Mastic has a higher level of fire protection, and the impregnation is almost colorless.
Fire retardant treatment can be carried out by both representatives of the Ministry of Emergency Situations and the owners of a wooden house. In the latter case, before starting to operate the stove, it will be necessary to obtain a certificate from the inspector of the Ministry of Emergency Situations about the compliance of its installation with the requirements of the safety regulations.
All leading European and Russian manufacturers of solid fuel stoves describe in detail the rules for installing equipment and fire safety requirements in their technical documentation.
How to properly heat the second floor
Supplying heat to the second floor of a house is a rather difficult task. As an option, you can consider installing a fireplace equipped with additional equipment. The fireplace has a number of advantages. Among them are the following:
- ease of operation;
- small sizes;
- use of almost any fuel.
How to properly heat the second floor
In fairness, it should be noted that most of our people consider it a luxury item, but this design is capable of combining democracy, aesthetic properties, and excellent performance of its main task - heating the room.
Heat supply to the second floor due to air convection. That is, passing by a heated fireplace wall, the air receives thermal energy and continues to move upward through a special box. Warm air is supplied to rooms located on the second floor through air ducts, which must be covered with thermal insulation. This is necessary to minimize heat losses and ensure fire safety.