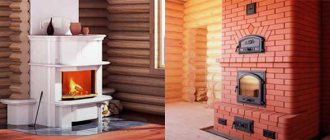
Repairing a brick stove in a country house with your own hands is quite possible. Is it possible to give a second chance to a heating stove that stood at the dacha for ten years without major repairs and was the only source of heat for the dacha house. In principle it is possible. Here we will introduce you to how you can repair a brick oven without the expense of calling specialists. We repair the stove ourselves!
To do this you need:
1) conduct a visual inspection of the furnace.
2) Decide what needs to be changed.
3) Determine what else may well serve.
Today we will repair a brick oven. In this case, a stove complex, which is located on two floors of a dacha.
Installation details
Gaps are left between the brick and the slab so that the expansion of the metal does not destroy the masonry.
During installation, the thermal expansion of various materials must be taken into account. For example, brick and cast iron are affected completely differently by high temperatures. If, during installation, the cooking floor is tightly walled into the masonry, soon such a stove will simply fall apart as a result of the expansion of the metal.
Installing tiles on a brick stove:
- A horizontal 5 mm gap is left between the heating structure and the panel. Thanks to it, thermal expansion between objects will be compensated and the service life will increase.
- The hob is installed in a strictly horizontal position on a flat base - the tiles should not play. To determine whether there are any deviations along the horizon, use a building level. The largest of the cast iron circles for the stove is located above the combustion compartment.
- The panel is mounted on a clay-asbestos composition. These materials are resistant to high temperatures. You can make the solution yourself by grinding and mixing the ingredients with water, or dilute a ready-made store-bought solution. The consistency should be similar to liquid sour cream. When installing, make sure that the horizontal gaps remain empty, otherwise the stove will quickly collapse.
- An asbestos cord or sheet is laid under the base of the panel.
- The top row of bricks, on which the cast iron sheet is placed, is “ringed” with a metal corner - this will give the structure strength.
Due to gradual heating, the internal stress of the cast iron is relieved, and the stove plate acquires greater strength. The procedure has a positive effect on the further operation of the stove and tiles, preventing bending and cracking.
Installation on a metal stove follows the same principles. But it is necessary to take into account that cast iron is a heavy material, so a brick structure can deform under its weight. Additional reinforcement of the stove with a cast iron corner is required. You can use a “support” from another resistant material.
Rework
Before drawing up a project for a future fireplace, check the condition of the chimney. The smoke exhaust system bears most of the responsibility for safety.
Check the condition of the stove and foundation. If violations are detected, it will be necessary to redo it from scratch, especially if the foundation was damaged.
It is easier to convert the structure into a decorative device.
The chimney pipe must meet basic requirements. For example, the height of the pipe used can be at least 7 m. The cross-section of the material is 13 - 25 cm, the depth of the firebox is from 0.5 m.
The combustion chamber is lined with fireproof, fireclay bricks, which will not deteriorate from direct contact with fire.
During laying, channels are created that allow air to pass along the door, which will prevent the accumulation of soot.
After all the rough work has been completed, you can begin finishing.
An example of converting a stove into a fireplace design with a heat shield:
Installation and use rules
To install a cast iron cooktop for a wood stove, observe the following points:
- Lay it on top of a thin, liquid layer of cement mortar, the distance between the stove and the upper edge of the oven should be 50-60 mm.
- Before installation, ensure that there are thermal gaps in the stove (at least 5 millimeters). This will help the masonry not crack as the oven heats up. Otherwise, you will have to seal the cracks with clay mortar.
- To strengthen the structure, secure the top of the brickwork using angle steel.
- The largest burner should be located above the firebox.
- After installing the stove, heat it for 8 hours until the temperature reaches 640 degrees (for every hour the temperature should increase by 70-80 degrees). Follow the following algorithm:
- first heat with shavings and wood chips;
- then start tossing larger logs;
- After eight hours, leave the stove to cool until all the wood has gone out.
- Make sure that moisture does not get on the heated flooring.
- Mechanical damage and shock loads during transportation or use are dangerous.
If you follow all the installation and use rules, you will extend the life of your cast iron stove and stove and ensure the safety of yourself and your loved ones. Cooking decks made of cast iron can also be used in solid fuel boilers, double-circuit stoves, as well as stoves with a water circuit.
We recommend that you watch the video on how to properly install a stove hob
The secret of lining the firebox
To prevent the row of tiles from sagging down, we place a 25 mm angle into the masonry groove. Its thickness is approximately 4 mm, which is the row spacing of the tiles. The door fittings will completely cover the space not covered by tiles, and the corner itself will prevent the tiles from sliding off. After the glue has set, carefully remove the corner from the masonry.
Here is the secret to gluing the tiles - the corners are installed above the view and above the firebox.
Pay special attention to the “synchronism” of the rows of tiles; they should go one after another from one wall of the oven to the other.
Grouting joints
Approximately 10 - 12 hours later, after the glue has completely set, we need to grout the joints. We remove all the crosses (spacers between the tiles) and apply grout. You can use Ceresit Grout - it is heat-resistant. It is sold ready-to-use, white, so that its color matches the color of the tile - add a little chocolate color to give the desired shade. Apply using the continuous method. As much as necessary will sit in the seams, the rest of it will then be removed from the surface of the tile.
We grouted the seams of the stove façade. We wait three hours and remove the grout with a damp cloth or sponge. Everything should be easy to remove from the surface of the tile.
Be careful. Once you leave the grout on the tiles too long, you will no longer be able to remove it without the help of abrasives. And this, in turn, can seriously ruin the appearance.
Installation of furnace fittings
Let's start installing the furnace fittings. We take all of it from one manufacturer, I used the Finnish company SVT. For decoration we use Senegal porcelain stoneware steps 50*50 mm. This is a fairly durable and heavy material, but it looks very expensive.
We finish the pipe and the top of the stove with porcelain stoneware.
The technology is like this. We apply glue, the same as for tiles. We screw self-tapping screws into the masonry seam, place the slabs on them and then tighten everything with tape around the pipe. We leave it for a day, remove the tape, check the reliability, unscrew the screws - it turned out very impressive!
End view of the second floor oven.
The final touch. We install the cooking accessories - the hob, the firebox door and the vent. We secure everything using concrete dowels.
If you compare what was and what has become, I can’t even believe that repairing a brick oven was able to bring it back to “life”!
We invite you to watch the video:
The nuances of choosing and installing a cast iron stove for a stove
The stove runs on solid fuel (coal or charcoal, peat), which is burned directly in the firebox and thereby heats the heat-releasing surfaces. The cast iron stove plate is one such heat dissipation element, it not only helps distribute heat in the room, but is also used for cooking.
Purpose and technical characteristics of the product
Cast iron stove plates, also called cooking floors, are mounted directly on the upper horizontal plane of the stove. They are used for cooking and heating the room. This element has inertial heat transfer: the hot cast-iron surface cools down for a long time, while evenly heating the room and at the same time performing the function of a hob.
The product is produced by casting. The material used is gray cast iron grade SCh 15-20. This metal is a compound of iron and carbon (more than 2%) and is characterized by high strength and fire-resistant properties. Gray cast iron also contains silicon, phosphorus, manganese and sulfur. The presence of such impurities significantly improves the physical and chemical characteristics of the metal.
The cast iron stove plate is resistant to temperature changes, does not deform during operation and maintains its integrity throughout its entire service life.
Cast iron hob on a modern fireplace stove
For your information! Any products made of gray cast iron are immune to corrosion, since their surface is covered with a layer of rust immediately after casting. It is this “protective” layer that prevents corrosion from penetrating deep into the metal.
Types of cast iron stoves
The cast iron stove installed on the stove can be prefabricated or solid. In both cases, it simultaneously acts as a heat conductor and a cooking burner. The difference lies in the presence or absence of thermal gaps, which compensate for the expansion that occurs when the metal is heated.
Let's take a closer look at each type of product and get acquainted with their advantages and disadvantages.
Subtleties of installing the stove on the stove
First of all, it is necessary to take into account the characteristics of thermal expansion of various materials. For example, brick and cast iron behave completely differently under the influence of high temperatures, and if you wall the hob end-to-end in the masonry, then such a stove will not last long. It will simply collapse due to the expansion of the metal.
Correct installation of the stove requires a 5 mm gap around the entire perimeter, without coating. Thus, when heated, the stove element will have sufficient free space for expansion, and the brickwork will maintain its integrity.
The top row is laid out “dry” (without mortar) in order to correctly lay the future expansion gap
During installation, a clay-asbestos solution of liquid consistency is used. It is used to fix the cast iron stove on the stove. The solution is prepared as follows: crushed asbestos is added to clay diluted with water, and then, gradually adding liquid, the compound is brought to the state of “liquid sour cream.”
The stove plate is always laid level. And the burner with the largest diameter is located directly above the firebox.
The top row of the stove masonry is secured with a steel angle along the entire perimeter of the stove, thus increasing the strength of the entire structure.
For your information! After installing a new cast iron cooking floor, the first firebox is carried out according to a special scheme. Slowly, over 8 hours, heat the oven to a temperature of about 600°C. This means that every hour the temperature of the heat-releasing surfaces should increase by 75-85°C. This gradual annealing eliminates the internal stress of cast iron, which significantly enhances its strength characteristics.
Installing a cast iron stove on a stove is no joke. The length of operation of the product directly depends on the accuracy of installation, so such important work should be entrusted to professionals.
Chimney installation
Due to the strong heating of the furnace, the temperature in the chimney area can reach 300 °C. If there is a large accumulation of soot in it and it ignites, this figure rises even higher. When installing steel chimney pipes with your own hands, you need to take into account a number of points regarding the order of their installation.
Firstly, the chimney can be laid not only inside the building, but also along the outer surface of the wall (in the attic). Secondly, in the internal spaces of the house it will be necessary to reliably insulate the pipe in the areas where it passes through the ceiling and roof. Finally, the outside of the chimney should be carefully secured to the wall of the building.
In the process of arranging a diversion channel, it is necessary to be guided by the following requirements of the PPB:
- near the walls, the drain pipe should be laid at a distance of approximately 25 cm;
- the surfaces of the walls are first lined with basalt cardboard, and then sheathed with galvanized or stainless steel sheets;
- the holes in the ceiling must be large enough to maintain 25 cm gaps on the sides (they are subsequently filled with basalt insulation).
To install a chimney, it is preferable to use a sandwich pipe made of ceramic and stainless steel, protected by a layer of thermal insulation. If you have available funds, you can install a branded ceiling trim.
Features of cooking ovens
Depending on the model, cooking stoves combine a real oven, stove and oven, differing in fairly compact dimensions. Most cooking stoves are no larger than a standard gas stove. In addition, manufacturers of cooking stoves place great emphasis on the design of this equipment, which makes them a real decoration of the interior. Installing the stove is quite simple and does not take much time, but it should be entrusted to professionals, this will guarantee long and correct operation of the equipment. A modern cooking and heating unit is mobile and, if necessary, transporting it to another place will not be difficult.
Constructions
There are several options for converting old stoves (Russian stove, “stove stove”) into a fireplace, all of them depend on the original technical condition of the structure.
One of the easiest options is to update and expand the firebox to the required size, as well as install a glass “Finnish” door. This option is attractive for its simplicity, since there is no need to make fundamental changes to the design, just clean the stove properly. If you add a glass door and properly decorate the existing stove, it will look as similar as possible to a fireplace.
The most expensive and time-consuming modification of a stove into a fireplace is the complete dismantling of the existing structure and the creation of a new one. The stove must be completely dismantled and, if necessary, new sand must be added to the base. Next, make a roofing felt waterproofing flooring and create a new masonry according to one of the existing schemes.
Purpose and technical characteristics of the product
Cast iron stove plates, also called cooking floors, are mounted directly on the upper horizontal plane of the stove. They are used for cooking and heating the room. This element has inertial heat transfer: the hot cast-iron surface cools down for a long time, while evenly heating the room and at the same time performing the function of a hob.
The product is produced by casting. The material used is gray cast iron grade SCh 15-20. This metal is a compound of iron and carbon (more than 2%) and is characterized by high strength and fire-resistant properties. Gray cast iron also contains silicon, phosphorus, manganese and sulfur. The presence of such impurities significantly improves the physical and chemical characteristics of the metal.
The cast iron stove plate is resistant to temperature changes, does not deform during operation and maintains its integrity throughout its entire service life.
For your information! Any products made of gray cast iron are immune to corrosion, since their surface is covered with a layer of rust immediately after casting. It is this “protective” layer that prevents corrosion from penetrating deep into the metal.
The cast iron stove installed on the stove can be prefabricated or solid. In both cases, it simultaneously acts as a heat conductor and a cooking burner. The difference lies in the presence or absence of thermal gaps, which compensate for the expansion that occurs when the metal is heated.
Let's take a closer look at each type of product and get acquainted with their advantages and disadvantages.
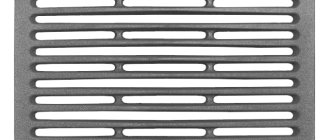
Prefabricated slabs
Prefabricated stove plates consist of several cast iron rings of different diameters, which are folded into a single surface like a puzzle.
A significant advantage of prefabricated flooring is the vertical thermal gaps located between the cooking rings. The presence of these small distances makes it possible to compensate for the expansion of the metal when heated. Thanks to this, the stove plate does not warp or deform during operation.
Particularly strong cast iron plates are cast with stiffening ribs located at the bottom. This addition increases the heating temperature of the hob, thereby increasing the efficiency of the entire oven.
Solid slabs
A solid cast iron stove is a flat sheet of metal on which one or two burners of a stationary diameter are placed. In addition, there are solid stove floors; there are no burners on their surface at all.
A small number or complete absence of thermal gaps makes a solid slab less practical and reliable. When highly heated, cast iron expands and, without sufficient free space, can become deformed.
But a solid stove slab also has its advantages: it is easy to install and is more affordable in comparison with prefabricated slabs.
For your information! To increase heat transfer rates, a cast iron plate can be cast with a notch or three-dimensional ornament.
Correct installation of the stove requires a 5 mm gap around the entire perimeter, without coating. Thus, when heated, the stove element will have sufficient free space for expansion, and the brickwork will maintain its integrity.
The top row is laid out “dry” (without mortar) in order to correctly lay the future expansion gap.
During installation, a clay-asbestos solution of liquid consistency is used.
It is used to fix the cast iron stove on the stove.
note
The solution is prepared as follows: crushed asbestos is added to clay diluted with water, and then, gradually adding liquid, the compound is brought to the state of “liquid sour cream.”
The stove plate is always laid level. And the burner with the largest diameter is located directly above the firebox.
For your information! After installing a new cast iron cooking floor, the first firebox is carried out according to a special scheme. Slowly, over 8 hours, heat the oven to a temperature of about 600°C.
This means that every hour the temperature of the heat-releasing surfaces should increase by 75-85°C.
Installing a cast iron stove on a stove is no joke. The length of operation of the product directly depends on the accuracy of installation, so such important work should be entrusted to professionals.
Preparatory work
Before making fireplaces with your own hands from a stove, it is worth measuring the sources.
It is necessary to check the following parameters of the Russian stove:
- Inspect the stove for chips in the brickwork or other damage. Check to see if the solution has weakened. If several bricks are deformed and may fall out, the stove will need to be completely disassembled. Pay attention to whether the oven interior is made of fireproof material.
- Estimate the size of the combustion hole. Since stoves were used as a source of heat or for cooking, fireboxes were often made small. To determine which insert is right for your fireplace, measure the dimensions of the room. The firebox should occupy 1/50 of the area of the room. There are 2 parts of height for 3 parts of width. Consequently, the size of the combustion opening should be calculated so that when multiplying the width by the height, an area equal to one fiftieth of the area of the room is obtained. The depth of the firebox must be at least 50 cm.
- The construction of a fireplace largely depends on the foundation. The space between the foundations of the floor of the room and the stove should be about 25 cm. The gap should be filled with sand.
- The chimney should be inspected quite carefully, since all further operation of the fireplace depends on it. A strong draft should be generated in the chimney. The minimum permissible chimney height for a fireplace is 4.5 meters. The optimal height is 7 meters. The air duct pipe should be of such a size that a whole brick could easily be inserted into it.
Advantages of an army stove
The POV-57 cast iron stove is very economical in fuel consumption.
One load of the unit can heat it for 6-10 hours. Historically, this type of stove was used about fifty years ago to heat barracks and army tents. This is where the name came from. The ease of operation and maintenance of a cast iron stove, as well as safety and low fuel consumption, have significantly increased its popularity and made it possible to use the stove in our time, in conditions where heating with central heating is impossible.
Today, an almost original version of the potbelly stove design is used, which has not been modernized. The reliability of the unit ensures a long service life. Another advantage of a cast iron stove is that you can use not only firewood as fuel, but also construction and wood waste and even household waste.
Conclusion
For heating a house, a stove with a water circuit is the most economical option, however, to fully use hot water, it is necessary to add a heat accumulator to the system, which entails additional costs.
- Content:
- Installation of water heating from a furnace
- What to consider when installing a water circuit
- Additional equipment for stove heating
Using traditional stove heating, you can quite effectively heat small rooms without internal partitions adjacent to the wall in which it is built. The disadvantage of such a system is that the circulation of warm air is limited by the walls.
Types of heating cables for water supply
There are two types of heating cables - resistive and self-regulating. Resistive ones use the property of metals to heat up when passing an electric current. In this type of heating cables, a metal conductor is heated. Their characteristic feature is that they always emit the same amount of heat
It doesn’t matter whether it’s +3°C or -20°C outside, they will heat up the same way - at full power, therefore, they will consume the same amount of electricity. To reduce costs in relatively warm times, temperature sensors and a thermostat are installed in the system (the same as those used for electric heated floors)
Structure of a resistive cable
When laid, resistive heating wires should not intersect or be located next to each other (close to each other). In this case, they overheat and quickly fail. Pay close attention to this point during the installation process.
It is also worth saying that resistive heating cables for water supply (and not only) can be single-core or double-core. Two-core ones are more often used, although they are more expensive. The difference is in the connection: for single-core ones, both ends must be connected to the mains, which is not always convenient. The two-core ones have a plug at one end, and at the other end there is a fixed ordinary electrical cord with a plug, which is connected to a 220 V network. What else do you need to know? Resistive conductors cannot be cut - they will not work. If you bought a coil with a section longer than necessary, lay it in its entirety.
This is approximately how heating cables for plumbing are sold.
Self-regulating cables are made of a metal-polymer matrix. In this system, the wires only conduct current, and the polymer, which is located between the two conductors, heats up. This polymer has an interesting property - the higher its temperature, the less heat it releases, and vice versa, as it cools down, it begins to release more heat. These changes occur regardless of the condition of adjacent sections of the cable. So it turns out that it regulates its own temperature, which is why it is called self-regulating.
Structure of a self-regulating cable
Self-regulating (self-heating) cables have many advantages:
- they can intersect and will not burn out;
- they can be cut (there are markings with cutting lines), but then you need to make an end coupling.
They have one drawback - the high price, but the service life (subject to the operating rules) is about 10 years. So these expenses are reasonable.
When using a heating cable for any type of water supply system, it is advisable to insulate the pipeline. Otherwise, heating will require too much power, which means high costs, and it’s not a fact that heating will cope with particularly severe frosts.
Beautiful examples in the interior
The Russian stove does not look organically in all interiors. Often such a structure requires serious changes. Remaking it is not so difficult if you follow our recommendations. A converted fireplace stove will suit any room.
It is worth highlighting the following interior styles:
In such ensembles, fireplace stoves look especially harmonious and attractive. They can have not only smooth and neat surfaces, but also artificially aged surfaces with scuffs.
For more modern interiors, fireplace stoves with shiny or plain dark surfaces that have the most laconic or angular appearance are suitable.
To learn how to make a fireplace stove, see the following video.
All rights reserved, 14+
The use of any materials without our prior written consent is prohibited.
Characteristics of cast iron stove
The hob is installed horizontally on the stove
The cooking floor is installed on top of the horizontal plane of the stove. It is made by casting from gray cast iron grade SCh 15-20. This durable and fire-resistant metal is an iron-carbon alloy, which also includes silicon, phosphorus, manganese and sulfur. These impurities significantly increase the physical and chemical properties of the metal.
The cast iron hob for the stove has the following qualities:
- Resistance to temperature changes. The product does not deform if you follow the instructions for use.
- Anti-corrosion characteristics. Immediately after casting, the panels are coated with a layer of rust, making them resistant to corrosion.
- Heavy weight. Cast iron slabs are heavy, which gives them stability.
The quality of the product is subject to such requirements as evenness of the surface, absence of scratches, chips and other damage.
Characteristics of modern cast iron stoves
Cast iron plates, also known as cooking floors, are mounted directly on the upper horizontal surface of the stove. The cast iron stove has inertial heat transfer.
When fuel (wood, coal, peat) is burned in the stove, the cast-iron stove heats up well and then remains hot for a long time, giving off heat. Once the cast iron is hot, it can be used as a cooktop.
Modern cast iron stoves for installation on a stove have a number of characteristics that distinguish them from other similar options.
- The cast iron used to cast the slab has increased strength.
- Due to the fact that the material also includes a number of chemicals, the physical characteristics of the product are improved.
- Throughout its service life, cast iron does not deform, does not crack and withstands high temperatures well.
- The cast iron stove is resistant to temperature changes, maintaining its appearance and original performance properties.
- Plates for installation on the stove are not subject to corrosion.
In general, all cast iron stove stoves are divided into two groups: prefabricated and solid. In both cases, the product can serve as a heat conductor, uniformly heating the air in the room, and as a burner for cooking.
A prefabricated cast iron slab is a panel with rings installed on it that fit into each other. By adjusting the number of rings and their diameter, you can choose the best option, depending on what kind of cookware you use.
This option has one important advantage - thermal gaps, which allow the plate to heat up evenly without deforming under the influence of high temperatures. Solid plate due to the absence of thermal gaps is less reliable during use
Cast iron can expand when exposed to too much heat and warp. However, cast solid cast iron plates are much cheaper and easier to install on the stove yourself
A solid plate, due to the absence of thermal gaps, is less reliable in use. Cast iron can expand when exposed to too much heat and warp. However, solid cast iron stoves are much cheaper and easier to install on the stove yourself.
If, when choosing a stove for the stove, you caught your eye on a model with a cast ornament or pattern, take a closer look at this option. Due to the patterns, the heat transfer of the plate increases, which has a positive effect on its functionality.
Features of installing a cast iron stove in a stove
Installing a cast iron stove on a stove is a serious matter. Violation of technology and incorrect selection of materials can lead to the fact that during the first fire the slab becomes deformed or cracks due to expansion.
Yes, cast iron stove plates have increased durability, but do not forget that when heated they expand, which must be taken into account by the technician during installation.
You cannot install the stove next to the material from which the stove itself is made. As a rule, this is brick. But brick expands differently when exposed to high temperatures. If you do not leave a gap between the masonry and the slab, either bricks or cast iron will not last long, since the metal simply will have nowhere to expand.
- The slab cannot be tightly walled into the masonry.
- There should be a gap of approximately 5mm around the perimeter between the brickwork and the slab.
- There is no need to coat the gap with mortar - it is necessary so that the slab has room to expand. This will keep both the cast iron stove and the stove masonry intact.
- When installing a cast iron slab, a special liquid clay-asbestos solution is used. It makes the fixation of the stove on the stove stronger.
Remember that it is necessary to install a cast iron hob level, otherwise cooking on it will become difficult. The smaller the stove burner, the closer it should be directly to the firebox. This is explained by the fact that a small burner heats up faster, but also cools down faster. This rule is for your convenience.
The first firebox is produced according to a special scheme. Don't expect to be able to cook on your new stove right after installation. To relieve the internal stress of cast iron, it is heated slowly and thoroughly for the first time.
If you are not sure that you can install the stove according to all the rules, it is better to trust professionals in this matter.
On the website https://svt-ukraine.com.ua/lyuki-dlya-zoly you will find even more useful products for building a functional stove in the house.
Finishing a built fireplace
Particular attention should be paid to the appearance of the former stove. If you have saved the old case, it may not look aesthetically pleasing enough in the interior of the room
This can be corrected with the help of competent finishing.
Finishing work on fireplaces is carried out using several types of materials:
- bricks,
- plasters,
- stone,
- tiles
The time spent on finishing the fireplace depends on the complexity of the decor.
Finishing work using bricks
Old brickwork can be given a beautiful look if it is treated well. Using an abrasive material, you need to remove excess mortar from the seams. You can also update the seams by making them convex. Another interesting decor option is updating the seams using a solution with colored pigment.
Brick trim can be painted with heat-resistant paintThe brick itself can be painted with heat-resistant paint. If it is preserved in excellent condition, it will be enough to coat the brickwork with a paint and varnish composition that is resistant to high temperatures.
Finishing the fireplace with plaster
This method of finishing work can be considered one of the simplest and most affordable. Plaster does not require installation, like stone or tile.
The plaster mixture for the fireplace must be strong enough. To do this, add salt and finely chopped fiberglass to the plaster. To add color, you can add lime-based paint.
Before starting work, it is advisable to heat the fireplace, as the surface should be slightly warm. You also need to moisten the surface. The plaster is applied in several layers. The first layer must be applied with a spatula, the walls of the fireplace must be leveled. When it dries, you can begin applying the second layer. Its thickness should not exceed half a centimeter.
The layer is applied using a trowel or brush and leveled in a circular motion. To apply the plaster with a wave effect, use a sponge or rubber spatula to apply the second layer.
Artificial and natural stone for finishing the fireplace
Various types of natural stone are used to decorate fireplaces. The most difficult thing to work with is granite or marble, as this is a fairly durable material that cannot be processed without special tools. You can also decorate the fireplace with stones such as limestone, shell rock, and rubble stone.
A cheaper finishing option is to use artificial stone. You can purchase it or make it yourself. To do this, you should prepare in advance silicone molds that imitate real stone blocks. The mixture for artificial stone consists of cement, sand and paint of the desired shade.
A fireplace portal can become a real work of art if you use figured stone carving
Particular attention should be paid to the fireplace portal. Uneven stones can be placed together to make an imitation of a stove from the times of knightly battles
A fireplace made of marble blocks will add luxury to the atmosphere. You can build stone columns or use natural stone in several colors.
Finishing work using tiles
Another common finishing material for stoves and fireplaces is tile.
Several types of material are used:
- clinker tiles,
- porcelain stoneware,
- majolica,
- terracotta.
The most common option for finishing fireplaces is the use of clinker tiles. This is an environmentally friendly and fairly strong material that is made from clay. Porcelain tiles are made artificially and are also not inferior in strength to clinker tiles. Majolica is a patterned material made from pressed glazed parts. Terracotta is a porous tile made from colored clay.
Before tiling the fireplace, remove the coating remaining from the stove from its surface. You can leave it only if you first stretch a metal mesh over the fireplace and secure it with self-tapping screws. The base of the fireplace is leveled with glue. When the mixture has dried, you can attach the tiles. To do this, glue is applied to the part with a spatula and the tile is applied to the fireplace. To make the glue stick better, tap the tile with a rubber mallet. You need to start laying the tiles from the base of the structure.
You can use a fireplace converted from a stove two weeks after finishing. Heat the fireplace using only dry logs. During the first kindling, you need to check the operation of the chimney, assessing whether there is an unpleasant odor in the room. Smoke can enter the room due to too strong or weak draft in the chimney, as well as errors in calculations.
How to use a home wood stove correctly and safely
The stove must not be left unattended. When opening the door, embers and sparks should not fall outside the pre-furnace area.
If the sandwich pipe has a damper, it is not closed until the fuel is completely burned. For combustion, use the fuel specified by the stove manufacturer.
You should not leave hot ash removed from the ash pan at home, as it emits deadly carbon monoxide.
The cast iron body and parts of the device do not like sudden temperature changes. Do not allow cold water to come into contact with cast iron surfaces, as this can lead to cracks. It is forbidden to move an already installed stove, this will cause depressurization of the chimney.
Style solutions
After the work on creating a fireplace instead of a Russian stove is completely completed, you can begin finishing it.
A wide variety of materials can be used to cover the fireplace - brick, stone or ceramic tiles, tiles. It all depends only on your taste and imagination.
A fireplace lined with natural stone will look very chic and stylish.
Types of cast iron stove surfaces
Regardless of the configuration, all cast iron surfaces perform heat transfer functions well and are suitable for cooking. The difference between a solid and prefabricated slab is the presence of thermal gaps between the elements, which compensate for the expansion of the metal when heated. You can understand the structure of hob surfaces in more detail by reading about each of them separately.
Prefabricated slabs
The prefabricated cooking deck is a structure made of a cast iron surface and several rings that differ in diameter. They are inserted into each other and assembled into a single plane like a puzzle.
All prefabricated stoves can include from one to several burners, and thanks to the ability to remove and put on rings, you can choose the most suitable burner size for each specific cookware.
This type of flooring is more durable and resistant to temperature changes. Due to the presence of gaps between the rings, the metal can expand during heating without deformation or other damage. To provide extra strength, some slabs are produced with additional stiffening ribs on the inside. A significant advantage of this addition is an increase in the temperature of the hob, and thus an increase in the efficiency of the oven in cooking.
Solid slabs
A solid cooktop comes in the form of a single sheet of metal, usually with
one or two burners with a constant diameter. There are also blind stoves that do not have burners.
This design of the stove plate has virtually no thermal gaps, which makes it not as reliable and practical as the previous model. Due to the lack of free space, deformation of the cast iron may occur during heating.
However, an important advantage of solid slabs is ease of installation and reasonable cost compared to prefabricated ones.
The main nuances when installing a cast iron stove:
- When making a furnace, it will be appropriate to compare the difference in the behavior of different materials under the influence of temperature. Metal and brick have different expansions, and during the heating process the oven may collapse. To prevent this from happening, it is necessary to provide gaps between the cast iron slab and the brick surface of up to 5 mm around the entire perimeter. This way you can significantly increase the service life of the furnace.
- The metal plate on the surface of the furnace is fixed with a liquid clay-asbestos solution. To prepare it, clay is mixed with crushed asbestos and by adding water the solution is brought to the correct consistency (liquid sour cream).
- When installing a cast iron stove, be sure to control the process using a level. The largest burner is always located above the firebox.
- To strengthen the structure of the stove, the top row of brickwork should be fixed with a steel angle around the perimeter.
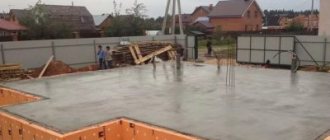
Types of foundations
Among the known types of foundations for arranging furnaces, the following are suitable:
- concrete pillars;
- strip foundation;
- monolithic slab.
Each type has its own characteristics. Concrete pillars are suitable for both a heavy metal stove and a massive brick fireplace. The number of supports is selected based on the total weight of the structure and the condition of the soil at the installation site. To install them, holes of the required size are made in the floor, and after installing the posts, a frame of welded metal channels is laid on them.
Strip foundations are erected according to the classical scheme. According to the method, when constructing them, formwork is first made around the perimeter of the supporting structure, into which liquid concrete is then poured. All other operations are performed in exactly the same way as described in the previous case.
The monolith is mainly used when installing fireplace-type stoves in dachas. Its thickness can reach 15–20 cm, which is quite enough to withstand the design pressure on the foundation.
Any of the types of foundation discussed above must sit for some time after pouring. You can begin installing the stove on it in about 28–30 days.
Advantages of cast iron
Cast iron provides the product with inertial heat transfer, which means that slow cooling of the surface contributes to uniform heating of the room. Cooking decks are cast from SCh 15-20 cast iron (carbon combined with iron), which is famous for its strength and fire resistance.
Phosphorus, sulfur, silicon and manganese added to the composition enhance the chemical and physical properties. That is why cast iron structures are not subject to temperature changes and remain intact for quite a long time of operation. In addition, any cast iron structures will not be subject to corrosion due to the rusty layer covering them.
How to make a choice
You can buy an imported cast iron hob, for example, Finnish Pisla and HTT. Among domestic brands, products from NMK, SibStalShar, Litkom, and Balezinsky LMZ are in greatest demand.
All of them have a beautiful appearance, heat resistance up to 1000°C and are environmentally friendly, without emitting harmful substances when heated.
For stove slabs, standard dimensions for laying are accepted: 710x410 mm, 340x410 mm, 660x410 mm, 585x340 mm and others. The number of burners in a typical section is one or two.
The thickness of cast iron in expensive slabs reaches 12 mm, and the structure itself has stiffening ribs on the reverse side. Weight is about 20 - 25 kg.
Caring for a cast iron cooktop
Cast iron is an unpretentious material, but even it has its weak points. First of all, it is natural fragility. Careless handling of the slab or impacts lead to the appearance of cracks and chips on the surface. It is impossible to weld defects, so such a slab will have to be thrown away.
The hot plane is sensitive to liquid contact. A sudden cooling of the slab is fraught with the appearance of cracks and a violation of the tightness of the seal.
The surface of the slab does not require additional treatment with any compounds. It is enough to regularly wipe the cold stove with a damp cloth, and remove burnt food residues with a stiff brush. Rust deposits due to long periods of inactivity will disappear immediately after heating the stove.
Traditional methods for cleaning surfaces are popular: baking soda, soda with vinegar, ammonia and hydrogen peroxide, mustard powder. Do not use flammable liquids (solvents, acetone) or strong detergents containing acids. It is best to use mechanical cleaning methods using various abrasive materials.