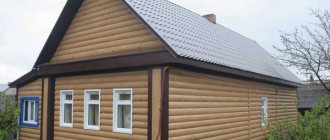
The use of a variety of materials in the cladding of buildings allows us to achieve the most optimal combination of aesthetics, reliability and low cost. In this light, we will consider such finishing material as horizontal and vertical metal siding, its possible configuration, places of application and installation methods.
Metal siding in different colors
Content:
- Metal siding and facade panel
- Technical specifications
- Accessories
- Leveling system Control of cladding plane
- Setting the starting bar
Basic rules of work
Metal siding is supplied packaged not only in bundles, but each sheet is individually wrapped in a special protective film, which must be removed after installation. This film prevents abrasion of surfaces during transportation.
Cutting metal siding must be done only in compliance with safety precautions. Some companies offer the production of panels to customer size . This will not only make installation work easier, but will also save you from the need to purchase additional equipment. Moreover, the linear dimensions of the sheets will be observed much more accurately than with manual cutting. This may complicate the preparatory and calculation stages, but will significantly simplify installation.
Technical specifications
STARTING MATERIAL - rolled galvanized steel with polymer coating in various colors.
| Metal thickness: 0.5 mm for siding; 0.5 and 0.7 mm for facade panels. Panel length up to 6,000 mm Weight sq.m. siding thickness 0.5 mm - 5.67 kg/m2 Weight sq.m. facade panel 0.5 mm thick - 5.61 kg/m2 0.7 mm thick - 7.84 kg/m2 |
Types of coatings
A rich color palette allows you to choose the optimal solution for any design idea. A variety of color solutions will help you choose the desired shade so that the façade fits organically into the overall style.
Below we consider the basic types of polymer coatings for protection and decoration:
- polyurethane – has good strength, is resistant to temperatures and mechanical damage, and is not afraid of exposure to ultraviolet radiation.
- PVDF (composed of acrylic and fluorine-containing polymers) is a special coating that can be used to create a glossy surface. Resistant to environmental influences, durable and versatile.
- Plastisol is a matte coating, not inferior in characteristics to a polyurethane coating, its thickness is 200 microns. Among the disadvantages: it is not resistant to high temperatures.
- Pural - resistant to fading, thickness varies within 50 microns, protects steel well from corrosive influences;
- Polyester is a relatively inexpensive material, a wide color palette, and a layer thickness of 25 microns. On sale you can choose different coatings: matte or gloss.
Modern manufacturers of coatings for siding panels offer many standard and original solutions. Among the latter you can find unique imitations of stone, velor, granite chips, and wood. Special polymer coatings provide adequate protection from various types of influences. It is impossible to say for sure how much the cladding costs, it all depends on the square footage. m of working area and specifics of work. To cover the facade with siding, it is better to contact professionals who will first calculate the amount of work in square meters and help you decide on the type of material.
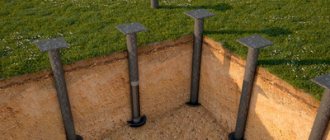
Leveling system
To create a mounting plane for metal siding and façade panels, a leveling system is used.
The leveling system is mounted from brackets and galvanized profiles or from brackets and wooden blocks with a thickness of at least 40 millimeters.
The design of the brackets allows you to adjust the size of the distance of the vertical guides from the load-bearing wall, thus making it possible to level out the actual deviations of the wall plane from the vertical. The design of the bracket allows for leveling the plane by 30-40 mm. An increase in the offset value is solved by choosing brackets of different lengths. Leveling brackets are attached to the base of the load-bearing wall using anchors and frame dowels.
To eliminate cold bridges, when insulating the facade, thermal break gaskets (made of paronite 3-5 mm thick) are installed under the brackets. All other elements of the leveling system are attached to the brackets.
To cover a house with metal siding and facade panels, depending on the direction of installation of the facing elements, there are two leveling systems for installing guides: vertical and horizontal.
Vertical leveling mounting system. For horizontal installation of facing materials (metal siding, facade panel), vertical guides (U-shaped profile) are attached to the brackets with galvanized steel rivets 3.2x8mm or self-tapping screws 4.8x16mm, at least two rivets (screws) on each side (Fig. .23). After leveling the plane, bend the protruding shelves of the bracket to the sides (Fig. 23). The vertical guide profiles should be paired with a gap of 5-10 mm to compensate for temperature deformations (Fig. 24). The maximum guide extension from the bracket is 150 mm.
Horizontal leveling installation system. For vertical installation of facing materials (facade panel, siding), vertical guides (U-shaped profile) are attached to the brackets with galvanized steel rivets 3.2x8mm or self-tapping screws 4.8x16mm, at least two rivets (screws) on each side. Horizontal guides made of a U-shaped profile are attached to the vertical guides (Fig. 25). The vertical and horizontal guides are fastened together with an “overlap”, with the side shelves at the horizontal guides being trimmed, using galvanized rivets 3.2×8mm or self-tapping screws with a press washer 4.8×22mm. The vertical guide profiles should be paired with a gap of 5-10 mm to compensate for temperature deformations (Fig. 24).
Advantages
The main advantages of metal siding are:
- Long service life . Most manufacturers guarantee the service life of their products for 20-25 years without burnout and up to 50 years before through corrosion;
- Light weight structure . Since thin sheets of metal (about 0.5 mm) are used in production, and protective coatings are applied in a layer calculated in micrometers, then 1 m2 is only about 4 kg;
- Economical . By using domestic metal, creating an extensive logistics network and distributing production facilities throughout Russia, manufacturing companies can offer metal siding cheaper than foreign manufacturers;
- Environmental Safety . Metal panels, unlike PVC, are not only non-flammable, but also do not emit harmful substances during operation;
- Ease of installation . Due to the fact that metal is not so susceptible to thermal deformation and is not afraid of low temperatures, the installation process is not complicated by the need to control the tightening force of fasteners, there is no need to leave special temperature gaps, etc.
4.1. Control of the cladding plane
During installation of the leveling system, check the plane of the cladding using a level, a standard rule strip, or strings.
Permissible deviations in the position of the guide profiles: - vertically (horizontally) in the plane of the wall - 5 mm; - vertically (horizontally) perpendicular to the plane of the wall - 3mm; — from the specified distance between adjacent profiles – 10 mm; — coaxiality (coincidence of the central axis) of profiles adjacent in height – 4 mm; — the ledge of profiles adjacent in height is 3 mm.
Design features of metal cassettes
Open and closed metal cassettes are used for cladding the external walls of buildings. The former differ from the latter in the installation method and the appearance of the finished structure.
When constructing a façade from open-type metal cassettes, all points of attachment of the panels to each other will be visible. Therefore, fasteners are used for connection, the caps of which are painted in the same color as the metal cassettes. When installing closed panels, a continuous plane is formed without visible gaps. Regardless of the method of fastening, metal cassettes are installed on the subsystem of the ventilated facade, that is, on a durable frame.
This is what the main fasteners for lathing a façade made of metal cassettes look like
Please note: the subsystem is a load-bearing plane to which the facing material is attached. In the case of a ventilated facade, this is a structure assembled from a heat insulator and additional elements: load-bearing profiles, brackets, anchors, etc.
The essence of the open fastening method is the gradual laying of metal cassettes with the side shelves of each subsequent panel overlapping the side shelves of the previous one. The standard insertion depth is 2.5 cm. Fasteners are installed in increments of 20-25 cm.
Metal cassettes of closed (left) open (right) fastening type
Corner elements
The hidden installation method is based on hooking each subsequent cassette onto the shelf of the previous one. Assembly is carried out in the direction from bottom to top and from left to right. Each subsequent panel, when installed, covers the place of fixation on the frame of the previous one. And, in turn, it is attached in the same way. This is how the façade is finished with closed-type metal cassettes.
The main difference between open and closed type metal cassettes is the fastening of the metal cassette seam itself
Metal cassettes of closed fastening
Closed metal cassette drawing
The difference between closed and open types of fastening
Insulation
The walls of a built house that do not provide a sufficient level of thermal protection require insulation.
Installation of insulation boards is carried out after attaching brackets to the load-bearing wall. The thickness of the insulation boards is determined by thermal engineering calculations. The density of the insulation must be at least 80 kg/m3. If the insulation thickness is significant (from 150 mm), it is divided into two layers. This is done to make it possible to bandage the joints of the insulation layers. For the inner layer it is possible to use insulation with a lower density of 40 kg/m3.
The insulation is fastened to the base using disc dowels with spacer elements made of carbon steel with an anti-corrosion coating, corrosion-resistant steel. Sleeves are made of polyamide, polyethylene, modified polypropylene. The length of the dowels depends on the thickness of the insulation. For the first and second layers of insulation, use dowels of different lengths to ensure a tight fit of the insulation. Consumption - at least 5 pcs. per 1 sq. m of facade surface with a single-layer arrangement of insulation boards, in the extreme and corner zones 8 pcs. per 1 sq. m. The insulation slabs of the lower supporting row of the first layer are secured to the wall with three dowels, the slabs of subsequent rows are secured to the wall with two dowels, and each slab of the second layer is secured with five dowels.
To protect the insulation from weathering and moisture, a wind-proof film is installed. The slabs of the outer layer and single-layer insulation are secured together with the wind-hydroprotective material with five disc-shaped dowels.
To ventilate water vapor and condensate, it is necessary to provide a ventilation gap between the outer surface of the insulation layer (wind-hydroprotection) and the inner surface of the cladding slabs. The gap should be 40-60mm. The maximum size of the ventilation gap is 100mm.
Types of metal siding
Each material used for siding production has pros and cons, but definitely deserves attention.
We will look at two basic types that are widely used for finishing facades:
- Steel. A common option for external cladding of various buildings. Also used as a base trim. It imitates brick and wood well. Suitable for finishing a wooden house, as well as buildings made of brick, concrete and used panels. Only galvanized steel, which is resistant to various environmental influences, is suitable for siding. Steel has many advantages, including a rich range of colors, and is therefore the best option for cladding buildings. Among the disadvantages, it is worth noting the large weight and the likelihood of deformation as a result of exposure to temperatures. Also among the disadvantages, it is necessary to note the likelihood of condensation if you install steel siding without insulation.
- Aluminum. It is distinguished by its low weight, practicality, aesthetic appearance and long service life. Aluminum panels are available in different colors and textures. Due to its low weight, reinforcement of supporting structures is not necessary. The material does not create loads on walls, is not afraid of exposure to temperatures, and is suitable for cladding any construction projects. Cons: aluminum is not resistant to mechanical stress, quite high cost compared to its steel counterpart.
It is impossible to say for sure which metal is better, since each material has its own pros and cons. Many property owners rely on reviews and recommendations from professionals, this allows them to make the right choice. You can purchase metal siding made of steel or aluminum inexpensively from any specialized company.
The cost of metal siding directly depends on the type of metal and its functional features.
Horizontal installation
Before installing metal siding or facade panels with your own hands, you need to check the plane of the leveling system using a standard rule strip and install:
- initial strip (when installing metal siding);
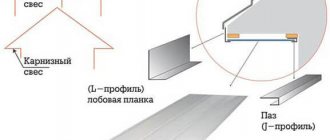
- corner elements - external or internal corners (Fig. 29);
- Framing elements of window and door openings - slope strips, platbands (Fig. 30-32).
- In the places of planned joints, strips are installed (Fig. 29).
6.1. Setting the starting bar
The starting strip, which secures the first panel of metal siding, is installed along the lower edge of the cladding. The starting plank must be installed strictly horizontally using any type of level or geodetic instruments (Figure 28). The distance from the blind area or plinth to the starting plank is at least 40mm.
6.2. Installation of corners and strips
Set the outer and inner corners using a plumb line or level, secure them to the horizontal profiles of the leveling system, then install metal siding or facade panels (Fig. 29).
In the places of planned joints, an additional vertical guide is installed or horizontal guides are mounted between adjacent vertical profiles. The cover plate is installed level and attached to the guides with a pitch of 600 mm (Fig. 29).
6.3. Installation of cladding
6.3.1. Installation of metal siding
When installed horizontally, siding is installed from the bottom up. Hook the first strip of siding with the base onto the starting strip and secure the top edge with self-tapping screws, starting from its center. Before attaching the siding, make sure that it is firmly hooked along its entire length. All subsequent claddings are hooked onto those already installed and secured in the same way.
Be sure to check the horizontalness of the installed cladding. To avoid deformation due to thermal expansion, it is necessary to leave a gap of 6-9 mm between the end of the cladding panel and the vertical components.
6.3.2. Installation of facade panel
In the horizontal version, the installation of the facade panel is carried out from top to bottom. Fix the first facade panel into the U-shaped part with a self-tapping screw. After horizontal alignment, fasten the lower edge with self-tapping screws (fastening S-shaped part). Attach the top of the panel to each sheathing profile. The second panel is inserted into the first, and it is necessary to ensure that the second panel along its entire length is tightly inserted into the groove of the first. Then attach the second panel. Avoid uneven compression of the panel, this can lead to disruption of the flatness of the facade. All subsequent claddings are inserted into those already installed and secured in the same way. Be sure to check the horizontalness and flatness of the installed cladding. To avoid deformation due to thermal expansion, it is necessary to leave a gap of 6-9 mm between the end of the cladding panel and the vertical components.
6.4. Framing doors and windows
The framing of window and door openings can be: slope strip, aquilon, platband. A window drainage system is usually installed on the windowsill. When installing door and window frames, you must first install the top parts, then the side ones.
6.5. Adjusting siding around windows
First, fit the siding panel so that the edges extend from both sides of the window opening. Then mark the width of the window on it, adding 6-10 mm. The resulting marks will show the locations of the vertical cuts. Make a sample horizontal cut. To do this, secure a small piece of metal siding near the window and mark it 6mm below the sill on both sides of the window opening, since it is not certain that the window level is ideal. Transfer the marks from the samples onto the metal siding panel. After this, make the necessary cut.
The siding is adjusted to the door frame in the same way. For the façade panel, the window framing is done in the same way, only the installation direction changes.
6.6.Complete installation
The final touch to finishing the house with siding is framing the top edge of the cladding. It can be done, depending on the situation, with an internal corner (85*85; 50*50), an upper ebb or other components. All these elements are fastened with visible self-tapping screws or rivets, and it is preferable to use fasteners painted to match the color of the closing element. Screw pitch 400...500 mm.
When finishing with a façade panel, the connection to the plinth is made with an upper ebb. The upper ebb is inserted under the façade panel or inserted into the panel lock, after which it is attached to each sheathing profile. If the end of the finishing falls on a non-complete panel, the panel cut is covered with an additional element.
Areas of application of metal sidings
Metal siding is used for exterior decoration of the house - plastered and unplastered facades of old and newly built buildings and structures:
- brick;
- concrete;
- aerated concrete;
- wooden;
- frame.
They are also used for constructing various fences, walls, not only of main buildings, but also of utility rooms:
- sheds;
- garages;
- places for keeping pets;
- greenhouses;
- workshops;
- baths;
- seamless cladding of interior ceilings.
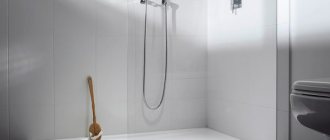
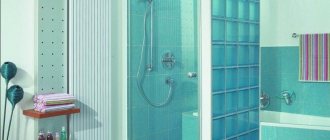
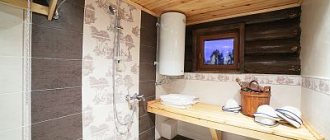
Metal sidings are often used to finish the enclosing surfaces of interior spaces with a humid climate:
- bathrooms;
- bathrooms;
- showers;
- baths;
- saunas;
- swimming pools;
- laundries;
- treatment facilities.
Vertical arrangement of panels
Depending on the situation, the starting element for a vertical arrangement of metal cladding can be: a starting strip, a fastening strip located vertically, corner strips, and slope strips.
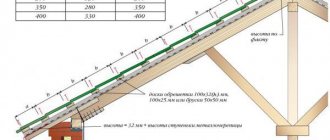
The starting element is leveled and fixed to a frame made of a U-shaped profile. Make the frame of the leveling system as shown in Fig. 30 and 31.
The final horizontal elements can be: platband, slope angle, upper drainage. To avoid deformation due to thermal expansion, it is necessary to leave a gap of 6-9 mm between the end of the cladding panel and the horizontal components. The framing of door and window openings is carried out in the same way as described in the “horizontal installation” section.
Cost of metal siding finishing
The price of finishing with metal siding is determined by:
- location (region) of the building (transportation, loading and unloading services);
- finishing area (the larger the area, the lower the price);
- number of floors;
- exclusivity of design;
- qualifications of performers;
- the cost of the material (steel, aluminum), the complexity of the profile, the composition and method of applying an external coating that imitates plaster, brick, wood;
- manufacturer (manufacturer);
- type of frame or subsystem (metal, wood);
- option on the facade - simple, ventilated, insulated.
The average price for 1 square meter of finishing buildings with metal siding panels can vary from 400 to 3000 rubles;
Review of manufacturers
Iron panels are produced manually at the construction site or automated at the enterprise. Among foreign manufacturers on the market, there are several brands that have become especially popular:
- British-Dutch brand Corus Group;
- American company Alcoa, which produces aluminum siding;
- Finnish company Ruukki with metal panels.
Among the Russian suppliers, the Grand Line brand, the products of the Severstal enterprise, and the products of the Lipetsk enterprise and the INSI holding have proven themselves well. They have more affordable prices per m2.