Only a true housewife and owner can preserve the warmth of the family hearth - this requires patience, experience, dexterity and love for your home. As for physical heat, it all depends on the materials chosen, a well-thought-out heating system and thermal insulation of the house.
Properly designed communications and installation of thermal insulation will provide the dacha with protection from cold winds and frosts in winter, giving a comfortable atmosphere in the rooms. In addition, good thermal insulation of the cottage will help you save on heating and electricity bills.
If you have seriously decided to extend your dacha season into the winter months, don’t hesitate - insulate your dacha! In order to do this as quickly as possible and with your own hands, there are several simple techniques. These secrets will help you relax in warmth and comfort at your dacha all year round.
However, we note that there are two difficulties in this matter. First, it is important to choose the right materials. Secondly, it is important to check everything before the cold weather sets in. We will talk about these and other nuances in this article.
Why insulate
Insulating your dacha will allow you to save on heating costs in winter.
Modern heating systems are able to create the desired temperature in the room, so why is it necessary to take additional measures. Insulating a country house will allow the owner to solve the following problems:
- high heating costs;
- the appearance of condensation on the walls and ceiling;
- violation of the operating conditions of structures and their destruction.
If during the cold season there is a positive temperature inside the house, but its enclosing structures are not insulated enough, this will lead to many problems, which are easier to prevent than to fix with your own hands.
Window
After insulating the walls, we move on to the windows. They also lead to significant heat loss, so close attention should be paid to windows, especially if the design is outdated.
Cleaning and waterproofing
The frames of the house should be thoroughly cleaned of dust, cracked glass should be replaced, and the gaps between the walls and frames should be sealed.
For high-quality insulation you will need silicone sealant in a special gun. It reliably protects joints from the inside from fungi and mold.
Polyurethane foam will also work. However, it quickly deteriorates from the sun and is not entirely aesthetically pleasing. If you choose foam, you will have to take measures to protect it from ultraviolet rays.
D-profile tape
Then you need to glue the sealing tape. D-profile tape is best suited. It effectively closes gaps up to 7 mm. For a more secure fixation, you can secure the tape with nails or staples.
Film on glass and insulation of slopes
To maximize the insulation of windows, cover them with heat-saving film. This material is applied directly to the glass. When laying the film there should be no folds, swelling or bubbles. Carefully done work will help save more than 30% of heat.
Don't forget about insulating the slopes. For this, you can use various materials, for example, polyethylene foam or mineral wool. The insulation is fixed to the slopes using glue.
Materials for thermal insulation
The building materials market offers a huge range of types and manufacturers of thermal insulation materials. It’s easy to get lost in this variety. The choice depends on the location of the thermal insulation and the wishes of the home owner. The main heat insulators include:
Main thermal insulators of the house
- Mineral wool. Available in the form of mats (rolls) and rigid slabs. The first option is suitable for walls and floors along joists, the second for walls, floors, and roofs. The advantages include non-flammability, high efficiency, durability, resistance to rot and mold. The disadvantage is the ability to absorb moisture. It is important to remember that when working with this material you need to use masks, gloves and protective clothing. Neglecting safety measures will lead to cotton particles getting on the skin and into the lungs, and ultimately to irritation and allergic reactions.
- Styrofoam. The material is made of polystyrene. It is a slab of small balls filled with air. The undeniable advantage was the low cost of the material and availability. There are quite a lot of disadvantages. These include flammability, inability to pass air (the house will need additional ventilation), low strength and instability to simultaneous exposure to moisture and low temperatures. Suitable for do-it-yourself insulation of walls (it is recommended not to use outside), ceilings (better for insulation from below), and attic roofs.
- Extruded polystyrene foam (penoplex). The material is similar to foam, but is an improved version of it. It is low flammable, has increased strength and moisture resistance. Disadvantages include airtightness. Suitable for insulating walls and floors (both between floors and on the ground).
- Expanded clay. Inexpensive material. Compared to the previous three, it is not highly effective. It is small granules of baked clay, free-flowing. Disadvantages include high thermal conductivity and large mass. Suitable for insulating floors (at the same time leveling the surface).
There are also a number of less common materials, these include:
- polyurethane foam;
- ecowool (insulation mats made of flax);
- penoizol (foamed polymer resin);
- isokom (foil material);
- sawdust.
Walls
Insulation of walls is the main stage of work, since they occupy the main area of any building and have the highest heat transfer.
Surface preparation
Before insulating wooden walls, be sure to clean the entire surface of dirt. Carefully treat the inside of the walls with special solutions and aerosols that will protect the wood from insects. Then caulk all the gaps using dry tow and a thin chisel.
Insulation
Jute fabric is very suitable as a heat insulator for walls. It is quickly and easily laid with a construction stapler, does not rot, is not blown away by the wind and is not of interest to moths. Tow and jute fiber have low thermal conductivity due to their capillary structure and easily release moisture. In addition, as bactericidal materials, they successfully resist the spread of fungus.
It is not recommended to use improvised materials to insulate the walls of a country house: felt, batting, wool. They accumulate moisture abundantly. As a result, the process of rotting quickly begins, and moths are sure to appear in the wool.
How best to insulate
After choosing a heat insulator, you need to decide on the method of insulation. Do-it-yourself insulation of a house for winter living can be done using two methods:
- outside;
- from the inside.
Construction of a country house with thermal insulation
Insulating a country house from the inside is important in the following cases:
- work is carried out in winter, when it is not comfortable to perform operations outdoors;
- you must not touch the façade of the building or disturb its decoration;
- insulation of walls at a sufficiently high height.
It is important to remember that insulating the outside with your own hands is more correct from a technical point of view.
Protecting your home from cold air helps prevent the effects of cold on supporting structures and extend their service life.
External insulation of the cottage
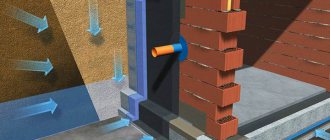
Such insulation can protect not only the room from freezing, but also the material from which the building is made. In this case, the “dew point” will shift towards the street, and condensation will form outside the elements made of wood, and under the ventilated facade (the moisture under it will soon dry out).
Let's look at how external insulation is produced.
Stage one. Material selection
In this case, it is better to use mineral or basalt wool as insulation. In the case of wooden structures (and country houses are often wooden), it is undesirable to use polystyrene foam, since it is vapor-tight and therefore does not remove steam from the surface. Mineral wool can have different densities and thicknesses. The denser it is, the easier it is to install and the longer it will retain its original properties. Loose insulation will slide and crumble, spreading dust harmful to the body. In short, you shouldn’t skimp on the quality of insulation material.
Note! The advantages of the material also include the fact that it does not burn and rodents do not “like” it, which distinguishes it favorably from the same foam plastic.
In addition to the heat insulator itself, the work will require a film that will be laid in 2 layers - one to protect against moisture penetration, the other for wind and water protection. The film is laid on wooden surfaces. What is characteristic is that it must be vapor-permeable and remove moisture from the wood to the outside through insulation. Wind protection is installed on top of the heat insulator, and it is absolutely necessary.
The outside insulation layer can be covered with any material, but a gap must be left for ventilation. This design is called a ventilated facade. Air will circulate between the facing surface and the walls, due to which moisture will be removed from the mineral wool. This will increase the service life of the building as a whole.
How to insulate a bathhouse?!
Previously, we talked about how to properly insulate a bathhouse from the inside on your own; in addition to this article, we advise you to read this information and read about it here
Stage two. Warming procedure
Below is an algorithm of actions for thermal insulation of a country house.
Step 1. First, the walls are treated with an antiseptic, in two layers. Extreme attention should be paid to the corners, as well as the crown located below. The ends of the logs should be treated with special care, because they are often the most susceptible to rotting. The application of the antiseptic itself is carried out in dry, warm weather, after which the walls are left for a couple of days so that the product dries completely.
Step 2. Next, an insulating film with a vapor-permeable coating is attached to the walls (a mounting stapler is used for fixation). The coating of the sides of the film may vary. In this case, the porous side goes towards the wall (it absorbs and removes excess moisture), and the smooth glossy side goes towards the street. The film is attached with an overlap of 10 centimeters, all joints are taped with mounting tape.
Step 3. A vertical type of wooden sheathing is installed on top of the film (it is constructed from bars, the thickness of which is equal to the thickness of the insulating material). The step between the beams should be 4-5 centimeters smaller than the width of the mineral wool mats. In this case, the material will fit tightly to the sheathing and will be held there well even without additional fixation.
Step 4. We continue to figure out how to insulate a country house from the outside. Mineral wool slabs are laid on top of the film between the sheathing bars, pressing each of them a little. If necessary, the material is cut using a regular knife. If the material is not hard enough or is poorly held inside the sheathing, then it can be temporarily fixed with slats. The final fastening of the mats is done using anchor nails.
Note! If thermal insulation is laid in several layers, then the new layer is laid with offset joints - that is, so that the sheets overlap the joints of the previous layer.
Another important point: all work related to the installation of mineral wool slabs must be carried out exclusively in a respirator and special protective gloves.
Step 5. A layer of wind and waterproof membrane is laid on top of the wool (staples are used again). It is important that the side with waterproofing “looks” towards the street. The material is laid with an overlap, the joints are still sealed with mounting tape.
Step 6. A ventilated frame is installed on the film. It is made from the same beams that were used for the sheathing. In this case, there should be a slight gap (about 50 centimeters) between the insulation and the frame for ventilation. The bars are installed to the previous frame using self-tapping screws, and if the surface of the walls is sufficiently flat, then perforated profile hangers can be used, thanks to which the distance to the frame can be adjusted.
Step 7. Next, the sheathing is attached. This must be done as specified in the manufacturer's instructions. Here are the main materials recommended for the exterior decoration of a country house:
- vinyl siding;
- imitation timber;
- metal profile;
- block house.
During finishing, you need to pay attention to ensure that there are no gaps left, otherwise moisture will seep through them into the structure.
Video - Sheathing and insulation of a wooden house
Important aspects
When the house is already ready, and the amount of insulation turned out to be insufficient, then it is worth following a few tips when creating insulation for garden houses:
- Using bulk and mineral insulation, the thickness of the backfill for temperatures not lower than -20°C should be 10 cm. If the cladding is blown, the figure increases to 15 cm.
- When laying insulation, it must be sufficiently compacted. When clicked, the form should return to its original state. Fine, loose thermal insulation of natural origin is compacted tightly.
- To ensure that the insulation of a garden building for recreation does not result in high costs, you can combine industrial materials with improvised ones. Use good insulation closer to cold sources. When insulating the floor, industrial raw materials will be laid down.
We recommend watching the video: mistakes when insulating a house.
All thermal insulation materials must be dry. At the slightest humidity, the insulation will lose its properties and rot.
After installing a heat-insulating pie, increased humidity may occur in the house, which is provoked by the following conditions:
- Cracks.
- Lack or improper ventilation. Impaired air circulation leads to a lack of air with the subsequent appearance of moisture.
- Poor quality vapor barrier. It does not affect the humidity inside the room so much as it affects the deterioration of the insulation.
Correctly carried out work and timely identification of shortcomings will avoid problems in the future.
Read on our website: drawings and projects of garden houses.
Roof
According to statistics, a house loses from 10 to 30% of heat through the roof if no attempts are made to improve its thermal insulation. Therefore, if you are determined to convert your summer country house into one suitable for winter stays, then it is simply necessary to pay attention to the under-roof space.
The insulation technology will directly depend on the type of roof in your house. For example, if there is a cold attic between the roof slopes, then the simplest and most inexpensive method of insulation would be to pour a layer of sawdust on the roof with a layer of at least 30 centimeters. Wooden sawdust meets several requirements at once: firstly, they are cheap, secondly, they are environmentally friendly, and thirdly, they perfectly fill all sorts of unevenness and joints of floors. They retain heat quite tolerably and reliably protect from drafts. So if you are looking for a “cheap and cheerful” option, sawdust will help you.
Photo: odstroy.ru
Another quick and cheap way is polystyrene foam. It’s also fast, cheap, and you don’t have to carry heavy bags of sawdust into the attic. But there is one big fat minus: polystyrene foam is a very attractive place for mice to settle. And even if you are not afraid of them, a mouse colony on the roof can create two types of inconvenience for you. The first is harmless: when the mice begin to fuss and wander around in their foam palaces, you will hear them clearly. And the second is more formidable: mice can carry hemorrhagic fever, outbreaks of which occur with enviable frequency in Tatarstan. For example, you risk catching a disease in the spring when you clean your country house after winter. Therefore, it is still not recommended to breed mouse colonies in the house. However, if you equip your foam attic with reliable means of protection from unwanted residents, foam will become a good way of insulation.
You can sheathe the floors, ceiling or roof from the inside with mineral wool - mice will no longer settle here. The material, however, will be more expensive.
Technical characteristics of insulation
All insulation materials have their own technical characteristics, which can affect the ease of installation and their heat-saving properties; to make the right choice, you should familiarize yourself with them.
Types and properties of mineral wool
The class of mineral wools includes glass wool, stone wool, and slag wool. All of them have one common characteristic - they are the finest fibers, which, due to their structure, can guarantee a high level of thermal insulation.
All mineral wools are highly hygroscopic, so it is important to use waterproofing during installation. When working with mineral wool, you must follow safety rules
Properties of polyurethane foam
In its rigid (frozen) form, polyurethane foam has the lowest thermal conductivity of all insulation materials, and it does not require such a large layer as for mineral wool or penoplex.
In addition, this type of insulation is very light, you do not need to use additional devices to attach it, it is simply sprayed onto the surface. This monolithic coating guarantees the absence of cold bridges; the material is environmentally friendly and durable.
Related article:
Audit
So, where should an owner begin who has undertaken to turn his home into a frost-proof fortress? Of course, from the audit! To plan your future actions, you need to understand how things are at the moment.
We will move from bottom to top.
First, let's check what gender we have. If it is just a poured concrete screed or plank flooring, it cannot be warm a priori, which means it needs to be insulated.
Then look at the carpentry - these door and window openings very often serve as the main factors of heat loss, which means they can easily ruin you.
Next are the walls. If you have an ordinary brick house, then in order to satisfy SNiP requirements, the width of your wall without insulation should be around two meters. Is it really less ☺? Then the walls need to be improved.
Now we have to check the attic floor and, of course, the roof. I can tell you from experience, since you are reading this article, the attic and roof were definitely left without proper attention - if not, sorry, I could have made a mistake ☺.
Penofol or penoplex
There is no point in comparing these two materials with those discussed above, since their price is superior to both foam plastic and mineral wool. Speaking about them, we note that penofol and penoplex are modern thermal insulation materials that are distinguished by excellent performance characteristics. Especially in this regard, penofol stands out, which experts call combined because it has three layers in its structure:
- waterproofing;
- thermal insulation;
- vapor barrier.
When installing penofol, they resort to the use of a special adhesive composition. But to install penoplex on the surface, special fasteners are used - fungal screws. You should know that penoplex is a panel with a smooth and even surface, which facilitates the process of laying finishing material on top of it.
Proper ventilation
However, it is not enough to know how to insulate a garden house from the inside: a properly equipped ventilation system is also important. For a comfortable stay in the house, supply valves and ventilation ducts for air outlet are necessary. If ventilation ducts run in unheated areas of the house, they must be insulated to avoid moisture condensation.
Today it is customary to install valves for fresh air in window units. Forced ventilation is advisable in damp rooms: in the bathroom and kitchen.
Thus, an ideal microclimate will be maintained throughout the house.
