Glass cladding is actively used in the bathroom interior: it visually expands the room and makes it brighter. Translucent glass blocks can be mounted not only on walls, but also in the middle of the room, zoning the space and forming supports for shelves.
The design of a glass block shower allows you to separate the bathing area without being limited by the volume and geometry of a closed cabin.
What is glass block
A glass block is a closed, hollow “brick” with thin glass walls, inside of which there is rarefied air or vacuum. The wall thickness is no more than 6-8 mm, so the facing element is light - up to 2.2-4 kg.
Depending on the transparency of the glass and the texture of the surface, the blocks can transmit, scatter or refract light. To create an original light pattern, you can combine different types of blocks in your bathroom design.
The advantages of block cladding are:
- high moisture resistance, sound and heat insulation;
- easy installation, light weight;
- assortment of designs, colors and shapes of blocks;
- easy care of the material, inertness to household chemicals;
- no mold.
The only disadvantages include the need for a frame made of metal or plastic, as well as the low strength of glass blocks. The construction of a wall of large area and height can lead to cracking of the lower rows of the structure.
Curved walls made of glass blocks must have a large radius of curvature: large gaps between the elements worsen the appearance and reduce the strength of the structure.
Device Features
The design of the shower cabin itself, mounted from glass blocks, looks simple: a small room with 4 walls and a tray. Since in most cases shower cabins are adjacent to one of the corners of the bathroom, only a couple of partitions are built from glass blocks.
In practice, it is difficult to select a ready-made pallet that suits all parameters. If the homeowner has an original design in mind, then it would be more appropriate to install a drain. In this case, the shape of the cabin can be any - the absence of reference to the configuration of the pallet removes any restrictions in the choice of options.
Homemade cabin
But even the most creative idea will not get you far - you need to have a certain supply of construction skills to ensure the rigidity of the structure, waterproofing of joints and floors.
Partitions made of glass blocks do not reach the ceiling and are not wedged.
Shape and size
The most popular shapes of glass blocks are square and rectangle. They can have the following sizes:
- squares: 19x19x5 cm, 19x19x7 cm, 19x19x8 cm, 20x20x2.2 cm, 24x24x8 cm, 30x30x10 cm;
- rectangles: 190x90x80 cm, 240x11.5x8 cm;
- small (mini) glass blocks: 11.5x11.5x8 cm, 14.6x14.6x5.5 cm, 14.6x14.6x8 cm, 14.6x6x8 cm.
To create a pattern or clear corners on the shower wall, you can use triangular blocks that have dimensions of 17.2 x 23.6 x 8 cm (legs, hypotenuse and thickness).
To form edges and wall transitions, curved, half-shape and rounded models are available. The dimensions of the corner glass block are 19x19x8 cm (for the top joint of the two sides) and 19x15x8 (for the side joint). The standard halves have dimensions of 19x9.4x8 cm, and the end halves have dimensions of 19x9x9 cm.
To decorate the edge of the partition, end blocks are used, having 1 connecting and 1 transparent side wall. They are available in standard sizes - 19x19x8 cm and 24x24x8 cm. The convex end blocks have parameters of 19x14.4x11 cm and 19x13x8 cm.
The thickness of the seam between the elements should be from 2 to 5 mm. The recommended opening size is indicated by the manufacturer.
Glue method for laying glass blocks?
- The block located at the edge is fixed on the guide horizontally.
- To connect vertical surfaces, special dividing strips are used.
- Before you start laying the second row, install the horizontal guide again and attach it to the wall.
- The glue can harden either quickly or over a long period, depending on its type.
- At the end, all joints are grouted with the required color, and then the blocks are washed from the solution that has fallen on them.
Design options for glass blocks
Glass blocks are classified according to surface texture, color scheme, the presence of lighting and additional accessories between the glass walls.
Smooth and textured
The surface of the glass can be smooth, matte or embossed. Smooth elements visually expand the space, matte elements softly diffuse light and hide the silhouette of a person in the shower. Glass with a relief pattern intricately distorts the direction of light and creates an imitation of frozen water.
Colored and transparent
In a small bathroom, it is recommended to combine colored and transparent blocks: the former will create bright accents in the center of the room, and the latter will visually increase the area of the room.
When installing the wall yourself, you should study photos of designs in advance and decide on the ratio of multi-colored elements.
With a laconic palette (transparent and matte white blocks), you can delimit the shower wall with horizontal stripes. At the level of the hips there is a strip that intensively scatters light and hides the silhouette, and above and below there are more transparent embossed glass blocks.
Backlit
LED lighting inside the glass blocks provides night illumination and well delineates the space. With a matte surface, the light will softly diffuse throughout the room, and with a transparent and embossed surface, it will form a bright accent. Diodes can be single-color to match the wall palette or with a gradient transition.
Installing the lighting yourself will save money on already equipped glass blocks. To create an illuminated cladding, you need to remove part of the seam on the side of the block and place a self-adhesive LED strip in the resulting groove. The recess with the tape is filled with transparent sealant on top.
With filling
The internal space of the block can be filled with various decorative elements: shells, flowers, models of butterflies, etc. Instead of a three-dimensional figure, an image can be placed between the glass walls. Blocks with photographs are available upon individual order.
Classification
Classification of glass blocks according to four parameters will help the consumer in selecting the optimal option.
- According to the degree of matting: matte, semi-matte, transparent, colored.
- For additional decoration: ombre, with a pattern, metallized, with applique.
- Shape: round, oval, square, rectangular, combined.
- Contents: hollow, with decorative filling.
- By purpose: end, corner, main, finishing.
Calculation of the number of blocks for the partition
A glass block wall is assembled using cement mortar, special glue or a frame. The choice of material for the base depends on the weight and configuration of the partition. Small structures made of standard and mini-blocks are mounted on a plastic frame, and high walls made of heavy and large elements are mounted on a metal frame.
The number of glass blocks is calculated in the following sequence:
- Designing the height and length of the wall. When creating a project, you need to take into account the height of the users, the size of the opening and the shape of the partition (smooth curves increase the overall length). After measuring the length and height, you need to calculate the area of the glass wall. If the structure area is more than 15 square meters. m, then for installation you need to use a metal frame or a reinforcing rod with a diameter of 4-5 mm.
- Selection of shape and size. The linear dimensions of the partition are multiples of the length of the sides of the elements, taking into account the thickness of the seams. For example, to create 1 level of a wall about 2 m long, you will need 10 standard glass blocks (19 cm) and 1 “half”. If the partition is erected from floor to ceiling, then the number of end blocks corresponds to the number of levels, and if it does not reach it, to the number of rows vertically and horizontally.
- Quantity calculation. The area of the partition is divided by the area of 1 element. After the initial calculation, the correspondence of the number of blocks to the linear dimensions (height and width) is specified. To more accurately calculate the number of glass elements, construction adhesive, fittings and mounting crosses, you can use online calculators. When making your own calculations, you need to take into account the thickness of the seams and the dimensions of the outer blocks (halves, corners, ends).
Decorative and colored inserts are excluded from the total quantity and are counted separately. For the vertical ends of the shower, between which the entrance to the cabin is located, only glass blocks with a rounded edge are used.
Design
Design - a project with sketches and drawings of the future interior play an important role and are of paramount importance. A new useful trend in planning is ergonomics. Proper organization of space, taking into account needs and preferences, helps to correctly distribute the area of the room.
Where and how a glass block shower should be installed is clearly stated in the diagram, identifying the locations of the plumbing fixtures. The markings must take into account the norms and standards required for bathrooms. For example, the distance between plumbing objects should not be less than 35 cm.
Design is a vast field of activity, limited only by financial capabilities. The only thing that is mandatory when solving a problem is the correct combination of the technical capabilities of the room with the selected interior.
How to do it yourself: step-by-step instructions
The glass block shower is built according to the plan:
- determining the type of pallet, partition design, shape and type of elements;
- calculation of the number of blocks and materials;
- selection of necessary tools;
- erection of a pallet;
- installation of the frame and installation of glass blocks.
Required tools and materials
To install the partition yourself, you will need the following tools:
- ruler;
- building level;
- hammer drill or drill;
- trowel, rubber spatula;
- construction marker, masking tape to mark the level.
In addition to glass blocks, the following materials will be required to build the wall:
- cement, sand and water for preparing the solution (1:3:1) or ready-made tile adhesive for fastening the elements;
- PVA glue (when using a cement mixture) - 200 g per 1 bucket of cement;
- mounting crosses made of plastic for leveling the blocks;
- metal reinforcing wire (4-5 mm) or fiberglass rods (6-8 mm);
- plastic module, metal frame or wooden beam 40x80 mm;
- polyethylene foam tape (when using timber);
- silicone sealant (when installing a modular frame);
- grout for glass blocks.
The color of tile adhesive and grout is selected based on the lightest blocks. The adhesive is diluted a little thicker than required for laying tiles. To prevent drying out, it is prepared in batches.
Construction of a shower tray from tiles
To create a shower tray you will need concrete mortar M200-M250 (for screed), bitumen or other waterproofing, bricks for the sides, tiles and tile adhesive. Ceramic tiles must have a non-slip surface. The installation may involve a hammer drill, a grinder, a tile cutter and a mixer for cement (concrete) mortar.
The pallet is built according to the following algorithm:
- make a branch for the drain hole;
- assemble the formwork for the elevation, taking into account the width of the sides, mark the height of the proposed pallet inside;
- prepare concrete mortar, pour formwork;
- if the screed thickness is up to 7 cm, place a metal mesh in it at a distance of 3 cm from the floor;
- 2-3 days after pouring, lay polystyrene foam (50 mm), roofing felt or bitumen (1-2 mm) on the screed;
- adjust the height of the drain hole (ladder);
- lay the sides in 1-2 bricks, wait for the cement to harden;
- pour the finishing screed with a slope of 1 cm per meter towards the drain, re-insulate the cement with bitumen mastic;
- After the concrete has hardened, lay the pallet with tiles, laying it on a special tile adhesive and checking it with a building level.
Laying should begin from the corner of the structure. The distance between the tiles is maintained using plastic crosses. After the glue has hardened, they are removed and the joints are covered with grout.
The connections between the pallet and the walls and sides must be treated with silicone sealant.
If the bathroom is undergoing a major renovation or insulation, you can do without formwork. In this case, the pallet is formed directly on the finishing floor screed with a recess towards the drain.
Installation of glass block partitions
To build a partition from glass blocks you need:
- Mark the walls with construction tape and a marker to determine the laying level.
- Drill holes in stationary surfaces, install a metal frame or modular profiles (QuickTech) on dowels or anchor bolts. When laying on timber, attach it to the floor and wall along the partition line. If the structure is reinforced with wire or rods, the junction of the tiles and glass blocks can only be treated with a sandy primer.
- Apply a layer of tile adhesive 1 cm thick and 1 block long to the profile or primer. Press the glass block into it, treat the free end with tile adhesive and install the next one, adjusting the gap with plastic crosses. When bending the partition, the crosses are installed only on the inner side of the radius.
- Lay rows 2 and 3 of glass blocks, covering their upper ends with tile adhesive.
- In order to reinforce the structure, metal or fiberglass reinforcement is laid on top of each horizontal layer. For it you need to pre-drill holes in the supporting walls. To prevent contact with glass, the rods are laid on top of the mounting crosses and covered with a thick layer of glue.
- If the shower stall has a door and not a free opening, then it needs to be mounted on the wall: the glass partition is not designed for increased load. Following the marked marks, several holes are drilled in the wall. Dowels are inserted into them, which are intended for fastening the hinges. The glass door is hung on ready-made hinges.
When assembled into a modular frame, each element is installed in its own niche, and the ends are treated with liquid sealant.
The film, which protects the glass from damage, is removed after all work is completed. If the protective layer is damaged, you can seal the open area with transparent tape. If the manufacturer did not provide for the presence of a film, then after laying each layer, traces of glue, sealant and grout must be removed from the surface of the glass.
Installing a glass block partition is a lengthy process. After installing 3 rows, you need to leave the masonry for 1-2 days to harden. Otherwise, the wall will turn out to be fragile and may deform under its own weight.
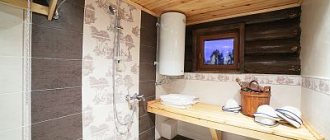
Photos of ready-made solutions
We have prepared for you a selection of photos of showers with partitions made of glass blocks in bathrooms of different sizes, both small and large.
Laying glass blocks on cement mortar
- The solution must be spread not only on horizontal surfaces, but also on vertical walls.
- Using a building type level, measure the evenness of the installation.
- In order to strengthen the structure, reinforcement is performed with rods.
- After the solution has hardened, the seams are rubbed with the required color and the surface is washed away from dirt.
Removing tint
It may well happen that after tinting you decide that there is no need for it, and the glue for it is usually so strong that you just can’t get rid of it. The film is applied to glass in several stages, so it must be removed in the same way. After you remove it, the problem will arise how to wash off the glue from it. The most affordable option is to use soapy water. However, it does not always help, so when deciding how to remove the adhesive from the film, you can use commercially available compounds: a special spray or a rust converter.