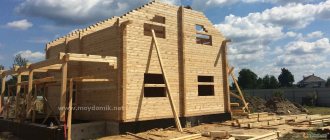
The appearance of the house is determined by the quality of the exterior finishing.
The higher this quality, the higher the costs expected for the home owner. This rule is true, but there are exceptions.
Siding is a simple and effective method of cladding, in which the result is quite capable of competing with the most expensive finishing options, and the work can be done with your own hands and in a fairly short time.
At the same time, the service life of the cladding is comparable to the service life of the house itself, there is the possibility of partial repairs, the cladding contributes to the safety and normal operation of the insulation and wall materials.
Let's talk about siding in more detail.
What is siding, pros and cons
Siding is a cladding material that forms the so-called. ventilated facade - the air gap between the cladding and the wall allows moisture to be removed and materials to be kept dry .
Siding consists of separate narrow and long panels that can be connected to each other into a set of any size, so the size of the house does not matter when finishing.
Advantages of siding:
- Neat, solid appearance of the house.
- Easy installation, the ability to do the work yourself.
- Durability of the material.
- Virtually no maintenance required.
- Relatively low price of the material.
Flaws:
- If repairs are necessary, you have to disassemble the canvas to replace the problematic panel.
- Mechanical stress is poorly tolerated, vinyl panels break, and dents remain on metal panels.
- A high coefficient of thermal expansion puts forward special requirements for installation; the use of dark panels is inappropriate for the same reason.
- Low level of sound insulation, especially if there is no external insulation.
The disadvantages of the material are largely compensated for by careful use, and the advantages allow us to rank siding among the leading finishing materials.
Photo of a private house with siding:
Tool preparation
As mentioned above, no special tools are required for installation work.
The list of tools that must be prepared before starting work is as follows:
- Sharp knife;
- Jigsaw . Used as an alternative to a knife; with its help you can get a beautiful and neat cut;
- Drill or hammer drill . Needed to enlarge and make new holes necessary for attaching panels;
- Screwdriver;
- Building level . It is most convenient to use the laser variety;
- Roulette.
CAREFULLY!
You can use a grinder to cut the material, but it is recommended to use it only at low power. Otherwise, when cutting, the material begins to melt and deform at the edges.
Tools
Types of siding
There are many types of siding currently being produced. All of them can be combined into groups according to various criteria.
So, according to the source material, siding can be:
- Metal. This group includes samples made of steel, copper, aluminum, etc.
- Wood. Panels are available from pressed or natural stabilized wood.
- Plastic. Vinyl, acrylic and other options are available.
- Fiber cement. Another name is fiber-reinforced concrete.
By method of application:
- Facade.
- Basement.
In the direction of the panels:
- Vertical.
- Horizontal.
By profile type:
- Under a log.
- Under natural stone.
- Under the beam.
- "Ship board".
- "Herringbone."
In addition, each group of materials has its own options for size, color and configuration, expanding the possibilities for choosing cladding.
Technical specifications
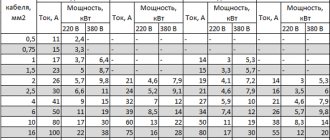
STARTING MATERIAL - rolled galvanized steel with polymer coating in various colors.
| Metal thickness: 0.5 mm for siding; 0.5 and 0.7 mm for facade panels. Panel length up to 6,000 mm Weight sq.m. siding thickness 0.5 mm - 5.67 kg/m2 Weight sq.m. facade panel 0.5 mm thick - 5.61 kg/m2 0.7 mm thick - 7.84 kg/m2 |
Choosing lathing - which is better, wood or metal?
The siding sheathing plays the role of a supporting system. In addition, it is the sheathing that creates the ventilation gap necessary to keep the insulation and walls dry, and therefore in working condition .
Such tasks make the functions of the lathing key, so the issue of choosing a material is far from secondary.
The traditional type of lathing is the wood plank system . Its advantages are ease of processing, availability and the ability to manufacture almost any size of planks.
At the same time, the wood is unstable, subject to shrinkage, warping, rotting, and has the ability to change shape (turn out with a screw, bend, etc.).
Metal guides are free of all disadvantages . They have a straight surface, the same thickness, the installation method allows you to accurately adjust the plane and easily adjust the result if necessary.
An anti-corrosion coating - hot-dip galvanization - solves rust or corrosion problems, and the prices for metal and wood planks are almost the same.
Therefore, when choosing a material for lathing, it is better to give preference to metal parts . This will save time and reduce the risk of curvature of the supporting plane or destruction of the planks from mold, mildew or insects.
Installation of the selected sheathing
The order of installation work depends on the presence (or, more precisely, the intention of installation) of insulation.
The fact is that with the usual method of insulation, two layers of sheathing are created:
- Main sheathing . Installed in the same direction as the siding panels, it serves as support for the insulation.
- Counter-lattice . Installed perpendicular to the location of the panels. Provides a ventilation gap and serves as a supporting system for the sheathing.
If insulation of the walls is not expected, then a counter-lattice perpendicular to the panels is immediately installed. That is, horizontal panels require vertical strips.
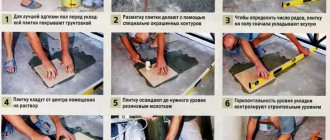
Step-by-step installation instructions:
- Cleaning the wall surface from old paint, layers of plaster, peeling or crumbling areas.
- Sealing cracks and dents with putty. Coating with a primer to bind crumbling areas . If necessary, complete leveling plastering of the wall plane.
- Marking the wall plane - the axes of the planks are determined. The standard distance between them is 60 cm. Direct hangers for drywall are installed along the axes.
- Installation of the extreme strips (for a two-layer sheathing - upper and lower, for a counter-lattice - vertical right and left). The planks are carefully leveled, vertical or horizontal is displayed .
- Cords are stretched between the slats along two (at least) lines.
- Intermediate sheathing strips are being installed. The plane is adjusted using the cords.
- A counter-lattice is mounted across the first layer of planks.
NOTE!
There is a single-layer lathing option, when there is no first layer of planks; after installing direct hangers, the wall is immediately insulated. The petals of the suspensions are passed along the joint lines of the insulation, and a counter-lattice is mounted on them. This method is more economical, but it can only be used when the wall plane is flat, otherwise the length of the hanger petals will not be enough to adjust the position of the slats.
Content:
- Metal siding and facade panel
- Technical specifications
- Accessories
- Leveling system Control of cladding plane
- Setting the starting bar
Insulation, vapor barrier and waterproofing
Insulation of an external wall is an important operation that contributes to significant savings on heating a house, preserving wall materials from destruction. Various materials are used for external insulation, but the most successful option is mineral wool .
Depending on the condition of the walls, one or another type of material is selected - a hard slab or a softer one that can be pressed tightly against uneven walls.
The thickness of the material depends on local climatic conditions, the original thickness of the walls and other factors. To install the insulation, special dowels with wide caps - mushrooms - are used .
A layer of waterproof film is required on top of the installed insulation. In this capacity, a waterproof membrane with one-way throughput is most often used - allowing moisture to escape from the inside and preventing its penetration from the outside.
Without this layer, the insulation will get wet very quickly and completely lose its heat-saving qualities..
CAREFULLY!
A vapor barrier film is not needed in this case, it will only do harm. The fact is that a vapor barrier is absolutely impenetrable to moisture in any form, so installing it will block steam inside the wall pie and cause the insulation and walls to get wet.
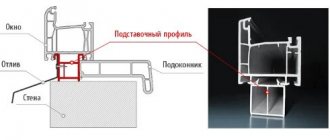
Installation of the starting bar
The starting strip serves to support the locking part of the bottom row of panels. The starting strip is installed at the level of the upper edge of the plinth or at another height chosen for your own reasons .
For this it is necessary:
- From the selected starting point of the siding, 40 mm is measured upward, and a horizontal line is drawn along this height along the entire perimeter of the house. Horizontal accuracy is checked by level, errors are excluded.
- The top edge of the starting strip is applied to this line and attached to the sheathing with self-tapping screws. The next strip is not installed tightly end-to-end, but with a gap of 6 mm to compensate for thermal expansion of the material. This value is the same for metal and vinyl siding, although their coefficient of thermal expansion is significantly different - vinyl expands much more .
Installing a J-bar instead of the starting bar is unacceptable, since in this case complete fixation of the lower edge will not be ensured and there will be a danger of the panel falling off in strong winds.
Color combination techniques
The facade of the house can be divided into:
- walls,
- plinth,
- roof,
- additional elements: corners, window and door openings, soffits, gutters, etc.
As a rule, the base and roof are made of one shade, the walls of another. The corners can be the same color as the base or wall, or contrasting (most often white). In the first case, the house will look smaller and neater, in the second - more spacious. Openings, soffits and gutters can be made in a contrasting shade or to match the base.
Designers use different techniques to change the visual perception of a building. Consider them when choosing siding, colors, combinations.
1. Light colors make space appear larger.
Siding in light, pastel shades is good for small buildings to give them volume.
It will look advantageous against the backdrop of dark treetops or fences. !
Light siding gives small buildings volume and makes them visually more spacious.
2. Dark shades make the house visually smaller.
This finish is suitable for large cottages that want to give a strict look. In addition, dark colors will help the house “get lost” among the trees.
3. Bright colors give your home a fresh look.
This is a bold and interesting solution, but you should not use more than one bright color on the facade. The corners can be emphasized with a contrasting shade, which certainly matches the main one.
4. Contrast is used for buildings with complex architectural forms.
The walls are made in one color, and all protruding elements are made in another. Moreover, if the second one is lighter, the facade will look lighter and more elegant.
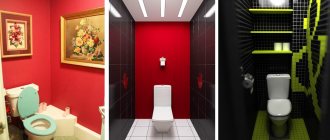
How to highlight architectural elements of a building with color (photo No. 2)
5. Buildings of simple shape are a field for design experiments.
Here you can combine different shapes and colors to create a spectacular look. But they must be in harmony with each other.
Colored details change a simple facade (photo No. 3)
6. Dark bottom, light top.
Classic combination: dark base and light walls. The color of the base can (but not necessarily) be matched to the roof and reinforced with corner elements, finishing of window and door openings.
Classic combination (photo No. 4)
7. Inversion
Inversion in facade decoration (photo No. 5)
A bold decision that not every homeowner dares to make: a light base and dark walls.
How is siding attached?
There are certain technologies for fastening panels :
- Self-tapping screws should not be tightened all the way; slack should be left so that the part can move freely within the installation hole.
- Self-tapping screws are screwed perpendicularly and exactly in the middle of the oblong holes, providing movement in both directions.
- For vertically installed parts, an exception is made for the upper self-tapping screw - it is screwed along the upper edge of the hole to prevent the element from moving downwards.
- All connected components or panels are mounted taking into account the temperature gap, otherwise swelling of the planes or separation of parts from the sheathing is possible.
4.1. Control of the cladding plane
During installation of the leveling system, check the plane of the cladding using a level, a standard rule strip, or strings.
Permissible deviations in the position of the guide profiles: - vertically (horizontally) in the plane of the wall - 5 mm; - vertically (horizontally) perpendicular to the plane of the wall - 3mm; — from the specified distance between adjacent profiles – 10 mm; — coaxiality (coincidence of the central axis) of profiles adjacent in height – 4 mm; — the ledge of profiles adjacent in height is 3 mm.
Installation of internal corner strips
Internal corner strips are installed immediately after the starting strips (together with H-profiles, external corners and window frames).
To install, you should either not bring the starting strips to the corner by the width of the corner profile (this is the best option), or trim the nail strip and the inside of the corner profile so that they do not rest against the starting strip.
The installation is done flush with the bottom edge of the future siding panels (3 mm below the starting strip). If the length of the corner profile is not enough, an overlap joint is made (by 25 mm) , and the lower part is placed under the upper part so that rainwater can drain freely and does not get inside.
Additional elements
Auxiliary elements are used to cover corners, openings and other complex areas of the facade.
This improves the quality of installation of vinyl siding and improves the appearance of the finished facade. Start strip
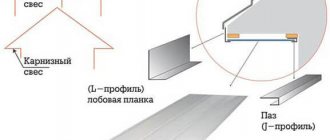
| Final strip | |||
| F - Profile | J - Profile | ||
| Chamfer | N - Profile | ||
| Internal corner | Platband | ||
| External corner OSCP | Gutter |
H-profile fastening
The H-profile is designed to connect siding planes in the longitudinal direction. Its installation is no different from the installation of internal or external corners, it is carried out simultaneously with them and is subject to similar requirements .
The only caveat may be the location of the H-panels, which can be installed symmetrically, distributing the length of the panels into equal sections, or, to save material, using the full size of the panels on one side and trimmed parts on the other.
Most often, the first option is used on the front sides of the house, and the second - on the reverse, invisible sides .
Installation of ordinary siding panels
Installing row panels is the simplest part of the installation work. The first, lowest panel is snapped into the lock of the starting strip, at the same time inserted into the recesses of the corner or H-profiles and secured with self-tapping screws along the upper nail strip .
The next panel is snapped into the lock of the previous (lower) one, similarly installed in corner or H-profiles and fixed with self-tapping screws. In this way, the entire siding sheet is assembled to the designated top point.
IMPORTANT!
Dense installation of panels into the nests of corner or H-profiles is prohibited. It is necessary to maintain a temperature gap of 6 mm on each side.
Issues to consider
- How should you screw in the screws?
At a right angle, strictly in the center of the perforation. A gap of 1 mm should be left between the cap and the panel. You can use a nylon washer.
- How much space should be left between siding panels and profiles?
If siding is installed in winter, the gap should be 5-6 mm. In summer – 1-2 mm. Accordingly, in the off-season, 3-4 mm will be enough.
- Is it possible to install siding in winter?
Yes, it can be mounted at temperatures down to -5 degrees. But you will need to cut the panels in a warm room, and after cutting, leave them outside for several hours.
Summary
Rice. 11. Facade covered with vinyl siding
The installation process is simple and straightforward. If you follow the technology, it is quite possible to cover your house with vinyl siding yourself. The only thing is that due to the fact that the panels are long (3 m or more), you need to work in pairs.
If you are not confident in your construction skills, entrust the work to professionals. Siding panels installed in violation of the technology are excluded from the manufacturer's warranty.
Return to list
Installation of finishing siding strips
The finishing strip completes the installation of the siding, covers the top edge of the panel and protects it from water. Installation of finishing strips is carried out immediately before installation of the top row of panels .
Typically, finishing strips are located under eaves or soffits. To install the top panel, it must be trimmed to a width corresponding to the remaining distance from the edge of the bottom panel lock to the top of the finishing strip minus a 6mm temperature gap.
Installation is quite simple - the top panel is inserted into the curl of the finishing strip and snaps into the lock of the bottom panel.
Solving the problem of volumetric vibrations of the material
It's no secret that vinyl siding is subject to contraction and expansion as temperatures drop and rise. To prevent the casing from deteriorating prematurely due to this, we recommend following the following instructions when installing it:
- When fastening siding, you should not drive the nail (screw in the screw) all the way. You need to leave 1-1.5 mm between the surface of the panel and the head of the fastener.
- The fasteners must be installed strictly in the center of the hole provided on the panel.
- It is strongly recommended to leave a gap of 5-10 mm between the ends of the panels and the adjacent accessories (additional elements).
- When joining panels to each other and to component elements, there is no need to tension them. After fastening, the panels should not experience stress.
- If you plan to install decorative, facade and other elements on top of the siding, the holes for the mounting bolts in the siding must be drilled 5 mm wider in comparison with the diameter of the bolts.
Correct installation of nails or screws in siding mounting holes