Today, owners of houses and apartments are massively replacing old wooden windows with practical and durable PVC structures. And this choice is quite justified for a number of reasons:
- Due to increased thermal insulation, material costs for heating are significantly reduced.
- High functionality and modern materials make it possible to avoid additional window maintenance work: tinting the frames to give them an aesthetic appearance; caulking cracks to insulate windows for the winter; removing the insulation from the window in the spring; pulling gauze over the sashes to protect against mosquitoes and other midges and other work that is implied in the operation of wooden window structures.
- A sealed double-glazed window well insulates the room from noise, allowing you to maintain home comfort and protect the peace of the owners.
- The structures have a long service life while maintaining impeccable functionality and aesthetic appearance.
- The cost of a plastic window is lower than a similar wooden product. For example, the price of an unpainted double wooden frame without glass measuring 120x90 cm is 3,600 rubles, and a plastic window is 5,500 rubles. However, a wooden window will still need to be glassed and painted, which means additional time and materials. Whereas the plastic window is already ready for installation.
Those who are going to take on the task of installing plastic windows with their own hands often lack basic knowledge of how to do it correctly. That’s why we present this article here in the form of instructions to help owners who want to carry out the installation themselves.
Installing plastic windows has a number of nuances. For example, PVC windows are not such universal designs. And their use has a number of limitations. Thus, it is not recommended to use plastic windows in cold rooms without heating (verandas, canopies, attics, garages, bathhouses, etc.). By the way, window production and installation companies prefer not to talk about this. In addition, problems may arise when installing PVC window profiles in multi-storey buildings above the 4th floor.
When choosing a contractor to replace windows in your house, you may encounter the fact that the craftsmen simply will not delve into the intricacies of this issue. There are only a few people who have control over the situation and can comprehensively cover it.
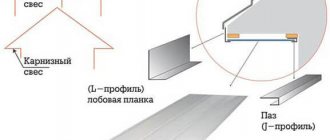
What is a stand profile
The stand profile is an auxiliary element made of plastic, the purpose of which follows from its name. The base strip is placed under the lower ends of the metal-plastic to simplify installation, and then removed after installation work.
Main characteristics:
- length – from 6 to 7.5 cm;
- width – 2-10 cm;
- number of cameras – from 1 to 5;
- thickness – from 2 mm;
- internal partition – from 1 mm.
The production material for the coasters is plastic, the color of which differs by one or two tones from the opening. Often, a support strip is needed to mount a window in an opening; after that, the mount is not removed, but is finished together with a plastic bag with plaster, which does not affect the overall appearance.
Low tide
The ebb and flow is an important part of the window design. Installation of a low tide on a plastic window is mandatory, since the design removes excess moisture from the room, but does not take much time. From the street side, the ebb tide is attached with self-tapping screws to the stand profile.
- Pool finishing: description of all types and features of modern finishing
- How an independent examination of construction work is carried out: an overview of all stages
Fasteners for the construction of frame houses: features of the right choice
To prevent water from getting inside the system, all connections must be well treated with sealant. The edges of the low tide need to be deepened into the walls. To do this, you need to first make recesses with a hammer drill.
To reduce noise from rain, the lower part of the ebb is glued with a strip of sound-proofing material or a “cushion” is made of polyurethane foam.
Why do you need a support profile for a plastic window?
There are many reasons to use a plastic window sill profile. Installing the clover simplifies installation work and eliminates the risk of frame damage.
Other reasons to use a stand:
- transportation - stands simplify the delivery of windows to an apartment in a multi-storey building, eliminating the risk of accidental damage;
- fastening the window sill - without a stand, fastening the window sill and drainage took several hours; installing the stands simplifies the work and eliminates additional work;
- sealing the installation seam - the seam between the window and the wall is blown in with foam, but such material does not exclude misfire, the formation of a cold bridge, the basic clover provides complete sealing and heat insulation;
- fastening the window - mounting the window holders fixes the window at a level with the safety of all fittings and accessories.
Slope
If you follow simple instructions, installing slopes on a plastic window with your own hands does not cause much trouble. The first step is to carefully remove excess foam along the entire frame so as not to scratch the window material. For slopes, PVC panels of the required size are most often used.
After vertical alignment, fixation is carried out using polyurethane foam.
You need to glue the panel to the walls with masking tape in at least three places. This will prevent the panel from being pushed away from the wall.
After the foam has hardened, a border should be made along the edges of the panel. For this, there is a special profile in the form of the Latin letter F. Because of its shape, it easily fits between the bar and the wall.
Selection requirements
The lining strip is a part that cannot be ordered blindly in an online store. In order for it to fit under the new PVC box, it is selected taking into account all the requirements. The wall thickness is more than 2 mm for reliable insulation. It is better to choose a sweet clover equipped with at least two chambers.
Please note: the shade of the base part is always in harmony with the color of the window or 1-2 shades darker than it.
Recommended size of the base part: width 2-4 cm, height – 2-3 cm. The length of the part corresponds to the length of the opening. It is not recommended to attach a window sill or ebb directly to a frame without a profile. This will lead to its damage and depressurization. Excluding the sweet clover when installing the box will lead to problems and possible damage to the frame.
Installation of plastic windows on an anchor
Everything related to the installation of plastic windows on anchors can be boiled down to the following: the anchor fastening system implies a through hole in the window frame, which undoubtedly violates its integrity, resulting in depressurization of the profile chambers.
In addition, the anchor is driven into a brick or concrete wall, and, as already mentioned, passes through the profile of your plastic window, coming into contact with the reinforcement of the profile system inside.
The result of such interaction can be icing and freezing of the double-glazed window, and as a result - its fogging, in addition, there is a possibility of flowering of the slopes. The second concern when installing PVC plastic windows on anchors is the possibility of stretching the window profile structure if it is not installed carefully.
After the installation is completed, returning the frame to its normal position will be quite problematic.
In addition to these disadvantages, it is important to highlight, perhaps, the main advantage of anchor installation - high reliability of fastening and quick readiness of the window for use, this is especially convenient when installing balcony blocks.
Types and parameters
The basic bottom profile differs in size, cross-section, quantity, chamber filling, length, height, thickness of outer walls, and intersection partitions. There are differences in compatibility with production systems.
Based on this, the planks are:
- single-chamber - a simple basic element for fastening a PVC structure with low weight, thickness of outer walls, low cost;
- two-chamber - a durable element with two chambers, designed for glazing balconies, verandas, loggias, for cold glazing;
- five-chamber - endowed with high thermal insulation, energy-saving properties, rarely used for domestic purposes;
- prefabricated modifications - a part of an unusual design, from 10 cm or more, equipped with vertical and horizontal sections at the same time, and have compartments for collecting sealant.
All types are intended for indoor installation and are not noticeable after finishing work. Planks of a sophisticated design completely replace windows. The cost of such models is higher, and skill is also required to mount them correctly.
The best manufacturers
Window profile systems from large manufacturers are usually equipped with a stand profile.
Their separate purchase may be required if:
- The complete profile is not suitable or the customer is not satisfied with its characteristics (lack of thermal insulation filler, number of chambers).
- In case of loss (happens quite often with domestic installers) or breakdown;
The most common manufacturers on the modern market:
- Rehau. Popular models: energy-saving five-chamber profile - 561910 and two-chamber with reinforcing filler - 561790;
- KBE. A three-chamber version (article 342) 46 mm wide, 3 cm high and its analogue with a pressure wing (article 343) are often used.
- Veka. The products of this company are represented by models of the Softline line - a two-chamber profile with a pressure wing and Euroline - a three-chamber version without filler.
Also, high-quality products are manufactured by Wintech, Enwin, and domestic Novotex and Brusbox. The products of the latter two are more affordable, but the quality is not always comparable to foreign analogues.
Installation methods
To correctly install the support strip, it is important to take into account the characteristics of the walls, building material, ebb, opening, and the part itself. The base element is mounted in two ways. The choice of installation method depends on the characteristics of the room.
Option one
It is distinguished by an increased level of complexity, so it is rarely used for self-assembly at home. The method consists of step-by-step fastening of the stand and box.
Let's look at this method step by step:
- Marking the stand strip in accordance with the frame parameters.
- Cutting the stand to the required length.
- Aligning the prepared part at the bottom of the opening according to the level.
- Measuring the distance from the top of the opening to the plank.
- Preliminary block fitting.
- Adjusting the size of the gaps between the glass and the frame.
- Sealing gaps with foam.
Option two
Suitable for beginners and experienced installers.
It involves mounting the opening according to the following algorithm:
- Removing the sweet clover attached to the box.
- Inserting an additional warm layer into the stand chamber.
- Filling the junctions of the lower element with foam or adhesive tape for sealing.
- Attaching the base stand to the bottom of the frame.
- Installation of the block using a level.
- Using foam to seal gaps.
- Cut off excess foam.
- Preparing a place for a window sill and installing it.
Measurements
It is worth remembering that window openings can be either without or with a quarter. This means they have different formulas for calculating sizes.
In the first option, the width of the opening between the existing quarters is measured. Measurement should be carried out in the narrowest place. The required frame width is obtained by adding 30-40 mm to the obtained figures. The resulting result should not be larger than the calculated width of the block.
Using measurements between the bottom plane of the window opening and the top quarter, the height of the frame is obtained.
In the second option, the result is obtained after subtracting 50 mm from the vertical measurement (in order to insert the window sill) and 30 mm from the horizontal.
Stand profile - an addition or a necessity?
If desired, you can install the box without using bottom elements. Eliminating this detail helps save resources, but has a detrimental effect on further operation. It is important to remember that the window sill inside the room is attached to the bottom strip, the ebb is from the outside of the wall.
If this element is completely abandoned, the structure will suffer, since there will be nothing to attach it to. The absence of spacer elements increases the risk of frame damage, deformation, depressurization, and the development of fungus and mold. The frame will become unstable, fragile, and with little weight it may sag or fall off along with the slopes. Therefore, the use of auxiliary parts when assembling the box is recommended.
How to install a window sill without a support profile?
Installing a window sill and drainage without a stand is a task of increased complexity. The exclusion of bottom parts requires special attention to surface preparation and selection of fasteners.
For installation you will need the following tools:
- PVC corner;
- level;
- pencil;
- roulette;
- sealant/foam;
- screws;
- self-tapping screws;
- perforator;
- jigsaw
Preparation stage
First, the surface needs to be prepared for the window sill. The opening is leveled and cleaned, measurements are taken for the future structure, and markings are left with a pencil. Using a jigsaw, the product is cut to the required measurements. When the ceiling is ready, proceed to the main stage - installation.
Installation of a window sill without profiles
If the use of bottom elements is excluded, wooden beacons up to 80 cm in size are used instead. They guarantee the strength and stability of the structure in a horizontal position and are easily controlled by a level. The window sill is installed in a prepared place, under the slabs of which wooden blocks are installed at a distance of 50 cm from each other.
When lowering the structure, the wooden elements should not go beyond the level of the wall, and their distance to the side walls should not exceed 10 cm. Before fastening, it is advisable to perform a preliminary check of evenness using a level.
Without stand profile
Please note: the load for fixing the window sill should not be too large so as not to provoke deformation.
Foam is used to secure the stands. After fastening, a small load is placed on the surface to avoid lifting and deformation of the plane. The free space under the window sill is filled with foam. The structure is left in a fixed position for 3 days until the foam completely hardens.
Excess material is removed with a utility knife, the surface is leveled and finished with plaster. If cracks are found, they are sealed with sealant. The final stage of installation is painting to match the color of the opening.