I got a garage by accident, and initially it was planned to sell 18 and a half meters of space without windows and doors (gates do not count) and use the proceeds to buy an apartment. Then it was more topical for my family.
When I first went there, a sigh of disappointment involuntarily escaped from my chest. The “inheritance” looked unpresentable. There was nothing of the word “at all” there: the walls were without plaster, rusty pipes of the fire extinguishing system and exhaust gas hood, the floor was covered with a thick layer of construction dust.
All this happiness was illuminated by a pair of dim lamps. As soon as I remember, I’ll tremble!
The idea of selling soon failed. At this time, another crisis broke out, and it was not square meters that were in short supply, but money. Despite the fact that I posted ads on the main Internet sites and lowered the price several times, not a single interested buyer responded.
Garage turned into warehouse
I soon became immersed in renovating the apartment and began using the garage as storage. First, I loaded finishing materials there. And when it came time for finishing work, instead of wallpaper and tiles, he brought boxes of household appliances, leftover laminate flooring, some buckets, etc.
Gradually the mountain of rubbish grew. Following the construction legacy, an old TV, refrigerator and children's electric ATV, which were “a shame to throw away,” were moved to the garage.
There was also a working archive: notebooks covered from cover to cover, certificates of honor, diplomas, books...
Over the course of several years, the mountain has grown considerably. This became more and more stressful. Then the desire to gather financial strength and put the legal 18 and a half meters in order finally took shape. I no longer wanted to sell the garage.
The main question is traditional: where to put the junk?
Construction stages
When building a sewer system in a garage with your own hands, all work should be done in strict order. Main stages:
- drafting;
- marking, excavation work;
- installation of a storage tank, insulation and sealing;
- pipe connection;
- checking functionality, backfilling the sinuses of the trenches and the nest for the container;
- laying flooring, installing gutters and gratings around the perimeter of the garage.
Only the main steps are indicated; depending on the complexity of the system, additional work may be required.
Design is one of the main stages of creating a drainage system. You cannot take on a job without calculations and preliminary preparation, as this can result in fines and technical problems. First of all, you need to choose a place to place the storage tank. After this, a working drawing of the system is drawn up. When a sewer system is being built in a garage, the diagram makes it possible to provide for a lot of little things on which the effective operation of the drainage line depends. The drawing must be made to scale, taking into account the slope of the pipes. It is imperative to provide water seals and avoid sharp turns in the line.
Construction equipment is used to carry out excavation work. If the garage has already been built, you will have to dig the soil manually. This is much more complicated; you will need to organize temporary storage and removal of excess soil. The depth of the nest for the tank is selected based on the climatic conditions in the region. In any case, the container will need to be insulated. Many owners use a heating cable to restore system operation in cold weather.
The container is installed on a prepared base. A sand cushion is made. On which the tank is installed. Before descending into the recess, it is recommended to waterproof it and properly insulate it.
The pipes are connected in the usual way. The entrance area to the container is carefully isolated and strengthened. The line is laid with a given slope, after which the system is checked for leaks. To do this, pour water into the pipe and observe the connections. If everything works fine, the sinuses are filled with soil and proceed to laying the garage flooring.
Start of renovation: where to put the trash?
Conversations with the experts I brought in to discuss the features, plans, and cost of the renovation quietly led to concrete action. They took me to a similar facility, where I liked everything.
To be honest, I couldn’t wait to see the changes, and I quickly agreed so as not to change my mind.
But the first step was to get rid of the junk. Have you ever thrown away something that has been an eyesore for a long time, but still couldn’t get around to sending it to the landfill?
My advice: find the strength, time and definitely get busy!
Firstly, you will realize that you have been storing a bunch of unnecessary things. Secondly, you will experience relief. Third, enjoy freeing up valuable space.
Despite the measures taken to clean out the garage, there was still an impressive portion of items that needed to be put somewhere. At first I planned to rent a box nearby. But there were no such proposals. Luckily, a close friend's father-in-law had a garage in the next block. On the builders' bus we took bags, boxes, an old refrigerator, tires, etc. there. We had to make 5-6 trips.
Looking ahead, I will say that the move to the already renovated garage also took place in transit through a landfill. After the first event of throwing away trash, the second one was easier and with even more pleasure. So I highly recommend...
The walls are crooked, it’s cold, the plaster doesn’t dry
We started with electrics. I wanted to properly illuminate the box (so that I didn’t have to look for a wrench in the dark), and also install additional sockets for ease of use of electrical appliances. At the same time we agreed to change the shield.
A special wish for the future: the electrician installed a five-core cable for a three-phase power supply system, so that in the future it would be possible to charge an electric car. Still, I hope that over time they will become more accessible.
A compliment from the electrician was the installation of a motion sensor that turns on the lamp when you approach the gate.
It was decided to paint the walls and ceiling, clean the exhaust pipes and fire extinguishing systems from rust and also paint them. They persuaded me to lay inexpensive ceramic tiles on the floor.
However, even during the preparatory work, some not entirely pleasant nuances were discovered. The garage was built in the post-Soviet years, and the quality was not so good. The workers found out that the walls were very crooked: it took a lot of plaster, effort and time to correct the shortcomings.
Then another problem surfaced. Although the box is heated, in the cold season the pipes were barely warm. Therefore, the plaster took a very long time to dry. The builders brought a heat gun, but that didn’t help much either.
But when the frost hit, a valve somewhere in the system was unscrewed and it became really warm. Only then were the walls dry and work could continue.
But essentially all that was left was to paint, seal and hand over. These works were completed very quickly. It was an absolute pleasure to receive the object. Special thanks for the coverage!
How to convert a garage into a comfortable apartment
The question of how to purchase affordable housing in a metropolis worries not only Russians, but also many people living abroad. This is due to the high cost of square meters in large cities and the reluctance to take out loans. To avoid paying rent for a rented apartment, young couples often resort to tricks. For example, our portal has already told you how to build an inexpensive frame house with your own hands for year-round use and at the same time save money for a full-fledged cottage. An interesting project is that of an Australian studio that has undertaken the reconstruction of a garage and its transformation into small apartments.
Peter McGregorArchitect
Real estate in Sydney is expensive, so people get by as best they can. A customer approached my studio with a proposal to convert his garage into an apartment. Although the idea is not new, we took on this work with pleasure and, I think, were able to fully realize all the client’s “wants”.
Because the garage is located within the city, in a dense building, then the option of a global remodeling and addition (as is usually done) of a full-fledged “second” floor was immediately eliminated. To ensure that the building did not stand out from the overall picture, the designers decided to only slightly increase the overall height of the garage by building a residential attic on top.
To make it possible to walk at full height in the room and not feel cramped, Peter suggested lowering the garage ceiling, turning it into the floor of the superstructure, and dedicating the space below to a storage room and technical room.
Peter McGregor
Using this trick, we got a full-fledged room, and the superstructure, finished on the outside with seam panels, does not seem very large. You can get into the house through a side door, and then, going up the stairs, the owner finds himself in a mini-studio, where there are all the amenities for a normal life.
The garage apartment has a kitchen with a sink, stove and oven.
We have arranged a place to sleep with a double bed.
The bedroom is separated from the main volume of the room by a sliding partition, which at the same time provides access to the closet.
Next to the bedroom there was a bathroom with a full shower, washbasin and toilet.
The walls of the bathroom are decorated with mosaics.
There was also enough space for a kitchen table and a sofa, which serves as an additional sleeping place if guests arrive.
Peter McGregor
A small area imposes certain restrictions on the design of the room and finishing options. To maximize the visual volume of the apartment, we installed large windows oriented to the south and painted the ceiling white. To reduce the cost of the project, the walls and furniture are made of plywood with a pleasant “warm” wood texture.
All necessary utilities, including a ventilation system, are installed in the apartment garage. According to the owner of the mini-apartment, he got what he wanted - comfortable and inexpensive housing where he can live all year round without feeling deprived in any way.
Another option for converting a garage into a house is offered by American builders. We recommend articles on the topic: Diary of life in a mini-house and How to build a mobile home with your own hands.
The video shows how to independently build a workshop where you can live while a country house is being built.
Equipment: cabinet, shelves, household appliances
Then it was necessary to think through the storage system and use the space as rationally as possible. With the foreman who oversaw the process from start to finish, we came to the conclusion that it would be appropriate to install a cabinet near the back wall, and shelves on the sides on top.
Before the work began, transparent containers were purchased in which it was planned to place rags, old cameras, various types of car fluids and other belongings.
The foreman personally built a special structure for the tires. You can store two sets of wheels at once.
And I installed the shield so that in the future, if necessary, I could hang the instrument. In the meantime, shelves for all sorts of small items are in greater demand.
I never thought of the garage as a place for leisure. But sometimes you want something warm. Therefore, I bought a kettle, brought cups and other accessories for non-alcoholic sugrevo.
I moved chairs and a coat rack from my old apartment. If the need arises, you can sit and rest. And hang your clothes carefully and don’t throw them under your feet.
As I mentioned above, in the cold season it can be chilly in the garage, so I bought a small heater. I'll be honest: I need more help.
To top it off, a vacuum cleaner was purchased, which serves two purposes: to clean the interior of the car and the garage itself. I decided to go with the simplest Kärcher, which has two buttons: on. and off He copes with his responsibilities.
A stepladder is needed to once a year throw in/take out a Christmas tree, toys and other things that are required extremely rarely from the top shelf.
I consider the project under the code name “Garage” to be completed. We managed to bring the box into a more or less divine form, build a normal storage system and even create the groundwork for using an electric car.
Drainage system design
When choosing the appropriate way to make a sewer in the garage with your own hands, owners usually get stuck at the stage of choosing a method for removing drains. If you only need a hand-washing basin, installing a small container at the bottom of the garage is sufficient. As it fills, the wastewater is pumped out and removed. However, to organize a small car wash you will need a fairly large tank. It must be installed at the stage of construction of the garage, since installation of a large capacity tank will require excavation work and other measures. You will need to install a sealed tank, which is equipped with a neck with a tightly closing hatch. It must be positioned so that a sewage disposal truck can easily approach and pump out the wastewater.
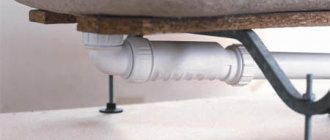
The composition of the internal section of the system differs little from conventional structures. Standard plastic pipes with a diameter of 50 mm are used, which are connected to the washbasin and to trays for discharging car wash waste. The second end is connected to a vertical pipe (riser) with a diameter of 110 mm. It is immersed in the ground and connected to a storage tank. All pipes must be equipped with water seals to eliminate bad odors. In addition, it is necessary to ensure the slope of all lines so that the wastewater immediately goes into the tank and does not stagnate in the pipes. It is important. since in winter the water can freeze and break the channels. To protect the container, you will need high-quality insulation and a sufficiently large depth of immersion in the ground.
If a car wash is being built, drainage trays must be installed. The sewage system in the garage in the floor is built according to the principle of assembling storm systems. Gutters with gratings are installed along the perimeter of the room, and the floor covering is made with a slight slope towards them. the trays are connected to a network of drains through which the waste flows into the reservoir. It is necessary to immediately provide filters and sand traps, otherwise solid particles will quickly overflow the storage tank and create blockages in the connecting pipes. It is recommended to remove sand from trays and traps after each car wash, until it has caked and does not require the use of additional tools for extraction.
Also read: Non-return valve for draining a washing machine: connection, principle of operation, review


