Cladding materials have always been in great demand. One of their varieties is lining. It has established itself as a high-quality product with many positive properties. There is a wide variety of profiles on the market, which allows you to create different textures and attach panels anywhere. Almost any type of wood can be used as a primary raw material. Lining has become a common material for finishing steam rooms, but it can also be found in expensive private homes. The styling pattern is selected individually. It can be horizontal, vertical, diagonal, combined. Complex configurations are popular these days. Eurolining has a good reputation. It has a neater appearance and improved properties. If you have basic knowledge, clapboard cladding can be done on your own.
Advantages and disadvantages of finishing
Initially, lining was used to decorate train interiors. Even then, people paid attention to its ability to soften changes in humidity and temperature. It was quickly attached with profiled joints - this is another plus. Then the lining was improved: the shape and grooves changed, and the design characteristics improved. Finishing with modern lining has many advantages. First of all, this is the convenience and speed of installation thanks to the tongue-and-groove system. Another advantage is environmental friendliness. And one of the main advantages can be considered a low price with a fairly presentable appearance. Clapboard finishing has several negative aspects. The material can be spoiled by parasites. Rotting also causes deterioration in the appearance of the cladding. Wood also absorbs a lot of moisture and heat and deteriorates because of this. However, in doing so it improves the indoor air.
Bathroom partition
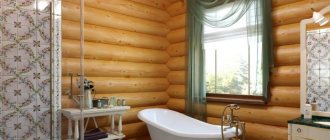
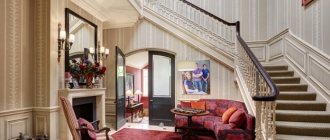
Bathrooms with a large area require functional zoning. Especially often, the toilet is separated from the main room, so that it is more comfortable to use and the room looks aesthetically pleasing.
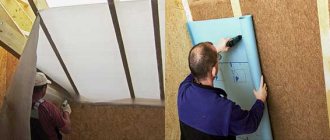
Happy owners of spacious bathrooms in a country wooden house do not always know what it is better to make partitions from so that they do not collapse from moisture and are light (to reduce the load on the floor).
Brick and concrete structures are excluded immediately - due to too much weight.
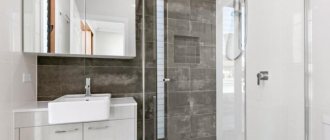
The best option: frame partitions in the bathroom covered with clapboard or moisture-resistant plasterboard. Another suitable material is glass blocks, which look beautiful, transmit light well and add airiness to the room.
Important: partitions in new wooden houses should be installed only after the building has completely settled.
Bathroom interior in a wooden house with partitions, photo :
Types of lining
Conventional lining is characterized by the following dimensions: thickness - 1.2-2.5 cm, width - up to 15 cm and length - up to 6 m (this is basically what it was in the old GOSTs). Standard lining has a smaller tenon - 4-6 mm, compared to 8-9 for Euro lining. The humidity of ordinary material is 8-12%, 25-35%, the European version is up to 12%. The old type of lining is made from material with natural moisture. Eurolining is a high-quality cladding board for external and internal wall decoration. It masks imperfections well and is capable of leveling surfaces. In addition, it performs sound and heat insulating functions. Eurolining has certain fixed parameters. The thickness is 1.3, 1.6 and 1.9 cm. The width is 8, 10, 11 or 12 cm. The maximum length of the board is 6 meters, but this figure depends on the manufacturer and varies greatly in different cases.
Types of wood from which eurolining is made:
- oak;
- Linden;
- pine;
- spruce;
- aspen.
Advantages of the material
Lining made of natural wood has a number of advantages that are known to many. Let's look at the main ones:
- Environmentally friendly finishing material;
- There are no emissions of substances that negatively affect humans;
- Allowed for use in children's rooms and rooms where allergy sufferers live;
- Duration of operation (if you periodically carry out special processing of wood, it is maintained in ideal, new condition);
- Wood paneling does not burst or scratch;
- Not afraid of damage (minor mechanical);
- It is easy to realize any design fantasy (due to different wood species, their coating with varnish and paint);
- Withstands temperature fluctuations (certain types of wood);
- It is moisture resistant;
- Modern types of panels have high fire safety;
- Withstands significant influences both indoors and outdoors (one of the main differences from plastic lining).
Types of lining profiles
Variety is important in finishing, so manufacturers produce different variations and modifications of the lining. Traditional eurolining forms distinct seams after installation. If this type of lining has a rounded chamfer, then it is “Softline”. Its outer part is devoid of corners, which allows you to protect the wood from burrs and chips for a long time. "Softline" is well suited for saunas. The Shtil lining does not have a chamfer near the tenon, and, as a result, there will be no pronounced seams after assembly. The thickness reaches 2.5 cm, so it can be used for decorating facades. “Landhouse” is a lining with a complex rounded shape at the edges. Finishing with this coating will make the interior more “expensive”. Another interesting option is “Blockhouse”, which features a rounded front side. This material can be used to finish the surfaces inside log houses and facades.
Several more types of lining:
- "American". Has a sloping surface. The elements are overlapped.
- Double-sided. Both sides are obverse. It is used not only for finishing walls, but also for constructing partitions.
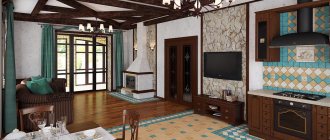
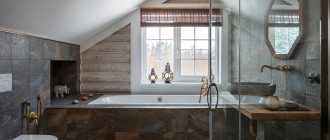
Stylish solutions for a bathroom in a wooden house
Let's look at the most common style trends. They are able to emphasize the individual characteristics of wooden buildings and create a harmonious, integral image.
Provence
Finishing with clapboard or wooden siding in light shades will fit perfectly into the interiors of this style. To achieve the desired effect, the boards are coated with glazing compounds that do not hide the texture of the material. White bathrooms are especially popular , giving a feeling of romance and comfort.
Wooden boards are also recommended for the floor. As an option, you can opt for terracotta tiles, but in no case should you choose linoleum or laminate for French country.
Exposed ceiling beams will complete the look.
Bathrooms in Provence style, photo:
Rustic style
If you want to show the beauty of wood in its raw, natural form, the rustic direction will be the most suitable choice.
This is an unusual “mixture” of industrial and rustic styles, without a shadow of grace, but with its own special, brutal charm. Here it is possible to use open wooden walls or block house finishing. The tree must be tinted to give it expressiveness.
Finishing a bathroom in a rustic wooden house, photo :
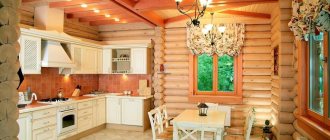
Country
As is clear even from the name, rural style is ideal for wooden houses.
The only advice: it is better to choose country for bathrooms, where you can leave the log walls open or at least imitate them using a block house. In old buildings, where enclosing surfaces and ceilings have to be covered with plasterboard or plastic, this style will not take root.
Country bathrooms in the photo :
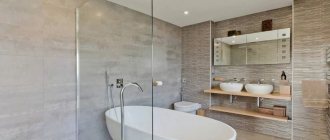
Modern
Wood, with its natural warmth and positive energy, is so universal that it is suitable not only for “rustic” styles, but also for modernity born of urbanization.
A soft, natural palette will soften the excessive laconicism of shapes and textures, adding a little warmth and comfort to the modern interior (see photo ):
A bathroom in a wooden house is not a problem, but an opportunity to create a unique place for rest and relaxation. And you should definitely take advantage of this luck.
Type of lining depending on the type of wood
The lining is made from coniferous and deciduous trees, as well as from exotic species (for example, mahogany). Among the coniferous species, it is worth highlighting spruce, pine, larch and cedar. Spruce is endowed with softness, which is important for making boards with rounded shapes. This material looks great in a modern interior. Pine lining is a budget option that has many important qualities, including high strength. Larch is one of the most expensive coniferous species. Cedar boards have a pleasant natural smell that has a beneficial effect on the body. Among hardwoods, the most popular are oak, alder and linden. Oak wood is a durable and sought-after material. Lining made from this wood is considered a classic option. Alder is suitable for use in damp rooms as it does not absorb moisture. Linden is very resistant to deformation and mechanical damage. Lining from it is relatively inexpensive.
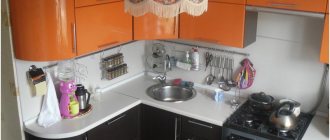
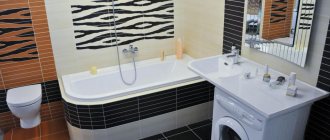
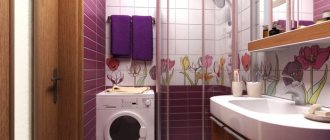
Bathroom in a country house
Such a bathroom is rarely large, and they try to keep the costs of its equipment and finishing to a minimum.
It is important to prepare the floor and walls, clean them of old layers, treat them with antiseptics and take care of high-quality waterproofing.
How to cover a bathroom in the country? You can use clapboards followed by treatment with stain or water-dispersed paint, or you can use moisture-resistant plasterboard if the house is used year-round and the bathroom needs to be well insulated.
, a small bathroom can be decorated with PVC panels.
As for design, where else but at the dacha to implement the most daring (and also cost-effective) solutions, showing imagination and skill?
Examples of original bathroom decoration in the following selection of photos :
Type of lining
There are 4 varieties:
- Extra;
- Class A;
- Class B;
- Class C.
The boards are sorted depending on the presence of resin pockets, pronounced blueness, knots, cracks, and roughness (poorly treated areas). The extra grade is characterized by the complete absence of prostrog or minor defects on the front side. There may be one light knot per linear meter. For class A, the presence of microcracks and small untreated areas is allowed. At the longitudinal ends, cracks no longer than the width of the board are allowed. There should be no more than a fifth of all boards made of core profiles. It is acceptable to have 3 knots on one linear meter. As for class B, the presence of 2 falling knots is allowed on one such board. Cracks up to 3 cm are allowed on the front side, and cracks of any size on the front and back sides. All panels can be made from core, with resin pockets. Class C includes all boards that are not included in the categories from extra to class B, but are suitable for use. Rottenness is not allowed.
Ventilation arrangement
To protect wood from rot and fungus, it is necessary to equip an effective ventilation system. A constant flow of air should be ensured. To do this, you can create a gap under the door by installing a decorative grille.
Exhaust ventilation plays an extremely important role. It can be taken out into the attic or mounted under a suspended or suspended ceiling, if there is one.
It is recommended to equip ventilation ducts with fire-resistant valves, fans and other equipment. The power of the exhaust fan depends on the area of the room.
Where to apply
Clapboard finishing is often used in steam rooms and other bathhouses. In this case, choose panels made of linden and alder (for steam rooms) and coniferous wood (for other places). These types of wood are endowed with healing properties, thanks to substances that are released when heated. Boards with knots cannot be used in steam rooms, as the corresponding areas become hotter. For a good aroma, it is recommended to install several pine boards in the area of the stove. The lining treated with protective compounds is suitable for cladding facades; the type of wood in this regard is not particularly important. Interior decoration is a complex task; panels in a uniform color scheme are required. Mahogany lining is used for cladding walls in expensive mansions. The panels are also used to make partitions to divide space: both in apartments and in open areas.
Choosing plumbing
- If the bathroom is located on the second floor, you should abandon the heavy cast-iron bathtub in favor of a steel or acrylic one.
- A bathroom with a shower is an excellent opportunity to reduce the overall level of humidity in the room. It is best to use a hydrobox, which provides complete isolation from the surrounding space. As an option, you can consider a built-in cabin with hermetically sealed doors - it will fit well into the interior of any style.
- When covering the walls in a bathroom in a wooden house with plasterboard, clapboard or PVC panels, it is not advisable to choose hanging plumbing fixtures - its fastening will be very difficult and unreliable.
It is desirable that the shower stall is in harmony with the wooden paneling of the bathroom. To do this, you should choose models made of transparent glass with a shallow tray - factory-made or home-made.
what a bathroom with a shower in a wooden house below in the photo :
Sheathing schemes
There are two ways - using external fastening and hidden. With the external method, the boards must be fixed with fasteners. In the second case, the panels are attached to the sheathing from the groove side, where there is a joint with a tenon. The appearance with this option will be more aesthetic. The lining can be mounted vertically, horizontally and, if necessary, in a non-standard way. When laying panels horizontally, the teeth must be directed from the lower element to the upper one, and not vice versa. When sheathing a log wall, staples and nails for them and lathing are used. To clap a room with smooth walls, you need to use bars. They are placed at a distance of no more than 50 cm between adjacent elements and perpendicular to the panels. The cladding is framed with decorative skirting boards and fillets
Basic fastening methods:
- nails;
- screws;
- staples;
- kleimers.
Frequently asked questions
Some questions that arise for untrained home craftsmen are exactly the same. You can answer them immediately, without waiting for them to appear:
When is it better to paint the lining, before or after installation?
Sometimes the material changes its linear dimensions slightly, and the gaps between adjacent lamellas become wider. If the lining is painted and finished before installation, such changes will remain invisible. This is especially important if dark colored fabric is used.
Is it possible to install panels with glue or do you have to use clamps?
Adhesive mounting can only be used when installing on a wall. Ceiling decorative panels have to be fastened in a more reliable way - with self-tapping screws directly through the slats, onto clamps, or a combination of several methods at the same time.
How to choose the trim color?
This is a purely individual question, determined only by the personal preferences of the home owner. The only recommendation would be to follow the basic rule - the larger the area of the cladding, the lighter it should be. This way it is possible to reduce psychological pressure and the dominance of the cladding fabric.
How dangerous is the cladding fabric in terms of fire?
The lining itself will not ignite. If there is a fire in the room, the canvas will burn, but it will never cause a fire. However, before installation, you can impregnate the material with a fire-retardant compound to prevent combustion.
Should the lamellas be glued together when assembling the canvas?
This should not be done. Despite the apparent strength and reliability of this installation option, the result will only be the impossibility of partially disassembling the canvas for repair or replacement of an individual element.
How to sheathe it yourself
You will need to complete the following stages of work:
- Prepare the lining.
- Prepare the wall.
- Assemble the sheathing.
- Attach the clapboard to the lattice frame.
- Finish the covering with skirting boards and, if necessary, other elements.
The panels are processed first. Depending on the place of application, any class of lining can be processed. It is always necessary to prepare the surface of class C products. The same applies to lining made by yourself. Preparing the walls consists of leveling them and applying markings for the sheathing. It is not necessary to level it; instead, you can do other manipulations. The crucial point is the installation of the sheathing. The timber itself and the distance between the elements are selected. The configuration completely depends on the planned method of laying the lining. Different approaches are used to fix the panels. The main thing in the work is caution, because inaccurate driving of the fastener can lead to the appearance of serious defects in the material. When the sheathing is ready, installation of baseboards and finishing begins.
How to prepare the lining
If necessary, the panels are treated with fine-grained sandpaper to eliminate roughness. Further processing begins with cleaning the surface of the material. If you plan to apply wax or varnish to the lining, stain is first used. It will preserve the color of the wood for a long time. There are 3 types of stain: oil-based, alcohol-based and water-based. Antiseptics will protect the wood from moisture penetration and mold. If the installation location is a bathhouse, waxing will be required. It is applied in small quantities, in the direction of the fibers. This procedure must be repeated several times. Then the products are polished. Among other things, the color of the boards will become deeper. There is a large selection of wax impregnations on sale, which are also suitable for preparing lining. The last stage is applying varnish. You will need at least 2 layers. The material must be perfectly dry before installation.
Grease stains can be removed using a 25% acetone solution.
Preparing the walls
You will need to make markings on the wall for the sheathing. This action is performed using a pencil and level. The configuration of the cladding and the direction in which the lining will be placed are determined in advance. The bars are always placed perpendicularly. If everything has already been decided about this nuance, you can start treating the walls with antifungal agents and marking the surfaces. If something happens, the pencil is replaced with chalk. The width of the sheathing step is selected depending on the purposes. For strength, it is advisable to make it as small as possible. Usually this figure is in the range of 35-60 cm. If in the future it is planned to insulate a room, the step is determined based on the size of the insulating material and should be slightly less than it. To ensure that the frame structure is level, you will need to use a plumb line and fishing line. A visualization is created, along the edges of which bars are then placed.
We create a sheathing for fasteners
This is one of the most important stages, which has a significant impact on the final result. Only sometimes the lining is attached directly to wooden walls; in other situations, lathing is necessary. At the very beginning, we select the timber. For this sheathing, a block with a cross section of 40×20 mm is the best option. We install the frame one level at a time. If necessary, we level each individual wall. You can use another method - determine the most protruding place on the wall. Then a small piece of timber is placed there and the sheathing is mounted from it. From this point the thread is pulled parallel to the planned direction of laying the panels. At the extreme points of the wall, 2 load-bearing beams are placed. If necessary, install spacers between the wall and the beam. If a row of lining will be mounted from 2 boards, another beam is needed at the junction.
Other important nuances:
- when securing the structure, you need to check the level;
- if there are door or window openings, the beams must be fastened around them;
- Installation of lathing on the ceiling is done in the same way as on the walls.
Fixation methods
The lining is secured using staplers, clamps or fasteners (screws, nails). During installation, care must be taken to avoid splitting the wood and causing cracks. Full insertion of the nail head into the material and accuracy of work are ensured with the help of a hammer. When installed in a hidden way, the panels are nailed to the frame at the junction of the tongue and groove. The simplest and easiest assembly method is to fasten with small nails in any places, but it is better to prefer a neat method that involves hammering nails into the grooves to hide the connection. The highest quality fastening is ensured by metal clamps. They come in different sizes, shapes and are designed for a certain board thickness. The fasteners are connected to the sheathing on one side, and cut into the grooves on the other.
Fastening the lining to the ceiling requires careful steps, so it is better to do this together with a specialist!
The process of fastening the lining
If the sheathing is installed correctly, the process of installing the lining will go without complications. A level may be needed when attaching the first panel. The first question before installation is which side to start laying the boards on. You can determine the answer by finding out how smooth the surface is. If it corresponds to the level, then you can start laying from any side: top, bottom, right, left, corner. The first board is then placed level. If the surface is slightly “overwhelmed” or some corner is uneven, the boards cannot be installed this way. Otherwise, they will visually emphasize the curvature. The lining will need to be assembled in a different way. The first board is attached flush to the corner, the rest - with a slight inclination in the desired direction. Sooner or later some panel will become level. All boards “fill up” to the same extent. The first one needs to be placed with the spike towards the corner.
Rules for installing skirting boards on a wall with lining
For an aesthetic appearance, the sheathed walls are decorated with floor and ceiling skirting boards. Sometimes they need to be mounted on the wall (corner). When finishing corners, they are guided by the following rules: if there is an adjacent unsheathed wall, then the plinth is installed on it, and when placed between two sheathed ones, it should be attached to the shorter one. These measures should not prevent thermal deformation and drying out of surfaces that are most susceptible to them. If the wall is decorated with clapboard, then the baseboards are fixed using finishing nails. They hammer it through the body, the narrow cap goes into the mass. These areas are then treated with a wax pencil. If the surface is not flat (for example, log), nailing a regular baseboard will not always be possible. Gaps may remain. It is likely that in the corners the baseboards will not meet at all. Instead, you can use flat platbands. They fit tightly on the wall, and you can make them yourself, including from clapboard.
Some laying rules
In order not to spoil the finished repair, when installing the lining, follow some rules:
- Do not install lathing directly on a damp, porous wall;
- The wall must be properly prepared;
- The best option is cement plastering;
- If the room is dry, there are smooth walls plastered with concrete - the bars are secured with EC staples (which are used for drywall). These are plates that have been perforated.
To ensure that everything is done masterfully, the bars are chosen as smooth as possible. The staples are attached to the walls, the middle block is installed (placed first), along the edges of which the staples are bent, and the ends of the blocks are secured. Next comes the bending of the intermediate brackets, the block is mounted completely (without deformations). Subsequent bars are leveled with the middle one and placed evenly along this plane.
The surest preparatory method for walls under lining is to carry out a vapor barrier. For some rooms this is extremely necessary (kitchen, bathhouse, hallway, etc.).
Decorating walls with clapboard with your own hands requires care.
The wall must be completely leveled, insulation must be placed on top, with the foil side facing out. The insulating material (on special tape) is placed with an overlap (15 cm). Next comes the fastening of plywood pads (of the required thickness, at least 8 mm) to the wall under the bars. Then sheathing beams are attached to them.
This results in a well-ventilated spatial gap (between the lining and the insulating material).
The basic principle of laying lining is to start work from the most difficult small places; finish in large, simple sections.
When the wall is already covered with clapboard, the baseboards are attached. Covering walls with clapboard yourself helps you save money and find interesting solutions. An analogy with laminate flooring is appropriate here.
Decorative finishing methods
If installation is carried out in a hidden way, it is recommended to use decorative fasteners. A hammer will ensure accurate fixation and decoration of the nail in the wood. You can decorate the corner between the boards using treated timber - this way there will be no gaps in the opening. If the natural color of the wood does not fit into the interior or does not add any color, then the lining is coated with paint. It’s better to match the decor or white. The nail heads that secure the starter board are covered with decorative corners. If there are no decorative slats, then the tops of the fasteners are removed with side cutters. All joints, internal and external corners must be closed. Bottom and ceiling plinths are also used for decoration. The interior can be radically changed by installing false beams on top of the lining.
Video description
Initially, they preferred to leave clapboard walls in their natural state. Modern trends suggest decorating the interior using painted lining, indicating several good reasons for this decision:
- The protective role of paint and varnish coatings . The coating protects the wooden board from premature aging under the influence of solar ultraviolet radiation. In a house with insufficient ventilation, a layer of varnish or paint will protect the wooden surface from fungus and blueing.
- Creative solution . The decorative advantage of lining (both wooden and plastic) is the possibility of tinting or painting it. In this simple way, you can create either an unobtrusive, muted background or add a bright accent.
- An easy update . If you are bored with the old look of the walls in your living room or bedroom, you can easily update it with a simple repaint.
Accent of color and texture Source rerooms.ru
Fastening wood sheets
To determine the exact height from floor to ceiling, you need to use a tape measure and a water level. It is necessary to cut a fragment of a suitable length from a sheet of lining, attach it to the corner of the wall, while maintaining the vertical level. After this, you need to insert a fastening bracket into the groove of the lock and secure it to the frame using nails or small self-tapping screws.
The same operation must be done for each frame strip. If the first sheet was installed correctly - in a strictly vertical position, on powerful fasteners, then the probability of successful completion of the repair is 90%. Subsequent sheets are installed flush against it, and first you need to make a rocking movement to fasten the lock, and only then install the bracket holders.
It is important to know that some craftsmen skip the holding brackets on every second sheet to save on material. This will lead to rapid destruction of the structure. If it is necessary to save material or time, fasteners are used in a “checkerboard” order - the first sheet is attached to 1,3,5 slats from the ceiling, the second - to 2 and 4, the third - again to 1,3,5, etc.