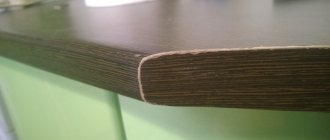
When producing various finishing works or making furniture, the use of plywood is a common practice. At the same time, home craftsmen are faced with a choice: how to cut plywood and how to achieve a perfect cut without chips. When cutting such material, some difficulties arise: the sheet is large in size, and the structure of its base creates difficulties when sawing. Knowing some features, you can achieve excellent results when working with an electric jigsaw, hand saw or circular saw. The main condition is to ensure reliable fixation of the plywood.
Plywood is a material that is practical to use and easy to process.
Shaped cutting of plywood: methods, nuances of the process and prices
Figure cutting of plywood (cutting out figures from a sheet of plywood using a machine) is popular among decorators and furniture makers. Using a sheet of plywood and special equipment, you can create not just a home decorating craft, but an entire work of art.
Laser cutting of decorations for home decoration
Sawing methods (basic techniques)
You can cut out a figure using:
- machine for figured cutting of plywood – laser equipment;
- a regular jigsaw (you will also need a set of files for it);
- CNC – milling equipment.
Before you start sawing using one technology or another, you should know some nuances that need to be taken into account when working with glued veneer:
- You should know that cutting a figure from plywood made from pine/spruce will be much more difficult than from other wood species. This is explained by the fact that coniferous varieties have a viscous structure due to their resins.
- Glued veneer should be cut in the direction of the grain. If you need to make a cross cut, then first make small cuts with a knife, and then start sawing with the main tool.
- Before driving a nail, you need to make holes for it.
Sawing with a jigsaw
- You only need to cut in one vertical plane. The saw should be moved “up and down”.
- If you need to make a turn according to the drawing, then turn the workpiece, not the base.
- They begin to cut in the inner contour. Then they move to the outer contour.
- The nail file should be cooled periodically (pause work for 10-15 minutes). Otherwise, it will become unusable.
Note.
From ancient times to the present day, sawing with a jigsaw has been considered an interesting and creative activity.
Creating a masterpiece with a hand jigsaw
Laser cutting of plywood sheet
Operating principle: beam burning along the contour. The main advantages of this technique include:
- there is no need to process/file the edges of the figure after cutting;
- high-quality cutting;
- the size of all laser-processed parts is the same;
- You can burn a pattern of any complexity.
Disadvantages and possible risks when working with laser equipment include:
- with excess power, plywood may char (despite the fact that the technology provides a special air supply, there is a risk of fire/charring, albeit small);
- When a craftsman sees plywood, he must be able to determine what species the veneer is made of and what kind of glue it is glued with (the burning mode depends on the type of wood and the type of glue);
- If a novice works with such equipment, and during the burning process the beam “accidentally” (due to the operator’s inexperience) hits a knot, the product will be damaged.
Before you start cutting plywood with a laser, you need to learn how to work with this type of equipment. How the figure will look depends on experience.
Cutting with a milling machine
The main advantages of this cutting method include:
- quick sawing;
- when cutting a figure from plywood, charring and other unpleasant consequences will not arise (this technique is best suited for beginners);
- the cutting accuracy is the same as when using laser equipment;
- There is no need to process (sand) the edges.
The milling machine also copes well with the art
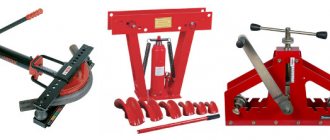
Listed below are prices for popular brands of domestically produced plywood cutting machines.
Sells a machine for shaped cutting of plywood. The price depends on the size, type of drive and spindle.
Choosing a tool
At home, you can cut plywood with both hand and power tools.
Power tools for cutting plywood:
- circular (circular) saw,
- jigsaw
Less commonly, but still can be used for cutting plywood, power tools such as grinders or band saws.
* All images are taken from open sources and are provided as examples and illustrations. And are not subject to copyright of our company.
If you find your photos here and want to delete them, write to us.
A few words about circular saws
Among the advantages of a circular saw, we note, for example, the ability to cut several sheets of plywood, chipboard or fiberboard (stacked) at once. And also the fact that circular electric saws allow you to cut both thick and thinner sheets of plywood.
The disadvantages of disk tools include the difficulty of obtaining geometrically complex cuts and parts made of plywood. This cutting method is mainly suitable for straight line cutting.
Jigsaw for plywood - ideal for the home craftsman
However, at home, more “piece” or even small shaped work is often in demand. For which a regular manual or electric jigsaw is quite suitable. The latter, of course, significantly speeds up and facilitates the process of cutting plywood sheets.
Hand tool for cutting plywood:
If we talk about hand tools, then for straight and long cuts special hacksaws for plywood and chipboard can be used. For example:
Rice. 2. Hand hacksaw for plywood and chipboard.
Such hacksaws and saws are usually made of spring steel** with the so-called. reverse teeth. And they can be additionally equipped with materials that are harder than the main saw blade.
** Spring steel is a medium- or high-carbon steel, products from which have the ability to easily return to their original shape (despite significant bending and twisting). What happens due to the high yield strength of this type of low-alloy alloys.
If you plan to cut fairly small and geometrically complex parts or shaped blanks from plywood, then you will, of course, need a jigsaw using a hand tool. Something like this:
Rice. 3.(a). Straight cutting from plywood with a hand jigsaw
Rice. 3.(b). Sawing out shaped parts from plywood with a hand jigsaw
Hand tools or electric?
Let us however note that sawing plywood with hand tools in some cases may not be a very pleasant procedure. The layered structure of plywood with wood fibers in different directions in these layers makes the process quite complex. You won't cut much like that.
Therefore, when choosing how to cut plywood at home, we recommend choosing a modern electric tool. Among which, it seems to us, the most versatile for working with plywood is a jigsaw.
How to cut plywood at home
Determining the optimal device for cutting wood panels is not the most difficult task; standard equipment can be used for the process.
Hacksaw
Hand tools are a universal solution.
Slicing is carried out using two main types:
- A standard version with small teeth, which is used for woodworking. To avoid the appearance of burrs and ensure smooth running of the hacksaw, the cutting part is first slightly spread and carefully sharpened.
- Special saw for plywood. Due to the frequent and fine arrangement of the teeth, the cut is the most even.
There are special saws designed for cutting plywood, but with the same success, plywood can be cut with fine-tooth hacksaws designed for working with laminate and plastic.
Cutting with a manual device has the following features:
- Labor intensity. Due to the fact that the veneer and adhesive fibers are multidirectional, cutting a large number of parts will require a lot of time and effort. Particular difficulties arise when working with hard wood species.
- Possibility of curved cutting. With certain skills, elements of the desired shape can be created using a hacksaw. Exceptions include strongly curved fragments.
- The need to comply with the slab placement technology. The sheets must be placed on two stops to prevent the blade from being clamped between the cut fragments. Otherwise, not only damage to the workpiece is possible, but also failure of the hacksaw.
For small internal cuts, a manual jigsaw is used; it allows you to form complex shaped sections.
A hand jigsaw is a specific tool; it is used only for small decorative work and is designed for cutting plywood up to 7 mm thick.
On a note! When working with an old saw, difficulties may arise due to corrosion on the blade. To eliminate the defect, grinding is done using a fine abrasive.
Jigsaw
This device is the optimal solution when it is necessary to cut plywood into parts. When choosing such a tool, you need to consider some nuances:
- It is recommended to abandon cheap models, since they do not achieve the desired result and significantly slow down the cutting process.
- A power switch is required. This allows you to adjust the jigsaw to slabs of different densities.
- The ability to adjust the stop plate ensures leveling for an accurate and straight cut. If the device does not have this function, then the sole should not be curved.
The main factor determining the quality of the cut with a jigsaw is considered to be the pitch and size of the tooth, and only then come the local settings of the tool itself, such as turning off the pendulum stroke and adjusting the frequency
The correct choice of file is carried out taking into account the following conditions:
- Preference is given to branded blades designed specifically for sawing plywood. They provide the highest quality results.
- The nozzle may have different tooth directions. Depending on the position of the cutting part, one of the sides of the slab will be completely free of chips.
- An alternative option allows you to use a metal blade. But this solution has disadvantages: the work is carried out very slowly, and small teeth become clogged.
It is with the help of an electric jigsaw that you can quickly and efficiently cut plywood at home. The tool makes it easy to do the process yourself.
Attention! The device is suitable for complex shaped cuts. Difficulties arise when processing thick sheets: the nozzle is quite thin, so it collapses, which requires additional preparation of the fragment.
Hand electric saw
- Saber. It is an alternative to a jigsaw, but is more suitable for quickly cutting off excess without forming an even and precise edge.
- Disk. It is used most often because it allows for large-scale work. The disadvantage of the device is that cutting is only possible in a straight line.
A reciprocating saw is not designed for precise cutting, so it can only be used for rough cutting of plywood, while a manual circular saw is considered one of the best options for such work
Sawing purposes and suitable tools
Depending on the purposes of sawing, we select what can be used to cut plywood most effectively. Among the tools used for work are the following:
- electric circular saw;
- hand saw;
- electric jigsaw.
Let's consider the features of using various tools for cutting plywood and in what cases it is more advisable to use one or another device.
Hand saw
When cutting plywood with a hand saw, physical effort is required due to the significant density of the material. This tool is used when it is necessary to cut a sheet of plywood into identical fragments.
A hand jigsaw is the best assistant in processing plywood sheets
A hand jigsaw is considered the best tool and allows you to decide in advance how to cut plywood without chipping, eliminating the need to purchase electric tools. It can be used to produce a small number of elements of complex shapes. Having certain skills in working with a jigsaw, you can make a neat cut, however, due to high labor costs and low productivity, this method cannot be called optimal.
Hand saw for plywood
If you don’t have electric tools or a simple jigsaw at hand, you should resort to using a simple hand saw. To make cutting a sheet convenient and to avoid chipping, the tool blade must have a large number of small and well-sharpened teeth. The angle of the saw to the plywood sheet should be sharp. It is recommended to avoid jerking and make even movements with strong pressure.
Tip: The cut of a regular saw is rough, so it is recommended to sand the end parts after finishing the sawing.
Circular Saw
Sheets of plywood can be created into various shapes using a circular saw or circular saw, but the main purpose of these tools is to create square cuts. When cutting material, it is very difficult to get a neat cut because the rotation speed of the discs is very high. In this regard, preference should be given to those cutting wheels that have small teeth and are used for working with wood. When processing plywood, it is good to use cutting wheels designed for sawing chipboard.
A cutting wheel with fine teeth will prevent the formation of large chips
Tip: when cutting a plywood sheet, make sure that the pressure on the sheet is insignificant and the rotation speed of the disk is low.
Circular Saw
When making furniture or repairing it, you often have to choose what to cut laminated plywood with. To get a clean cut, you need to select discs or blades that have frequent and fine teeth. The angle of their sharpening, as well as the shape, is of great importance. It is advisable to select discs with a positive sharpening angle and different tooth shapes (alternating trapezoidal and straight teeth are observed). If the disk has negative sharpening angles, then it is necessary to reduce the speed, otherwise the wood will burn.
Important: the larger the diameter of the disk, the wider the cut will be and, accordingly, the number of chips will increase. It is completely impossible to avoid the formation of chips, but it is possible to reduce their number and size to such an extent that subsequent processing can completely eliminate all roughness.
A relationship has been established between the size of the chip and the saw teeth: small ones leave less damage than large ones. The amount of tooth set affects the cleanliness of cutting plywood. The best result is achieved with minimal wiring. You can check this parameter using a regular ruler. You should not saw a thick sheet using a disc with minimal tooth spacing, since increased friction will cause it to burn and the disc will become pinched.
Electric jigsaw
An electric jigsaw is best for cutting any plywood. When working with this tool, you should use small files, cut the blade, pressing the jigsaw and avoiding jerky movements. Upon completion of the process, the ends of the material are processed using sandpaper.
A jigsaw will make sawing easier and make a high-quality cut of the sheet
Advice: when choosing saws for an electric jigsaw, you should give preference to those models that are marked “clean cut”. Most manufacturers of cutting tools have saws in their assortment for these purposes; for example, BOSCH has a product line called CleanWood. A distinctive feature of the teeth is their regular triangular shape and the ability to cut in opposite directions.
You should not purchase low-quality tools, since after a cut 5 meters long, the cutting edge becomes severely dull, which causes chips to appear. The absence of setting and the opposite sharpening of teeth located next to each other and the small width make it possible to make complex figured cuts. But these qualities of files for finishing cutting cause the fragility of the blades.
Plywood saws are the key to successful sawing of the material
Finish cutting of plywood can be done using blades for working with metal parts. The size of the teeth of such saws is minimal, which greatly slows down the cutting speed, but allows you to achieve the highest quality. Since the width of the metal files is large, it is possible to carry out a figured cut only with a large bending radius (0.6-0.8 m).
How to cut material without chipping
To avoid such defects, it is advisable to consider the following recommendations:
- Based on the cutting drawing and the dimensions of the selected tool, the thrust rail is set. It will avoid vibrations of the cutting device, which will reduce the amount of damage.
- If the work is carried out with a hand-held circular saw, the tooth output is minimized. As a result of the adjustment, the sawing part should not protrude more than 5 mm.
- To make the edge without chipping, a special tape is glued along the line. This reduces delamination, but does not guarantee complete absence of defects. An alternative option is to wet the upper area, but due to the moisture resistance of the material, it will not be possible to achieve the desired effect.
- The cutting part is brought to the starting point of the process in the switched on state, since when started, the teeth tear the wood fibers directly at the edge.
- The movement of the tool should be uniform; pressing too intensely creates creases and burnt areas. If you move very slowly, tracks will appear as a result of constantly entering the surface.
An important point is the type of plywood. The most difficult to process are laminated options: chipping can be completely eliminated only on a format-cutting machine, where trimming is carried out from above and below. You can minimize damage if you immediately select the front side and carry out a test saw on the section. This will allow you to determine the correct location of the sheet in relation to the cutting part.
Sawing with a hand jigsaw
For this work you will need the following tools:
- saw for plywood. You may need several files of different sizes
- awl
- knife
- pencil and ruler.
Start with a simple drawing. If you have a 5 in drawing, you can apply the pattern to the sheet with a simple pencil. If you are not very good at drawing, use carbon paper to transfer the pattern. For the first time, animal figures, flowers and other light designs are perfect.
Before starting cutting, it is necessary to secure the plywood sheet with a special machine to prevent the occurrence of defects, for example, in the event of the sheet shifting. However, if such a machine is not available, try to hold the sheet as tightly as possible. During cutting, only the jigsaw moves.
If you need to create through elements, you should use an awl. The file must be held strictly perpendicular to the sheet. Upon completion of cutting, it is necessary to sand the edges of the product with sandpaper.
Cut plywood with your own hands
- All procedures are carried out according to drawings that are drawn up in advance. This will avoid mistakes.
- The marked slab is laid in the prepared place. It is important to ensure free passage of the disk or saw and rigid, stable placement of the resulting fragments.
- The exposed stop is fixed with clamps.
- Based on the most comfortable position, the largest possible cut is made. It is important to ensure that the parts - especially the part being processed - do not sag or jam the tool. Whenever possible, cutting is carried out without stopping.
- Figure cutting is performed in a single section or fragments, the excess is removed gradually.
Masking tape glued to the cutting line can prevent small chips along the edge, but if the blade is selected correctly, you can do without such manipulations
For complete safety, it is recommended to work in safety glasses, a mask and a respirator. All processes are carried out carefully; upon completion, the device is disconnected from power.
How and with what to cut plywood and chipboard without chipping: straight and curved cuts
It is believed that without professional tools it is impossible to make high-quality cuts of wood or sheet materials. Today we will talk about ways to make a clean, even cut without chips, on your own and without using expensive equipment and consumables.
- Cutting tools and the mechanics of their work
- Selection of saw blades and blades
- Zero gap technique
- Using adhesive tapes
- Ensuring a perfectly clean cut
Cutting tools and the mechanics of their work
Apart from stationary sawing machines, there are not many alternatives for manual work. Among the available tools, we can offer circular and pendulum saws, commonly referred to as miter saws and jigsaws. It is also possible to perform a fairly high-quality cut using an angle grinder, on which a wood saw blade with pobedite teeth is installed. But this is not the most effective and, moreover, far from safe option.
In the process of cutting with any type of power tool, the working parts move at a very high speed, and therefore the mechanics of processing remain behind the scenes. However, understanding it is the key to getting a clean, chip-free edge. The simplest principle underlies the operation of pendulum saws. The cut is carried out with direct movement of the saw blade, and the size of the removed fragments completely depends on the size of the tooth and its setting.
Chips occur due to the heterogeneity of the processed material, in particular due to the hard crust of laminated sheet materials or because the fibers of solid wood have different densities. Chips can form on different sides of the product depending on the shape of the tooth, the feed force and the speed of movement of the working element. When working with a jigsaw, the appearance of chips is caused either by the fact that the teeth tear out large fragments from the reverse side, or by pushing through the top layer, during which it is not cut off, but breaks out in large fragments.
The operation of the teeth of a circular disk is in many ways similar to a jigsaw, with the only exception that their movement is directed strictly in one direction, and they move at a very high speed. Also a significant factor is the direction (angle) of the applied force: if the jigsaw blade moves strictly perpendicular to the surface, then the circular saw cuts at an arbitrary angle, depending on both the diameter of the disk and the thickness of the part. This can work to your advantage: the oblique immersion of the tooth contributes to more accurate cutting of chips, but on the reverse side, due to the tangential movement of the cutting edges, quite large fragments can be torn out. Of course, you can only make a straight cut with a circular saw.
Features of cutting tools
Each plywood cutting tool has its own characteristics when used. Let's look at the rules for working with plywood with various cutting tools.
Sawing with a circular saw
Using a guide when cutting with a circular saw will help avoid unevenness.
To effectively cut a sheet using a circular saw, you should adhere to the following rules:
- Place the plywood sheet on a stable support and make the first cut closer to the middle of the sheet.
- Adjust the cut depth. To do this, lower the disk and start cutting, while the depth of immersion of the disk should be 0.5 cm greater than the thickness of the blade.
- To avoid injury due to the high risk of kickback, position yourself to the side of the saw's line of action.
- Prepare the saw to make the required cut. To do this, you should attach the saw shoe (its part in front) to the blade and install the blade on the cutting line, having previously bent the casing.
- Make sure there are no obstructions at the bottom of the sheet.
- Turn on the saw and slowly plunge its blade into the material. To prevent kickback, hold the saw firmly. After immersing the disk in the slot and installing its shoe on the surface of the sheet, the protective casing should be returned.
- Run the tool along the line to the end of the canvas.
- Turn off the saw and only after it has stopped completely, remove it from the slot.
Cutting with an electric jigsaw
A jigsaw allows you to make high-quality curly cuts
To obtain an even cut, the sequence of actions should be as follows:
- Securely fix the material.
- If possible, cut perpendicular to the grain of the wood, otherwise it will be very difficult to obtain a straight edge.
- Under no circumstances should you put pressure on the tool; this will not increase the cutting speed, but the tool is guaranteed to break.
- The surface of the teeth should be lubricated with oil to facilitate work (subject to working with high-strength wood).
- It is undesirable to use the tool for a long time due to its heating and damage to the engine.
- After use, you need to clean the jigsaw and lubricate it.
Working with a hand saw
Metal saw is good for working with plywood
Working with a hand saw involves a lot more labor compared to a circular saw. To properly cut a sheet of plywood, you need to consider the following rules:
- Make a vertical notch along the cut line. To do this, you need to place a saw blade and pull the blade through to form a groove.
- Tilt the saw blade until an acute angle is formed with the plane of the sheet (from 30 to 400) and begin to make smooth movements.
- To maintain an even cut, the forearm and shoulder should be located in the same plane. If you deviate from the specified direction, you need to slightly bend the saw in the desired direction and continue working.
- To avoid the formation of a fracture, you need to hold the part being sawn off with your unoccupied hand.
- When you finish cutting, you need to return the blade to a vertical position and finish the work by making several movements perpendicular to the sheet of plywood.
This is interesting: the hard coating of laminated plywood imparts heterogeneity to the material, which causes chipping during processing. Another reason for the appearance of such defects is determined by the speed of movement of the cutting edge, the shape of its teeth and the applied forces. Often the jigsaw blade breaks out large pieces of plywood, which is due to the use of saws with large teeth or pushing through the top of the sheet.
Selection of saw blades and blades
When cutting, cleanliness and processing speed are inversely dependent quantities. It is worth noting that chips on the cut will appear in any case, so the main task is to reduce their size to such a value that they can be easily eliminated by subsequent processing. The smaller the size of the tooth and the closer to the right angle at which the cutting edge touches the surface of the material, the smaller the chip size. When choosing a circular saw blade, these are the two most important factors out of three.
Zero gap technique
Carpentry craftsmen most often use the principle of modifying the sole of a cutting tool, which consists in reducing the gap between the working tool and the pressure pad. This is almost guaranteed to eliminate the effect of “breaking” the crust in the top layer of the material.
Zero clearance is achieved by securing the cover plate to the tool base. The pad has only one narrow hole (or slot) that fits tightly to the cutting organ. Because of this, even with a high feed force, the teeth are guaranteed to cut off small chips and not turn out the chips in the upper layer of the part.
When using overlays, it is extremely important that they do not scratch or damage the surface of the part. Therefore, they are most often made from a material that is inferior in hardness to the material being processed, for example MDF or plasterboard. Unfortunately, such an overlay does not last long, which is why it has to be changed every 4–5 meters of the cut.
More durable linings can be made from sheet plastic (PVC, fluoroplastic), fiberglass or metal. In the latter case, the surface of the lining must be carefully polished and soft metals such as aluminum or duralumin must be used to reduce vibration.
How to get the perfect cut
A high-quality cut simplifies further work with the material
In order to get a perfect cut from the end side, you can use either a hand saw or a power tool. There are several techniques to help achieve high-quality plywood cutting. Here are some of them.
Zero clearance
The principle of this technique is to reduce the distance between the saw blade and the pressure pad to the minimum possible. This avoids breaking off the top layer of plywood. This effect can be achieved by attaching an overlay plate to the sole of the tool. The pad has a slot to maintain the ability to saw along the intended line. Thanks to this, the teeth are guaranteed to cut small chips and not break out the material.
It is important to prevent mechanical damage to the sheet surface by the overlay. The pad should be changed every 5 meters of cut. The use of linings made of more durable materials (metal, plastic or fiberglass) eliminates the need to frequently change the linings, the surface of which must be pre-polished.
Adhesive tapes
To protect the back side of the plywood, tape is applied along the cut line. This method helps prevent large pieces from breaking off, which is especially effective if you decide to use a manual or electric jigsaw. However, not every adhesive tape is suitable for these purposes. For example, masking tape in this case will be completely useless due to its small safety margin.
Adhesive tapes are the best protection against chipping
Before you start sawing, tape with fiberglass or aluminum reinforcement is glued to the surface. The requirements for its width are as follows: there should be a margin of 1.5-2.0 cm on both sides of the cutting line. It is better to paste by pressing the tape with a dry cloth, preventing the formation of wrinkles and gluing.
After the saw blade or electric jigsaw has stopped working, you should remove the tool, first unplugging it from the power supply. Then start peeling off the tape. In this case, great care should be taken so that sudden movements do not cause the tearing of small fragments of the laminated surface that inevitably form during cutting. Therefore, it is necessary to abandon the use of materials with a strong adhesive base. When choosing such a tape, you should take into account its adhesive ability and ease of cleaning from rough surfaces.
Using adhesive tapes
Using the same principle, you can protect the back side of the material being cut. Tape should be placed along the cutting line to protect against large fragments being torn out. Pasting surfaces is one of the few ways to ensure the cleanliness of a curved cut with a jigsaw. Unfortunately, masking tape is not the best choice for this due to its low strength.
The best quality cut can be obtained by covering the part with aluminum or fiberglass-reinforced tape. It should be wide enough to cover 15–20 mm on each side of the cutting line. The density of the sticker is also important: the tape must be pressed down well with a dry cloth swab and the formation of folds must be prevented by any means.
You should avoid tapes with very tenacious adhesive. During the tearing process, they can carry along small fibers and fragments of the laminated surface, dissected by microcracks that form during cutting. Also pay attention to how easily traces of glue are removed and whether the adhesive adheres well enough to work with rough materials such as unsanded plywood or OSB.
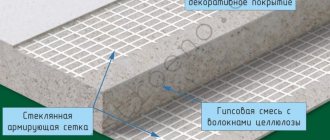
Processing methods
There are several ways to treat plywood and protect it from moisture. Here are some of them (the most common in everyday life):
- Putty with PVA glue;
- Drying the oil coating;
- Treatment with nitro paints;
- Fiberglass bonding.
Next we will look in more detail at what is best for processing plywood and how to do it correctly.
Protecting plywood from moisture and rot with PVA filler has many advantages. Reliably protects the material from many negative factors. We provide step-by-step instructions to complete the protection process:
- Before processing the material to increase moisture resistance, it is laid parallel to the floor and a layer of PVA glue is applied.
- They are given time to assimilate well in the initial layer, after which they are covered with another layer of PVA.
- Follow the process until glue stains begin to appear on the back of the sheet.
- The plate is turned over and the impregnation process is repeated.
After finishing the work, the plate is placed on a flat surface and allowed to dry naturally. The disadvantages of this process include the rather long processing time. Plywood should be protected from moisture for 3-4 days.
Oil drying
Drying oil. The easiest way to saturate a plywood board with water. Implement processing as follows:
- The solution (plywood oil) should be preheated to a temperature of 60 0 C, due to which its penetrating ability increases.
- Then saturate the horizontal sheet with drying oil using a brush.
- Having completed the impregnation process on one side, move on to the other.
- Be sure to cover the ends of the plywood thoroughly.
- After applying the first coat, we begin to force-dry with an iron or hair dryer.
- After drying, the process of applying drying oil and forced drying begins again.
The number of layers may vary. Stop treating with linseed oil only when the solution is no longer absorbed by the material (full achievement of the water-repellent effect).
Fiberglass
Plywood can also be protected with fiberglass, but this requires working with waterproof varnishes that do not contain epoxy or polyester resins. The protection technology consists of the following stages:
- The polished plate is varnished.
- After the applied layer of varnish has dried for about two hours, the fiberglass is glued to the surface of the plywood.
- Reapply a coat of varnish to the end of the plate and allow to dry completely.
- The treatment is completed by applying another layer of varnish and drying the impregnated plywood under natural conditions.
READ Which grinder to choose
Nitrogen paint
Another way to treat plywood from moisture. Nitro paints. This is especially true when the material is in direct contact with water, such as when repairing a boat or installing a wet room.
Here are the instructions for doing it yourself:
- First you need to sand the surface and cover it with drying oil.
- Let the dried oil dry completely and apply liquid paint as a primer.
- Apply a layer of nitro paint to sheets protected with a primer.
- Cover the surface of the plywood with a cloth, which should be soaked in parallel with nitro solvents.
- After drying, it is again treated with diluted nitro paint. The resulting moisture-resistant material is even suitable for making boats.
Ensuring a perfectly clean cut
For most parts, it is enough to reduce the chip size to 0.2–0.5 mm. Such small irregularities in the cut edge are not noticeable; if desired, they can be easily eliminated by chamfering with an emery block or covering them with a wax corrector pencil. It is also possible to grind the end with sandpaper if a sufficient allowance was given during cutting.
However, even at home, it is possible to achieve cut quality comparable to the result of a cutting machine with two high-speed disks. This is only possible when the tool moves along a guide rail, or, in extreme cases, along a temporary stop bar.
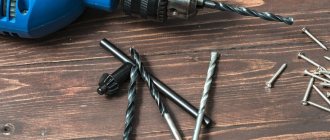
First you need to make two cuts about 0.5 mm deep on both sides of the part to indicate the thickness of the cut. Along the edges of the cutting line, you need to scratch two grooves under an even ruler. This is done either with a segmented or oblique shoemaker's knife (for chipboard and uncoated wood), or with a sharply sharpened drill or pobedit cutter (for laminated materials).
The depth of the grooves should be at least half the thickness of the outer layer, which is non-uniform in relation to the main body of material. This method requires high precision in matching the grooves and the cutting line, but this is the only way to ensure a perfectly even cut end that does not require additional processing.
Festool - a tool for professionals
Industrial Equipment LLC is the official dealer of Festool. Buy German quality on individual terms!
How to cut plywood without chips at home
Plywood is available in sheets of fairly large sizes. When finishing walls or laying floors, the material needs to be trimmed. Wood panels are easy to cut and saw, but there are many subtleties here.
- Why do you need to cut plywood?
- Selecting Tools
- Hand tool
- Power tools
- What to choose depending on your goal
- How to cut plywood yourself
- How to make the perfect cut
- How to cut plywood without chipping
Carved plywood
Decorative wood panels. A true classic, they give nobility and are considered a sign of excellent taste. Carved plywood wall panels. This is an affordable and durable material for creating a unique interior. The plywood sheet is the basis for applying natural veneer of valuable wood species, such as oak, ash and others. Such products are distinguished by their attractive appearance, low cost, durability, flexibility and ease of processing. In addition, this material is resistant to chipping and damage when cutting out patterns.
Why do you need to cut plywood?
Standard sized plywood sheets are rarely used and usually need to be sawed
Plywood is used in many construction and renovation projects. In addition, it is the safest and easiest to handle option for making home furniture, especially children's furniture. Sheets have to be sawed, cut, bent and cut.
The complexity of such work lies in the structure of the material. In regular wood, the wood grains are oriented in one direction, which makes work easier by allowing you to choose the right tool for each direction. In the chip material the fiber has no orientation at all; the user has to deal with a relatively homogeneous composition.
Plywood is a multilayer wood-laminated board in which the wood fibers in each layer are oriented perpendicular to each other. When sawing, the tool simultaneously works with several planes . This makes it very difficult to work, especially manually. You have to put in more effort. The cut often turns out uneven, with chips . This property is especially pronounced during complex cutting, when it is necessary to perform a rounding.
Plywood frame
Plywood. This is a building material consisting of several layers of veneer interconnected. How moisture resistant it is depends on the composition of the glue that binds the layers. A highly moisture-resistant material, the production of which uses bakelite varnish or glue. They are able to withstand direct exposure to water. Thanks to this, the material can be used for the manufacture of boats and other floating structures without additional processing. There is only one “but”. The price is too high.
READ Installing Rings on the Motoblock Piston
Other materials that are optimal for construction work and furniture making begin to peel off and rot at high humidity. You can increase the protection of plywood from moisture by impregnating it with special substances. It should be noted that some of them cope with their task adequately.
On video: which plywood is better.
Selecting Tools
To cut plywood without chips and cracks at home, use hand and electric tools . In the first case, physical effort is required, so such work is quite tiring. However, it is not always possible to use the electric option. The power tool causes the material to heat up and heats itself up, which is undesirable for large thicknesses. Not every model is suitable for cutting plywood. A good jigsaw or file is not cheap.
Hand tool
Hacksaw for plywood
Whatever tool is used for manual cutting, the work will have the following features .
- Labor intensive - cutting is difficult due to the multidirectional fibers. Cutting a sheet of plywood will require more effort than cutting an OSB board of the same thickness. This is especially noticeable when working with hardwood sheets.
- to secure the slab correctly . The blade is placed on 2 stops to avoid pinching during cutting.
- Using a hand tool, you can cut a workpiece of any shape from the material . This is the main advantage of this method.
The selection of hand tools is very small. To cut plywood, you need a knife with fine, well-sharpened teeth made of hard metal and with minimal setting. The teeth should not have a clear direction, otherwise the hacksaw will not overcome multidirectional fibers.
Wood hacksaw
Adviсe
To cut a plywood sheet correctly, you must use the right tool and follow some rules:
- Before cutting, you need to take all measurements and check yourself to avoid annoying mistakes;
- During operation, you must monitor the power cord;
- before using the tool, you need to adjust the cutting depth to an unnecessary amount;
- the saw blade must be suitable for cutting plywood;
- the use of a saw must be accompanied by the use of protective gloves and goggles;
- dull saw blades are more dangerous than sharpened ones;
- When sawing plywood, you must be careful not to bring your hands close to the blade;
- Do not start work without skills in using power tools.
How to cut plywood without chips and burrs
How to cut plywood without chips and burrs.
Beginners often have difficulty cutting plywood. Namely, when cutting plywood across the grain, the top layer of veneer breaks off. This is especially unpleasant if the cut is made on a ready-made burnt picture. These chips appear for various reasons. In most cases, it is almost impossible to fix them. In this article we will look at the main reasons for the appearance of chips and a couple of tips on how to avoid them in finished portraits.
The chip appears due to the fact that a saw with teeth pointing upward strips off the top layer of veneer. Due to the fact that there is space between the jigsaw feet and the file, the fracture occurs in this space.
Disable the pendulum action on the jigsaw.
A number of modern electric jigsaws have a setting that helps speed up the cutting of wood. The sawing speed increases significantly. However, the quality of the cut suffers and chips appear on the surface.
Choose the right file
Files differ in tooth size, edge, length, tooth direction, etc. You can read more about which file to choose and what it looks like in the next article
Saw plywood from the rough side
The fact is that standard files have teeth away from the jigsaw (unlike files with the opposite tooth). These saws “eat” the wood as they move from bottom to top. When a tooth catches on the top layer of veneer, it often splits and chips appear. This often leaves the underside with a very good edge. From this, the craftsmen made a simple conclusion that to get a clean saw, it is enough to turn the plywood upside down and saw from the “wrong” side. The method gives the best results, so feel free to use it.
Anti-splinter liner
This is a special pad for a specific brand of jigsaw. It is simply inserted between the jaws of the jigsaw and is not secured in any way. The insert is adjacent to the file, so it does not allow the pile of the top layer to rise (which is what causes chips), so the saw is smooth. Craftsmen advise using files from the same manufacturer as the jigsaw - the quality of the cut will be better with the use of an insert.
The inserts are sold in sets of 3-5 pieces. They do not last forever - they have to be changed periodically. There are liners made of plexiglass
Such an insert, for example, for a Bosch jigsaw, costs about 400 rubles.
If you haven’t found an insert for your jigsaw or don’t want to buy one, then there is a small life hack from the craftsmen - stick ordinary tape in the place where you will be sawing. After this, you need to iron the tape well with your fingernail. Then saw directly on top of the tape. After that you delete it. The result will be similar to the liner.
Our subscriber experience
Vladimir shared his method of making an anti-splinter liner. Or rather, it’s not even an insert, but a whole sole for a jigsaw
He simply took a piece of tin 1 mm thick and made a hole in it for a file. I screwed the piece to the existing holes in the jigsaw legs. The cut turned out perfect, although as you can see in the photo, it was a file with a large tooth.
Using a jigsaw
It is worth noting that jigsaw files are fragile and can only be moved in a strictly vertical plane. Any distortion will cause the fabric to break. The saw functions when moving downwards, and saws are positioned in the same way, with the teeth downwards. When working with complex areas, it is the workpiece that is scrolled, and the canvas should remain in one place. In the case when the outer perimeter does not contain difficult patterns that could be damaged while working on the internal scheme, then you can start working from the outer perimeter. This way you will lighten the weight of the workpiece.
It is imperative to control the temperature of the canvas. The file tends to heat up quickly, and overheating causes damage. For this reason, it is worth letting the nail file cool from time to time or changing it to another one.
In this article we tried to answer the question: how to cut plywood? Cutting plywood is more labor-intensive than cutting wood. This is mainly due to the multidirectional nature of the fibers and viscous adhesive mixtures. However, with the right equipment, these problems can be overcome with ease.