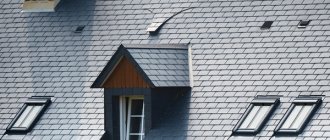
When any owner of a plot of land chooses SIP as the material for building a house, sooner or later the question arises: how to make a roof? Choose the classic option with a rafter system or still make it from the same material as the whole house. Each method has its own disadvantages and advantages. For example, the roof on the rafter system must be additionally insulated if the top floor is intended to be an attic. And in the case of SIP panels, the roof needs a ventilation system, but even with this nuance, this option is several times better than the traditional one.
In the case of a rafter roof, there is a possibility of poor installation or selection of poor materials. In the case of SIP panels, this cannot happen, as in the construction of houses, this installation method is simple but effective.
Advantages of using SIP panels for roofing a house
Over the past few years, a large number of houses with roofs made of SIP panels have been built and are in operation in our country. The growing number of cases of their use as roofing material is explained by the advantages that distinguish SIP panels from other building materials:
- high installation speed;
- cost savings on additional roof insulation and vapor barrier installation;
- high degree of heat transfer resistance;
- ability to withstand significant load;
- excellent sound insulation qualities;
- significant service life without loss of thermal insulation properties.
Hip and half-hip
They are characterized by the presence of two slopes in the shape of a triangle and four in the form of a trapezoid. The first slopes are called hips, they are located on the side of the gables. To implement such a structure, high professionalism of builders is required. The design is difficult to implement, repair, and maintain.
With a half-hip design, all 4 slopes, having the shape of a triangle, converge at 1 point. In fact, they form a figure similar to a pyramid. Such varieties can be found in regions where there are strong winds.
High installation speed
The installation of the rafter system, sheathing and roofing together with the installation of steam and thermal insulation takes many times longer than the installation of the Mauerlat, ridge and connecting beams with the subsequent installation and fastening of SIP panels. Moreover, the panels can be laid in both rain and cold. The use of polyurethane foam at the joints of panels in winter does not threaten the quality of the roofing in any way, since after freezing and thawing the foam restores its properties, polymerizes and reliably fills the joints between the panels.
Method of installing a multi-gable roof
Multi-gable roof requires a lot of attention and patience:
- First you need to draw an exact diagram, then cut the beams and rafters, number them, and treat them with an antiseptic.
- Installation of the frame begins with fastening the valley (the internal corner when connecting the planes), and there are at least four of them, and the skates. They are connected by rafters and lathing.
- It is more convenient to attach ready-made panels of the required size, without unnecessary cuts, unnecessary connections - they are simply screwed to the frame, inserted into each other with connecting elements.
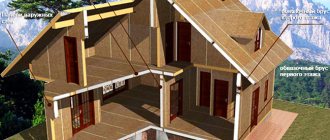
Roof insulation and vapor barrier
The design of SIP panels includes two OSB sheets with a layer of insulation laid between them. Thus, the insulation appears on the roof along with the installation of the panels. The exceptionally low thermal conductivity of SIP panels is an excellent protection for warm air inside the house from contact with cold outside air. And the high degree of air permeability of the insulation does not prevent heated air from leaking out, allowing you to save on the vapor barrier device.
Do you dream of your own home, a holiday home or for permanent residence? There is nothing easier than doing this at TechnoSip.
Look at our catalog of projects, the prices will pleasantly surprise you.
up to 100 sq. m. from 100-200 sq. m. from 200-250 sq. m
Roof installation: stages of construction
The sequence of erecting a roof from SIP panels is as follows:
- If the dimensions and configuration do not meet the requirements, the panel will have to be cut. It is laid on a flat surface, to prevent damage, it is better to first cover the surface with felt or other soft material. Chips are removed as they form. For positioning accuracy, the element is held by a gripper. The location where the grip is installed is cleared of packaging film.
- Raising SIP to the roof. If there are no special mechanisms, it is permissible to feed along slipways - boards leaning diagonally against the wall.
- It is better to remove the film from the bottom plane right before installation.
- Once the panel is placed on the beams, holes can be formed into it. They are needed to accurately install the screws without resistance. The screw material is stainless steel, adapted to atmospheric loads. When screwing in fasteners, you must strictly maintain a right angle. Washers and washers made of artificial rubber are placed under the caps in advance. This will provide a tight seal and prevent excessive pressure on the material. Too much force when tightening is not required, it can damage the base and lead to premature wear of the polymer gasket, due to which it will no longer be elastic and the seal will be compromised.
- If the slope is more than 15 degrees, a stop is placed under the panel, in the overhang area. This part prevents it from slipping.
- Using the technology described, the following panel is installed. The connection with the previous element is locking. The class of such a connection is different: in some places a seam seam is used, but more often on the top sheet of one of the panels there is a wave edge slightly raised above the main plane, which is placed in the recess of the next panel. You can create a reliable seam connection using a special tool.
- The joints must be sealed to prevent leaks. To do this, you can use silicone-based sealant or special adhesive tape. Tapes are also used at the junctions with the wall.
- If the length of the panels is shorter than that of the slope, when laying it is necessary to maintain a vertical overlap, starting from the bottom part. The amount of overlap between the 1st and 2nd rows is determined by the slope; if the slope is less than 10 degrees, 30 centimeters is enough, more - 20.
- To get a protrusion of the top layer that is large enough to overlap, you need to trim the insulation on some panels.
- When the installation of all panels is completed, complete removal of the protective film is permissible. This must be done immediately (if you hold it under the sun, it will stick tightly to the base, the material will look ugly). Walking on the panels is acceptable, but with extreme caution. It is better to step on the areas of contact with the purlins; shoes should be soft enough; hard soles are unacceptable.
- The final stage is decorating the ridge unit. The voids between the end parts of the panels are filled with insulating material. If the insulation is foamed polymer, it is necessary to fill it with polyurethane foam, if it is mineral wool, then the gaps are filled with a similar material. After filling, a plastic overlay is placed on top, secured with self-tapping screws, and covered with a steel ridge strip. After the installation of the panels is completed, you can install auxiliary elements, drains for drainage of sediments, and others. When working with SIPs, you cannot place them on the side where the element for the “lock” connection is located. It may be damaged by the weight of the panel.
Reducing home heating costs
Comparing the heat-shielding characteristics of SIP panels with similar properties of other materials, it is easy to see that no insulation layer that was once installed as part of the roof can compare in its heat-shielding qualities with the energy efficiency of SIP panels. If their installation is done efficiently, then there are no joints between the panels, turning the roofing pie into a single whole and reliably protecting the rooms inside the house from the penetration of cold air masses. Therefore, heating a house requires less heat energy than houses with roofs made of traditional materials.
7. Basic layout schemes for a cold rafter roof
Gable roof
Hip roof
Hip roof with cuckoo
Note:
The pitch of the rafters is taken according to calculation.
Possibility of increasing roof load
When designing buildings and structures, the roof structure is calculated taking into account the standard load. And if an error crept into the calculations or the work was performed poorly, then an increase in the thickness of the snow cover on the roof leads to its subsidence and causes injury to those who were inside the premises. This is precisely what caused the tragedy in the Moscow Transvaal Park water park.
Therefore, it is very important that a roof made of SIP panels can bear a significant load. The frame structure of the panels forms, as it were, a single monolith (since the joints between the panels are monolithic) and can withstand a load significantly greater than that which roofs made of traditional materials are designed to bear.
Conditions for planning the construction of a roof
When arranging, the following is taken into account:
- Slope.
- Load created by snow.
- Wind pressure.
- Probable directions of air flows.
Atmospheric loads must be considered taking into account the region of residence and probable deviations from average climatic norms. From this data you can determine what roof slope is required.
Required Tools
The installation of the roof involves the following work:
- Configuring the panels, giving them a shape that ensures a tight fit.
- Transportation to the installation site.
- Sealing gaps.
- Preparation of technological holes.
- Installation of mechanical fasteners.
The following tool is required:
- Hacksaw. An alternative is electric scissors or a circular saw.
- Vacuum or mechanical type gripper.
- Screwdriver, drill with a set of attachments.
- Mallet made of polymer material.
- Hand tool for measurements.
- Mounting gun.
Load calculation
When the slopes and dimensions of the slopes are known, you can understand the wind and snow loads that will affect the roof.
- The snow load is determined by multiplying the standard mass of snow precipitation by an indicator that takes into account the roof slope. This indicator is equal to one if the angle is not more than 25 degrees, 0.7 - from 25 to 60 and 0 if more than 60. You can determine the area in which the construction site is located by evaluating the climate map prepared by the meteorological service.
- Determination of wind load. Strong winds can cause serious damage: from tearing off individual roof segments to overturning the entire structure. The reason for such destruction is the separation of wind flows horizontally and vertically, the formation of force applied along different vectors. Wind load can be determined by multiplying the following indicators:
- Ripple factor.
- An aerodynamic indicator determined by the geometry of an object.
- The standard value of wind pressure determined for the area.
You can understand in which wind region a building is located by looking at the wind map of the country.
After calculations, it is possible to determine the positions of intermediate runs that help maximize the load-bearing capacity of SIP panels.
What weather can you work in?
SIP is characterized by a minimum weight, but a large windage, due to which installation is unacceptable if the wind speed exceeds 9 meters per second. Negative temperatures are not a hindrance, however, when sealing joints with sealant, temperatures below +4 degrees are unacceptable.
If it is raining, the fog has thickened, the surfaces have become slippery, you cannot lay the roof, this is a safety requirement.
High price
Opponents of the use of SIP panels for roofing cite the results of studies conducted in the USA that their cost is 13% more than the cost of installing a roof on a rafter system. But another result of these studies is hushed up, which established that a roof made of SIP panels delays heat loss from the premises of the house by 18% more than a roof made of traditional materials. It turns out that the somewhat inflated costs of constructing a roof from SIP panels not only pay for themselves within a year or two, but also help reduce operating costs in subsequent years.
Mounting selection:
Before installation, you need to evaluate the configuration of the house and understand how to fix the panels. There are three methods:
No runs
The elements of the rafter system are the Mauerlat, beams for forming the ridge and joining. This option is good for small houses, if the distance from the ridge to the Mauerlat does not exceed 4 meters. If the indicator is higher, then you cannot do without intermediate runs.
With intermediate runs
This method makes it possible to increase the rigidity of the roof and adapt it to heavy loads. The upper edge of the beams, even ridge beams, is beveled at an angle corresponding to the slope of the roof. Solution for large cottages, attic floors.
With rafter system
SIP panels are lightweight, so you don’t have to lay the rafters over the entire length or width of the roof. You can focus on the size of the working area, or use the option based on intermediate runs. You don’t need a lot of beams, increased strength is not required, and material consumption will significantly affect the price.