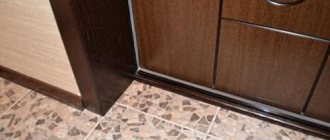
The starting profile is used during the installation of wall and ceiling cladding made of plastic panels; the element can be used when finishing surfaces with plasterboard boards, etc. Due to this element, the appearance of the tiled surface is significantly improved, work is accelerated, and the final quality is improved. The L-profile is installed in corners, near door and window openings. It is also used at the junction of wall finishing and floor coverings.
Collapsible starting L-profile
Improved starting collapsible L-profile
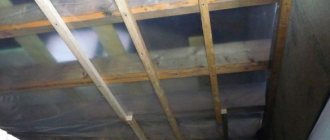
Ceiling mount
The ceiling frame is a mesh of ceiling profiles, fixed to the ceiling with guide analogues and U-shaped brackets. You can also use quick hangers. A natural question arises: “How to attach profile hangers? » They are mounted in increments of 500 mm under the attached supporting profile. And then their ends sticking down are pushed apart. If direct hangers are selected, then the profile is attached to them with self-tapping screws with a press washer. And for analogues with traction, it snaps onto their special protrusions.
A mesh of profile strips is mounted on one side in increments of 400 mm, and on the other - 2.5 meters. During installation, the PN is controlled by level, and the supporting profiles are attached along a tightly stretched thread. Excess sections of the profile are cut off at an angle of 45o. The installation process of the ceiling structure should begin with the corner parts, and then move on to the straight ones.
Features of application
Finding out the desired profile is quite simple; it looks like the Latin letter “F”. The material is fixed using special plates that are fixed in its grooves. The starting profile for slopes has two important functions:
- Decorates the ends of windows, giving them a decorative look.
- Levels the surface without the use of complex structures and plaster.
Related article: Silicone sealant for windows and glass
Fastening materials for guide profiles
The quality of installation of the guides depends on the chosen fasteners, because how well the frame is connected to the load-bearing walls determines almost the entire safety margin of the finish and the ability to hang additional elements on it.
The main feature is hidden in the self-tapping screw for the profile, which is not screwed in, but is driven into the attachment points like a regular nail. Why is there not a drill on the tip, but a pointed end. However, you need to select the type of fasteners in accordance with the material of the walls of the room where the repairs are being carried out. A dowel-nail cannot always provide reliable fastening in the thickness of the masonry. It is best used for installation work in rooms with concrete and brick surfaces.
Characteristics of dowel nails
Existing sizes of dowels for profile installation Today, aerated concrete and foam blocks, rather soft and fragile materials, are increasingly used for laying walls and partitions. Guide profiles are attached to such surfaces using another type of dowel - crocodile.
This is a metal type of fastener with longitudinal slots and teeth. When the mounting screw is screwed in, it opens and is securely fixed into the thickness of the wall with hooks. In wooden buildings, you can use a regular self-tapping screw of the appropriate length, without pre-drilling and driving in dowels.
Design of metal dowel nails for concrete
Design options for plastic dowels
In houses built with raw brick, the selection of fasteners is individual. Dowel-nails are definitely not suitable; most often it is better to fasten with long self-tapping screws (120-150 mm) or crocodiles, which are better fastened in such materials. The choice of fastening material should be taken responsibly, otherwise inappropriate hardware will not provide reliable fixation in repair areas, which is dangerous due to collapse of the assembled structures.
How are guide profiles attached to the surfaces of walls and ceilings and what technological nuances are observed during the work process?
Selecting window fasteners
Fastening elements used in the installation of PVC structures must meet the following requirements:
- Ensuring rigid fixation of the plastic window in the opening , taking into account wind and shock loads. Taking into account the impact of wind is especially important when installing blocks on the upper floors of buildings. Impact loads on the structure are most significant in large opening systems.
- Compensation of temperature loads arising as a result of seasonal changes. For example, in winter the profile bends into the room (1-2 mm per linear meter), therefore, the fastening should allow the structure to move by this amount.
What determines the choice of fasteners?
When choosing a fastener, first of all, they look at what the opening in which it is planned to install a plastic window is made of. Openings are constructed from brick, concrete, decorative stone, wood, metal, cinder block, shell rock or light porous materials (foam concrete, aerated concrete and others).
The second important factor is the type of structure and technical features of the installation. Balconies, loggias, entrance doors, hallways and windows are installed from PVC profiles.
Installation of rack profiles for drywall
So, the guide profiles around the perimeter are fixed. Now we will learn how to attach a drywall profile to a wall. To do this, we take rack profiles 60x27 mm (CW or PS).
But before doing this, you need to saw off each such profile to size. To do this, use a tape measure to measure the distance from the guide profile on the ceiling to the guide profile on the floor and subtract one centimeter from the result obtained.
This is necessary so that the rack profiles can be easily inserted. It’s more convenient to insert from the top first, and then insert the bottom diagonally:
After the first rack profile is installed in place, we immediately grab (fix) it with hangers (crocodiles), that is, we bend them, moving them to a U-shaped position.
We move on to the next rack profile, do it in the same way: first insert its top, then insert its bottom diagonally and grab it with U-shaped hangers.
After the rack profiles are installed, stretch the nylon thread and align them on the plane. To do this, take a mounting bracket (self-tapping screw with a press washer, 4.2×13 mm without drill), attach it to the profile and screw it into the profile not completely:
We take a nylon thread and put it on the screw so that it holds.
And tighten the screw at low speeds.
Stretch the skein of thread. You need to pull it 10-15 cm above the suspensions (crocodiles). We stretch the thread, go to the other side wall and screw in the screw there a little, after which we tighten the thread.
And tighten the screw. Let's move on to the top row of hangers and do the same thing.
So, two threads are stretched. You can start installing rack profiles.
An important nuance! You need to set profiles from the last one and then everything in order
Therefore, it is important that the other profiles do not touch or pull the thread. To do this, we take two self-tapping screws, press on the profile and insert them into the side holes in the U-shaped suspension to fix the profile so that the profile does not reach the thread.
Thus the following profiles.
Now you understand: to the question of how to attach a drywall profile to a wall, you can answer that this is a rather lengthy and careful procedure that requires care and patience. But let's continue.
Now all the profiles preceding the first profile are pressed against the wall. We begin setting up the first profile. The profile should under no circumstances bend the thread.
But also he should not be too recessed in relation to her.
It is optimal if the distance between the thread and the profile is about 1 mm or even less.
Let's start fastening - we use self-tapping screws with a press washer. We insert a self-tapping screw onto the screwdriver bit. We hold the profile with one hand, and with the other we screw a self-tapping screw into the side of the profile through the hole in the suspension.
It is better to try to secure it in the middle of the profile.
We do the same on the other side of the profile.
The thread does not touch the profile, which is optimal.
We secure all subsequent profiles in the same way.
Upon completion of installation, the threads are removed. And the protruding ends of the U-shaped hangers are bent inward, but this is provided that the wall will not be insulated. If insulation is installed between the profiles, then it is too early to bend the hangers - they will still be useful.
What is the difference between an ordinary starting L-profile and a collapsible one?
An ordinary profile is made using automatic presses and consists of one continuous element. This design creates problems for builders when cladding walls; it is difficult to work with - individual panels constantly go beyond the top strip during filling, and it is difficult to insert them back there.
Starting L-profile
In addition, this procedure is performed with a metal object, most often a kitchen knife, and it can damage the front surfaces of the panels. If excessive force is applied, their attachment to the support rail is disrupted. The risk of damage increases if the fixation is made with a stapler; such fastening is not reliable. When bending the panel to fit it into the profile, the thin tongue of the panel breaks off.
Start profile
Starting profile (L)
Collapsible starting L-profile
How to mount a metal profile on a wall
Tip: Before installing a wall frame made of a metal profile, all work related to electricity is carried out: wires are supplied to switches, sockets, lighting fixtures, and all household devices.
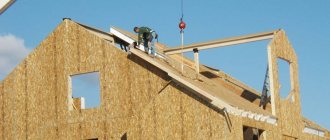
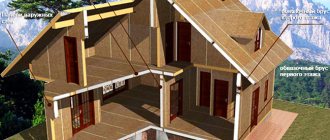
The technology for installing a wall frame consists of finishing each wall separately.
Installation of a metal profile on the wall
The instructions for attaching the frame to walls made from a plasterboard profile suggest the following procedure for performing the work:
- Walls with windows require special attention when constructing the frame. If you need to insulate walls, vertical profiles are installed at a distance of 50 millimeters from the old slopes.
- The width of the window sill has an influence; when finishing the walls after its installation, the marking of the frame starts from the window. But the thickness of the plasterboard sheet must also be taken into account; it can be 12.5 or 9.5 millimeters.
- A square is applied to the frame and the required distance is measured, adding 5 centimeters on the other side of the opening. You can immediately install a PN to the “bottom” of the window sill, with a pitch of vertical posts of up to 60 centimeters.
- A building level is applied to the risks, which will help transfer them to the side planes of the window sill.
- The marks on the floor and ceiling are connected.
- The profile guides are installed along these lines:
- on the sides of the window, the verticals in this case are marked from these profiles in increments of 60 centimeters;
- one of them must be installed in the corner of the room.
- The hangers are mounted in increments of 60 centimeters, with the center strictly along the line.
- Rack profiles are installed in the guides so that their middle groove coincides with the mark on the floor and ceiling, and then they are connected to each other.
- The level regulates the verticality of the elements on the shelves and base.
- The final fastening is done with self-tapping screws.
- The crossbars are fixed using a “crab”. A horizontal lintel is installed above the opening.
- After the metal frame is completely secured to the wall, you need to sketch out the placement of the transverse and longitudinal profiles. This diagram will be required if there is a need to place paintings on the wall, an additional shelf, or attach a decorative flowerpot to the ceiling.
- In this case, so-called “umbrellas”, “butterflies” and other similar elements are used for fastening, which are fastened according to this principle: when a screw is screwed in, a plastic dowel spreads its “wings”, which ensures reliable fastening on the back side of the plasterboard sheet.
Installation of slopes
The top panel is installed first. To cut a piece of the right size, you need to carefully measure everything. The internal and external length of the segment and its width are measured. When applying markings, you must make sure that exactly the side of the plastic along which the cut was made will be inserted into the profile. Cut with a circular saw or jigsaw according to the markings. If you don't have either, you can use a fine-toothed hacksaw. We install the finished panel in the starting profile. The other edge of the sheet is attached with self-tapping screws to the sheathing slats. In order not to spoil the appearance, screws should be screwed at an angle into the top layer of the plastic panel in increments of 30-40 mm. The side panels are attached in the same way as the top panels and are also screwed to the slats.
Outer slope diagram.
When the panel is inserted into the guide, it must be moved slightly inside the window. The resulting space must be filled with industrial foam. You should start from the window itself, gradually moving forward and reducing the intensity of foaming. In addition to additional rigidity, the slope will be warmer, since the flow of cold air from the window will be reduced. You should only use industrial foam; it has a lower expansion coefficient, which will prevent the slope from bending from the inside.
The final stage will be the installation of the final profile, the platband. Plastic strip in the shape of the letter “F”. It is decorative in nature and also gives additional rigidity to the entire structure. We measure and cut the profile to the required length. The profiles are joined to each other at an angle of 45°. In those places where the profile will rest on the screws, it is necessary to make an incision on the inner longitudinal plate and remove the unnecessary part. The F-profile is tightly installed at the end of the slope and securely fixed in it. All joints created during installation must be treated with white sealant, and the excess must be removed with a rubber spatula or a piece of plastic.
External slopes
Finishing of external slopes is often carried out at heights (multi-storey buildings).
Plaster is used for this. Such slopes are made by the window installers themselves before inserting a double-glazed window. The good thing about this method is that the outer side of the opening is not wide and it can be made quite quickly using gypsum mixtures with the addition of glue. It is important that the composition covers the window itself by 3-5 mm; this will prevent heat loss and moisture penetration.
Rarely does a 2nd coat need to be applied. As a rule, a slope made of gypsum plaster adheres perfectly to the wall with a layer of up to 50 mm. If the aesthetic component is not the least important, plastic corners come to the rescue. They are attached to the window frame with double-sided tape, and to the wall with silicone sealant. The corner reliably hides the installation seams of the window and protects against harmful atmospheric influences.
When the window is not at a height (private house, 1st floor) or opens onto a balcony, there are much more variations. The most common option is to make a slope similar to the internal one from plastic panels. The best way is to finish the window with metal slopes. Sheets of galvanized iron are measured and bent into a “Z” shape, then attached to the window frame. A sound-absorbing layer of rubber is first glued to the inside, which becomes a tangible advantage during rain. Next, all places where the sheets adjoin the walls are treated with silicone-based sealant, and the seams and joints of the sheets are treated with sealant to match the color of the slope.
Slopes, regardless of the type of materials used, are designed to protect all mounting connections and seams on the windows. High-quality installed slopes will protect from cold, noise, dust, rain, snow and other atmospheric phenomena. They can give a beautiful look to even the most inconspicuous window. There are no big difficulties in installation either. Using recommendations and instructions, anyone can install them themselves, saving a good amount of money. But in order for the slopes to perform all the duties assigned to them efficiently, it is best to entrust such work to a professional team.
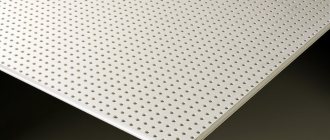
Drywall
The main material you will have to deal with is a sheet of drywall. GKL (gypsum plasterboard sheet) can also be called Knauf-sheet (from the name of a German company whose main activity from 1959 to the present day is the production of plasterboard and its components). This company developed plasterboard technology, which is used today by all other manufacturers, from small “handicraft” factories to the largest manufacturers.
Despite the fact that the technology for producing plasterboard is the same, the quality of the finished product can vary dramatically, since it also depends on what equipment is used for drywall and what materials are used as raw materials. Therefore, if you want to achieve good results in repairs, purchase only drywall from a well-known brand manufacturer that guarantees high quality products.
The plasterboard sheet structurally consists of three layers: two outer layers made of special cardboard and an inner core made of gypsum mixture. By adding modifying additives to the gypsum composition and impregnating the cardboard jacket with special mixtures, the following types of plasterboard are obtained.
Conventional drywall (GKL) is used in domestic, office and industrial premises with normal temperature and humidity parameters.
Moisture-resistant or waterproof plasterboard (GKLV) is highly resistant to exposure to moist air. The use of such gypsum boards in rooms with high humidity guarantees the absence of warping and delamination of the sheets, and the occurrence of mold or mildew.
Fire-resistant plasterboard (GKLO) is indispensable for industrial premises where there is an increased risk of fire. In general purpose domestic premises there is no need to use such sheets, since the fire resistance of ordinary plasterboard meets all fire safety requirements.
In some cases (rather infrequently), fire- and moisture-resistant plasterboard (GKLVO) is also used. Each type of sheet has its own marking, applied to its back side and a specific color of the facing cardboard.
Currently, you can purchase plasterboard sheets in several standard standard sizes. For renovation of domestic premises, it is convenient to use plasterboard sizes of 1200*2500mm. The thickness of the sheet can also vary. When installing the ceiling, sheets with a thickness of 9.5 mm are used (the weight of a sheet of plasterboard is approximately 25 kg). For leveling or constructing walls, the recommended sheet thickness is 12.5 mm (plasterboard weight is 30 kg).
Finishing methods
There are several ways to tidy up your window. These may be the following options:
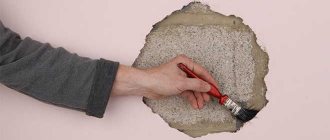
- Finishing with plaster. This method is quite old. Its main disadvantage is the complexity of the work. Plastering is time-consuming and requires careful cleaning of the area after finishing. When a house shrinks, it may crack.
- Application of drywall. This option is not bad, but it is only suitable for interior work. The room must be dry and warm, otherwise the sheet of drywall will begin to collapse.
- PVC profile for slopes is the best option. It is not afraid of moisture, temperature changes, is easy to install, and can be used both outside and indoors. This is an excellent solution for plastic windows, as it matches them perfectly in terms of material; the PVC F profile for slopes is very easy to install. It is quite possible to do this yourself. With other materials, for example, wood, the profile may not look so harmonious, although you can order wood lamination, and the differences will not be noticeable.
PVC profiles for slopes
Installation of drywall with adhesive mixture
This assembly is the most complex and painstaking way to level walls with plasterboard without a frame. Installation is carried out in the following order:
- Inspection of the leveled surface. Includes identifying protruding areas of walls and piers. In these areas the amount of adhesive applied will be minimal. Identifying areas with swollen plaster and putty. Such places will need to be cleaned.
- Preparing the surface for installation. Mechanical removal of old wallpaper, tiles, peeling plaster. Notching sections of walls coated with oil or pentaphthalic paints.
- Primer of walls and partitions. It is better to use a deep penetration primer as a primer. For areas covered with paint, concrete contact can be used.
- Installation of beacon marks. The main task of such an event is to create support points for the back side of the gypsum board. Plastic dowel clips with self-tapping screws screwed into them can serve as beacon marks. The heads of the hardware should create a plane on which the drywall will be mounted.
- Installation of plasterboard sheets. A special adhesive mass is applied to both the wall and the plasterboard. The glue is not applied in a continuous layer, but in fragments. The distance between such fragments is 30–40 cm. The height is 15–20 mm greater than the gap between the base and the back side of the drywall. The sheet is pressed against the wall, and the correctness of its installation is checked using a rule with a level.
Walls leveled using any of the above methods are ready for finishing. Any of these methods is the shortest path to success in repair.
Fasteners for PVC structures
Plastic structures are installed using anchors, self-tapping screws (in some cases with dowels) or anchor plates.
Anchors
This type of fastening is available in two versions: a classic anchor and an anchor for hollow materials.
- Classic anchor. Consists of an outer galvanized sleeve, a Phillips screw and a bushing. The principle of operation is as follows: initially the screw and part of the sleeve screwed onto it are inside the sleeve, which expands when the screw rotates in a certain direction, thus fixing the anchor in the seat. A regular anchor is great for fastening in dense materials (brick, concrete, cinder block).
- For hollow materials. In general, this anchor is similar to the classic one - the differences are in the design of the sleeve and the sleeve, which now does not expand the sleeve, but deforms, squeezing along the axis (deformation is possible thanks to special slots). When twisted, part of the anchor significantly increases in diameter, which allows it to be fixed in loose environments. In dense materials, such fasteners also hold up well.
How to attach drywall to a wall without a profile. Secrets of the frameless method
Successful perception of the repair and construction work carried out. Even the most sophisticated finishing materials will lose all their luster against the background of depressions or bumps in the wall planes. Therefore, leveling the walls during repairs can be considered a priority. Drywall is ideal for this purpose.
GCR, as a finishing material, does not require special advertising. Moisture-resistant, regular, fire-resistant - for any room you can choose plasterboard of the required quality. For bathrooms - moisture-resistant, for the corridor - fire-resistant, common for living rooms.
Standard sizes 600x1250, 1200x2000, 1200x2500, 1200x3000 allow the use of this material with virtually no waste. After minimal processing, the surface of the sheets is ready for wallpapering, applying textured plaster, and laying tiles.
There are two ways to attach gypsum boards to walls - framed and frameless.
- The first option is much more suitable for large rooms where there is no space limit. The frame made of profiles and the drywall mounted on it take away at least 40 mm of the floor and ceiling of each wall (27 mm - profile + 12.5 mm - gypsum board).
- The frameless method allows you to attach sheets of drywall directly to the vertical surfaces of a room or office. In addition to saving space, this method is more profitable from an economic point of view. The financial component of the frame is 60% of the cost of the walls mounted from gypsum plasterboard.
There are three options for frameless installation of plasterboard sheets on walls:
- Fastening sheets with self-tapping screws.
- Installation of gypsum boards with dowels.
- Gluing drywall.
Fitting sizes, possible colors
The fittings may have different sizes, but they are all systematized. The following sizes are used for standard panels:
- for simple corners – 15x15; 20x20; 30x30; 40x40 mm;
- for ceiling skirting boards – 6 x 0.5 m.
However, the dimensions used must correspond to the format of the panel products, without detracting from the attractiveness and functionality of the cladding.
Accessories for PVC panels
When choosing PVC wall panels, the modern buyer, first of all, pays attention to quality and size. He is usually of little interest in the color of the fittings, and, as practice shows, it is in vain
There are many examples when, when decorating interiors, moldings and other fittings made of wood or plaster are painted to match the color of the walls. This is done in order to emphasize the classic style in its purest form. In this case, the moldings that create and decorate a certain architecture do not stand out from the general background.
Important! Cornices, moldings and other components are considered to be required to be painted. Even if they are white, paint them white
This is done so that there are no joints. However, plastic fittings cannot be painted, as over time they lose their attractiveness.
PVC molding
Plastic wall panels are in high demand due to such properties as versatility, unpretentiousness, and a large number of possible design options. Components such as joining and connecting profiles, internal and external corners, ceiling or floor plinths:
- allow for high-quality fastening of wall panels;
- provide a fast and waste-free construction method.
Installation of panels using components takes three times faster than traditional framing. We invite you to watch a video on the topic.
Types of profiles for drywall and rules for their installation
The most commonly used are the following varieties:
- Guide. Used as a horizontal base for vertical posts. It is marked with two capital letters - PN. Selected based on the following dimensional characteristics;
- Rack profile (PS). Made in the form of a channel made of galvanized sheet. The flanges of its cross-section have longitudinal grooves that provide the required rigidity. It is secured with self-tapping screws when constructing vertical frame posts for the construction of walls and partitions;
- Ceiling profile (PP). It is made of the same cross-section and from the same material as the rack-mount one. The reliability of the entire structure will depend on knowing how to properly attach a drywall profile to the ceiling. There are three longitudinal grooves in its back and shelves. The outermost ones are responsible for rigidity, and the central groove allows for precise fastening of drywall sheets (GKL);
- Angular. It strengthens the corners of the structure after the main work with drywall. It is marked (PU), made at 90o. This profile protects the outer and inner corners of the cladding from mechanical damage. It is made of galvanized perforated tape, on the surface of which there are small holes. The solution penetrates through them and ensures reliable adhesion of the profile to the overall structure;
- Arched profile (PA). It can be concave or convex. It is used not only to decorate window and door openings, but also to create complex wave-like hanging structures.
Using the listed profiles, frames are erected. They largely depend on the correct installation of the profiles. Several rules for their installation should be taken into account:
- You can attach two ends of a sheet of drywall to the profile post. The main thing is that they are located equally on it;
- screws are screwed into the profile strip near the wall to avoid them getting into the end of the material;
- Do not attach screws at an angle. Their cap should be recessed;
- if the length of the profile during installation is not enough, then it is extended using a special extension, the type of which depends on the location of the joint.
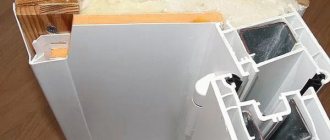
Improved thermal insulation
It is impossible to properly insulate the seam at the junction of the window frame using polyurethane foam alone, so a support strip is needed.
For high-quality thermal insulation, it is recommended to choose a product with at least 2 air chambers and a wall thickness of 2 mm or more. For regions with cold winters, the best option is 3 cameras. A profile that is too narrow and thin will become the weakest point of the entire structure.
Practice shows that the stand itself, even with 3 chambers, does not provide adequate thermal insulation. Additional insulation and sealing are required, which will be discussed below.
On which profile can drywall be fixed?
For ease of installation, you can use a plasterboard wall profile, which comes in four types:
- Two of them are used for mounting frames on walls and for making partitions.
- Two - for installing a frame on the ceiling.
The standard length of the elements is three or four meters. The thickness of the metal used for their manufacture is from 0.4 to 0.8 millimeters. The best option is with a profile thickness of at least 0.55 millimeters. In addition, two types of elements are used for finishing plasterboard surfaces.
According to their purpose, profiles are:
- Rack or PS. They have a C-shape with longitudinal grooves. The base of the element is the “back”, its width ranges from 50-100 millimeters, and the sides are “shelves”, their size is always 50 millimeters, used for installing partitions and cladding the room. Used when installing vertical racks.
- Guides or PN. Manufactured in U-shape with dimensions:
- 40 mm shelf width, always constant;
- from 50 to 100 millimeters, base dimensions.
They are used to create partitions and wall frames. During installation, it is fixed to the ceiling and floor, creating a rigid frame for the main structure.
- Ceiling or PP, with dimensions: 60x27 millimeters, have three identical longitudinal grooves. Used to construct a suspended structure.
- Ceiling guides or PNP, their dimensions: 28x27 millimeters. They are used for mounting frames on ceilings and as a vertical element for walls.
- Corner or PU, sizes that are: 31x31, 25x25 millimeters. Used to strengthen corners. They are made external or internal, which differ in parameters and purpose.
- Arched or PA have a curved or convex shape. They are used to design arched doorways and create complex suspended wave-shaped structures.
Profiles for drywall installation
The following additional elements are used:
- Connecting sleeve to increase the length of PP profiles.
- The crab is made in a cross shape and is used at the intersection of profile elements, as in the photo, which increases the strength of the structure. The two-level crab is mounted on the upper-level PP and firmly fixes the metal profile of the lower level.
A straight hanging element is attached to the surface and bent along special lines. Then the profiles are installed and fixed into the U-shaped opening. Excess “ears” are carefully bent or cut off.
Tip: When using such a fastener, it is necessary that the under-ceiling space is no more than 6 centimeters.
Clamps and rods of anchor suspensions. With their help, you can adjust the height of the inter-ceiling space in the range from 25 to 100 centimeters. The supporting part of the element ensures a stable location of the PCB.
How to choose hardware for mounting profiles
Hardware for fixing guides and hangers should be selected based on the type of surfaces for which they are intended.
- For walls and ceilings made of concrete, the profile or anchor hangers are fixed with dowels, the dimensions of which are 6x60 or 6x40 millimeters, which depends on the quality of the surfaces.
- On wooden bases, screws measuring 6x70, 6x80 millimeters are used for fastening.
- All metal structural elements, such as: straight hangers to ceiling profiles, rack-mount profiles to guides, couplings, crabs, are best fixed together with self-tapping screws with a pointed end, dimensions 3.5x11 millimeters.
- Drywall is attached to metal profiles with self-tapping screws with fine threads of 3.5x25 millimeters, made of galvanized steel. In this case, there is no need to make any holes first.
- Profile guides for making plasterboard ceiling racks can be fixed with special drop-down dowels, ensuring reliable fastening.
What tools are needed when installing profile elements?
The profile for plasterboard walls is attached to:
- Direct hangers.
- Anchor hangers.
- Crab connectors.
To install the frame and lay insulation you will need to prepare:
- Hammer for drilling holes for installing dowels.
- Screwdriver.
- Electric drill with a special attachment for fixing drywall.
- Screwdriver.
- Staple profile or cutter.
- Rasp.
- Jigsaw.
- Wire cutters.
- Construction level with magnetic side.
- Water level.
- Laser level.
- Chockline or painter's cord.
- Blue.
- Plumb.
- Metal or wooden square.
- Dowels and drills for them, 6 mm in diameter.
- Self-tapping screws, 4 mm in diameter.
- For cutting profiles, metal scissors.
- Double-sided tape.
- Protective gloves.
- A mask to protect the face when working with insulation.
HOW TO CORRECTLY INSTALL SLOPES YOURSELF. LET'S UNDERSTAND THE SEQUENCE OF ACTIONS.
After the window sill is installed, we proceed to installing the slopes. If you have not yet read the article on installing a window sill, I recommend that you now follow the Link to read it.
Rules for installing slopes
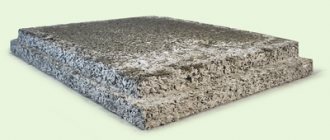
There are some rules that should be followed when installing slopes. Firstly
, slope material only from sandwich panels. Read about the advantages of sandwich panels here.
Secondly
, sandwich panels are divided into soft and hard. The soft sandwich is sold mainly in such large construction hypermarkets as Leroy-Merlin, Petrovich, Maxidom.
Buy there when you don’t want to waste time searching. Also, if you have to buy a sandwich in one of these stores, for example, only one side, then there is a chance that it will be a different shade.
What does a hard and soft sandwich mean?
The top of the sandwich pie is covered with white plastic, the same one that is covered with a protective film. If you take a soft sandwich and lightly press it with your finger, a small dent will immediately appear. During installation, such a sandwich can easily be damaged.
But the soft sandwich has one small advantage: it is easy to cut with a stationery knife.
A hard sandwich, on the contrary, can only be sawed off with a saw or grinder. The top plastic part is very hard and the sandwich itself is very hard. After installation, such a sandwich can be easily wiped with a cloth without fear of denting it.
The next important rule.
The slope should be installed BEHIND the profile. It can be installed in a starter profile, which is screwed along the edge of the window frame and a sandwich is inserted into it.
But it's better not to do that. Firstly, the integrity of the window frame will be compromised. Secondly, the width and height of the window are creeping, two centimeters in width and one in height. And thirdly, if suddenly the foam presses a little harder on the sandwich, then the edge of the starting profile will bend outward, and this will be very visible. You'll have to glue it with superglue.
One more rule.
All sandwiches are installed only by level. The very brickwork of the window openings is crooked. This is especially observed in brick houses. And if you simply apply the sandwich to the wall, then after completion of the work you may end up with visually crooked slopes. Therefore, when installing slopes, we use a bubble level.
Sequence of installation of slopes
It is important to understand that installation of slopes should begin only after installing the window sill. The sequence for installing slopes is as follows:
- installation of the upper slope
- installation of side slopes
- installation of decorative corners
- sealing joints with liquid plastic
Consider each stage in more detail.
Before installing the slopes, I recommend cleaning the profile from stubborn dirt. Cleaning the profile after installing the slopes will be difficult, since it will not be easy to clean out the dirt at the junction of the profile and the slope.
You can clean the profile either with solvent No. 646, which is sold in any hardware store, or with a special profile cleaner, for example, Cosmofen 10.
You may want to order
window repair in St. Petersburg, then follow the link right now and place your order.
Installation of the upper slope
Cut out the top slope. Our first task is to lay down the dimensions of the upper slope on the sandwich panel. It’s not difficult to determine the width of the slope: measure the width of the slope, put it aside for a sandwich and cut it off.
But the depth of the slope needs to be measured as follows. We take the slope cut to width and insert it behind the profile. We press it to the ceiling and draw a line along the edge of the ceiling with a felt-tip pen or pencil. So we will cut the sandwich exactly along the edge of the wall, which part is not even.
Using a saw, we cut off the size we need in depth along the marked line.
After cutting, we place the top sandwich behind the profile and foam the far seam. Next, foam the sides. Now apply a layer of 1.5-2 centimeters to the edge of the sandwich.
The foam should be applied a little further from the edge so that after pressing the foam does not fall out into the apartment. They applied foam and pressed. Of course, you should already have pieces of masking tape torn off in your hands. We attach four pieces of tape to the window, leveling the top sandwich horizontally with a level.
Installation of side slopes
The side slopes are cut in the same way as the top slope. And the installation of side slopes, in principle, is no different from the installation of an upper slope.
When installing side slopes, do not forget to foam the bottom and top of the slope. If these places are not foamed, then after all the work is completed, these places will “walk” - there is no foam there.
Installation of decorative corners
Decorative corners should be placed on polyurethane foam. Gluing corners to silicone or sealant does not give a high result in terms of strength over time.
Just like the slopes, we first install the upper corner. Then the side ones.
We measure the width of the window opening at the upper slope. We put the resulting length on one side of the corner. On the other side of the corner we need to set aside the width of the side of the corner itself.
For example, your corners are 3x3 centimeters. This means that on the other side of the corner you need to put 3 centimeters on each side. This is necessary to overlap the decorative corners at the junction in the corner. We cut off the excess, apply a thin strip of foam on the inside of the corner and install the first upper corner. We press it with tape to the sandwich panel and the wall.
As a result, one side of the corner should overlap the wall, 3 centimeters on each side.
We cut out the side corners and install them in the same way.
Sealing joints with liquid plastic
After the foam has dried and completely glued both the sandwich panels and the corners, it is time to carry out the final stage - seal the joints of the corners.
It is better to seal the joint with liquid plastic Cosmofen. Over time, it does not darken, is easy to clean and firmly glues the joint. In general, Cosmofen is designed for gluing plastic, so it will come in handy at the window joint.
That's all. Good luck to all!
Give it a thumbs up. Subscribe to our Zen channel about window installation and repair.
Our group is on VKontakte - there are many photographs of our work. Add to the group, it will come in handy.
Ready solution
The F-shaped profile for slopes is a convenient solution for cladding. It creates a perfectly flat surface, free of imperfections, protects the opening from moisture and sunlight, as well as wind, dust, and other mechanical influences.
The starting profile is attached to a plastic window without the use of glue. The design not only helps to make the slopes visually attractive, but is also perfect for places where different materials meet. The starting profile is most often mounted in this way: one side of it touches the wall, the other touches the plastic structure. If the size of the material does not correspond to the required parameter, it can be cut using a stationery knife; for the same purpose, a grinder or a metal file is sometimes used.
Advantages
The starting profile for PVC windows has several obvious advantages:
- Ability to resist ultraviolet radiation. The profile does not fade even for ten years.
- The material is durable, looks good, and can fit into any interior without standing out.
- Suitable for use both indoors and from the facade.
- Moisture resistant.
- The chalk content in the composition is minimal.
- The semicircular end of the tail allows you to lay the profile on the most uneven wall.
- Hides wall imperfections, levels slopes without the use of other materials.
- The plank can be safely cut, no chips or cracks will appear on it.
- Installation is carried out independently; this does not require special skills.
- No glue is used.
Window profile F-shaped, 2.5 m
Description
The profile is intended for decorative interior decoration during the assembly and installation of windows and installation of slopes. Used to close gaps or fastening elements. Size - 250 x 5 cm.
Characteristics
Product type Slope profile Manufacturer's article 10000477 Type F-shaped Material PVC Color white Length, cm 250 Width, cm 5 For panels thick, mm 10 Weight, g 150 Country of origin Russia Additional information The width of the product is composite - 50 mm (main part profile) + 10 mm (slope) Package dimensions (WxHxD), cm 8 x 250 x 5
Sources
- https://plastokonnik.com/napravlyayuschie-dlya-otkosov-plastikovyh-okon/
- https://delaydachu.ru/steny/f-profil-pvh-dlya-otkosov.html
- https://dekoriko.ru/paneli-pvh/startovyj-profil/
- https://stroy-podskazka.ru/stroitelnyj-profil/kakim-byvaet-f-obraznyj/
- https://LeroyMerlin.ru/product/profil-pvh-f-obraznyy-dlya-paneley-5-mm-18720743/
- https://www.Castorama.ru/profil-okonnyj-f-obraznyj
What is required for finishing
The starting profile is the main component. If the window is standard, you will need 6 meters (the fact is that the panels are sold in lengths of 3 and 6 m). In addition, you will need a drill or screwdriver, as well as metal cuts.
The F-profile is attached using liquid nails. Before its installation, a starting profile is attached. This is easy if the windows are level. Pay attention to the joints: they must be cut to fit exactly together. You need to start work from the side slopes. Insulation can be placed between the wall and the profile.