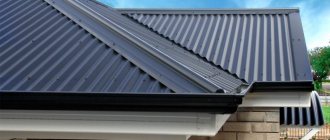
We wrote about how to choose a material for a seam roof, as well as what types of seam joints are considered the most reliable in the first part of this article. Today we will talk about the design features of metal roofing and the technology of its installation.
Compliance with certain rules regarding the arrangement of the roofing pie, the features of laying the roofing itself and the sequence of its installation will help to guarantee the protection of the seam roof from condensation, deformation and depressurization.
In this article we will consider the following questions:
- What elements does a seam roof pie consist of?
- How to arrange the eaves overhang of a standing seam roof.
- Sequence and technology of installation of seam panels.
- Arrangement of valleys and abutments of seam roofing.
If the construction of a house begins from the foundation, then the installation of a seam roof begins with the creation of a roofing pie that protects the attic space from condensation and cold. At the same time, the roofing pie serves as reliable protection against noise arising from precipitation.
Pavel T. FORUMHOUSE user
If the roof insulation is 250-300 mm (I have 300), then no noise is heard (unless, of course, there is hail the size of an egg). The only place where I can hear the rain (and even then weakly) is in the bathroom, which has a suspended ceiling.
To ensure that the thermal insulation is of the required thickness, the insulation can be laid in several layers (between the rafters and under them).
The roofing pie of a seam roof consists of several layers:
Let's take a closer look at them.
Supporting lathing - lower wooden slats on which a vapor barrier film and insulation are placed.
Vapor barrier film is a special material that does not allow moisture from the room to penetrate into the insulation.
Rafters - wooden beams with a section of 200x50 mm. The distance between the rafters is 1.2...2 m.
Mineral wool is most often used as insulation. The insulation is laid between the rafters directly on the vapor barrier film, which, in turn, is supported by the lower sheathing.
Waterproofing is a special film that allows moisture to pass through only in one direction (from bottom to top). Waterproofing prevents under-roof condensation from penetrating into the insulation, but allows moist air that accumulates in the mineral wool layer to pass through. Waterproofing film is a diffusion (breathable) membrane that is sold in hardware stores.
berd80 FORUMHOUSE user
You can lay out a diffusion membrane, you can use a special bulk membrane (but it costs a lot). There was no consensus on this issue.
The waterproofing spreads across the rafters in the direction from bottom to top (starting from the eaves strip, towards the ridge). The film is attached to the wooden rafters with staples (using a stapler). Separate strips of the waterproofing membrane are laid overlapping (the overlap width is at least 100 mm). On gable overhangs it is necessary to ensure the overhang of the film (overhang width is approximately 150 mm).
The film should not be in a tense state, and the permissible sagging of the membrane between two adjacent lags is 35 mm.
Under no circumstances should you use the same material as a vapor barrier and waterproofing. Moreover, you cannot swap them. All this will lead to the accumulation of moisture in the insulation or, conversely, in the room. The development of mold and subsequent destruction of building structures in this case are guaranteed.
Counter-lattice is a 50x50 beam that is nailed to the rafters on top of the waterproofing film. The counter-lattice allows you to create an air gap between the waterproofing and the seam covering.
A special sealing tape is placed under the counter beams, which ensures tightness at the nail joints and protects the insulation from moisture.
Sheathing - transverse strips nailed to the counter-lattice at a certain distance.
Arhios FORUMHOUSE user
A 50x50 block (counter-lattice) is nailed along the rafters, and on them (across) - 100x25 planks with a spread (lattice).
The counter-lattice provides ventilation of the under-roof space, which eliminates the condensation that forms there. In order for the counter-lattice to be guaranteed to fulfill its functions, the eaves overhang of a seam roof must be made according to the following scheme:
The sheathing must be strong, rigid and even. The maximum clearance between the sheathing and the control batten 1 meter long should not exceed 5 mm.
Effective ventilation of the under-roof space is ensured by a ventilated ridge.
And also a PVC ventilation mesh tape, which is stretched between the sheathing and the front board of the eaves overhang.
Thanks to these two elements, constant ventilation of the under-roof space is ensured.
The pitch of the sheathing deserves special attention - the distance through which the transverse strips are nailed. In accordance with the set of rules for the installation of metal seam roofing (SP 17.13330.2011), the distance between individual sheathing strips should not exceed 200 mm. This allows the foot of a person walking on the roofing to rest on two boards at once, which protects the metal from deformation.
Along the edges of the roof (in areas of roof overhangs), as well as in the gutters, a continuous boardwalk with a width of at least 700 mm is created.
Some users of our portal recommend making a continuous sheathing over the entire area of the seam roof, which, in general, is not a mistake (especially if this coincides with the recommendations of the manufacturers of seam roofing). For example, in accordance with technological requirements, a continuous sheathing must be “spread” under a zinc-titanium roof.
Continuous sheathing is a relative concept. A small gap (no more than 10 mm) must be left between each transverse plank of the sheathing, which will compensate for the thermal expansion of the wood.
You can learn more about the roofing pie and the materials from which it is created by visiting the corresponding FORUMHOUSE section.
Procurement of materials
If you decide to make folded pictures from rolled or sheet metal, then you cannot do without the use of sheet bending and folding machines. Purchasing such equipment for personal construction is impractical. But this does not mean that metal should be bent by hand.
vasilpolt FORUMHOUSE user
It is better to use the service of a team that has a machine for rolling pictures. The quality of the roof in this case will be better than if you bend the rolled products by hand. There is even a separate one. Virtually every roofing company that has the necessary equipment offers it to their customers. Try searching in your area.
Also, using sheet bending equipment, you can produce the necessary additional elements. What kind of extensions will be needed for construction depends on the design features of the roof.
The photo shows typical profiles, the geometry and dimensions of which may differ depending on the characteristics of a particular roof.
What it is?
Roofing pie - several layers of material and structures used to construct a roof. Therefore, it was compared to a pie - multi-layered and difficult to prepare. This is a whole system with its own nuances, secrets and rules. Nowadays, roofing pie performs many more functions than before; This makes its installation one of the most difficult points in building a house. What does this “pie” consist of?
Construction and installation of a curtain rod assembly
Installation of a seam roof begins with the installation of eaves overhangs. We immediately draw your attention to the fact that the eaves overhangs have different designs. It directly depends on the design of the drainage system. Gutter systems, in turn, can have suspended or wall-mounted gutters.
The eaves overhang with a hanging gutter does not have transverse folds, making the roof more airtight and easier to install. Considering that snow and ice can easily damage a suspended drain, the roof surface with long slopes must be equipped with additional elements for snow retention.
A system with wall gutters and flat top ebbs has a more complex design, and its installation is best left to experienced tinsmiths. The rigidity of a system with wall gutters is an order of magnitude higher than that of its counterpart with hanging gutters.
Roofer1959 FORUMHOUSE user
Regarding gutters: if they are made correctly, then any are good. The wall-mounted one is more reliable in terms of rigidity, and I can vouch for its safety. But there is a weak point - the liner of paintings (especially if the fold is single). The suspended one does not have this disadvantage, but its rigidity under certain operating conditions can be called into question.
There is no consensus on which drainage system should be installed in conjunction with a seam roof. But no matter which option you personally like, the cornice assembly will have to be arranged according to the same principles.
Installation of the cornice assembly begins with the installation of drips and ventilation tape.
The lower eaves profile – the “drip tray” (through which the condensate formed in the under-roof space will flow) – is mounted on the rafters and covered with a waterproofing membrane. This is done at the stage of arranging the roofing pie.
A thin layer of adhesive or roofing sealant should be applied between the waterproofing and drip line.
Sometimes the bottom drip is not used at all: for example, if the under-roof space is well ventilated (using a ventilated ridge on top and a ventilation tape on the bottom). But it is better if it is installed after all.
nekorsakov FORUMHOUSE user
The first step was to install a plastic mesh in the gap between the sheathing and the front board. Eaves strips were placed on top of the mesh, which were fastened to the sheathing with galvanized roofing nails, driving them in a checkerboard pattern. The planks were mounted along a cord stretched along the eaves, and the mesh was simply attached tightly along the edge.
PVC mesh protects the under-roof space from insects and debris. The distance between the cornice strip and the ventilation mesh must be at least 2…3 cm.
If you plan to use suspended gutters as part of the roof, you need to think in advance about how to install eaves hooks for the drainage system. Thus, long curtain rod hooks, which are attached to the top sheathing, are inserted directly under the curtain rod. Under each hook it is necessary to make a recess in the surface of the sheathing. Otherwise, the seam paintings along the edge of the overhang will go in waves.
To give the eaves overhang additional rigidity, metal roofing spikes are installed under the eaves strip.
The crutches cut into the flooring flush with the surface of the sheathing (similar to drainage hooks) and are attached to it with self-tapping screws.
The distance between two adjacent crutches is 60...70 cm.
Standard crutches are commercially available, but you can easily make them yourself. For the manufacture of crutches, a steel strip of 40x4 mm is most often used. Blanks of the required size are welded together, after which they are drilled and subjected to anti-corrosion treatment (treated with a primer).
Fasteners for galvanized roofing (including crutches) must be made only of galvanized steel.
A standard T-shaped spike for an eaves overhang has a width of 100 to 200 mm, and its length depends on the design features of the roof.
Crutches are used to strengthen eaves overhangs, as well as other roofing elements. Therefore, they can have different geometries, which depend on the intended purpose of the product.
Seam connections themselves are already stiffening ribs. Therefore, on roofs with suspended gutters, roofing spikes may not be used, but can be replaced with strips of galvanized or painted metal. They are installed along the overhang. Steel strips are placed on top of the cornice strip or placed under it, depending on the geometry of the cornice profile.
nekorsakov
Before installing the rebated paintings, it was necessary to install additional strips of metal, reinforcing the rigidity of the overhang and forming a protrusion (50mm), for which the curved edges were then secured and crimped.
Seam roofs equipped with wall gutters and flat flashings must be reinforced with roofing studs.
Having completed the arrangement of the cornice assembly, you can move on to the next stage of work. But first, let's talk a little about construction tools.
Tools and accessories for mounting folded pictures
A mallet (plastic, wood or rubber) and a hammer are tools for forming bends and other elements of a seam roof.
Shlazen (mandrel, mandrel-blade) is a device that serves to form ridges and arrange locks at junctions (valleys, bypasses of ventilation ducts and chimneys, etc.).
Straight and corner pliers (large and small) for forming seam bends and other complex elements and roofing.
Crimping roofing frames – used for crimping L-shaped and double seams. Essentially, both frames are used to close a double seam, because the folding is carried out in two passes: the L-frame closes a single standing seam during the first pass, and the frame to close a double seam is used during the second pass.
There are also frames for bending roof overhangs. They are used when installing various paintings (including self-latching ones).
Set of metal scissors with different cutting angles.
You cannot cut panels with a grinder or other abrasive tool! This destroys the protective coating of the material.
Questions of aesthetics: not everything is so simple!
You probably remember how sad a seam roof looked just 15 years ago. Featureless and rusty galvanization in places is not the most pleasant sight.
If you get closer to such a roof, you can clearly see the type of seams, their spacing and the shape of the seam. Please note that usually the shape of the seams may not be ideal, although this does not reduce the reliability of the coating.
Also, if you stand close enough, you can see a slightly wrinkled surface of the metal - this is a feature of a seam roof. During installation, such a roof will look smooth and neat, but after several winter-summer cycles, large local bubbles will appear.
To some extent, it will resemble a down jacket with longitudinal seams. But after a few years of operation, all these stresses in the metal will go away, and the roof will level out. By the way, sometimes dents and irregularities are allowed on purpose, as planned by the architects, in order to create a certain texture of the roof.
Also today, it is not at all necessary to use rough galvanization as a basis for a seam roof. Now there is zinc-titanium, aluzinc, aluminum, several other quite interesting alloys, as well as a large selection of beautiful polymer coatings.
The service life of the roof directly depends on the material used:
Another advantage of seam roofing: it can be easily installed on roofs of complex configurations. Try something similar with the same corrugated sheeting or metal tiles. Despite the fact that the upper shell must also reliably protect the building from rain, wind and snow.
Installation of roof slopes using the example of a gable roof
Installation of roof slopes begins with the installation of the starting panel. The key difference between the starting panel and the ordinary panel is the special geometry of the profile, thanks to which you can attach the picture to the sheathing on both sides at once.
The pitch between adjacent fasteners (clamps) is 40...50 cm.
The clasps must completely repeat the geometry of the bends that are on the side shelves of the folded paintings. Such fasteners can be made independently, or can be purchased on the construction market.
If the length of the roof slopes exceeds 6.5 meters, experts recommend using movable clamps, which allow you to compensate for possible deformations from thermal expansion of the panels.
After installing the starting picture, the rest of the roof is installed.
nekorsakov
Next to the laid and fixed picture, the next one is laid, which overlaps (with a curved edge) covering the nail flange of the previous panel. Both pictures are crimped into a lock together with already installed (hidden) clasps. The result is a very reliable and airtight connection, because all fasteners are covered with sheets of metal.
Crimping of seam joints is carried out in a standard sequence. First, using a frame to close the horizontal lock, the first crimp is performed. A second crimp is then carried out using the double fold closure frame.
The finishing picture is cut to size (so that it does not protrude beyond the gable overhang), folded and secured with clamps to the sheathing. The gable overhang is subsequently covered with a special profile.
Foamed soundproofing tape, which can be placed under the seam panels along their entire length, additionally protects the room from noise generated during rain. The tape is cut to size and stapled to the sheathing.
We have described the installation sequence of paintings produced using folding equipment according to individual sizes. Installation of a self-latching roof has its own nuances.
For example, when installing self-locking panels, instead of clamps, roofing screws are used, which are screwed into the nail strips of seam panels. The nail strips have oblong holes that help compensate for thermal deformation of the panels.
To attach clasps and self-locking panels to wooden sheathing, use roofing nails or galvanized self-tapping screws with a press washer (for wood) that have a flat head.
To prevent the self-locking roof from waving in hot weather, the screws must be screwed exactly into the middle of the oblong hole. In this case, after screwing the self-tapping screw completely, it should be unscrewed about a quarter of a turn (so that the panel can move slightly under the influence of thermal expansion).
Special integrated solutions
For special tasks today, a complete roofing system is used. For example, this is offered by Astron. It is made of steel panels with aluminum-zinc coating and special fixing clips. Such panels have a thickness of 0.66 to 0.75 mm and a width of 600 mm.
The ribs have a height of 50 mm, i.e. quite high and provide additional rigidity, making it possible to install purlins in increments of 1.5 m.
At the same time, the fastening system is movable, which allows the panels to move slightly during thermal expansion. This technical point allows you to avoid deformation of the paintings. Will the same metal tiles or soft roofing be movable? That's another question.
Only metal and ceramic tiles from some manufacturers can boast of such comprehensive solutions.
Design of the roof in areas of eaves overhangs
The ridges of folded paintings, located in places where the eaves overhang, should be trimmed (literally by 2...3 cm).
After this, the remaining (protruding) part of the picture will easily bend under the eaves overhang, forming a reliable and airtight eaves overhang.
It is not necessary to completely remove the outermost part of the ridge. It can be folded, forming a neat decorative plug at the end of the fold.
Installation of side end strips
We present the installation diagram for the side gable profile.
Where:
- The beam on which the wind strip is attached (the dimensions of the beam are selected based on the geometry of the wind profile).
- Roofing screw “metal-wood”.
- Side end strip.
- Start/finish seam roofing panel.
- Self-tapping screw with press washer.
- Klyammer.
At the junction of the roof slopes, the end strips are connected as follows.
Choosing a seam for the roof and the main type of fastening
The installation of a seam roof begins with the choice of fastening - the seam. The folds can be standing or lying, but they differ in that with the help of horizontal folds you can effectively connect all the elements that are in the same position. Standing elements can be used to connect the roof along the entire length of the slope.
Rebates are characterized by different types of joints produced, which can be single and special double . In the first case, there is one classic bend; a double bend is distinguished by its ability to ensure maximum tightness. Such folds are used in those areas of the roof where there is a danger of moisture accumulation due to leakage, which is typical for gutters.
Types of castles
Installation of a ventilated ridge
The main elements of a ventilated ridge are: the upper ridge profile, the ventilation grille and the supporting elements.
The ventilated ridge design, which is simple and reliable, was installed by user nekorsakov.
The upper cornice profile was purchased ready-made. The lower (support) profile was made of galvanized steel using sheet bending equipment. Its perforation was carried out directly on the construction site.
nekorsakov
I decided to place the lower (support) strips between the sheathing and the picture, without securing anything else. I mounted the upper planks on top of them (with some overlap). The support strip is ultimately held not by individual screws, but by an entire roofing sheet, fixed with clamps and pressed together with adjacent sheets. In this mounting option, the perforated wall of the support bar was pushed deep from the edge, which seemed to me both aesthetically and functionally better (away from the “aggressive” external environment with its precipitation).
Waterproofing
The waterproofing layer of the roof protects the insulation from moisture that can get into it during a leak or due to condensation on the inside of the roof covering.
The simplest waterproofing is the same polyethylene or propylene film. But now waterproofing diffusion membranes are much more often used - materials that retain moisture that enters them from the outside, while freely allowing water vapor to pass through.
Membranes are the optimal waterproofing material when constructing a roofing pie. They help to avoid the effect of “locking” moisture inside the insulation, which can occur when using conventional film.
The fact is that it is impossible to completely avoid moisture inside the insulation. The vapor barrier, although minimal, allows water vapor to pass through. If the waterproofing layer of the roof is made from ordinary film, this moisture will leave the insulation with great difficulty, so more and more of it will accumulate every day. And the membrane will simply let water vapor pass through.
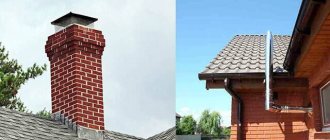
Pipe bypass
Chimneys and ventilation shafts are protruding elements, the bypass of which when installing a seam roof requires certain skills in performing tin work. Let's consider a standard bypass option using a self-latching roof as an example. Any non-professional roofer can install it.
Owner of the sofa User FORUMHOUSE
Blue indicates standard patterns of the latch, red indicates pieces cut off from the latch, and green indicates just metal. A standard apron (adjoining strip) is cut and made from red and green, the paintings on top fit snugly onto it, and the apron from below rests on the lower paintings.
In practice, the workaround looks like this:
Pieces with locks are cut off from standard seam panels (indicated in red in the diagram). They are used to form abutment strips (side aprons), which on one side are adjacent to the pipe wall, and on the other, snap into place with adjacent panels. The space between the side aprons is closed with junction strips (top and bottom), which do not have a latch. A hook is made on the top bar, on which the picture fits to the chimney from above rests. The bottom bar with a hook rests on the bottom picture.
The junctions of the aprons with the pipe walls are sealed with roofing sealant.
Panels that are rolled with a double seam are mounted in the same way at the pipe bypass.
All four aprons, in this case, are connected to the adjacent paintings using recumbent and standing seams.
Frame
To create a flat roof frame, choose beams with a cross section of 100-160 mm. They are laid according to the standard for interfloor slabs. Suitable for work are elements made from several composite (glued) parts, as well as lumber of the required (fixed) size and length.
Installation of a flat roof necessarily (by default) implies a slight slope of the future roof by 1-6 degrees. This is necessary so that the collected water from precipitation and melting snow flows freely towards the drain and does not stagnate. Professionals recommend installing the slope in several ways:
- the beams are laid horizontally, and the angle of inclination is created by laying out thermal insulation material of different thicknesses (on top of the frame);
- beams with different allowances (height) are specially taken into work;
- the beams are laid immediately with the required slope - in this case, it is recommended to create a suspended ceiling inside the room or install lathing, then a flat, horizontal ceiling;
- The beams are laid horizontally, then to create the desired slope, wooden overlays of the required sizes are nailed to them.
The most common option is to use beams with an already prepared slope. A reliable method of installation is to secure a reliable timber purlin along the top of the load-bearing wall (can be replaced with durable boards). It will carefully lift the entire frame of beams on one side and provide the required roof slope.
There is another way, when they create short radial beams. They are pulled from the double central one (diagonally).
Beam calculations
The number of beams to create a flat roof is calculated according to the expected load. SNiPs do not have clear instructions on choosing the section of boards; the main thing is not to skimp on the thickness of the lumber.
The specific pitch between the beams also depends on the further load on the structure and can range from 50 mm to 120-125 mm.
The nuances of leaning on walls
The frame of beams is mounted with obligatory emphasis on the walls, as in the assembly of interfloor ceilings. In a frame or wooden structure, the beams are laid with support on a crown (on top) of logs or frame.
When designing a building from brick or blocks, first create a mauerlat (from timber measuring 150 mm by 100 mm-150 mm), fix it on studs or anchors. Next, a frame of beams is attached to it, in which undercuts are made in advance for a tight connection with the Mauerlat. Fixation is carried out using reliable metal corners and nails.
Important! It is necessary to reliably protect the Mauerlat - builders lay out a layer of waterproofing between it and the walls. For example, roofing felt, this guarantees wear resistance and strength.
Valley device
Let us immediately pay attention to the requirements for arranging the base for the valley plank: the base here will be a solid wooden sheathing.
The design of metal junctions should ensure maximum tightness of the roof at the junction of two slopes. Therefore, the valley strip must be secured to the sheathing with clamps (in no case with self-tapping screws), and the junction of the paintings to the valley should be closed with a double fold.
It is recommended to bend the resulting ridge, forming a recumbent fold at the junction.
The owner of the sofa
It’s not the best solution to make holes in the paintings (and at the same time the valley) with self-tapping screws. It is more correct to make a fold (fold) on the edge of the picture and place it on the corresponding fold of the valley. The result is a recumbent fold. The overlap size is approximately 30 millimeters. The endova, in turn, is attached with clamps to the sheathing.
These rules are relevant for folded pictures and profiles made from sheet or rolled products using sheet bending/folding equipment. When installing junctions on a “self-latching roof”, you should follow the instructions and recommendations of the roofing panel manufacturers.
Wall connections
The connection to the wall is a structural element without which no complex roof can do. Such connections have a simple design and are made using a special profile.
You can learn more about the features of standing seam roofing, as well as the technological aspects associated with its installation, in the corresponding section of our portal. You can get information about the features of the operation and restoration of seam roofing by reading the article based on the recommendations of FORUMHOUSE users. For those readers who want to see a visual master class on installing a seam roof, we have prepared a short thematic video.
Advantages
Seam roofing has a number of advantages, among which it is necessary to highlight:
- Reliability and long service life thanks to the rebated snap-on system, which does not require the use of nails. The absence of holes will extend the service life of the material for many years.
- Moisture resistance, which is explained by the same reason - structural integrity. A roof with a seam covering will reliably protect a private home and its inhabitants even on the rainiest day.
- Most roofing materials require a strong rafter system; it is often necessary to strengthen the roof frame. In the case of rebated roofing, this problem does not exist, since it is light in weight.
- Versatility. Seam roofing is perfect for any type of roof, because it can be used to decorate both flat, pitched and multi-gable roofs.
- Fire safety. Metal provides reliable protection against fire.
- Snow and rain will not linger on the roof, since the seam roof has a smooth surface on which precipitation will slide.
- No corrosion due to a unique fastening system.
- Easy to maintain and repair.