If gas is chosen for heating the house, care should be taken to remove combustion products. This means that you need to select and correctly install a chimney for a gas boiler. Compliance with the rules and regulations in this matter absolutely cannot be neglected, since this can call into question not only the health, but also the life of the residents of the house.
We are ready to share with you useful information about the rules for installing and connecting a chimney for a gas unit, and about the specifics of selecting the optimal design. The information is complemented by visual illustrations and video instructions.
Choosing material for the chimney
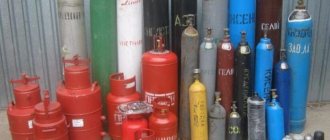
When installing smoke exhaust systems, metal, ceramic and coaxial pipes can be used.
You need to decide which pipe is needed for a gas boiler in accordance with the requirements of a particular boiler model. If the documentation does not contain such information, then you will have to study the characteristics of each of the presented materials. The most popular material for making chimneys is metal. Stainless steel is most often used, but galvanized steel options are also available. In any case, the operating temperature in the chimney of a gas boiler when using metal pipes can reach 800 degrees, which is quite enough for arranging a combustion product removal system.
The design of metal chimneys includes an inner layer made of stainless steel, a thermal insulation layer made of basalt wool and a thin metal casing. Such devices are quite reliable, highly durable and have acceptable visual qualities.
The next option is ceramic chimneys, designed for operation at temperatures up to 1200 degrees. Such devices have a three-layer structure, which includes a ceramic layer, thermal insulation and an outer shell of expanded clay concrete. The main advantages of ceramic chimneys include simplicity of design and installation, reliability and high fire safety.
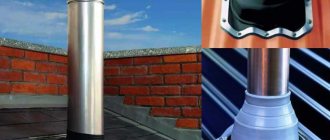
The last type of chimney is coaxial, which looks good and has very good performance characteristics. Thanks to the two-layer design, coaxial chimneys are reliably protected from condensate. In combination with gas boilers, this quality is especially pronounced, so choosing a coaxial chimney in this case will be the most justified.
There are also brick chimneys, but they are initially designed for use with solid fuel heating equipment. In order to be able to connect a gas boiler to a brick chimney, the latter must be converted by inserting a metal part into it and performing thermal insulation work.
How to properly install a coaxial chimney
Installation of the air/combustion products system is extremely simple. The pipe section and the elbow are connected “in a socket”; no gaskets or sealants are used (there is already an O-ring on the internal channel). How to install a horizontal chimney:
- Install the wall-mounted or floor-standing boiler in the designed position. Make an external hole and mark the route with a pencil on the wall.
- Connect a 90° bend or a straight section to the boiler fitting, depending on the installation diagram. Different adapters are used here - in some models you must first install a metal sleeve, in others you need to screw a flange to the unit body.
- Attach the next section; before joining, place an elastic cuff on the pipe.
- Pull the cuff over the joint, place the clamp on top, then tighten it with the screws included in the kit.
- Place an internal decorative apron on the pipe passing through the wall. Install a section of a coaxial chimney with an outer cap (divider), seal the gaps.
- If the gas duct was extended during installation, attach the pipe to the wall with special clamps.
Assembly diagram of a chimney system with a horizontal outlet
A few words about how to shorten a coaxial pipe if the chimney sticks out 40–50 cm from the outside. You need to trim the end of the straight channel from the heat generator side, do not touch the head.
Remove the inner flue and cut both pipes separately, since their ends do not match when assembled. The master will tell you more about installation in the video:
Step-by-step instructions for constructing a smoke exhaust system
Chimney location options for a gas boilerHow to install a sandwich chimney
The procedure for arranging a chimney will be considered using the example of constructing a sandwich system made of pipes. This is the most optimal and universal solution. There are 2 methods of assembling such a structure: inside the house and outside it. Explore both options and choose the one that suits you.
Outside the building
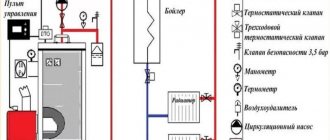
Gas chimney installation diagramChimney location for a gas boiler
First step. We connect to the heating unit nozzle a pass-through element intended for laying through the wall.
Elements for connecting a gas boiler to a chimneyConnecting a gas boiler to a chimney
Second step. We apply markings to the wall surface in accordance with the dimensions of the passage element and cut out the opening.
Hole in the wall
Third step. We remove the smoke exhaust pipe from the room.
Exiting the pipe through the opening
Fourth step. We carefully insulate the hole and the pipe passing through it.
How to make your own overlay plates
Fifth step. We attach a tee with an inspection to the pipe, then install a plug
Sandwich teePlug for inspectionConnecting a tee with inspectionConnecting a tee with inspection (bracket and clamp)
Sixth step. We extend the chimney by adding new links until the required length is reached. Having reached the planned height, we install a cone-shaped tip on the pipe. It will protect the system from precipitation and wind. To attach the pipe to the wall of the building we use brackets. The spacing of fixing elements should not be less than 200 cm.
Assembling a gas boiler chimney
Seventh step. We strengthen all joints of the structure with clamps. We tighten them with wire or bolts.
Eighth step. We paint the chimney with a special heat-resistant paint and varnish composition. It will provide adequate protection of the material from rust.
Inside the house
Inside the house
Let's start with preparation:
- we mark holes for the pipe in the ceilings and roof;
- Having checked the marks with the dimensions of the pipe, we make an opening for the chimney.
Next we deal with the actual installation of the chimney.
First step. We connect the adapter to the unit pipe.
Second step. We install the tee and revision.
Third step. We begin to build up the chimney.
Do-it-yourself chimney installation and installation
If necessary, we carry out work using the so-called. knees Where the pipe crosses the floors, we use a special protective pipe.
Docking
Fourth step. We put a stainless steel sheet on the chimney. We cut a hole in the sheet in advance, slightly larger than the diameter of the pipe. Such a sheet should be located on both sides of each floor.
Scheme for arranging a hole in the ceiling Ceiling-pass-through device Construction of a ceiling-pass-through device box Construction of the bottom of a ceiling-pass-through device box Installation of a ceiling-pass-through device Exit of the chimney pipe through a ceiling-pass-through device
Fifth step. We strengthen the joints of the structure with clamps.
Sixth step. If necessary, attach the pipe to the attic beams. To do this, we use brackets (every 400 cm) and wall clamps (every 200 cm).
Fastening the chimney with a bracket Roofing element 20/45 degrees diameter 300 mm (sandwich) Roofing passage Do-it-yourself installation and installation of the chimney Mushroom deflector
Seventh step. We install a cone-shaped tip (deflector) at the chimney outlet.
Assembly diagram for a hood for a gas boilerChimney elements
Insulation of the smoke exhaust structure
Insulation of the smoke exhaust structure
At the points of contact between the elements of the smoke exhaust pipe and flammable materials, reliable thermal insulation must be installed. To ensure this, cover the passage pipe with basalt wool with a foil layer. Fasten the insulation using fire-resistant mastic. Additionally, lay mineral wool around the perimeter of each opening in partitions and ceilings.
At the end of the installation, be sure to check the tightness of each seam in the system. To do this, simply apply a simple soap solution to the seams. The appearance of soap bubbles indicates a violation of the tightness of the system. Fix any detected problems as soon as possible.
Boiler connection diagram Gas floor-standing boiler
Good luck!
How to avoid problems with poor traction - the best ways
So that you don’t have to wonder how to improve draft in a chimney, you need to constantly monitor all processes related to heating, from creating drawings to operating the fireplace or stove. After all, a low draft speed may be associated with improper design of the fireplace, connection of parts, a large amount of ash, holes in the chimney, or poor insulation.
So, you need to monitor the condition of the chimney and heating structure from the very beginning (monitor the condition of the joints and connecting parts). Be sure to install a grate for self-discharge of ash; do not forget that the ash pan should always be slightly open to ensure air circulation. The chimney itself is best insulated with mineral wool or any other suitable insulation. Finish the lower part of the pipe with foam plastic and plaster, which will protect the structure from sudden temperature changes.
Do not forget to regularly remove ash from the fireplace so that it does not become an obstacle to the outflow of smoke and normal air circulation. Twice a year, use the necessary cleaning agents to remove soot from your chimney. Carefully monitor the condition of the pipe - there should be no cracks or damage. If they appear, immediately seal the resulting cracks, which will normalize the draft without installing additional devices. Now you know how to determine the level of thrust, the main reasons for the decrease in its speed and methods for solving problems. We hope our tips will help you improve your deadlift as quickly as possible.
Required components
The standard list includes:
- Boiler adapter. The initial section of the pipe. Responds to the required rotation during installation. Suitable for assembly in the direction of condensation.
- Starter sandwich. With its help, a transition is made from a single-wall to a sandwich (double-wall) structure.
- The gates are rotary. A valve or damper with several holes. The damper blocks the flow of carbon monoxide.
- Crimp clamps. Fasteners for tensioning are made of steel. Fix the chimney system in a stationary state and do not allow it to come into contact with the stove.
- PPU (ceiling-passage unit) with mineralite. Used in cases where the pipe will pass through the ceiling or roof. The composition includes fireproof insulating material, followed by a layer of air and space for fastening a layer of thermal insulation.
- Tees at 45, 90 degrees. Change the direction of exit of flue gases.
- Cap or head. Performs the function of an umbrella, protecting the internal cavity of the chimney from precipitation.
- Sandwich sections. Straight, 3-4 pieces. Length from 25 to 100 cm.
- Brackets, screws. They will connect the structural parts.
- Knees at 90, 45 degrees. Allows you to mount the chimney at the desired angle.
- End caps.
- Various adapters, condensate collectors.
- Support platform. Distributes the load evenly.
- Window for cleaning the chimney.
The list of elements is incomplete, since each heating system has its own characteristics. There are options for direct smoke channels with condensate drainage and stands.
Required Tools
After carrying out all the necessary calculations and deciding how to make a chimney pipe yourself, you need to prepare all the required elements. In addition to the list of parts of the sandwich system itself, you need to have on hand a list of the following items:
- clamps for tightening;
- support brackets;
- necessary hardware fasteners;
- heat-resistant sealant;
- grinder, metal scissors;
- spatula for sealant;
- roulette;
- square;
- screwdriver;
- drill and hammer;
- building level.
You also need a marker or construction pencil for marking. When assembling, the joints of the parts must be secured with clamps. The entire resulting structure is fixed vertically along the wall using brackets in increments of 1.5 to 2 meters.
General installation requirements - point by point
If you plan to perform all operations for arranging smoke exhaust structures yourself, remember the following rules:
The chimney is assembled with a minimum length of horizontal sections. It should be predominantly vertical. The presence of horizontal sections with a total length of up to 5 m is allowed. In this case, the use of more than 3 bends for the construction of the highway is strictly prohibited. Surfaces that are located next to the installed gas exhaust tract must be treated with fire-resistant compounds and heat-resistant materials. When calculating the cross-sections of holes punched in the roof and interfloor ceilings, take into account the thickness of the thermal insulation layer, and not just the cross-section of the pipe product being installed. The height of the exhaust pipe varies from 50 to 500 cm. Its specific size depends on how it is located in relation to the roof ridge. The inner surface of the hood must be smooth and characterized by a constant cross-section along the entire length of the line. All under-roof and inter-floor connections are made completely sealed
Important - the organization of joints inside the ceilings between individual parts of the chimney is unacceptable!
Small windows should be installed on the elbows of the exhaust structure and on its horizontal sections, which will allow you to regularly clean the structure. It is also recommended to place a drip tube - a special tank - slightly below the heating boiler pipe. It is necessary to collect condensate.
Installing a drip pipe on a chimney
If your house has 2-3 gas units, they can be connected to one exhaust system. But there are two conditions for the implementation of such a scheme:
- The cross-sectional area of the outlet line must be equal to the area of the widest pipe (outlet) of the gas installations used.
- The height distance between the flue gas entry points from different boilers should be 0.75 m.
Install a high-quality chimney with your own hands, following the tips outlined in the article. And then you will not have any problems with the operation of the heating system!
Optimal placement of the heat generator and chimney in the house
Many people are familiar with the expression: “Dance from the stove!” It means that the house should be built around the stove, and not vice versa - the heat generator and chimney are squeezed into an already built cottage by hook or by crook. In other words, it all starts with design. This is the choice of location for the foundation and chimney, for example, under a stone stove or fireplace lined with brick, the size of the indentations when passing through the ceilings and rafters and the chimney outlet through the roof.
If you neglect this rule, the installation of the entire system will become significantly more complicated, which will lead to an increase in construction costs.
Traditionally, the most rational place to place a stove and further install a vertical chimney is the conventional center of the house on the ground floor.
With this scheme, heat flows from the heated furnace are optimally distributed. Additionally, several adjacent rooms are heated, and the chimney ends up in an insulated area and as close as possible to the ridge of the house. We will explain why this is so important below.
Room standards for installing a gas boiler, where it is better to install the device
The premises where the gas unit is planned to be installed are subject to the most stringent requirements.
According to current standards, it is allowed to install them in non-residential premises equipped with high-quality ventilation.
In addition to the presence of ventilation, the area of the room must correspond to the power of the unit and the design of the combustion chamber. When a boiler and a gas water heater are installed together, their capacities are summed up.
Important! According to existing standards, the installation of two gas devices is allowed in one room. The following standards have been established:
The following standards have been established:
- gas boilers with a power of less than 30 kW are allowed to be installed in rooms with a volume of at least 7.5 m³;
- boilers with a power of 30-60 kW require a space of more than 13.5 m³;
- for installation of more efficient boiler equipment, the minimum volume is 15 m³.
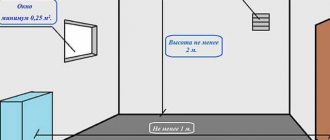
Standards for installing the device in the kitchen of wooden and other types of houses
It is important for homeowners planning to place equipment in the kitchen to know that there are special standards for this room:
- The area is more than 15 m².
- The height of the walls is at least 2.2 m.
- A window opening outward, equipped with a window. For 1 m³ of room volume there should be 0.03 m² of window area.
Photo 1. Gas boiler located in the kitchen. The device is installed in a special cabinet, which is closed with a lattice door.
- If the building is wooden, then the wall adjacent to the boiler is covered with a fire-resistant shield. The size of the shield is determined so that it protrudes 10 cm beyond the boiler at the bottom and sides, and covers 80 cm of the wall at the top.
- When choosing a floor-standing model, a base made of fire-resistant material (brick, ceramic tile) is installed under it, protruding 10 cm on all sides of the boiler.
- In addition to the presence of exhaust ventilation, there is a gap at the bottom of the door for fresh air to enter. It ensures constant air circulation.
- When installing a heating unit, it is necessary to maintain a certain distance between the wall and the boiler (more than 10 cm).
Requirements for a separate boiler room
When constructing an extension to the main building to accommodate boiler equipment, the following conditions must be met:
- the foundation of the extension is carried out separately from the main building;
- the design is made of fire-resistant materials, the same requirements are imposed on the interior decoration;
- mortar is mixed on sand;
- the foundation for installing the boiler is poured separately, after the completion of the extension;
- the base intended for installation of equipment is 15-20 cm higher than the floor surface.
Further requirements correspond to the conditions for installing boilers in non-residential premises:
- ventilation system providing three air changes within an hour;
- the distance between the floor and ceiling is at least 2.5 meters;
- boiler room volume is more than 15 m³, a larger volume ensures comfortable maintenance of all equipment elements;
- Water must be installed and a drain must be installed in the floor;
- all electrical outlets in the room are grounded;
- daylight;
- When placing the boiler installation, free access to the unit is ensured.
Photo 2. Boiler room with two gas boilers. The devices are installed on a special pedestal, providing access to sunlight.
Certain requirements are also imposed on the equipment used when operating the boiler:
- only metal pipelines are used for gas;
- The device is grounded using a separate grounding circuit;
- Without a gas meter, an automatic valve that shuts off the gas supply in the event of a leak, and a gas analyzer, the equipment cannot be put into operation.
Reference. Modern gas units are equipped with protective automatic systems of varying complexity that shut off the gas supply in the event of a malfunction.
Installation of a coaxial chimney: requirements
The total length of the coaxial chimney should be no more than 3 meters (for condensing boilers up to 5 meters).
Photo 1. Assembly diagram of a coaxial chimney for gas heating. All main parts of the structure are indicated.
No more than 2 turns (2 rotary bends) are allowed along the entire length of the smoke channel.
Important! The smoke exhaust channel is routed to the street through the wall. It is forbidden to display it out of a window or vent! It is prohibited to lead the smoke exhaust duct into the entrance, onto a closed balcony or loggia, as well as onto a street containing buildings of architectural or historical value, children's and medical institutions
It is prohibited to lead the smoke exhaust duct into the entrance, onto a closed balcony or loggia, as well as onto a street containing buildings of architectural or historical value, children's and medical institutions.
In addition, the general requirements applicable to all types of chimneys must be met:
- The diameter must be equal to or greater than the cross-section of the boiler outlet pipe.
- It should not have any curvature along its entire length, and its cross-section should not decrease.
- The smoke exhaust duct must be gas-tight, watertight, and the joints must be carefully insulated.
Installation
Installation of a coaxial chimney is not particularly difficult. In the standard case, the outlet is carried out through the wall on which the boiler is mounted.
Photo 2. Installation diagram of a coaxial smoke outlet for a wall-mounted boiler. The required indentations and diameter of the pipes are indicated.
In this case, a small piece of vertical section is attached to the device pipe, then a 90-degree rotary elbow is placed. Next comes the horizontal part, which is led out through a hole in the wall to the street. The length of the street part is at least 30 cm. The structure ends with a special head.
When the smoke exhaust channel is removed offset from the boiler or through an adjacent wall, the circuit becomes somewhat more complicated and requires the purchase of additional parts.
Attention! To avoid condensate getting into the boiler furnace, the horizontal section must be located with a slope of 3 degrees towards the street. The fitting of the coaxial chimney parts by the manufacturer is carried out carefully; additional sealing of the connections is usually not required
The fitting of the coaxial chimney parts by the manufacturer is carried out carefully; additional sealing of the connections is usually not required.
The diameter of the hole in the wall for venting smoke to the street is made several centimeters larger than the diameter of the outer pipe. Upon completion of installation, the space is sealed with polyurethane foam.
Some manufacturers provide boilers with separate pipes for smoke removal and air supply.
This design expands installation options to three options:
- both pipes are discharged through one wall;
- pipes are led out into different walls;
- the air supply system is discharged into the wall, and the smoke exhaust system into the existing chimney.
The third option is especially relevant for multi-apartment residential buildings.
Advice. In non-standard cases of chimney location, contact specialists to draw up a diagram.
Sandwich pipe connection options
If you are interested in the question of how to assemble a sandwich chimney, another question will probably arise: how to join the system pipes together. There are two possible options, and each of them has its own name:
- “By smoke”, when the lower pipe goes inside the upper one. In this case, combustion products have no way out and are freely discharged upward;
- “Ppo condensate”, when the inner upper pipe is inserted into the lower one. External pipes are assembled with the top side facing out.
It is believed that in the second case the risk of moisture getting into the insulation is reduced, but if the tightness is broken, then some of the combustion products may enter the room.
Connection for smoke and condensate Source www.rusovent.rf
Chimney device for a turbo boiler
The coaxial flue duct is a double-walled “pipe-in-pipe” structure that simultaneously performs 2 functions: removing smoke to the outside and taking in combustion air from the street. Hot gases move along the internal channel, the air flow goes towards the outer channel (between two walls).
Important point. The forced movement of combustion products and air is provided by the gas boiler fan; natural draft does not work here. At the same time, the coaxial chimney cannot be connected to turbocharged units using other types of fuel - wood, pellet or diesel.
The diagram shows a vertical version of the chimney, but more often it is installed horizontally
The 2 in 1 chimney system “air/combustion products” provides the following advantages:
- Hot gases give off some of the heat to the air flow, the combustion process improves, and the efficiency of the heat generator increases.
- The coaxial pipe is led out horizontally, using the shortest route through a hole in the outer wall. In some cases, vertical installation is possible.
- Thanks to the double-walled design of the flue, the turbo boiler or column can be installed in almost any room without a traditional smoke duct - the kitchen of a country cottage, garage, basement and even in a bathhouse. The room must meet the requirements for gas boiler rooms.
- The owner does not need to worry about the additional flow of air needed for combustion. Although general ventilation will still have to be done.
The disadvantage of the chimney system is the freezing of the tip in severe frost. The sucked air comes into contact with the hot wall of the inner pipe and releases condensation, forming an icicle. The problem is solved by installing a special stainless steel extension cord.
Main elements of a coaxial chimney:
- straight section with a head at the end;
- the same double-walled bend at 90° or 45°;
- adapter – adapter for the coaxial output of the boiler;
- connecting clamps, flanges;
- elastic cuffs, aprons;
- inspection section with condensate drain (for vertical installation);
- fastener
Installation kit for STOUT coaxial system for horizontal installation, adapter suitable for gas heat generators Bosch, Buderus
We will tell you later how to install coaxial elements correctly. But first we suggest you study...
Principle of operation
The operating principle of any chimney is based on a simple law of physics - warm air and vapors are always lighter and tend to rise, while cold air is heavier and, accordingly, settles below.
Due to the difference in temperature between the street (outside the pipe) and hot gases (inside the system), draft appears. Thanks to it, combustion products do not disperse throughout the room, but escape into the atmosphere.
Conclusions and useful video on the topic
Video #1. How to provide for all the nuances when installing a boiler room:
Video #2. More information about installing natural ventilation:
https://youtube.com/watch?v=LqBV3Ih5-yM%2520
Video #3. Review of coaxial chimney:
The principles of installing boiler room ventilation for gas equipment are similar to equipping other rooms with air ducts, so for experienced craftsmen most of the work is quite accessible and feasible.
The most difficult stage concerns design and calculations - in order to avoid making mistakes, we recommend contacting heating engineers or qualified gas installers.
Please leave comments in the block form below, ask questions about points that interest you, and post photos related to the topic of the article. Tell us about how you installed the ventilation system in your own boiler room. Share useful information that will be useful to site visitors.
Make it yourself or order it
Order a chimney from professionals or do it yourself – it’s up to you.
Proper independent installation of a smoke exhaust system will definitely save the family budget. When installing, be sure to comply with all requirements of SNiP and fire regulations.
Despite the fact that the temperature of the exhaust gases is low, the harm from them is no less than from any other emissions. Therefore, special attention should be paid to the tightness of joints.
It is also mandatory to organize a condensate collection system.