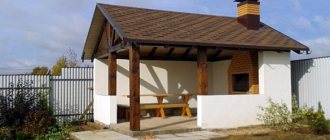
DIY bird nest
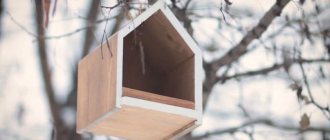
A nest box is a homemade birdhouse, titmouse, poultry house, made from cutting a log by hollowing out its core. It is installed on an improvised base, closed with a lid on top, and a hole for entry is made in the side wall. Used as an artificial nesting site for birds. Located on a tree in the forest.
A log nest differs from a regular birdhouse in its visual proximity to the tree trunk. In most cases, birds nest in nest boxes. Types of nest boxes vary in several characteristics, determined by the breed of birds for which they are intended.
Feeder "Avoska"
Often in supermarkets, vegetables and fruits are packaged in nets. Previously, our ancestors used to go shopping with these and they were called “string bags.”
Now it’s time to use them for good deeds by putting bird food in the net. True, you will have to work hard to make a bird's dinner that will not fall through the holes.
Mix the grain or grain mixture with unsalted lard, after melting it. You can use peanut butter instead of lard. Roll the resulting mixture into a ball, put it in a string bag and hang it on a tree.
The fat will harden in the cold and the food will not spill out. But it will be convenient for sparrows and tits to peck it through the net.
To prevent the food from getting wet and softening under the influence of precipitation, you can attach a gable roof over the string bag.
Materials and tools
To make a nest box with your own hands, you will need the following set of tools and accessories:
- Workbench;
- hammer;
- axe;
- wood hacksaw;
- chainsaw (preferably);
- drill;
- wood chisel;
- feather drills.
This house is preferably made of aspen or linden. Other softwoods can be used with a minimal amount of resin.
What and how to put in the feeder
When trying to save birds from the harsh winter, do not go too far, so as not to harm the birds with your ill-conceived care. Avoid giving your winged pets salty, fried, rancid or moldy food. You cannot feed birds millet and black bread.
But for sunflower seeds or oatmeal, the birds will be incredibly grateful to you. The wards will not refuse raisins, peanuts, and soybeans.
If you don’t know what to feed sparrows and titmice, purchase a balanced grain mixture at a pet store. There you can select food for each individual bird species that lives in your area. Just don't pour in a whole mountain of food at once. It's better to add a little each time.
Don't wonder if you need a feeder. Be sure to make the simplest one with your children and instruct the younger generation to ensure that it is always filled with bird food.
Manufacturing
Not everyone will decide to make such a house. You need to be patient and diligent. Let's see how this happens step by step.
Procurement of material
The cut log should be moderately dry, since completely dried wood is difficult to process. A too-damp chock from a tree in which sap has recently flowed may be rejected by birds. The wood is in a state suitable for the poultry house in the autumn-spring period.
The ideal option is fresh dead wood, the presence of which prevents damage to the forest for the purpose of harvesting material. If its middle part is rotten, this is not a problem. Birds often settle in hollows formed by the destruction of the middle part of the tree.
From a log with a diameter of 20–25 cm, you need to saw off a log 30–40 cm long. This length will allow you to achieve the best result with minimal effort and time. If there is bark on the surface of the log, it is worth preserving it if possible. It gives the artificial nesting site a natural look and serves as thermal protection.
If the bark is poorly attached and tends to fall off, it is better to remove it in advance.
Hollowing out the core
In order to remove the middle part from the stump, you can use a drill and feather drills. The amount of the latter may vary depending on the density of the wood. If the drill is only available in one copy, it must be periodically sharpened with a grinder or an emery machine. Drilling with a blunt tip can waste a lot of time and increase the load on the drill motor.
Before starting drilling, you should outline the inner circle - the border of the walls of the nest. Their optimal thickness is 2-2.5 cm, excluding the thickness of the bark. The thickness of the wall ensures the durability of the nesting box. And the diameter of the internal “room” affects the population of birds and the number of chicks they can afford.
Drilling is done using the point method. It is necessary that the resulting holes lightly touch each other. The work is carried out in several stages: the core is drilled to a depth of 5–10 cm, which depends on the length of the drill. Then finishing is done with a chisel. The inner side of the walls is given a condition close to flat. After this, spot drilling and manipulation with a chisel are repeated until the inside of the log is completely removed.
Important: during the drilling process, oil materials should not be used to lubricate the drill and reduce friction. There is a possibility that the technical smell will become entrenched within the nest box, which will scare away the birds.
In some cases, it is possible to complete the core excavation at a distance of several centimeters from the end of the stump, opposite the one from which drilling began. In this way, the bottom of the birdhouse will be formed, which is the best solution regarding the “floor” of the house.
The size of the entrance hole of the nest should be determined taking into account what birds are most likely to occupy this dwelling. Tits are representatives of a species of birds that more often than others set up nests in artificial houses. The diameter of the hole for the titmouse should be no more than 30 mm. Exceeding this value can lead to larger birds moving into it or to complete ignoring of the impromptu nesting site. The edges of a round “door” opening should be smooth, polished, rounded, and free of sharp protrusions and splinters.
Another option for arranging a passage to the nest is to use a hole from under a knot. To do this, you need to remove it from its seat and process the edges.
Lid
The choice of element that covers the upper hole must be approached very carefully. It is advisable to use for its manufacture the same type of wood from which the main body of the titmouse is made.
It is important to exclude the possibility of moisture and drafts getting under the lid. Croaker is a board with a semicircular side that is best suited for covering a poultry house. The rounded shape will ensure moisture drainage during rainy times. It is advisable to choose a lid, the size of which will allow you to create protrusions of the “roof” over the walls of the nest, and a canopy of sufficient length over the inlet. To create a greater angle of inclination of the slab, you can cut the top of the house at a slight angle.
The place of contact between the lid and the walls of the log must be sealed with moss, and in the absence of the latter, with odorless window putty. You can screw the lid to the walls of the bird's home using self-tapping screws. To prevent the wood from splitting at the points where the screws are screwed in, mounting holes should be drilled with a diameter of 2–3 mm. Screw the hanging hook into the center of the lid. It should not stick out from the inside of the cover board.
Important: the roof of the nest must be attached to the body as firmly as possible. When hanging the nest by the hook, the entire load will fall on the mounting screws.
Using screw elements to attach the cover is the best option. This poultry house requires annual cleaning of debris. If you have screw-on fasteners, this will be much easier.
Feeder from a 5 liter bottle
It’s difficult to work with coconut, but almost anyone can make a feeder from a bottle. Take a 5 liter plastic bottle.
Draw three or four squares on the same level so that the bird can fit. Cut out three sides of each square, leaving the top line intact.
Fold the resulting square outward to create a canopy. Pour some bird treats inside the bottle and wait for your guests.
Plot
Many people remember how, during labor lessons, boys learned to make houses or bird feeders, which they then placed in the school garden, and the best craftsman was rewarded with praise on the ruler. Today such events are held extremely rarely. Our smaller brothers, living in the natural environment, do not always have the opportunity to independently arrange their “place of residence.” Due to their capabilities, people are obliged to help them in this by inventing nest boxes, birdhouses, feeders and other architectural structures with their own hands. This article will talk about that. How to make a nest box with your own hands.
Content:
Everything that is done for animals or birds must be made exclusively from natural materials that smell reminiscent of a natural habitat that is as close to reality as possible. The design of titmouse nest boxes should be simple, without labyrinths or intricate passages. It doesn’t matter what kind of bird will live in it. The main thing is that in such a “housing” she feels comfortable and cozy.
Due to the fact that birds build nests, as a rule, during the period of hatching their offspring, the size of the nest should be large enough. The use of any paint and varnish materials is strictly prohibited. After all, the smell of chemicals will simply scare away birds from such a nesting site, transforming all efforts into the status of a simple craft.
Do-it-yourself nest box
Traditionally, a log or block of wood of any species is used to make a nest. This product can be manufactured in three types:
- made of hollow wood with a bottom that is additionally attached;
- dugout;
- drilled.
The easiest way to make a nest is to use a log in which the core has rotted. If you intend to build a bird nest with your own hands, you should stock up on patience, the necessary tools and raw materials.
Building a birdhouse is much easier and faster than building a nest box. However, most birds prefer the latter option when thinking about where to breed their offspring. The explanation is quite simple:
- this design is more similar to a hollow, the usual habitat of birds;
- the bottom area of the nest box is larger than that of a birdhouse with the same parameters;
- have a high heat saving rate;
- when placing the nest in the forest, it is camouflaged as much as possible to resemble the natural environment, since it is attached to a tree.
This is a rather important nuance, since protection of offspring from predators is the primary task of adult birds.
No special material investments are required to create a nest box. Having found one large log in the forest, you can make two or three bird nests at a time. The best material is aspen logs, although other types of wood will also work.
Before making a nest box, you need to go in search of raw materials in the nearest forest. It is recommended to take a closer look at those fallen trees where the top layer of bark is without any particular damage or cracks, but the core begins to rot and rot. If you manage to find such a specimen, then it will not be difficult to build a nest box, because nature has already done half the work, and all that remains is to improve the design of the nesting box.
Stages of work on creating a do-it-yourself nest box
- So, for work you will need: a saw or a hacksaw for wood, a chisel, a hammer, a drill, a drill, nails.
- The optimal diameter of a log trunk is 22 cm, excluding bark. If the log is long, then using a saw you should divide the trunk into logs. The optimal size of the nest varies between 20-40 cm. It is best to remove the bark from the workpiece before starting work.
- The resulting logs are laid out and the condition of the core is assessed. Depending on how rotten the tree was already, a tool is determined for the next stage of work.
- They begin to make a hole from the middle of the log, gradually expanding its diameter. You need to be extremely careful, because closer to the edge the core is harder and you have to make an effort or use another tool. Almost all the work can be done with a chisel. We must try to keep the interior space as round as possible. The thickness of the walls of the nest is 1.5 – 2 cm.
- If the core of the log is still damp, then it is best to use other equipment - a drill and a drill bit (diameter of at least 20 mm). With some effort, it is necessary to drill holes around the entire perimeter to approximately half the log, not forgetting the thickness of the walls. Do the same on the other side of the log. Moreover, the holes should be located as close to each other as possible.
- Using the same drill, the jumpers are removed, after which the core of the log is removed without much effort.
- Someone does it differently; instead of cutting it out, they simply burn out the hole in the nest.
- Next, they begin drilling the tap hole. Ideally, you should choose a log that has a small knot from a broken branch. If this twig is large enough, you can make a hole right in it, creating a kind of entrance to the nest. If its dimensions are small, then, stepping back a little, drill a hole - a taphole (8-10 cm in diameter).
- In order for the birds to be comfortable inside their nesting area, the internal space should be cleaned as much as possible from uneven areas and nicks. This process begins to be carried out from the side where it is supposed to equip the bottom. Using a semicircular chisel, all defects are removed step by step. However, they do this in such a way that small chips remain on the barrel.
- It should turn out approximately as shown in the photo. This is a little secret and a kind of help for the chicks. As they grow up, they will be able to get to the entrance as if they were using a ladder. Thus, the base for the nest is prepared. All that remains is to make the bottom and roof.
Orange bowl
You can come up with some pretty original bird feeders. For example, use an orange for this purpose. Cut the fruit in half and eat the pulp.
And make four holes in the skin opposite each other. Stretch the twine through them, connect them crosswise and tie the upper ends to a tree branch. The result is a container into which you can pour the grains.
March is the time to hang up your homemade birdhouse
This is also a help to smaller feathered brothers and a means of combating harmful insects in the garden. Let's look at what birdhouses there are, how to make a birdhouse with your own hands, and tell you what else you need to know to make your birdhouse useful.
- We remember the school curriculum, or what a birdhouse is
- Birdhouses from FORUMHOUSE members
- Record-breaking birdhouses
- Simple DIY birdhouse
- How to make a nest box
- A selection of drawings of birdhouses that you can make yourself
- How to properly install and care for a birdhouse
Photos of birdhouses made of cardboard
When making housing for birds that will be used outdoors, you need to take care of their comfort, all cracks must be eliminated, fill them with hot glue. Both the house and the roof can have an absolutely creative solution, it all depends on imagination, the ability to combine colors. Very beautiful and original bird houses look great, decorated in soothing colors, with images of flowers and berries. You can make housing for birds at home from any cardboard boxes, tetra-packs. You can easily decorate a cardboard house in any style and using available materials
We remember the school curriculum, or what a birdhouse is
A birdhouse is an artificial nesting place for small and medium-sized birds, which in the natural environment create nests in hollows.
In Soviet times, schoolchildren annually made birdhouses during labor lessons and hung them on trees in order to help the birds with food and shelter in the spring after arriving from warmer climes.
Despite the fact that, by name, birdhouses are intended for starlings, sparrows, tits, wagtails, redstarts, woodpeckers, blackbirds, nuthatches and other birds also like to live in them; Even squirrels can take a liking to a bird's house.
Among other things, birdhouses can bring great practical benefits to your garden. Birds are our best comrades in the fight against harmful insects. Leaders among birds in the number of insects killed:
Tits, for example, lay eggs 2 times per season with an average of 10 eggs. Their chicks are voracious that their parents bring them food to the nest up to 400 times a day. Thus, during the childhood of the chicks, about 10,000 insects (as well as their larvae), most of them harmful, are destroyed. That is, one pair of adult tits can clean up to 45 apple trees per season.
Even seemingly stupid sparrows are useful for the garden, in which the period of the first offspring coincides with the appearance of the larvae of the enemy of apple trees - the apple flower beetle.
In addition to birdhouses, titmice, wagbirds, flycatchers and other bird houses are also made. These modifications differ from each other in size, shape and taphole.
For example, a titmouse has smaller dimensions than a birdhouse and a square bottom.
The wagtail has a flat porch in front of the entrance, as wagtails like to “walk.”
Feeder from a 2-liter bottle
Take two or three wooden spoons. Make two through holes in a 2-liter plastic bottle so that the handle of each spoon pierces right through the bottle. At the same time, so that the spoons come out with the scoop in different directions.
Pour the beans into the bottle. Through the holes, food will be poured into spoons, and birds will be able to peck it without difficulty.
Birdhouses from FORUMHOUSE members
The topic of birdhouses is close to the participants of our Forum. There were so many options for bird houses on the pages of our website.
For example, an option from user Dmitriy_D, made from a ready-made “Assemble it yourself” construction set, and decorated with our logo.
Classic birdhouse from user legith:
This beauty was made by user leon42 with his son for a competition at school:
This is the birdhouse her husband pampered our participant Olko with:
Bird cottage from Lisovin:
If the birds do not find a house specially designed for them, they can adapt other objects into a birdhouse, for example, a mailbox, like our participant Yulentsia:
By the way, wooden birdhouses first appeared in Russia back in the 18th and 19th centuries. And in Europe they were originally created from clay.
A little history
People started building houses for birds not very long ago. Birdhouses appeared in everyday use among citizens of our country approximately 300 years ago. For the first time, the idea of building houses for feathered friends was introduced in Europe in the 15th-16th centuries. Only there the goal was pursued more for the benefit of people, namely, they loved to eat birds as a delicacy and caught them for meat.
Therefore, the decision was made to take advantage of the gifts of nature and catch the bird in a birdhouse near your home. Bird houses were also built near restaurants and taverns in order to quickly deliver free goods to the establishment’s cook.
Birdhouses were brought to the lands of Russia during the time of Peter I. In his personal use and in the everyday life of people during his reign, many different Western things were presented, which were presented as innovations in a developing power. The tradition of having a haven for birds near your home has been preserved to this day in our country. And the people who take care of the houses for them and put their living things there are spoken of as very good owners, caring not only about themselves.
Record-breaking birdhouses
The largest birdhouse in the world was recorded here in Russia in Belgorod. Its height is 5 meters. Of course, the building is not intended for birds. It houses a workshop where anyone can make a real house for birds themselves.
The longest line of birdhouses was 1,124 meters and was formed from 4,000 bird houses at VDNKh as part of the all-Russian environmental project “Let's Help Birds Together.” The record was officially recorded by representatives of the Guinness Book of Records.
Birdhouses of unusual shape:
And simply beautiful houses for birds:
Feeder "Coconut"
If you eat a coconut, do not throw away the shell. Look on the Internet for a photo of a coconut bird feeder and do the same.
Not everyone can make holes in the thick skin of a coconut. But if you manage to do this, the well-fed birds will thank you with morning singing.
Those who have not managed to cope with this matter can use half a coconut as a “plate” for the birds.
Simple DIY birdhouse
We offer you an option on how to make the most ordinary birdhouse with your own hands. You can safely involve children in creating such a simple product. Don't forget to explain to them why you are doing this.
To make a home for birds, you will need a board, preferably hardwood, 18-20 mm thick. Draw the details according to the dimensions shown in the figure:
Cut out the required parts with a jigsaw, circular saw or hand tool. Sand any sharp edges where the cuts were made.
Now let's start assembling the parts. You can fix them to each other using nails, screws or glue. It is more convenient to make holes for the tap hole and the stick before assembling the parts together. The size of the entrance depends on the type of future tenants.
So the entrance for starlings should be 4-5 cm, for tits or sparrows 3-3.5 cm, for redstarts 3.5-4 cm.
Start assembling the product from the bottom. Attach the side walls to the bottom, then the front and back, then install the roof.
If desired, the birdhouse can be painted with wood oil. And if you want your house to be colorful and bright, use water-based paints without a strong odor. Acrylic paints work well.
Please note that the boards inside the birdhouse must not be planed so that the chicks can cling to the walls. Do not use varnish or drying oil for external treatment. Glue can only be used without odor and does not emit toxic substances.
Apple pendants
A good idea for a feeder would be apples cut into rings and hung on strings from a wire rack.
If you want to add some nutrition to your bird's dinner, brush the apple rings with melted pork fat. You don’t have to take fresh apples – dried ones will do.
How to make a nest box
A nest box is a type of birdhouse made from a piece of log.
The inside of the log is cleaned out, making it hollow. This can be done using a chisel. Or cut the log into 2 pieces, peel each half and glue or tie the halves back together.
The bottom and lid are made from a plank, giving it a round shape of the required diameter. Or they can be made from cuts of the same tree. If you make the lid a little larger in size, you will get a protective canopy over the tap hole.
Pumpkin arbor
Work on the pumpkin just like you did for Halloween. Cut a solid hole and discard the seeds and pulp. Pour treats inside, and hang the pumpkin itself from the branch by its tail.