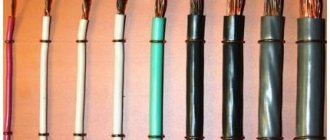
Every year frame construction becomes more and more popular. This can be explained simply - affordable price of the material, simplicity and speed of assembly, excellent performance of the finished structure. To erect a residential building you do not need to have special education or professional skills. If you decide to build a house yourself, the electrical wiring in a frame house should not only be reliable and safe, but also easy to use and fit seamlessly into the design of the premises. To achieve this, you need to study the GOST requirements and choose the optimal option for placing communications and devices.
Features of electrical wiring in frame houses
Options for electrical wiring in a frame house
Along with numerous positive characteristics, frame buildings have a number of specific features that must be taken into account when designing and practically implementing electrification.
The main nuance is the flammability of the materials from which the walls and floor slabs are made. The cause of ignition can be a spark or a significant increase in temperature. Even the use of fire retardants does not always eliminate the possibility of a fire.
The next property is the insufficient thickness and strength of the load-bearing surfaces. There is difficulty in attaching lines and devices to the plywood and drywall that are used for interior decoration of rooms.
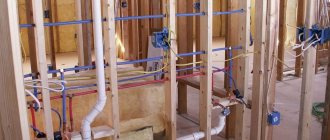
There is a certain order for laying cables depending on the chosen method. This operation is carried out at the stage of erection of load-bearing structures or after finishing finishing work.
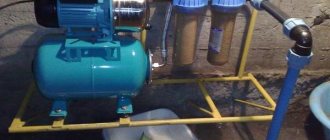
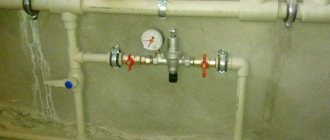
Welding polypropylene pipes
Polypropylene elements are considered the most reliable of the pipes for the dacha. Polypropylene pipes are welded on a machine. The process is specific, so it is worth reading the following instructions when welding polypropylene pipes:
- We need to get pieces; for this, the pipes need to be cut with special scissors.
- Welding areas must be marked and cleaned with an alcohol wipe.
- Next, select a suitable nozzle for polypropylene pipes, set the desired temperature and start the unit.
- We are waiting for the welding machine to heat up, after which you can slide the sections of the house marks onto the welding nozzles. There is no need to turn the pipes.
The welding machine looks like this:
soldering of polypropylene pipes
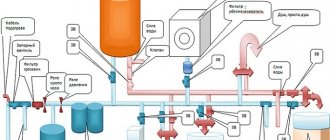
Wiring layout
Such a layout will help determine the amount of materials needed.
Electrification work begins with planning. You need to draw up a diagram on paper or in a computer version.
Drawings must include the following information:
- roof and supporting structures;
- entrance and interior doors;
- window;
- water, sewer and gas pipes;
- cable entry into the house;
- distribution board;
- grounding;
- bags;
- switches;
- sockets;
- lighting;
- Appliances;
- passing the wiring;
- distribution boxes.
Based on the number of consumers, you need to calculate the load for each room and for the building as a whole. This will help you decide on the type and power of introductory machines.
It is imperative to draw up a step-by-step plan, which will outline the sequence of all activities. This paper will allow you to avoid mistakes, since all actions will be performed in an accurate and thoughtful sequence.
Based on the design documentation, the types and quantities of materials and necessary tools are calculated. You should have a small reserve, as unforeseen circumstances may arise during the work.
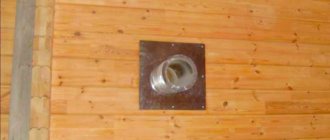
Entering the house
Inserting a power cable into a house
Inserting a power cable into a house can be done by laying it overhead or underground. Based on this, holes are made in the ceiling slab or in the base. When connecting by air, a steel cable is stretched between the building and the pole and the wire is suspended from it on clips. If the underground option is chosen, a pipe is first laid in the trench into which the cable is pulled. This will prevent it from breaking when the soil heaves. A flexible steel adapter is inserted at the point where the wiring enters the house.
In accordance with SNiP, the line is first connected to a meter, which is installed outside. To protect from environmental influences, the meter is placed in a sealed box with a window. A batch switch is installed after the meter, which will interrupt the power supply if emergency situations occur on the line.
Is it necessary to use corrugation or metal hose?
This is another point of debate. My personal opinion is no, not necessarily. That is, of course, it won’t make it worse, but how necessary it is - everyone decides for himself.
Firstly, because if you follow the rules listed above, the likelihood of getting a wire fire somewhere in the middle of the wire is very unlikely. Remember that in 99% of cases, a wire fire is a consequence, not a cause.
Electrical wiring in Finnish style - no corrugations
Secondly, the corrugation does little to protect against mechanical damage such as “driving a self-tapping screw into the wire”; a metal hose is not much better. And when building a house, it would be a good idea to make a “map” of where the wires go so that you know where you can drive a self-tapping screw and where you shouldn’t. Damage to a wire by rodents is actually an extremely rare scenario. It’s not worth citing as an example the wiring of a car that was chewed by rats. If you have rats in your house, then believe me, they will be the last to start eating the wiring.