For those who are able to build a house themselves, it is also quite possible to do the water supply for a frame structure on their own. As a rule, frame technologies are chosen by those who need to get a budget home at a minimal cost. This means that you need to supply water as cheaply and simply as possible. Outside the city there is often no central water supply, so you have to choose an autonomous water supply system. How to provide water to your home at minimal cost and in accordance with all the rules?
Schematic diagram
After considering different options, I decided to do this.
- The main line is 110mm. There is a main drain line of 110 diameter that runs under the house to the corner. There is a vertical transition and then the pipe goes underground to the septic tank. Why not go straight into the ground? Firstly, because I’m too lazy to dig under the piles. Secondly, there is a fairly long distance to the septic tank and a high groundwater level. If the required slope is observed, the pipe will approach the septic tank at a decent depth, which increases the labor costs for its implementation. The air section will be properly insulated in the future.
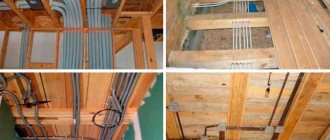
- Secondary highways. There are several of them in the house, in addition to sinks, a shower and a toilet, there are also emergency drains in wet rooms (an extremely useful thing) and water drains from household appliances. It was decided to install these pipes in the ceiling. With exits to the toilet or independent exits to the main highway under the house.
In the diagram: the orange line, the main line, running in insulation through the air, the blue ones, those that go in the ceiling. Branch 1 pipe of 40 diameter from the washing machine, then switch to 50, connect to the shower drain branch, exit to the washroom at the toilet and down, to the main highway
Branch 2 Emergency drain from the technical room, on the way to this branch the emergency drain of the bathroom is connected, through the sink drain we bring everything into the main line.
Branch 3 The drain from the kitchen sink connects to the emergency drains in the steam room and dives into the main line.
The central highway runs at a slight angle, because direct installation under the house is hampered by the diagonal jibs that connect the screw piles + there is a Christmas tree growing on the corner of the house, into which the pipe would directly rest.
Common installation mistakes
It is best to entrust the design of a water supply system, both collector and tee, to professionals familiar with building codes and capable of performing hydraulic calculations. But even the best project will be useless if mistakes are made during its implementation.
Shut-off valves are part of any water supply scheme: both sequential and collector. They are installed at the entrance to the water supply system, as well as in front of each plumbing fixture.
As a result, part of the thermal energy is transferred to the materials surrounding the pipe, which deteriorates the quality of the water. In addition, condensation from the surface of pipes without thermal insulation can damage the finishing of the room.
During installation work, experienced craftsmen recommend covering the ends of pipes that have not yet been installed to prevent debris from getting into them. The absence of this protective measure may lead to the fact that immediately after installation the water supply system will have to be thoroughly and for a long time flushed or even repaired.
When soldering polypropylene water pipes, you should remember that slight dirt or moisture at the soldering site can significantly impair the quality of the work
If soldering of plastic pipes is necessary, all work should be performed in a clean room to avoid contamination. It is also unacceptable to solder pipes that contain even a small amount of moisture. A drop of water or particles of debris at the soldering site can significantly weaken the connection and degrade its quality.
You should not design the water supply system in such a way that all pipes pass through the ceiling through one common hole. This may degrade the performance of the water supply. Professional designers never make such mistakes.
When drawing up a wiring plan, it is necessary to ensure that the pipes do not block access to the joints. This will make repairs much easier in the event of a leak.
An insufficient number of locking devices can also cause a lot of trouble during installation work. Such fittings must be present in front of each device to which water is supplied, as well as for each riser. If the house has more than one bathroom, you can install a shut-off valve for each of them.
Heating
In order for a building to be livable, the first step is to take care of its heating. This means that you need to plan and install the heating. Most often, to carry out work of this kind, the owners of the structure resort to the help of qualified specialists, and they carry out the installation in the shortest possible time. However, even in this case, you will still have to deal with the necessary minimum of concepts and technologies. As a last resort, you can purchase a convector.
At first glance, installing a heating structure is not such a difficult job. You just need to place pipes of a suitable diameter in the correct way in the space between the walls. In order to strengthen the entire structure, the heating elements are attached with special brackets to the frame posts and floor beams. You should also remember the need to isolate it. This will reduce heat loss.
Everything seemed simple and clear. However, this is only at first glance. When designing and performing installation, it is necessary to remember the existing real requirements for fire safety. There are some other difficulties.
Difficulties
If the heating was designed for some reason after the actual construction of the structure, then a conflict between the building and its sections may appear. In this case, you will have to make additional efforts when installing the heating. Additional assemblies to bypass existing obstacles in the building may be needed. There will be a need to convert one or another part of the structure into a technical room.
When designing a building's heating structure, keep in mind that equipment is easily accessible. This is necessary for monitoring and cleaning the system. This will make it easier to carry out scheduled or emergency repairs.
It is also important that individual sections and the entire heat supply structure of the structure must be organized in accordance with safety requirements. The possibility of burns should be prevented. You should also remember about the possible freezing of its components and high heat losses and condensation.
It is very important to properly isolate hot areas as they can ignite gases, aerosols and dust. It is necessary to control the surface temperature of exposed areas.
Methods
The question of whether to equip a building with heating or not is never a question. However, the question of choosing a method of heating rooms is sometimes quite acute. To choose the most suitable option, you should familiarize yourself with all existing methods.
Existing heating systems:
- air;
- electric;
- open;
- traditional with liquid coolant.
The air system is the safest heating structure. However, it requires significant installation and maintenance costs. The main element is air. It is taken from outside and, after warming up, is distributed throughout the rooms of the building.
The electrical system can become a very real competitor to warm air. It is unpretentious to use. The main element is a source of electricity. The negative aspects of this option are significant energy costs and dependence on the power supply.
The most primitive heating option will be an open system. Here fireplaces and stoves are used as heat sources. The main element is fire. The effectiveness of this option is unlikely to be suitable for a modern residential building. It simply won't be enough.
The traditional heating system for buildings is the one with a liquid coolant. It consists of three main elements: a boiler, heat pipes and radiators. The boiler is the main one. It comes in different types. Among the entire set, you can always find something suitable for the desired building.
Deciding on the type of heating is not enough. It is necessary to plan the installation of future structures.
This is interesting: Is it possible to fix a leaking heating pipe under pressure? Review
Welding polypropylene pipes
Polypropylene elements are considered the most reliable of the pipes for the dacha. Polypropylene pipes are welded on a machine. The process is specific, so it is worth reading the following instructions when welding polypropylene pipes:
- We need to get pieces; for this, the pipes need to be cut with special scissors.
- Welding areas must be marked and cleaned with an alcohol wipe.
- Next, select a suitable nozzle for polypropylene pipes, set the desired temperature and start the unit.
- We are waiting for the welding machine to heat up, after which you can slide the sections of the house marks onto the welding nozzles. There is no need to turn the pipes.
The welding machine looks like this:
soldering of polypropylene pipes
Plumbing systems
Depending on the power source, there are:
- Centralized water supply system. It is arranged if a central water supply pipe runs near the house, to which the water supply is supplied. Such a system is easier and cheaper to install, but in the future you will need to pay for the water supply. In addition, it is difficult to control water quality.
- Autonomous water supply system. Requires significant physical and financial costs, but the water quality is much higher. Autonomous water supply is absolutely independent of public water supply. The power source is wells or boreholes located on the plot.
The source of drinking water from which the water supply is drawn must be no closer than 20 meters from the cesspool, compost heap, toilet, septic tank, etc.
Separation based on water supply principle
Installation of a DHW and cold water system can be carried out in two ways:
- With “deaf” wiring. The water supply pipe to the last water intake point ends in a dead end. This scheme is more beneficial for saving space and from an economic point of view, but can create inconvenience during the operation of the water supply system. Water will flow into the last node with a delay, and only after it reaches the plug will it begin to flow into the tap.
- With closed circulation wiring. With this method, water constantly moves in a circle, has the same temperature at each point of the system and reaches the user immediately after opening the tap. The peculiarity of this wiring method is advisable to use specifically for a hot water supply system - it is important to prevent sudden temperature changes in it.
In order not to unnecessarily complicate the plumbing in the house, it is more rational to use a combined option. The cold water supply system is carried out with the help of blind wiring, the hot one - with the help of circulation.
This is interesting: How to insulate a well with your own hands for the winter with polystyrene foam or fencing: Step by step
Site selection and preparation
Before purchasing a frame, you must select and prepare a plot of land in advance. Regardless of the type of soil in a given area, it is necessary to ensure its good stability. This will save money on building a strong foundation.
An example of a garden house on a platform foundation
The choice of base for the house depends on factors such as:
- type of soil and its bearing capacity;
- freezing depth;
- ground water level;
- features of the building design.
Considering all possible terrain types, there is no one-size-fits-all option. Almost always it is necessary to prepare the land allocated for construction.
Site requirements
The better the land is prepared, the more stable the frame garden house built with your own hands will be. First you need to level the ground, remove, if any, protruding horses, stumps, and bushes. Next, markings are made, taking into account the distance to adjacent areas. The preparatory stage ends with the installation of an earthen or sand cushion.
Before starting construction, you should consider where and how the communication systems will run to ensure access for special equipment, if necessary. When choosing a foundation, consider the following soil parameters:
- Type. Rocky soils with good bearing capacity and a lower degree of deformation under the influence of temperature changes are preferable.
- Freezing level. The reliability of the soil according to this criterion is determined from the reference book.
- Groundwater. When they are close together, the foundation collapses faster and there is always a risk of flooding.
Today you can inexpensively buy a frame garden house from a turnkey developer, and the company will conduct geodetic research on its own. If the quality of the foundation is not the best, there is no need to immediately abandon construction. Installation even in this case is possible, but for the reliability of the construction it will be necessary to lay a more powerful foundation.
Foundation
When assembling a frame garden house with your own hands, you need to choose the right foundation:
- Columnar. The most inexpensive type of foundation, since its construction requires the least amount of material. Construction can be carried out with your own hands without the use of complex equipment. To install a support for a new structure, you need to dig holes around the perimeter and lay pillars there at a certain distance from each other. It is extremely rare to use a columnar foundation for sandy soils. It is more suitable for soil with medium to high bearing capacity.
- Tape type. It is used not only for frame construction, but also for structures made of bricks, concrete blocks and wooden beams. The strip foundation has high longitudinal strength, therefore it provides the necessary stability to a building standing on loose soils. When constructing a strip foundation, a concrete strip or blocks are laid along the perimeter of the future building.
- Pile foundation. Gaining popularity due to its simple construction, affordable cost and durability. If necessary, the piles can be dug up and moved to a new location. The type of installation of a pile foundation can be drilled, driven, driven or screwed. Best suited for soils with low bearing capacity and close groundwater.
Frame
In order for construction to be inexpensive, it is necessary to better study the proposals of developers for a specific region. Very often, companies hold promotions, and the consumer can count on good savings.
Example of a frame house for a garden
Most often, structures of this type are erected from wooden beams as strength elements for the structure. This material provides the necessary rigidity and stability. It has good thermal insulation properties and is easy to use. A frame made of timber will behave stably throughout the entire period of use of the structure.
Inexpensive buildings purchased on a turnkey basis for a summer residence can be made from boards. Such structures are somewhat easier to assemble because they are light in weight and do not require the use of special equipment.
Foundation for a frame house
For frame houses, the technology for installing foundation supports can be different. If piles or strip foundations are provided, a half-meter recess will be enough to take the load, distribute the pressure and transfer it to the ground. Piles can be concrete, reinforced concrete, metal. In this case, the construction is different:
- The speed of implementation of the supporting load-bearing part.
- Minimum amount of land work.
- The opportunity to immediately begin the next stage of building a frame house.
This cannot be said if a monolithic slab is provided. Concrete gains 100% on the 28th day after pouring. The structure is allowed to be loaded only after 7 days. Therefore, it will not be possible to continue work immediately. The same applies to supports with grillages. Slab foundations are the most expensive. In this case, the technology for constructing a frame house in stages is as follows:
Marking the site with reference to the boundaries of the perimeter of the land plot. Digging a pit, removing soil. Sometimes you have to use special equipment. Tamping, filling with crushed stone, pouring M100 concrete base with subsequent waterproofing. Installation of a reinforced frame according to the drawings from the design documentation. Pouring concrete mixture
It is important that it is laid continuously and vibrated. Caring for concrete during the curing period, erecting walls, etc.
Iron piles are screwed directly into the ground. This can be done independently or using specialized equipment. If reinforced concrete structures are used instead of steel, wells are first drilled, then a pile is immersed in the hole and the support is “pressed”. For this purpose, companies specializing in this type of activity are attracted. And the work will have to take from two to three days.
The technology of bored pile supports involves drilling a well, the walls of which are lined with roofing material twisted into a pipe. In order for a wooden frame house to stand securely, a frame of 3-4 reinforcement rods tied together is laid. Then a concrete mixture is poured into the cavity, the grade of which must be at least M200 (B15). Iron, concrete or wooden beams impregnated with a moisture-repellent composition are placed on the heads, which rise 40-50 cm. On the seventh day, when the concrete has gained 60% strength, they move on to the next stage.
A grillage is a structure that connects piles into a single system that is resistant to lateral displacements as a result of soil erosion. It can be hanging, above ground, or buried. The last option is a technology identical to a shallow strip foundation. Having decided to build a frame house with your own hands, step-by-step instructions include the need to install formwork and reinforced frame. To do this, the bottom of a trench 30-50 cm deep is covered with crushed stone and compacted. The reinforced frame must be tied to the pile reinforcement.
The strip foundation is arranged in a similar way, but without pile structures. It is enough to dig a ditch around the perimeter of the building and under the supporting structures to a depth of up to half a meter. Next, the drainage layer is poured, formwork and waterproofing are installed. The reinforcement is knitted in accordance with the drawings from the project. Now concrete is prepared not lower than class B15 (M200) and poured into formwork, which can be removable or permanent
It is important that work is carried out at air temperatures from +5 to +15 degrees. Celsius
On the seventh day you can move on to the next stage.
Technology of work execution
Fastening the strapping elements
Professionals in the construction field recommend using a combination of two fastening devices when installing a foundation grillage on screw piles - mounting on a threaded connection and clamps. The presented method of fastening all connecting elements of the harness will ensure reliable contact and durability of the structure.
The only nuance when laying wooden beams is their preliminary treatment with antiseptic compounds, which helps prevent premature rotting of the wood and its subsequent destruction. Before carrying out work, it is more advisable to draw up a diagram of the placement of all connecting elements indicating the necessary measurements.
Fitting on a threaded connection
It is more rational to use the presented method in the case of placing U-shaped screw piles. To install the foundation piping with your own hands, you must perform the following steps:
- Install the grillage beam into the opening between the pile posts. Before laying the beam element in the U-shaped flange, we lay an insulating layer of roofing material treated with drying oil.
- We fix the connecting elements. From the sides we fasten the beam to the head using self-tapping screws, and directly to the pile - with anchors or through pins.
We recommend watching a video of how timber is fastened using fasteners.
Fastening with clamps
If it is not possible to secure the beams using self-tapping screws and anchors, it is more advisable to fasten the component elements using clamps.
The installation procedure includes:
Rectangular bars are laid on the heads of the pile elements. When using wood beams, fastening is done using self-tapping screws, and in the case of metal products - by welding
During fastening, it is important to control the verticals of the elements being placed at the building level. After installing the guide beams along the entire perimeter, we lay a U-shaped board (in this case, it plays the role of a “clamp” or a special casing that ultimately secures the guides). The ends of the U-shaped element after placement should be directed downward, while it is advisable to remove excess material protruding beyond the head. fastening the components of the grillage (using a similar method to the presented method, we fix the sides of the head of the pile support and its central part by using screws and anchors, respectively).
Watch the video on how the elements of the strapping structure are fastened together.
Advantages of polypropylene pipes
All work is greatly facilitated if you use polypropylene pipes, which are compatible with other materials, they are durable, do not corrode and are lightweight. Cutting such pipes will not be difficult with a regular hacksaw or special scissors for cutting pipes.
To ensure that your indoor water supply system works properly, install faucets on hot and cold water pipes, as well as on other plumbing fixtures, such as toilet tanks, sinks, washing machines, and dishwashers. In cases when you need to turn off the water in the right place, you do not have to turn off the entire “riser” but just turn off the tap to the consumer. If you plan to have water-heated floors in a frame house, be sure to install taps. Technological hatches are used for access to cranes; they must be located in a convenient and accessible place. <.p>
Open the ball valves smoothly so that water slowly fills the entire system. Water hammer damages plumbing fixtures and pipes. During operation, it is necessary to open/close the ball valve completely - since when the valve is not completely closed or opened, salts will be deposited on the ball, and they prevent the valve from opening and closing.
For a strong threaded connection, use tow, wind it clockwise, use a special sealant paste to improve the tightness of the connection. Tighten the threads well with a pipe wrench, but do not overtighten or twist the threaded connection.
To install plumbing in a frame house with your own hands, we need the following tools:
- Manual pipe wrench – designed for a strong grip and grip on pipes;
- Adjustable wrench – designed for tightening and unscrewing nuts;
- Scissors for cutting polypropylene pipes;
- Construction tow – for winding pipes;
- Adapters for pipes of various shapes;
- Soldering iron for soldering polypropylene pipes;
Mistakes when installing water supply and sewerage systems, how to avoid them?
The installation of sewerage and water supply systems must begin with a ready-made design of engineering systems. Maintain the correct slope of the pipes. Do not try to insert additional risers into the common sewer riser for cold and hot water supply using one hole. Always install shut-off valves on each plumbing fixture so that you can turn off the water not only in the entire house, but also separately at the plumbing fixture and service or replace it.
The cutting line of the polypropylene pipe must be exactly at a right angle. The pipes are connected to each other using a rubber gasket; if the pipes are difficult to connect due to the rigidity of the rubber bands, spray them with silicone grease. Assemble short structures and install them on site.
The following pipe diameters must be used in the drainage system:
- For the central riser and toilet drain outlet - a 100 mm pipe;
- For vertical outlets of the riser - pipes from 65 to 75 millimeters;
- For a combined bathtub and sink drain, 50 mm pipes are required;
- Bathtubs and sinks - for them use pipes measuring 40 millimeters;
- For sinks and sinks, pipes with a diameter of 32 millimeters are suitable.
Prefabricated well
Last in the order of wastewater, but not in terms of its role in the operation of the sewerage system, is the collector or septic tank - a well into which sewage flows from the pipeline. The well is located so that it is at the lowest point of the drainage system.
Distance between the well and other objects located on the site and nearby:
| An object | Distance not less, m |
| non-residential outbuildings | 1 |
| residential buildings | 5-7 |
| water well | 50 |
| fence between plots | 2 |
| open waters | 15 |
Types of wells
For a private home, you can equip a well of one of three types:
- storage well or collector - a sealed container into which wastewater flows; when the collector is filled, the sewage is pumped out;
- a well with post-treatment, a septic tank - a container of several series-connected chambers in which wastewater gradually settles, the sediment is processed by bacteria, and partially purified water enters the last of the chambers and from there goes into the soil;
- deep treatment station - a well with filters and a bioreactor (a set of substances and bacteria), in which wastewater is purified from dangerous microorganisms and safe organic matter is separated, the purified water goes into the soil, and the separated organic matter can be used as fertilizer.
The first two types of wells can be equipped with your own hands. Ready-made plastic containers or reinforced concrete rings are used for these purposes. Septic tanks are also built from brick and concrete.
It is difficult to equip a deep cleaning station with your own hands, as it requires special knowledge. It is easier to buy a well of this type and install it ready-made in a prepared pit.
How to calculate the volume for a septic tank and collector?
The dimensions of the well are calculated based on the number of residents of the house, the presence of various household and plumbing appliances connected to the sewer system, the activity of water consumption and the planned frequency of pumping out wastewater from the septic tank, if it is a storage tank.
The volume of the septic tank is calculated based on the maximum daily water consumption by a person. If plumbing and household equipment are available, one person per day consumes no more than 0.25 cubic meters. m. In the septic tank, wastewater settles for about 3 days. Therefore, to obtain the volume of the collector, you need to multiply the number of family members by 0.25x3, that is, by 0.75 cubic meters. m.
You can use an online calculator to calculate the minimum volume of a septic tank. This calculator takes into account the number of residents, the availability of plumbing and household appliances and the frequency of their use.
The volume of a sealed collector can be calculated by knowing the average monthly water consumption in the house. If cleaning is planned to be carried out 2 times a month, then the well should have a volume of about half the average monthly water consumption.
When calculating the volume of the collector, it is worth taking into account the capabilities of the vacuum cleaners, which will need to be used periodically to clean the tank. Typically, the volume of a sewage disposal truck tank is 3 cubic meters, so it is better to make a well of multiple volumes. This will allow you to spend money more efficiently: you won’t have to overpay for calling an extra truck that will leave incomplete, and you won’t leave unpumped sewage in the sewer because there isn’t enough space in the sewer tank.
Source of water supply
It is advisable that the water source be a central water supply. But in some settlements this is not possible, so they drill a well on the site or dig a well. All three mentioned sources of water supply for a frame house have not only advantages, but also disadvantages.
Thus, for the use of central water supply, it is necessary to pay monthly meter payments to utility companies. But at the same time, connecting to the city water supply is often much cheaper than making a well or well. If there is no centralized water supply, you will have to think about autonomous options.
To drill a well on your property, you need to pay 300-700 rubles for each meter in depth. A pipe is inserted into the ditch to maintain depth and prevent the walls from collapsing in soft soils. For such casing you still need to pay a certain amount, depending on the pipe used and its diameter.
As for digging a well, it costs 3-7 thousand rubles for each meter, but prices differ in the regions. But the cost is final and includes both digging a hole and lining it with concrete rings. The only thing that will cost more is a well that the owner wants to line with stone or other additional materials.
Laying out water pipes inside and creating a sewerage system
A frame house has an advantage over other buildings - all communications can be hidden inside the walls under decorative panels. Only sockets, taps and other end devices are visible to the visitor's eye.
When laying pipes, it is important not to damage the integrity of the insulation. If this happens, cold bridges will begin to form there in winter.
To avoid this, pipes are additionally insulated, neutralizing the effects of low temperatures. Plastic pipes are used as the main material for water supply and sewerage systems. They are cheap, easy to install, lightweight, which allows for much faster and better internal wiring.
Basic materials
The flow of clean water into the house and its further removal along with waste products must be of high quality, because the comfort and health of people depends on this. This means that materials for this communication system must be selected very carefully. The most important thing in this case is to choose normal pipes.
They can be made of metal, plastic, asbestos and other materials. Metal pipes are considered the most expensive. Firstly, the material is expensive, and secondly, a welding machine is required to install them. But this design is quite strong and reliable.
Asbestos is used exclusively for the sewerage system, since it is not suitable for water supply. These pipes have a very high level of sealing. As for plastic pipes, this is the best and cheapest option.
What to choose a septic tank or cesspool
The wastewater from the outlet pipeline is collected in a reservoir, which can be a septic tank or cesspool. +
A cesspool is a deep pit dug in the ground and reinforced with brick or concrete. Some of the wastewater decomposes, some goes into the ground, but most of it remains in the pit, so it is regularly pumped out. This type of tank is suitable for private houses with a small amount of drainage, or for the time being until a septic tank is built. +
A septic tank consists of a settling tank where wastewater is decomposed bacterially to an insoluble residue. The clarified wastewater enters the filtration well and then disperses through the filter layers into the ground. It is extremely rare (compared to a cesspool) that a septic tank will have to be cleaned of insoluble residues.
Internal water supply
The complexity of distributing water around the house is related to the number of consumers (taps and mixers) and their location. Therefore, first of all, it is necessary to develop a scheme. This is the most important stage in the installation process, which should not be neglected. There is nothing difficult in drawing up a diagram. You just need to arm yourself with a tape measure and measure the distances from consumers to the connection points of each device.
Transfer all this to paper, taking into account the size and configuration of the pipes. The diagram will show exactly how many pipes and fittings will need to be used in the installation process, where deviations from straight-line wiring will occur, and where passages through load-bearing and non-load-bearing elements of the building will be installed. And the more rooms are involved in the plumbing system, the more complex the scheme will be.
One of the plumbing diagrams
Design Features
In practice, septic tanks, pits or treatment stations are very common
Considering the design features of sewerage in a frame building, we can say that this is a complex of systems that are aimed at collecting, moving and storing wastewater. Let's look at the components of this device:
- Domestic drainage is the sum of all the pipes, toilet components and plumbing fixtures within the home;
- The external part is a combination of pipes that transport wastewater from the toilet and plumbing to places of their storage and disposal outside the building;
- Tanks are screw or on stilts. who are engaged in the storage and processing of sewage waste. In practice, septic tanks, pits or treatment stations are very common.