A children's room with a bunk bed is convenient. There are several advantages. Firstly, it saves space. And it’s not always a matter of small area, although this is a common problem. After all, even in a spacious room, it is advisable to leave as much free space as possible for outdoor games and toys. Secondly, you can organize the space in a more orderly manner: make drawers at the bottom, attach or add a cabinet to the side. Thirdly, the kids like this environment. And for both girls and boys. Moreover, you can build a children’s bed with your own hands in a couple of days.
Children's room with bunk bed
Drawings with dimensions
Regarding how big or small to make the bed when children are still small. In principle, you can immediately install a full-size bed. It just seems like it will take a long time for them to grow up. In fact, before you know it, “children’s” sizes will become small. And then the problem arises: where to put the old bed. Naturally, it’s a shame to throw it away, but used furniture doesn’t sell very well. Therefore, recommendations: make a standard size bed right away: 1*2 m or so.
Frame drawing for a bunk bed
Drawing of a double-decker bed frame and necessary materials
Drawing of a bunk bed with dimensions
Corner bed drawing
Corner bunk bed
Bunk bed with wardrobe
Stairs to bunk beds
Drawings of stairs for two-level beds
How to update the appearance of old furniture can be read here.
Materials and tools
Master classes from experienced specialists contain useful tips on how to properly make a children's bed. Traditionally, the process begins with the selection of materials. Furniture must be safe and comfortable, so the most popular raw materials are:
- natural wood;
- metal;
- plastic;
- chipboard;
- MDF.
Models made from natural wood are environmentally friendly and safe. They do not have a specific odor or toxic elements in their composition. MDF boards are similar in performance to natural wood. Chipboard is somewhat worse, since it contains formaldehyde-based resins. When properly processed, the slabs are safe and cost less than other materials.
A wooden bed is the best choice, but this option will be quite expensive. Very beautiful colored models of different shapes and shades are assembled from plastic, but this material is toxic. It is difficult to choose high-quality synthetic raw materials.
In addition to materials, the master will need:
- special glue;
- self-tapping screws;
- drill;
- roulette;
- sandpaper;
- accessories;
- stain;
- brush.
Choosing the best car bed for a boy, useful tips
Depending on the type of crib, other tools may be required. By the time the drawing is completed, everything you need should be at hand. This will make the assembly process much easier.
Natural wood
Metal
Chipboard
MDF
Tools
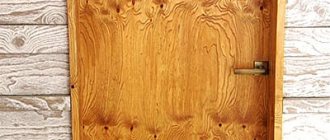
Wood for bed
Solid wood is the most optimal material for the construction of beds. The types of wood chosen for work are alder and ash. Wood of such species is particularly durable, absolutely safe for humans, and does not contain toxins or allergens.
The tree needs special treatment with moisture-resistant and antiseptic compounds to prevent the development of pathogenic fungus. For decoration you can use veneer, stain, acrylic varnish.
Craftsmen with the proper artistic skills can use stencil painting or wood burning as an additional decoration. A children's bed, made by hand from wood, has an advantageous design and special practical properties.
Design calculation and drawing
You can assemble a children's bed with your own hands according to a ready-made diagram or according to a independently developed drawing. The main elements of furniture are:
- legs;
- bottom;
- frame;
- sidewalls;
- back.
The complexity of the project depends on which model of bed is chosen: with drawers, shelves, attic, house, transformer or with a second tier. The smaller the living space, the more compact the product will be. Bed drawings can be found online - there are a lot of ready-made sketches from designers available for free.
In the case of independent development, they rely on the size of the mattress. Its parameters are the basis for the bottom. Then determine the height of the legs, sides, size and type of headboard. The dimensions are indicated on the general sketch, then each detail is schematically depicted, recording the dimensions. Errors at this stage will lead to the creation of an unusable product.
Errors are unacceptable. An incorrectly calculated load will turn a homemade frame into a traumatic product.
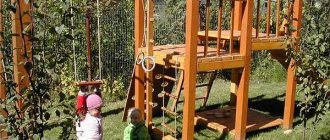
Loft bed for children
A children's loft bed is another model used to save space. The lower tier is limited by a wooden frame and is intended for installing a desk, chair, and organizing a play area.
The side walls can have additional open shelves for placing souvenirs, books, or a miniature lamp. On the top floor there is a limiting edge that prevents the child from falling from a height.
Manufacturing stages
Before work, you need to think through all the steps to minimize the possibility of error. When making furniture, it is important to follow the sequence of actions; this will help create a high-quality, unique product.
| Stage | Description |
| Marking | Use a carpenter's pencil to mark the details on the canvas. Marks can be easily removed with an eraser. Repeatedly check the correct dimensions, angles, thickness |
| Working with a saw | Using a jigsaw or saw, cut out all the previously marked parts. To avoid confusion, they are numbered in pencil. Often, for convenience, parts are laid out according to their belonging to the elements of the bed. |
| Preparation of fasteners | Joints for seamless connections and sockets for self-tapping screws are prepared before assembly begins. |
| Preparing parts | Using sandpaper, the surfaces and corners of the parts are processed. A sander will make this process easier. It is unacceptable to leave roughness or unevenness |
| Treatment | The parts are varnished and painted if desired. If the raw materials have not been pre-treated against deformation, then impregnation is also performed before assembly |
| Assembly | Step-by-step connection of parts and elements of the bed. The diagram will help you avoid mistakes |
Preparing parts
A wooden bed must be strong and can withstand the weight of even an adult. The bars and slats are chosen to be durable. At home or in the workshop, they lay out raw materials, tools, and begin preparation:
- Mark the edges of the parts with a pencil;
- elements are numbered and laid out;
- mark the joints;
- drill sockets for self-tapping screws, check symmetry;
- grind surfaces, corners, grooves.
Nuances of choosing beds for children over 2 years old, types of designs
When everything is ready, the parts are coated with a protective compound. Safe water-based varnishes are better. The sawn bars must dry well so as not to have any foreign smell, sticky layer, or roughness. Assembly can begin only after complete drying.
The assembled parts must be able to withstand the weight of the child and the increased load. Children are restless, this is taken into account when developing a drawing. For a bed with drawers, at this stage the components themselves are assembled and the handles are attached from the inside.
Assembling the frame and base
It is more convenient to assemble a wooden frame first. Check the correctness of the corners of the parts, install the side posts at the required distance, and mark the places where the side panels are attached. Next, they are fixed from the inside at an angle to increase strength. A base of wooden planks is attached to the lower frame from the inside.
When the frame is assembled, the mattress is placed on it for testing.
After assembling the frame, add side boards and install a bed limiter, if necessary. It is cut out in advance from a thin sheet of material, shaped, sanded, and varnished. Be sure to check the strength of the foundation joists.
Next, insert the drawers into the compartments and check that they can be easily pulled out. The handle should be comfortable, the contours of the container should tightly fill the space. They should not form cracks, dangle or sag. It is more difficult to assemble a bed with drawers yourself; you need to take into account the overall strength of the structure with cavities.
Manufacturing and installation of the backrest
According to the drawing, the headboard of the bed is cut out and fitted to the assembled frame. It must fit exactly to size. If errors are found, check:
- mark the correct position of the back;
- draw an edit line with a pencil;
- The excess is sawed off and the edge is sanded.
If the back fits perfectly, it can be decorated with sawn elements, stucco molding, and carvings. It is convenient to carry out manipulations before it is attached to the frame. Using the prepared holes, attach the backrest and screw it to the frame. If you plan to make a canopy, now is the time to secure the slats for it.
Canopy stands should be strong and lightweight and not reduce the functionality of the main structure.
Before final finishing, a piece of furniture is checked for stability, strength, and smoothness. Any possibility of getting a splinter, getting hurt, or hitting yourself must be excluded. Dimensions and dimensions must correspond to the drawings. The bed is almost ready, all that remains is decoration.
Classic and original children's beds with drawers, selection criteria
Final finishing and decoration
A homemade bed is a reason to be proud. Don't neglect the decorating stage. The product is decorated with drawings, carvings, burning of ornaments, using stencils and stucco molding. The main thing is to comply with the condition - the safety of the baby is more important than design. Bed decor should be made using materials that are harmless to health.
The canopy is the most common decoration element. A light, durable frame is installed above the bed, to which the fabric is attached:
- muslin;
- veil made of silk or cotton fabric;
- organza;
- chiffon;
- other translucent materials.
Often a table or bookcase is placed close to the bed. The one-piece design looks modern and practical. The appearance is influenced by bed linen, which is also easy to sew yourself. For a pillow, it is preferable to choose a filling made from microfiber, bamboo fiber or holofiber. Natural feathers and down can cause allergies.
Add a comment Cancel reply
You must be logged in to post a comment.
The podium is a modern solution that allows you to delimit the living space. And if a do-it-yourself pull-out bed is installed under the podium, then the functionality of the raised platform doubles. Plus, there is space for small cabinets to store small items. You should not assume that such a structure can only be done in small apartments. This solution will enliven any interior, even in a large room/apartment! Moreover, it never hurts to have an extra bed in case guests or relatives arrive. This design can also be assembled in a rented apartment, because there is no need to raise the floor and make an opening in the wall. So what kind of preparatory work needs to be done to make a pull-out bed and how does the manufacturing process itself go?
Additional items
The standard model is supplemented with various elements for beauty, space saving, and increased functionality. The boxes are designed at the drawing stage, but they can also be replaced with baskets made of lightweight, safe material. In this case, the height of the furniture should be sufficient for their location under the base.
The sides of the crib are made from safe cotton material. They are made in the form of cartoon characters, animals or simple geometric shapes. Restraints for older children can be made of wood or transparent thick plexiglass - they will prevent the baby from falling while sleeping. It is advisable to think through monolithic elements at the drawing stage.
Children's beds are often created with canopies. They give comfort, tenderness, airiness. The element is secured to the bed using racks or hung from the ceiling. Choose calm, soft shades, translucent fabrics that are pleasant to the touch. For independent sewing you will need: the material itself, scissors, a marking pencil, threads, needles, pins and a pattern. If desired, the canopy is decorated with ruffles, pompoms, and lace.
It is better to attach a children's canopy for little ones to a wide ring and hang it from the ceiling.
A bed for a child should be strong, safe, and reliable. You can independently build a model of any complexity. The algorithm boils down to drawing a drawing, preparing materials, procuring parts, processing and assembly. It all depends on the financial capabilities and skills of the master. Even a basic model must meet safety requirements.
Boxes
Side
Canopy
DIY bed construction
Having chosen a model and decided on consumables, you can begin to work independently. The entire construction process can be divided into several stages:
- Preparation of the drawing.
- Processing of parts.
- Assembly of the structure.
All stages are strictly required, because only through strict consistency can a positive result be achieved. The most optimal and interesting option would be to build a children's bed-house with your own hands.
Types of cribs for babies
Cribs, depending on their design, can be divided into several categories.
Classical
The most popular option is a simple rectangular model, mounted on legs or with wheels that ensure its mobility. It is intended, as a rule, for children from birth to three years. The bed can be equipped with drawers, removable side walls, and a lower bottom as the child grows older.
Transformer
Beds that can be adjusted depending on the situation will be a real solution in small apartments. When a child appears, in addition to the bed itself, he will need a changing table and a chest of drawers, where everything he needs is stored. In addition, it is convenient when it is possible to expand the structure as the baby grows. For example, a bed combined with a small changing chest can, after some time, be turned into a sleeping place for a teenage child. Round models with a diameter of 0.8 m are suitable for newborns. When the baby grows up, the transformer changes into an oval design. The absence of corners increases the safety of the piece of furniture for children.
Pendulum
Pendulum mechanisms installed in cribs help babies fall asleep faster. They can be longitudinal, transverse or universal. When choosing a model, you must carefully check the design for the absence of extraneous noise and jerking during operation. Pendulums must be equipped with clamps.
Cradle
If the financial capabilities of the family allow, cradles are installed for the newborn babies. Such designs are designed to provide maximum comfort to the newborn. Limited space creates conditions of complete security. A baby can sleep in a cradle until about six months of age, as it grows quite quickly. Cribs can be functional, equipped with various electronics and toys; simpler ones are intended only for motion sickness. Putting a baby to sleep in a bassinet is much easier than in a regular bed. In addition, many models have remote controls, making life easier for parents. An option for a cradle can be a cradle installed on a standard bed.
Manege
Beds with sidewalls made of mesh can be easily disassembled and transported if necessary. In such designs, which usually have bright colors, children not only sleep, but also play with pleasure.
Children's beds can be equipped with drawers, chests of drawers, and changing tables. To make it easier to move furniture around the apartment, rollers are installed, but you must not forget about the latches. Designs can have different shapes, be made in the form of a car, a house or a favorite cartoon character.
Preparation is the key to success
Corner bed arrangement diagram
The design of a retractable bed can be different. Let's look at an example of a corner location:
- Support wall frame.
- A frame podium that was mounted on vertical strong sides.
- Pull-out bed with mattress on rollers. There can also be several drawers for bed linen, books and the like.
- Several additional corner and side drawers.
- A ladder of one or two steps.
This is how the finished structure with a pull-out bed will look like.
Pull-out bed with mattress on casters
It is necessary to consider the size of the purchased mattress.
In fact, the space above and near the bed will be a kind of dead zone, since it needs to be pulled out unhindered at night. The height of the mattress and flooring will be 45 cm. This height is sufficient, since a standard apartment has a height of 2.30 m. A person of average height will feel completely comfortable. And on top you can easily place a computer table and an armchair.
Floor finishing
Carpet finishing
The completed frame should be beautifully finished. To do this, the entire surface must be treated with a wood primer, for example, drying oil. The surface must be dry. Then paint the surface in two layers.
If you don’t like painted surfaces, you can lay carpet on the floor of the podium. To do this, distribute the carpet evenly over the surface of the podium. Press it along its entire length with a heavy object. Then make markings that will exactly follow the outline of the entire structure. In places where the bed platform has rounded areas, work extremely carefully and carefully. Use a sharp knife to cut carpet. Each edge can be further processed, for example, with a braided cord or something else. When you have completely adjusted the carpet to size, it should be laid with glue so that it does not move.
This is how a pull-out bed is made. In literally four square meters you can organize a workplace on the podium and a pull-out bed under it. As you can see, making a pull-out bed is not that difficult. It just takes a little patience and effort.
Possible mistakes
Anyone who has not previously encountered furniture making may make a number of mistakes. Here are the most common ones:
- Using fresh wood. Since over time the material will dry out, become denser and, accordingly, decrease in size, the structure will simply fall apart. For a bed, you should only purchase boards that have been left in a dry, ventilated area for two or three years or have been machine dried.
- Neglecting to polish parts. All parts of children's furniture must be properly processed to avoid injury. Since a child can stick his hand even into narrow cracks or crawl completely under the bed, even those that are inside the structure should be sanded.
- Connecting parts using screws. This assembly option is good anywhere, but not in children's furniture. Under the influence of constant loads, the thread will destroy the structure of the wood fibers, and over time the structure will become loose. To assemble the parts, you should use special tenon joints, which are shown in the figure below, and be sure to glue them with wood glue. To strengthen areas that are subject to the greatest loads, metal ties are used.