Since plasterboard has recently been increasingly used when leveling walls, after its installation the question arises of how to seal the joints between the sheets. In this case, special-purpose putty mixtures are used, combined with serpyanka.
Sealing drywall joints requires proper surface preparation. For example, you need to make sure that the screws are not too deep. The fasteners should not protrude above the surface. Such work is carried out not only in the area of walls, but also in ceilings. In the latter case, the task will look somewhat more complicated.
Why seal seams?
Any surface, even the smoothest, needs proper preparation before further decorative work. Drywall is no exception in this matter. After installing it, you need to ask how to properly seal the joints between the canvases. It is also quite logical to ask whether such work is necessary at all. This stage should not be neglected, because if the seams are not sealed, over time they may become covered with cracks, which will immediately be noticeable in the final finish.
In addition, if the joints are not sealed at the stage of preparing the walls, the decorative material will hardly be able to be laid without flaws. This applies not only to wallpaper, but also to decorative plaster. The joints must be sealed correctly. It is not enough to simply apply putty to the seam; it is necessary to glue the sheets in these areas with a sickle mesh, which will provide reinforcement.
An alternative solution is canvas tape for sealing drywall joints. This material is made of fiberglass and has good strength. The tape is difficult to tear, so it will perfectly resist movement and shrinkage of the material. Even if the plasterboard on the surface of the walls expands and dries out under the influence of moisture and temperature changes, the canvas will hold the joints, eliminating the formation of cracks in the decorative layer.
When to start subsequent work
After the work has been done on reinforcing the joints, as well as grouting them, you need to thoroughly clean everything from dust, cover it with a primer, and only then start working.
The entire surface of HA sheets is covered with a finishing putty solution. After complete drying, use sandpaper and a grinding machine to remove small stones and other defects from the surface.
Before applying a decorative coating (paint, wallpaper, decorative plaster, tile), the surface is primed again.
Recommendations from the experts:
- After grouting, small cracks may appear on the plasterboard surface. This happens due to temperature changes. If cracks are found, they must be covered with a thin layer of joint putty.
- When the soil moves or the house subsides, cracks appear in the corners. They must be reinforced and then puttied.
- The packaging of putties often contains the inscription: “Use without reinforcing tape.” To achieve strength, it is worth using tape for gypsum board joints.
After all of the above, it is clear that the joints must be reinforced with tape and putty intended for this purpose. Grouting of joints is required for a good appearance, and the corners must be reinforced with a corner profile and tape with a metal insert.
Tools
Decorating joints involves using:
- brush;
- putty knife;
- sandpaper.
In order to seal drywall joints, you need to use convenient tools; they will help you achieve an ideal result. It is now known how to apply liquid compositions, but they have to be diluted in containers that must be well washed from the remnants of old solutions. It is recommended to use a container that is small in volume, because after half an hour the mixed composition will begin to polymerize.
If you need to seal joints between sheets of drywall over a large area, distribute the deep penetration compound with a roller, and use a brush for hard-to-reach areas. Once the sealing of the joints between the drywall sheets has been completed, you will need to sand the surface. For convenience, it is placed on a wooden block.
We attach modern “stucco molding”
Let's focus on fastening polyurethane fillets, since this is the most affordable and widespread material today. First, let's calculate the materials and prepare the tool. We count the length of all the walls of the room and divide by the length of one plank. The number obtained as a result of the calculation is rounded up to the nearest whole number. It is recommended to buy fillets with a small margin. Liquid nails or acrylic sealant are ideal for fastening. By the way, acrylic sealant will also be needed to fill the seams between the baseboard, wall and ceiling.
Required tool:
- Circular saw for cutting corners. Although, an ordinary hacksaw for metal is quite suitable.
- A template, also known as a miter box, for sawing an angle of 30.45 degrees.
- Construction knife.
Seal ceiling cracks
It is most convenient to start installing the planks from the inner corners, moving along straight sections. Next, install the plinth in the miter box. Press the smooth surface against the side wall and file at an angle of 45 degrees for right angles. If the angle of the walls is different, the cutting angle is determined experimentally. Attention! For one corner or slope, the planks should be mirror-cut. After the stucco is ready, we begin gluing. To do this, apply glue to the side surfaces of the fillet and gently press it from the corner along the entire length. We continue to glue the planks end to end.
We continue to glue the planks end-to-end
Important! If you can’t get a perfect fit, you can use thin steel wire as connecting pins.
After all the planks are glued, we seal the seams between the ceiling, baseboard and wall with a thin layer of acrylic sealant. We remove the excess with a napkin or a “universal tool” i.e. finger. Stucco molding has transformed your ceiling!
Stucco molding has transformed your ceiling
If you still find it difficult to decide on the choice of stucco, calculate its quantity or choose the color of the ceiling and walls, do not worry. Many manufacturers' websites have free online services for selecting materials, calculating their quantities, and selecting the color of the ceiling and walls. It all works very simply. You go to the online service. Indicate the dimensions of your room, select colors if necessary, and determine the number of decorative elements. Feel free to create, experiment with colors and materials, and your home will be filled with beauty and comfort!
How to seal drywall joints. The working process
Drywall joints are most often sealed using classical technology using serpyanka. But first, it is necessary to carry out preparatory work.
Attention! Joints between sheets of drywall should be sealed at an optimal temperature range from + 10 to + 25 ˚С. Humidity should not be high.
Drafts should be eliminated by closing windows and doors. The first step is to press on the space between the sheets of drywall. If this area is flimsy, there is no point in sealing the seams, since light pressure on the material after finishing will cause cracks to appear on the surface.
Before sealing the joints, the surface to be treated must be cleaned of construction dust. Excess material in the form of glue is removed. Make sure that the joints between sheets of drywall have indentations. When preparing drywall for wallpaper, you need to make sure that the heads of the mechanical fasteners are slightly recessed into the material. If they protrude above the surface, this defect should be eliminated.
Before sealing joints, you need to check whether there is a chamfer in the place where the drywall sheets are connected into a seam. You need to chamfer yourself if you don’t have one. In the absence of end processing of the canvases, it is necessary to perform jointing. Damaged elements are removed with a construction knife.
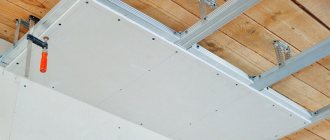
When sealing the seams between sheets of plasterboard on the ceiling, you need to make sure that the coating is firmly held. Otherwise, it is additionally fixed. After this work, a primer is applied to the surface of the drywall. When sealing joints in the seam area, the mixture is applied with a brush, because if this work is done with a roller, there is no guarantee that the composition will get into the seams. The primer is applied to the joints with a deviation of 15 cm from the seam to the left and to the right.
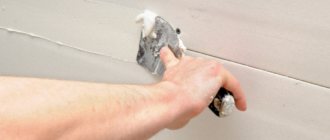
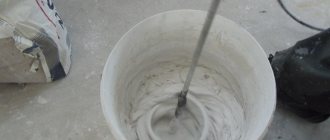
Now you can prepare putty for sealing drywall joints. The mixture should be left for some time so that its components begin to interact with each other. Do not dilute too much mixture. Now you can apply a layer of putty, picking up the material with a spatula. It is necessary to completely fill the border of the seam.
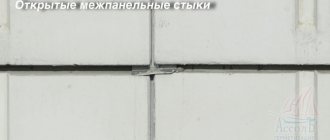
After this, the serpyanka is used, which is applied on top. The material is laid at the joint between the sheets of drywall so that the tape is distributed evenly on both sides of the seam. The seal involves embedding the tape in a layer of putty. You need to apply another layer of the mixture on top. The seams between the plasterboard sheets should not protrude too much above the surface.
Using a spatula, the composition is leveled over the base. In order to make sure that the wall is level, after sealing the joint, you need to apply a building level to the drywall. As soon as the putty has dried, you should sand it a little with sandpaper.
Perfect angle or a bummer?
Don't be alarmed, everything is fine! In architecture, a bummer is a decorative element that varies in cross-section.
Many people have heard these terms:
However, professional builders usually call this element a fillet (aka a plank covering the joint between the wall and the ceiling). There are many materials from which this decorative element is made. This can be classic plaster stucco (there are workshops that still make it by hand), wood, modern plastic fillets, and even luxurious marble.
When choosing, it is important to remember that the width of the cornice affects people’s perception of the room. A wide element will visually reduce the height of the ceiling and the volume of the room. While narrow, on the contrary, increases the height of the ceiling and the volume of the room. And the choice of color should be done carefully - too contrasting a color will tear the cornice out of the interior.
Depending on the material, installation methods also differ. If plastic parts are glued, then wood, plaster stucco and other heavier materials are attached with nails or screws.
Ceiling fillet
Sealing a seam with reinforcing putty without mesh or tape
If you do not plan to use serpyanka to seal the joints between sheets of drywall, you can purchase a special reinforcing putty. The process of preparing a seam looks the same as in the case of sealing according to the scheme described above. The joint must be cleared and deepened. A primer is applied to the drywall surface to be treated.
The seal will involve applying a reinforcing compound using a spatula. Sealing is carried out in two stages. The mixture is applied to the joints in two approaches. Between these steps you need to wait until the surface dries. When filling a seam with reinforcing putty without a mesh, you need to level the last layer on the surface of the drywall and sand it.
Installation of plasterboard, frameless wall covering with plasterboard
Frameless wall finishing with plasterboard is a fairly quick and elementary way to level surfaces. And this way you can really save quite a lot of space.
Special glue is used for fastening. With a difference of up to 0.02 m, a product called “Perflix” is suitable. It is placed on sheets in small mounds, which are leveled when the drywall is pressed against the wall. If the difference reaches 0.05 m, then you first need to fix narrow strips of drywall, and then attach the main sheets to them.
In general, the procedure includes the following steps:
- Cleaning walls of outdated finishes.
- Preparation of necessary materials and tools.
- Treating surfaces with a primer.
- Cut out the sheets.
- Applying glue to one part and attaching it to the wall.
The nuances of sealing seams at corners
If you plan to use drywall for painting, you will need to seal the joints between the sheets. The correct approach to this matter also involves the design of seams in the corners. The latter may be:
- internal;
- external.
To properly cover the surface of the inner corner, you need to apply putty on both sides. Work should start from one of the walls. At the next stage, sealing the seam between the sheets of drywall is accompanied by folding the tape in half and attaching it to the inner corner.
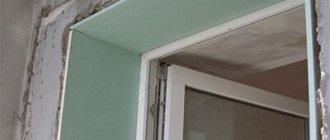
When you plan to paint a plasterboard wall, you need to especially carefully seal the corners. In the case of external ones, a plastic or metal corner with perforation is used. Such repairs are usually done by hired craftsmen, but if you decide to do the work yourself, the seam between the sheets will need to be decorated with a corner, which will increase the strength of this part of the room. The element is fixed with self-tapping screws.
Attention! Usually the design of the room is determined before the furniture is arranged. And at the repair stage, the joints between the cladding sheets are sealed. If these are internal or external corners, it is better to apply the putty with a spatula of the appropriate shape. Only with its help can you achieve an ideal right angle.
How to make a connection between walls and ceiling? Little tricks
When the renovation of a room comes to an end, reasonable questions arise: What is the best way to make an angle between the wall and the ceiling? How can I hide defects or technical seams between the wall and the ceiling? How to select a color? Let's talk about everything in order.
The connection between walls and ceiling is important
"Knauf Uniflot" for seams
Sealed seams will look aesthetically attractive if you use Knauf Uniflot for work. This is a high quality putty that is intended for indoor use. It is based on natural raw materials that do not release harmful substances into the external environment.
When dried, the mixture does not shrink, which ensures a high-quality seal. The composition is sold in the form of a dry powder, which easily combines with water without lumps. After sealing the joints, the dried putty can be painted, covered with plaster or wallpapered. It is based on gypsum, which means that the composition needs to be prepared in small quantities, as it hardens quickly.
First of all, first of all... the partitions, and then the ceiling!
For the first time, the builder is faced with the issue of interfacing the ceiling at the stage of erecting partitions. The top joint causes stress for many. In the case of a block wall, it is common to first coat the top edge of the block or brick with glue, and then press it between the wall and the ceiling. As a result, the glue or solution partially remains on the block and is partially squeezed out. A gap will form that needs to be filled with putty. And even if the putty was successful, a gap may still appear. The best, in my opinion, is to use polyurethane foam. You can use it when the partition has gained the necessary strength.
Using polyurethane foam to seal cracks
First, we insert a gun with a balloon of foam into the top seam and carefully go through the outer and outer sides of the partition. After the foam has dried, remove the excess with a regular construction knife. Ready! The result is a high-tech, durable connection unit. This pairing perfectly compensates for the movement of the ceiling and walls and provides excellent sound insulation to the room. In the case of plasterboard partitions, they try to seal the gap with putty. When installing drywall sheets, try to first leave a gap of no more than 5 millimeters at the top. And then seal the seam with acrylic sealant. The sealant, like foam, compensates for minor deformations.
What can you use?
The joints between plasterboard boards can be sealed with different materials.
Let us consider in detail the most common of them.
Paper tape
This material is sold in rolls. The length of the tape is most often 50, 76 or 153 m, width - 52 mm. Such materials are made from special paper, which is characterized by increased strength. It is reinforced with fiberglass in both longitudinal and transverse directions. As a rule, the surface of the paper tape has a rough texture, which provides better and more reliable adhesion to the putty on the plaster.
The paper tape has a special pressed insert located in the center. Thanks to this element, using such material is very easy and convenient. In addition, paper tape is perfect for sealing areas in the corners of the structure. This material is not subject to stretching and creasing, unlike simple masking tape.
Of course, paper tape is not an ideal material. It also has its own weaknesses. These include a rather labor-intensive installation process, especially when compared with the installation of a conventional serpyanka. This material is susceptible to the formation of air bubbles if the base is not covered with an insufficiently dense layer of putty.
Self-adhesive serpyanka
Most often, when sealing seams between drywall, craftsmen use a serpyanka. It is sold in rolls 45 and 50 mm wide, 20, 45 and 90 m long. Self-adhesive serpyanka is ideal for sealing joints between plasterboard panels that have a thinned edge. Additionally, this material can be used to seal cracks in the base or small holes. Currently, in stores you can find many options for high-quality and durable serpyanka, which is very difficult to tear.
There is such a network:
- self-adhesive;
- not self-adhesive.
When using self-adhesive sickle tape, you need to take into account one important detail: an already started roll of such material should be stored only in a plastic bag so that the adhesive layer does not dry out and lose its properties.
putty
This is another important component required for sealing drywall joints. Experts recommend covering the joints with high-quality putty, which does not shrink or crack over time. In addition, the putty mixture must form a smooth and durable surface on the gypsum base. Branded formulations produced by the Knauf brand meet similar requirements.
Primer
This composition is necessary to protect the material from mold and mildew. In addition, drywall coated with primer is not so afraid of contact with moisture. As a rule, the primer is applied to the base in 2 layers.
Plaster
Plaster serves as a finishing coating, creating a perfectly smooth and neat surface. In addition, the plaster mixture can provide drywall with additional protection and high adhesion to the following coatings applied.
Selection of materials
To putty joints you will need the following tools and devices:
- A pair of spatulas - narrow (100 millimeters) and wide (300-400 millimeters).
- Rubber spatula.
- Two corner spatulas, which we will use to process the outer and inner corners.
- Container for mixing the solution. The volume of the cookware depends on the area of the surface being processed.
- Serpyanka tape, with which we will reinforce the seams. An alternative to serpyanka is perforated paper tape.
- Sandpaper, which we will use to sand the coating, or a sanding construction float.
There are mixtures on the market designed specifically for puttying joints of plasterboard sheets. If possible, it is recommended to purchase drywall and putty from the same manufacturer, since in this case it is easier to achieve compatibility of materials.
Uniflot mixture
This putty for drywall joints allows you to do without reinforcing or perforated tape. However, the cost of Uniflot is quite high. The mixture is sold in 5 and 25 kg bags.
Method of preparation and use of the mixture:
- For 2 kilograms of powder you will need 1 liter of water. The components are stirred until a creamy consistency is obtained.
- Apply the solution to a surface that has been previously cleared of debris and dust.
- The coating hardens after 15-20 minutes.
- The consumption of the solution depends on how the edges of the sheets are prepared, but on average about 300 grams are spent per square meter of millimeter coating.
- Unused powder should be stored in a sealed bag in a dry place.
Fugenfüller mixture
The Fugenfüller putty composition is produced on a gypsum basis. Components are added to the mixture to delay the hardening of the coating. The composition is packaged in containers of the same volume as Uniflot. When working with Fugenfüller, reinforcing tape or perforated paper is used.
The mixture is used not only for joining seams, but also for the following purposes:
- installation of plasterboard sheets on a flat surface;
- hiding all kinds of defects on drywall;
- fixing corners on gypsum boards.
To prepare the solution you will need 2.5 kilograms of powder per 1.9 liters of water. The solution is thoroughly mixed. The final hardening of the coating occurs after 30-35 minutes. The putty is demanding on the lower temperature threshold: the room must be at least 10 degrees Celsius. Dry powder should be stored in a dry place on a wooden pallet.
Note! "Fugenfüller" cannot be mixed with other putty compositions, as this will lead to a deterioration in the performance characteristics of the solution
Fugenfinish mixture
Putty for drywall joints of the Fugenfinish trademark contains a gypsum base and fine additives. It is used primarily for puttying large areas and leveling minor unevenness on plasterboard sheets.
- high plasticity;
- ease of application;
- The coating is very smooth.
The solution is prepared by mixing 1 kilogram of putty with 500 grams of water. Then the solution is brought to a uniform consistency by stirring and left for 2-3 minutes to swell. After this, the solution is stirred again. The putty coating dries within 24 hours.