The development of some residential buildings does not require balconies on the first or even second floors. Such apartments have limited space. However, this problem can be solved if you set out to add a loggia to the room. This will significantly expand the space and arrange additional square meters to your liking. Of course, installing a balcony with your own hands is a labor-intensive and costly process. However, if the project is designed correctly, it is not so difficult to complete. In most cases, you can do a balcony extension yourself, subject to obtaining the appropriate permits.
This is a very important issue, since any redevelopment must be carried out in accordance with the law. If the owners of apartments on the first or second floor begin the process of unauthorized construction of new structures, they will most likely have problems with the building management authorities. As a result, they will simply be given a conclusion on the demolition of the constructed balcony.
Do-it-yourself balcony in a private house – is it possible?
The balcony is a beautiful addition to the facade, a place to be in the fresh air. It is possible to install the structure with your own efforts, subject to scrupulous adherence to installation technologies.
Advantages of self-building:
- regulation of deadlines;
- independent choice of materials;
- varying possible designs;
- regulation of construction costs;
- correction of building design.
Construction work begins with choosing the type of structure in accordance with the design and style of the dacha.
Rules for constructing a balcony
The construction of a balcony room is subject to a number of requirements that determine its location, length, height, type of fencing, and material.
When constructing a balcony room, the following requirements are taken into account:
- the building contains at least two floors;
- the loggia is mounted on the side of the house with access to the garden, park, quiet part of the street;
- the structure must support the weight of several people;
- installation of supports is required;
- the decision on glazing is made taking into account the possible weight of the house;
- The material of the loggia must match the main material of the house.
The balcony room is also an exit for additional evacuation in case of fire, so it is built in accordance with all safety standards.
Basic materials
A loggia in a private cottage is built from natural, artificial materials with high strength, load-bearing capacity, and long service life:
- tree;
- metal;
- concrete;
- glass.
Balcony with concrete floor
The design, type, and choice of material for the balcony room depend on the type of decoration of the house and its material. It should fit into the overall design, without standing out or resonating.
Selecting quality glazing
The balcony is the most open room to natural light in the apartment. But while allowing light into the room, bad weather cannot be allowed to enter. To do this, it is better to glaze it, choosing cold or warm glazing. Cold is intended for insulated from the apartment, uninsulated and unheated.
“Cold glazing” is supported by its cost. If you do not plan to use it as a warm extension or winter garden, you can limit yourself to windows of a simpler design and with single glazing. Moreover, they also use cold ones, but closed from rain and wind. Another argument in favor of “cold glazing” is the wide variety of opening options, since single-pane sashes are much lighter than double-glazed windows used in warm glazing. In addition, an aluminum profile is used, which is lighter than steel in heavy “warm” structures. In good weather, such windows can even be folded, opening up maximum space to fresh air. Windows are mounted resting on a concrete, brick fence or on the base plate itself, if the fence is not solid. In the latter case, the glazing can be from the base or part of the window structure can be covered with a sandwich.
Modern light-transmitting structures can save heat. When choosing warm glazing for a balcony, it is important to pay attention to elements that are specially designed to reduce heat loss through windows:
- glazing must be made with multi-chamber double-glazed windows;
- The design must use a heat-saving profile with gaskets that protect against freezing.
Detailed information about these window design features must be included in the certificate. And for these improvements to work, it is necessary that the installation of the glazing be done efficiently, with careful sealing of joints and junctions. Even if you decide to repair the balcony yourself, you will have to contact a specialized company for glazing. It is important to get as much information as possible about it in order to make a quality installation.
Construction safety requirements
A balcony room in a country house is subject to a number of technical requirements that guarantee the safety of the structure. The loggia must withstand the assigned load, not sag, or deform.
To do this, it is built in accordance with the following requirements:
- the base plate is designed for a minimum of 200 kg, the outer strip - 400 kg;
- permissible vertical load on the balcony parapet – 100 kg;
- permissible horizontal load on the parapet – 40 kg;
- standard parapet height is 1 m;
- ensure that the structure is adjacent to a load-bearing wall without a window, with a minimum length of 1.2 m;
- laying a drainage system;
- the minimum slope angle of the base slab is 3 degrees;
- length/height parameters of the structure in accordance with the housing design;
- installation of additional racks, supports, columns for a large loggia area.
After studying the basic requirements for a balcony room, they move on to choosing the type of structure, materials, and measurements.
Types of balconies
The range of loggias includes various designs for summer cottages and private houses. The choice of design depends on the size, style, dimensions, and design of the cottage.
Loggias are divided into types based on materials and location.
Depending on the loggia material, there are:
- wooden;
- forged;
- concrete.
Wooden balcony
According to the method of arrangement there are:
- hanging;
- attached;
- attic;
- console
Constructive solutions are distinguished by design, weight, method of construction and fastening of balcony slabs in relation to the load-bearing wall.
Documenting
Before proceeding with calculation and construction work, it is necessary to obtain permission to build a loggia.
Documents for installing a balcony in a country house with your own hands include:
- permission from the company on whose balance sheet the house is listed;
- official written agreement of the residents of the house for construction;
- a finished loggia project from an architectural agency;
- construction agreement from supervisory and municipal services of the city;
- ownership of the house;
- BTI certificate;
- owner's application for redevelopment;
- photo of the cottage.
For advice and a detailed list of documents for the construction of a balcony room in your home, contact the planning inspection in your city.
Video master classes on the topic
Detailed videos that will help even a beginner install a balcony block with a window sill and slopes on their own:
Tuning the opening and installing the BB:
Independent installation of a window and door unit on a balcony is a labor-intensive process that requires a lot of time and financial costs. Directly installation is preceded by a large amount of preparatory work. Both are based on certain theoretical knowledge and practical experience. If you are not willing to risk a PVC structure by installing it yourself, consider hiring a professional.
YOU MAY ALSO BE INTERESTED
How to make a balcony in a private house - help for beginners
The construction of a balcony structure begins with studying the installation technology and its stages.
When installing a loggia it is important:
- design begins at the cottage construction stage;
- calculate the maximum load on the load-bearing wall;
- when building a balcony on the roof, take into account the load the roof can withstand;
- think over the laying of the rafter system;
- designate places for laying waterproofing material, insulation, screed;
- A mandatory requirement for an extension is an adjacent wall made of massive, insulated material.
Thinking through the design of a future extension taking into account the design of the dacha eliminates the risk of unforeseen errors in the work.
Some good advice
There are no trifles in creating comfort in the house, and even more so in such a matter as choosing a convenient window, therefore, a few recommendations will not hurt you:
- If you have small children, order a locking device for the window so that the child cannot open the sash on his own;
- Don’t forget to order the micro-ventilation function to avoid increased condensation due to temperature changes;
- Do not take measurements of the future product yourself - entrust this to professionals, this will minimize errors in the finished dimensions;
- If possible, try to choose windows that are more square in size - they transmit more light flux than those that are elongated in length or width;
- Think about the width of the window sill in advance: maybe you plan to place flowerpots with flowers on them, then they should be wider, or maybe, on the contrary, some furniture will be placed near the window, and a wide window sill will only get in the way;
- A mosquito net will be a very useful element - it is also better to order it immediately complete with the windows;
- If your windows face north, you should not make a large glazing area - this can directly increase the future costs of heating the loggia.
If you decide to create truly comfortable conditions for relaxation, work, sports, or just staying on the balcony, admiring the sunset or cityscape, then PVC balconies with PVC windows are exactly what you need. Use the information provided in the article, we hope it was really useful for you.
Similar articles
- Personal data privacy policy
- Balcony glazing with plastic windows, which ones are better...
- Plastic balcony doors, types, methods...
- Glazing of balconies and loggias with aluminum profiles,…
- DIY clothes dryer
- How to make a balcony in a private house with your own hands
Preparation for construction
The first stage of the start of construction work is the selection of material, its purchase, the design of the future extension, and the preparation of tools. The material for the loggia is selected taking into account the design of the entire house. The material should fit into the overall style of the cottage, not stand out, not resonate against the general background.
Necessary construction tools include:
- metal fittings;
- wire;
- plywood, boards, metal profile;
- concrete solution;
- hammer;
- putty knife;
- channels for the frame;
- metal pipes.
The type of equipment varies depending on the type of balcony, material, and main construction project.
Lighting
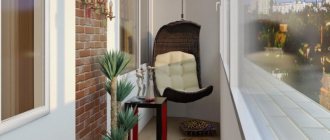
When installing a suspended or false ceiling, the simplest lighting option is built-in lamps. If there is no danger of leaks from above, they will last a long time and will not take up unnecessary space. The use of wall lamps is limited by the reluctance to have unnecessary elements in a cramped room. You can simply provide mounting points and connect portable lights when necessary. In this case, there should be enough sockets on the balcony so as not to bother with inconvenient extension cords.
Use a balcony when lighting is of particular importance - as a winter garden or a small apartment greenhouse. This can be a place for winter-spring growing seedlings, relaxation or creative pastime. A warm, sunny room provides comfortable conditions for the growth of citrus or exotic plants. A prerequisite is the organization of additional lighting. To do this, you can use powerful but economical modern LED lamps. And on the most stormy evenings your balcony will stand out as a bright spot against the background of a dark facade.
Detailed design and calculations
The preparatory stage of construction work begins with the development of a detailed design of the future loggia and calculation of the dimensions of the material.
The working draft includes the following details of the balcony:
- marking the installation of supports on the ground;
- marks for the depth of entry of support pillars into the ground;
- marking the future frame of the loggia;
- marking the location of sheets of material on the sheathing;
- layout of the balcony room relative to the living rooms;
- type of cladding;
- location of window opening, door;
- glazing decision;
- type of roof and its fastening;
- detailed diagram of fastening corners.
Correctly carried out, detailed calculations eliminate the risk of irreparable errors during construction, damage to the material, and additional payments due to incorrect calculation of materials.
Main stages of construction
After obtaining permission for construction and planning work, choosing the type of structure, preparing tools, you can begin work. The construction of a balcony includes several stages.
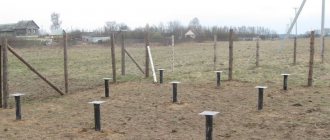
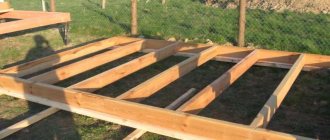
Stage 1 - installation of struts, foundation
Base frames and struts are the basis on which the entire structure is supported. They are made by hand from galvanized metal, or purchased in a specialized store. The size of the struts is 50x50 mm.
There are a number of requirements for the installation of struts:
- one side of the slope protrudes up and down by 50 mm;
- the distance between the struts corresponds to 100 cm;
- Anchors are used for fastening;
- tying the struts with metallurgical angles;
- mandatory jumpers are created across the triangles;
- Additional anchors are attached to the adjacent wall.
A metal frame made of struts is a reliable basis for a hanging or attic balcony.
Stage 2 - installation of floor, frame
The floor of the future loggia is laid on the base frames. Due to the limited load-bearing capacity of the frame, casting a concrete base is excluded.
The floor of the structure is performed in two ways:
- Fastening metal sheets under base frames. A layer of expanded clay is poured inside, a reinforcing mesh up to 5 mm thick is attached with wire, and welded around the perimeter. A layer of cement mortar is poured on top.
- Sheets of rigid material are laid on the base frame, a waterproofing layer is laid, and covered with wooden boards secured with self-tapping screws. Logs are attached to the top, an insulating layer with a vapor barrier is laid, and a subfloor is laid.
The metal frame is welded on the ground, then placed on the prepared base. The side edges of the frame and the top lintel are secured to the wall with anchors. This increases the durability of the structure and reduces the load on the base.
Stage 3 – insulation, finishing
The finished balcony frame is sheathed with profiled sheet material. The type of finishing material depends on the type of construction and design of the house. After cladding, an additional insulating layer and sealing are laid to prevent moisture from penetrating into the room.
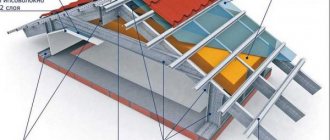
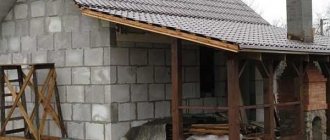
Stage 4 - roof construction
A support-cantilever roof is mounted on the finished frame. Attached to the wall with metal corners with lathing. The roofing material must be strong, reliable, withstand heavy loads, resistant to temperature fluctuations, and have a high reflection coefficient. Corrugated sheeting, seam roofing, and metal tiles are suitable for this.
Stage 5 – glazing, cladding, wiring
The final stage of construction and planning work is interior decoration, cladding, glazing of the balcony (in most cases, laminated plastic windows with a wood look are used). Finishing material is laid on top of the insulation for additional comfort indoors.
For internal lining use:
- lining (more details in the article “lining a balcony with lining“);
- drywall;
- plastic panels (discussed in detail in the article “finishing a balcony with plastic panels“);
- MDF, chipboard, plywood;
- Tiles (we recommend the article “tiles for the balcony“);
- PVC.
At the stage of covering the loggia, electrical wiring is installed, electricity is supplied, and heating is connected inside the room.
Preparatory work
Preparing a wall opening for installation of a balcony block begins with dismantling the old structure.
Note! Before removing the old block, it is necessary to clear the window sill and remove the curtain rod and curtains. Furniture located close to the window should be moved away or covered with film to protect it from dust.
Dismantling the old block
Dismantling of a wooden window and door unit is carried out as follows:
- Remove the opening doors and balcony doors from their hinges. The glass is removed from the blind sashes, after removing the glazing beads.
- The window sill is dismantled. The concrete is broken with a hammer, cutting the reinforcing elements with a grinder. A wooden, aluminum or plastic window sill is simply removed from the opening.
- Remove the tides.
- Remove the old frames from the opening. To do this, they can be cut, starting from the bottom, or pryed with a construction cutter.
- The slopes are dismantled and the insulation is removed.
Dismantling an old wooden structure
If you are dismantling old PVC windows and doors, first remove all fasteners and then remove the frames.
Try to perform the work as carefully as possible to maintain the integrity of the opening.
Preparation of window and door openings
According to the current GOST, which regulates the connection of PVC windows to openings, the latter must have a flat surface. The presence of chips, potholes, and other irregularities, the depth of which exceeds 10 mm, is not allowed.
>
If the walls crumble, they are strengthened with binders. Oily surfaces are degreased. Irregularities are eliminated with the help of plaster, and cracks in brick and block masonry are eliminated with the help of high-rigidity foam insulation or the same plaster.
You can clean the opening from dust and debris using a stiff brush or vacuum cleaner. If installation work is carried out in winter, then snow, frost, and ice are also removed from the working surface.
The walls of the opening must be aligned horizontally and vertically. Their deviation from the axes is acceptable, but not more than 4 mm per 1 m. Accurate measurements can be made with a building level or a laser plane builder. You can also control the equality of the diagonals in the opening.
The process of installing the frame in a clean and leveled opening
Connection of door and window frame
To connect the window and door parts, you must first remove the movable sashes from their hinges.
>
To do this you should:
- knock out the top hinge rod;
- open the locking mechanism by turning the handle;
- remove the sash from the bottom hinge.
Metal rod under the decorative hinge plug
Then prepare a connecting strip, self-tapping screws and an electric drill with a set of drills.
- Place the tie strip between the door and window frame.
- Place the entire structure “upside down” on a flat surface, making sure that there are no distortions in it.
- From the door side, drill tunnels in the end part of the frame in increments of 30-40 cm.
- Insert the fasteners and tighten them.
- Cover the visible parts of the fasteners with decorative caps.
- Apply sealing tape around the perimeter of the structure.
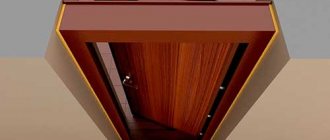
Profile for connecting balcony door and window
Fixing the sealing tape
If you want to make fastening units from the side of the window, you will have to remove the blind part of the window. To do this, you need to pry the glazing beads with a spatula, remove them, and then expose the glass.
Note! Choose self-tapping screws with a length of 80-90 mm so that when screwed to the end they do not violate the tightness of the window in the balcony block.
Connection diagram of individual parts of the block
Selecting fasteners for a balcony block
Before installing the balcony block, you need to make markings for the fasteners that will hold it in place. For these purposes, anchor plates or spacer frame dowels are used. What is the difference, what are the advantages of each option?
Anchor metal plates are attached at one end to the outer end of the window and door frame, and at the other to the wall of the opening.
Plate bent to the wall
Some of them (“with ears”) are first inserted into special grooves on the frame and only then screwed with self-tapping screws. Others (without “ears”) are fixed immediately, simply by attaching them to the box.
Fastening anchor plates “with ears”
The main advantage of anchor plates is that to install them you do not need to remove double-glazed windows from the blind parts of the window. This reduces the risk of damage to the PVC structure significantly, which is especially important for inexperienced craftsmen.
But anchor plates cannot always be used. They are unreliable fasteners for large (more than 4 m2) and structures with actively used sashes. They are also not suitable for installing a balcony door. However, many experienced craftsmen skillfully combine plates with spacer dowels, using the former in the upper part of the window-door unit, and the latter in the bottom and sides.
Fastening the balcony block to anchor dowels is the most reliable option. These elements are a set of a bushing and a durable metal bolt. When the bolt is screwed into the bushing, it expands, due to which the frame structure is reliably attracted to the walls of the opening.
>
However, the use of dowels requires the preliminary removal of even blind sashes, which may lead to a violation of the integrity of the double-glazed windows. If you are not a professional, then you cannot do without an assistant, or even two.
Removing the bead using a spatula
Note! To install the box using dowels, you will need a powerful hammer drill.
Construction of balconies of different designs
There are many variations of balcony buildings, differing in appearance, type and method of construction. Depending on the chosen design, different requirements are imposed on it. Let's consider the nuances of building different types of loggias.
Made of wood
The wooden suspended structure has an attractive design, ease of installation, and accessibility.
Among the features of a wooden building:
- using wooden beams as the main support;
- load-bearing beams enter the wall to a depth of at least 25 cm;
- impregnation of wood with an antiseptic agent is mandatory;
- metal corners and strips are used to secure beams;
- the racks are secured with M12 bolts;
- for greater rigidity and stability of the structure, grooves are made at the intersection of the beams;
- wooden boards are used to create the floor;
- The preferred fencing material is wood.
Strength and durability of the finished building can be achieved by using antibacterial impregnation and coating the elements with a layer of hydrophobic paint.
Frame check
An important stage, but for some reason missed by many. In some cases, the quarters chosen for glass turn out to be uneven - there is a difference in depth. If the difference is minimal, then it’s okay, but in more serious cases the glass may simply break. To avoid such troubles, the frame needs to be trimmed. A tool called a zenzubel or folding hebel is used for this. You can try to get by with a regular plane, but then you will have to finish the corners with a chisel.
Common problems during construction
When building a loggia yourself, a number of problems often arise that interfere with the progress of construction. Most problems arise due to lack of experience and knowledge of performing such work. Therefore, before starting construction and planning work, it is recommended to familiarize yourself with the installation technology of various balcony structures and recommendations for them.
How to attach a loggia to a wall?
Connecting the extension to the load-bearing wall is carried out in two ways:
- fastening beams with support on support boards - the construction principle is similar to the cantilever structure; the beams are supported on support boards, and not on the wall;
- mounting the second support row close to the wall is done by installing wooden slopes with an additional transverse beam.
An extension supported by support beams is not reliable and cannot withstand heavy loads, so installing furniture on such a loggia is not recommended.
How to install a fence?
Balcony railings are made of metal, wood or sheet materials manually, or purchased at a hardware store.
Installation of the fence is carried out according to the following scheme:
- Marking the future building.
- Installation of fence supports according to the project plan.
- Applying markings for fastening railings;
- Fastening reference points along the markings using anchors;
- Assemble and secure the fence.
- Final painting, decoration.
The installation method differs depending on the selected type of fencing and material.
Finishing the loggia with wooden paneling
Replacement of double-glazed windows
First, you should replace the double-glazed windows on the loggias. Window installation should be carried out by professionals. It is better not to do this work yourself; during operation it will be difficult to correct errors made during installation.
New glass unit Rehau 60 Blitz design. Each door of the two-chamber design opens. This will make it easier to keep the windows clean, since there is a road next to the house and dust accumulates on the surface quite quickly.
Glazing estimate. The total cost of installing windows was 18,220 rubles.
Material purchase
Tools:
- Construction knife and pencil;
- Concrete drill;
- BOSH bit;
- Yardstick;
- Jigsaw files;
- Set of wood drills;
- Stainless steel carpenter's square;
- Building level;
- Miter box with saw for cutting at an angle.
Power tools needed for work.
Lumber:
- Bars: 11x19x2200 (knot-free spliced), 20x20x2000 (dry planed, category 1), 40x40x2000 (planed, category AB);
- Eurolining 12x95x2700 (category B);
- Furniture panel 18x400x800 (BB grade);
- Skirting board 12x40x2200 (1 grade);
- Corner 27x27x2500 (external);
- Glazing bead 10x10x500 (category 1).