If we talk about plumbing, then from the technical side everything should be clear. But in practice, it usually depends more on the situation in which you have to work. Everyone knows that when working with plumbing, first of all you need to turn off the water and only then do what needs to be done. But what if this cannot be done, how to change a pressure tap? Let's talk about this.
How to repair a drinking water filter faucet?
Hello! I have an Aquaphor Crystal N filter with tap 3. The faucet began to leak. Is it possible to repair it - replacing the ceramic pair?
You voted (2)
To disassemble your faucet, you need to: 1. Unscrew the flow control knob. 2. Remove the outer part. 3. Unscrew the nut (together with the metal ring). 4. Remove the ceramic pair.
Another question is, is there a ceramic pair of the required size in your city? Only a service specialist in your city can answer this question.
PS: The faucet must be disassembled and reassembled carefully so as not to damage the threaded connections. It is advisable to entrust this procedure to a specialist.
All the best to you.
Good afternoon. Please tell me how the crane is disassembled. I was able to remove the plug from the flow control knob and remove the screw. And then without super efforts (I’m afraid to use force, because ordinary taps can be easily disassembled) or additional tricks, it’s impossible to disassemble. Maybe there is a diagram or a more detailed description. Thank you very much. Sergey.
Good afternoon You did all the steps correctly. The handle can be removed without effort, you just need to pull it towards you, do not twist it in different directions, as the grooves of the handle can be damaged. Due to the long use of the faucet, the handle has become stuck to the faucet axle, use WD-40, then remove the handle.
Thank you very much for your answer. I'll try.
Good afternoon Unfortunately, it was not possible to disassemble the faucet - the handle cannot be removed. Is it generally possible to disassemble this faucet - “Classic faucet version 1”? Sergey.
Good afternoon Yes, the faucet can be disassembled, but apparently the handle is so stuck that even proven means (WD-40) do not help; try lightly tapping the faucet handle with some kind of wrench, if this does not help, unfortunately, the faucet will need to be replaced.
I bought a new set of Crystal A. I installed it according to the instructions, but somehow clean water immediately dripped from the spout of the tap. A week later it began to drip continuously. A call to technical support yielded nothing in essence. Did you install it yourself? That means your problems. You can take everything apart (!) and bring it to the service center (this will take a whole day). Where they will conduct an examination and maybe decide to change it. Or maybe not.
I removed the crane axle box. It looks like the problem is in the original defect of the ceramic pair, the edge is broken off, there was no fragment inside (in the photo). It turned out to be impossible to buy such a 3/8″ crane axle box; they are not available anywhere. As a result, the filter stands idle. Terrible.
I do not recommend this company's products.
Hello Dmitry. We do not waive the warranty on our filter. You can contact the service center for warranty. Since you installed the filter yourself, the technician’s visit to your home will be paid, but if our technician installed it, the visit would be free. You can call the technician by calling the numbers on the website. Best regards, Aquaphor support service Nikolay Efremov.
You released a low-quality product, I have already spent time and money on it. Now you are asking me to spend time traveling across all of Moscow from the other end of the Moscow region. The cost of a trip to you is several times more expensive than the filter itself, and even more so than a defective part. Will you compensate me for the trip? The filter turns out to be golden.
In any case, diagnostics and identification of factory malfunctions take place in a service center or by a master installer on site. You decided to install the filter yourself without calling a technician, and took upon yourself to check the filter. You have a warranty for the product and you can check it with a receipt and passport at the Aquaphor service center. There are 3 centers in Moscow where you can check equipment: Oktyabrskoye Pole metro station, Shipilovskaya metro station and Proletarskaya metro station. Best regards, Aquaphor support service Nikolay Efremov.
Good afternoon Question to the manufacturers: where can I buy a ceramic pair for the Faucet (version 3), are there any analogues?
Unfortunately, we do not sell spare parts for the crane. If the faucet is leaking, then the entire faucet is replaced with a new one. Best regards, Aquaphor support service Nikolay Efremov.
Guys, your clean water tap started leaking 3 months after installation. You yourself are not ashamed to make such an open marriage and even sell it for 900 rubles. ?
Hello. Each case of failure of spare parts is considered separately. Take the product to the service center, they will check it on the spot and if the defect is confirmed, they will replace it with a new one. Since many reasons can affect the operation of the faucet: mechanical damage during transportation, too high water pressure, etc. You can find out in detail the address of the service center and repair details by calling 8-800-555-3035. Where did you buy the filter? If possible, send a photo of the faucet, purchase receipt and system passport. Sincerely, Aquaphor support service Mikhail Koshurenko
How to unscrew a stuck nut on a faucet
It seems that almost every man has encountered at least once in his life a nut that did not want to be turned off. She sits in her place, no matter how you spin around her. You run around, literally dance with tambourines, and, you know, she laughs. As if it had taken root. Sound familiar? In fact, a very common situation. The cause is common rust. And rust, as we know, is formed from contact of metal with moisture.
Rust seems to connect the nut to the bolt at the molecular level. Sometimes the bolt breaks due to the applied effort, but the nut does not come off. How to get out of this situation?
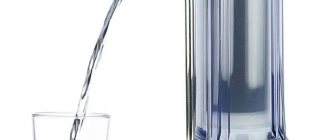
Connecting a drinking water tap
When connecting the filter system, you must ensure that the purified liquid does not connect to the tap water. For these purposes, install a filter tap in the mixer. It is connected to the structure via a flexible hose.
Separate drinking tap
Installing a drinking water faucet is not the easiest task. However, knowing some installation features, you can easily achieve your goal.
Tips for selection and installation:
- It is best to buy the device and components in specialized stores. There you can choose the most suitable option and find out from the seller all the features of each product.
- It is recommended to give preference to half-way valves made of bronze. They are more durable than any similar products and perform their functions well. An additional advantage will be the presence of a chrome coating, which will protect the part from moisture.
- When choosing a location for installation, you need to take into account the height of the existing containers. The optimal location would be a countertop or sink.
- When installing a faucet filter, you should leave a little space between the body of the product and the base. Free space will be needed to easily remove dirt.
Polypropylene tap - a modern solution for your communications
Faucets made of polypropylene cause distrust among many buyers due to the fact that they consider the material to be unreliable and short-lived. Meanwhile, modern technologies ensure the highest quality manufacturing, thanks to which such cranes are not inferior in properties to metal products, and in some respects even surpass them. This article will discuss the main features of this type of product and the criteria for selecting quality models.
Taps and fittings for polypropylene pipes meet the highest quality standards if they are manufactured in accordance with the technology
Advantages of this product group
Taps for polypropylene pipes can be very different: steel, brass, or made of the same material as the main communications. It is the latter option that we will consider in more detail, especially since it has a number of undeniable advantages:
A polypropylene faucet is an excellent solution for most types of communications
Important! Another important advantage is the fact that the locking mechanism is made of high-quality stainless steel, this guarantees the durability of the structure and its resistance to adverse influences.
Features of polypropylene taps
First, you should understand the basic design features, this will allow you to better understand how the system functions.
Products can be made from different types of raw materials, most often the upper limit of heat resistance is limited to 95 degrees. It is best to choose designs from the PPRC brand of raw materials; the size range of products is quite wide, but the most common sizes are 20, 25, 32 and 50 mm, but other options can be found.
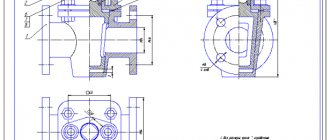
Regardless of size, the structure consists of the following components:
In the photo: this is what the structure looks like in cross-section
- Housing made of the highest strength polypropylene . It is very important that the assembly is cast with high quality, without any flaws or surface defects.
- The closing element is a ball with a hole for water flow . It is best if it is made of stainless steel and the surface is laser polished to ensure the tightest and most reliable fit.
- The rod is the axis on which the locking mechanism is attached ; it must be adjusted very precisely to prevent even minimal play.
- To prevent water from penetrating through the rod mounts, O-rings are used ; they must be made of high-quality rubber.
- To ensure a tight fit of the ball to the body, two rings are used , which can be used either from fluoroplastic or Teflon.
- The mechanism is adjusted using a handle, which is attached with a special screw..
What are the faults and how to fix them
When using a filter tap (Aquaphor, Geyser, etc.), various malfunctions may occur. In order not to call a plumber every time and spend money on repairs, you need to learn how to fix the problem yourself. If you approach the work responsibly and take into account all the nuances, then repairing a water filter will not be a problem even for a beginner.
Possible breakdowns and ways to eliminate them:
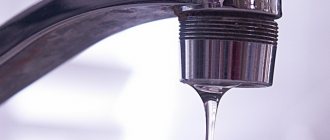
- The faucet is leaking. In most cases, this problem occurs due to wear on the bottom gasket. To change it to a new one, you need to disconnect the flexible hose and remove the adapter. After this, you should remove the switch, spool and eccentric one by one. Having reached the problematic part, you should replace it and reassemble the product.
- The faucet for drinking water is out of order. Before replacing, you need to remove the handle by unscrewing the screw covered with a decorative plug. Having disassembled the faucet from the filter (Geyser, Aquaphor, etc.), remove the faucet axle box. This damaged part is replaced with a new one. Assemble the device and check the quality of the work performed.
- The faucet makes noise during operation. The presence of such a problem indicates incorrectly selected gaskets. These products may be too large in diameter or thickness. Disassembling the faucet and replacing problematic products will help correct the situation.
- The flow power has decreased. The reason for this phenomenon lies in clogged pipes or connecting hoses. You can remove the blockage by cleaning or replacing clogged parts with clean ones.
- The crane lowers without human assistance. To correct the situation, it is necessary to replace the gasket located under the spool.
Installing a drinking water filter tap is considered a difficult job. To deal with it, you need to choose a high-quality cleaner and perform the installation correctly. If you can avoid mistakes, replenishing your supply of clean water will become much easier.
Preparation and necessary tools
Before you start dealing with a stuck compound, you need to be properly prepared. Armed with the right tools, we will unscrew the fastening element faster and, most likely, will not even damage it. One key obviously won't do the trick. You will need a whole set. What will be most useful to us in this matter are:
- heads with a knob;
- impact wrench;
- socket wrench;
- set of spanners.
When starting work, you should not forget about your own safety:
- Never use damaged tools.
- When unscrewing, proceed counterclockwise.
- Check that the key is securely fastened.
- To avoid injury, always wear gloves.
Causes of failure
Drinking faucet leaks are usually caused by wear of the gaskets or failure of the ceramic pair of the valve head; the most common problems and ways to eliminate them are shown in the table below :
| External signs | Possible causes of failure | Recommended Actions |
| There is a leak at the connection between the faucet spout and the body, the gander is dangling in different directions. | Wear of ring rubber gaskets. | Replacing gaskets. |
| Water drips from the tap when closed. | Incomplete closing of the ceramic valve-axle pair due to plaque, displacement or wear. | Disassembling the part, cleaning the plates from lime deposits. |
| Leakage at the valve or swing arm mounting area. | Worn gaskets of the valve axle box or loosening of the screw. | Replacing gaskets or tightening nuts. |
| Leakage at the installation site. | Installation errors, insufficiently tight connection of the polyethylene tube, wear of gaskets and washers. | Replacing gaskets or tightening nuts. |
| Loud noise and beating of the tap when opening. | Incorrect sizes of spacer washers or their displacement. | Selecting elements of the required size or cutting spacers. |
Dismantling
As already mentioned, there is a high degree of risk in this process, since the base of the faucet may crack or even burst when unscrewed. This occurs due to strong water pressure.
The valve handle can be removed by unscrewing the fastening nut. Then you need to adjust the gas or adjustable wrench to the size of the faucet edges.
After adjusting the tool, you need to unscrew the tap in the opposite direction clockwise, while holding the riser outlet. The final turns of the thread can be unscrewed by hand, because further the unscrewing resistance will become easier.
After unscrewing the tap, you need to prepare some kind of container and hose so that there is somewhere to drain the water.How to disassemble?
Disassembly of the tap begins after shutting off the water supply from the filter and draining the excess. If there are no leaks in the installation hole, there is no need to unscrew the nut and completely remove the housing.
In this case, a simple scheme is selected to parse :
The gander carefully turns in different directions and stretches upward.- The shutoff valve is removed: for models with a rotary valve, the top cover is first lifted, the thumb is unscrewed second, for lever valves the valve is turned up or towards the opening.
- Remove the decorative plug by hand (after loosening) or using pliers with a piece of leather or rubber.
- Using a regular, Phillips or hex screwdriver, unscrew the nut securing the valve axle box.
- The crane box is removed with tweezers or by hand, inspected, cleaned and repaired.
It is not recommended to displace intact and dense rubber bands on the rod or gander (it is easy to damage them when removing them; select gaskets of the required size and pull them onto the rod - vice versa).
It is not difficult to distinguish gaskets that need replacement - in addition to their solid service life (more than 2-3 years for high-quality models), they:
- crack,
- crumble
- leave black marks on fingers.
If there is a leak near the installation hole, the disassembly process becomes more complicated; work begins with unscrewing the water supply nut and removing the valve body.
How to fix it yourself?
According to the method of adjusting the water pressure, taps are divided into rotary and lever products.
Lever models come in two types:
- based on a metal ball;
- based on a cartridge with a ceramic mechanism.
The principle of operation and design of different cranes is different, therefore disassembly is carried out differently.
Dismantling the entire product is required in rare cases, but the removed faucet is easier to inspect and disassemble.
To do this you need:
- Prepare: a flip screwdriver, pliers, straight and lever adjustable wrenches, a container for water.
- Close the cold water supply valves to the system and to the storage tank.
- Unscrew the nut that secures the supply tube and disconnect the tube.
- Unscrew the clamping nut of the faucet shank.
- The tap has been removed.
If the nuts have become stuck, they are treated with WD40 or an analogue, leaving them to “sour” for 10-15 minutes.
How to properly repair and replace gaskets?
To clean the ceramic pair of the valve head from limescale, you will need a flat screwdriver and a solution of citric acid (2 tablespoons per 0.5 liters of warm water). Disassembly of this part begins by removing the rubber sealing cover.
Ceramic plates can be easily removed and lowered into the solution for 2-3 hours.- Heavily contaminated areas are first rubbed with citric acid slurry or soda with a drop of vinegar.
- If necessary, the same procedure is repeated with all remaining parts of the tap.
- Cleaned parts are washed with running water and dried well.
The diameter of the rings is selected in advance; the tensioned rubber bands must be lubricated with silicone or Teflon grease before reinstallation. If there are no problems with the valve head, the spout simply returns to its place; in other cases, it is installed last.
The rubber bands are tightened onto the rod manually , after checking the operation of the ceramic pair and provided that there are no other defects. Correctly installed plates click slightly and completely block the water supply channel.
Deviations of the inner diameter of the gaskets in a smaller direction are allowed, but in a larger direction - no, with the right approach they fit tightly on the rod.
If you do not have suitable materials (gaskets of the required size are rarely found in standard kits) or confidence in your actions, you should buy a new crane axle box. In any case, this part is cheaper than new plumbing, but it takes time to find it and compare sizes.
Repair if water leaks
Let's look at how to fix a leak yourself, depending on the cause of the breakdown.
- If the leakage occurs due to wear of the valve axle box, this part must be replaced with a new one.
- Disassemble the structure as described above, remove the unusable crane axle box and install a new one in its place.
- When the cause is plaque, it is necessary to clean the mechanism plates.
Features of cleaning plates
The valve head consists of 2 flat thin elements. They can be ceramic or plastic.
When the valve is turned, the plates move and regulate the opening or closing of the opening for the passage of water.
If you do not change the cartridges on time, a limescale layer will form on the plates. Because of this, the tightness of the mechanism is broken. The plaque must be removed.
How to fix it?
- Remove the rubber gasket.
- Using a flathead screwdriver, remove the plates from the housing.
- Add citric acid to warm water.
- Place the body and plates into the resulting composition.
- After 2.5 - 3 hours, remove the parts from the liquid and wipe with a soft cloth.
Advice! If you soak the chrome parts of the mechanism (gander, decorative elements) in the solution, the coating will come off from the surface and they will return to their original appearance.
For cleaning, you can use a mixture of baking soda and warm water . Apply the resulting slurry to the problem parts of the parts and leave for 1.5 - 2 hours. Using a damp cloth, remove the mixture and wipe the parts.
Causes of gasket damage
Often the cause of leakage is the rubber gasket. This part is designed to tightly close the hole when closing the valve.
The reasons for damage to the gasket may be the following:
- low quality material;
- discrepancy in the size of the rubber element;
- misalignment during installation;
- grains of debris or grains of sand get under the gasket, which deforms the rubber over time.
To replace, you need to purchase a set of gaskets. You can make the part yourself by cutting it to size from sheet rubber. Sometimes it is enough to simply rinse the old gasket under running water and put it in place.
Reassembly
Assembly is performed in reverse order:
- The first to return and tighten is the rod bushing;
- After it, a lever or lamb is inserted into place;
- Lastly, the spout is fixed in the tap.
At all stages of assembly, the tightness of the connections is checked , and the free play of the opening lever is made as minimal as possible.
The final fixation of the elements and fastening of the lid is carried out after checking the functionality and tightness of the tap.
The junction of the pipe with the water supply tube is sealed using FUM tape, worn flat gaskets are replaced with new ones of the same size and thickness.
Assembly of the mechanism after repair
After the restoration work, it is necessary to assemble the crane axle box. The steps are performed in reverse order:
- The plates must be positioned properly in the housing.
- Place the gasket in place.
- Place a plug.
- Screw in the valve.
- Using a wrench, screw the faucet axle onto the faucet body.
- Secure the faucet in place.
- Connect the water supply hose.
After this, turn on the water and perform a leak test. If it does not drip, then the problem has been successfully resolved.
Difficulties
The above actions will be meaningless or ineffective when:
- Significant wear of parts due to corrosion (rust-covered plumbing needs to be completely replaced);
- Lack of gaskets and seals of the appropriate size or failure to lubricate them during assembly.
The work becomes more complicated when it is necessary to repair combination faucets that simultaneously supply drinking and tap water or models with two valves that supply regular and mineralized water from filters. Such models have two or more valve heads; to determine the problem, owners must sequentially shut off the supply tubes or completely rebuild the tap.
Sealing
Before all work, it is necessary to prepare the wound tow and wrap it around the threaded parts of the outlet in a clockwise direction. So, when installing the tap, the seal will not unwind. For the best effect, it is advisable to rub it in place with your hands.
Check it out here too!
Low and high pass filter: making frequency filters and how to create high-end circuitry (95 photos + video)Do-it-yourself electric bike: how to build an inexpensive and powerful electric bike from scratch (100 photos)
How to choose a gas boiler - the best models and manufacturers. Review of modern boilers and options for their application (145 photos and videos)
Communities › Do It Yourself › Blog › Repair of ceramic faucet housing for drinking water.
I got tired of periodically looking at the dripping drinking water tap from a three-stage filter and decided to stop this matter. There are several ways to solve the problem, for example: 1. Buy a new faucet. In terms of money, it’s 1600 rubles and you have to go to the store, and then still bother with a replacement. 2. Buy a new ceramic axlebox, in this case 3/8. In terms of money, it ranges from 100 rubles to 3500 rubles (an axle box from a famous company), and not every store has axle boxes of this size. 3. Repair the old axle box. There are no costs in terms of money, disassembly is minimal and you don’t have to leave the house - this is an option just for lazy people like me.
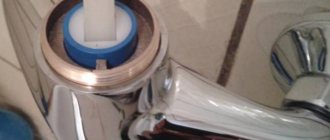
So, turn off the water supply to the filter and unscrew the axle box from the tap. Next, we disassemble the axle box into parts by pressing the rod with a finger. The result is something like the following:
Having disassembled it, the reason for the faucet’s leakage immediately becomes clear. The polypropylene spacer sleeve was worn out and torn, and as a result, sufficient clamping force in the ceramic pair was lost.
To fix it, you need to find a similar ring somewhere. I decided to make it from a 3 ml disposable syringe.
If necessary, sand the ring planes and put the axlebox back together.
I don’t claim to be the author of this method; similar methods have already been described on the Internet, where the spacer sleeve is made from copper wire, but it was easier for me to do it as described above.
Installation
Next, you need to screw on the new faucet by hand, making sure that the valve is open. After making a couple of turns, the joint can be pulled together using a key.
Then you need to close the valve all the way, aligning its location in relation to the rest of the structure, and turn the valve handle. The quality of the connection will be assessed by the absence of drops on the threaded joints.
see also
Comments 73
I make them from fiberglass, it works better for friction and doesn’t get crushed
They also leaked. For fun and exercise, I changed the rubber bands and replaced the plastic ring with an iron washer. It works fine for several months.
everyone had syringes lying around SUDDENLY at home))) I couldn’t unscrew the axle box from the old faucet at all, the edges are thin, they sit on a convex base and it’s all stuck nah
Eh, young people) There should be syringes on the farm
I’m not an addict or an insulin addict and I haven’t been sick yet, so keep syringes on hand at home