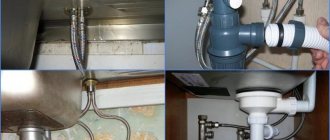
The topic of this article is the elimination of simple malfunctions of shut-off mixers and fittings. How to fix a bathroom faucet if it starts turning? Is it possible to repair a valve that has stopped shutting off the water? What to do with a faucet that doesn't want to switch to the shower? We have to answer these and other questions.
Why does the knob on the faucet turn, the water does not completely shut off, how to repair it
Unfortunately, plumbing fixtures have the unfortunate tendency to sometimes break down. This applies primarily to mixers and water taps. The most common malfunctions may be various leaks and leaks, noise when opening, low water pressure even when the valve is fully open, the valve turning or the inability to close it completely, as well as difficulty in rotating the faucet spout or the same valve head. If the faucet is leaking in the bathroom or kitchen, then, first of all, you need to find out the cause of the malfunction, and then try to repair it.
What to do if the faucet tap is difficult to turn
First of all, you need to remove the mixer and disassemble it to eliminate the cause of the breakdown. After this, clean all parts - first of all, the cartridge. Next, you need to assemble the mixer and check it for functionality.
Please note an important nuance - all these manipulations should be done only if you understand plumbing and have the skills to do such work. Otherwise, a repair attempt may result in another breakdown, and worst of all, complete inoperability of the plumbing fixture.
If the problem arose due to dirty water, then thorough rinsing and cleaning of all elements of the device will help correct the situation. After cleansing, all mechanisms begin to work correctly. There are 2 main methods that are best suited for washing:
- Using detergent. Mix hot water and mild detergent in a small bowl. Place all the elements in it and rinse. If you find old stains, you can wipe them with paste using a toothbrush. After this, rinse all elements under warm running water.
- Using chemicals. Wear gloves and use a special limescale remover. It will cope with any contamination. If it is not there, then ordinary table vinegar will help, but it cannot be used on iron parts. Dampen a cloth and lightly apply it to the faucet elements. After this, leave all the parts for 30 minutes, and after this time, rinse everything thoroughly under running water.
In the second case, the main thing is not to use a large amount of chemicals or vinegar, as they can damage the parts and elements of the faucet.
If the mixer's performance problem is related to mechanical faults, then it is important to understand which element needs repair. To do this, you will also have to disassemble the tap and study in detail all the components and components, and then replace the faulty one with a new one.
During operation of the mixer, the lubricant may dry out, which helps make the tap turn smoother. If for this reason it becomes difficult to turn, then the problem can be solved in just a couple of minutes by re-lubricating all the necessary elements.
Use only high-quality lubricant. Products of unknown origin can only harm the elements or dry out quickly, blocking all the holes, and thereby completely render the plumbing fixture unusable.
Fault categories
First, let's list the main categories into which common problems with shut-off valves can be classified.
- The valve does not hold water.
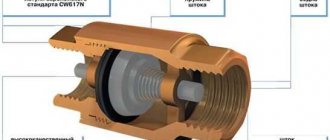
Let us clarify: within the framework of this article we will consider only malfunctions of screw valves. Ball ones fail very rarely, while cork ones are actually not used in private and apartment buildings.
- Water is leaking from under the valve stem.
- The faucet or mixer lever does not turn off the water.
- Water does not flow when the faucet taps are open.
- Water does not switch to shower.
Diagnostic Basics
Leaks can be repaired in a variety of ways.
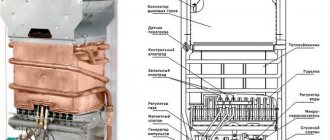
Before you start repairing, you need to study the structure of the mixer tap, as well as determine the nature of the breakdown. This can be done quite simply, especially if you use the table below:
Removing the aerator for cleaning
As can be seen from the analysis of the third column, to perform most of the work we do not need special skills. All you need is simple skill and studying the recommendations that we give below.
THE FAUCET IS LEAKING IN THE KITCHEN - HOW TO FIX IT YOURSELF
To repair a kitchen faucet you will need:
- knife with a sharp end;
- hex and adjustable wrench;
- screwdrivers;
- a new cartridge, valve axle, rubber gasket, etc. - depends on which part you will change;
- WD40 is a technical aerosol that is useful if parts are “stuck” to each other. However, you can get by with the traditional tapping of a hammer on a screwdriver, but there is a high risk of damaging the mixer.
Regardless of which faucet you have installed, before starting repairs, you must turn off the water supply to the system and drain its remaining water into a sink or a separate container. To do this, just open the tap. Then you can begin to repair it, taking into account the design features.
To repair a single-lever faucet, you will need a hex wrench.
REPAIR OF SINGLE LEVER KITCHEN MIXER
The main principles of repair are sequence of actions and accuracy.
- Using a thin screwdriver or knife, pry and remove the decorative plug on the faucet body.
- In the resulting hole you will see a screw connecting the lever and the adjusting rod. Unscrew it using a hex wrench.
- Remove the lever from the body and unscrew the decorative casing. This can even be done by hand if the parts are not stuck to each other.
Removing the decorative casing
- There will be a locking (clamping) nut underneath it. Gently unscrew it with an adjustable wrench or by tapping it with a hammer on a screwdriver.
- If you disassemble the ball mixer, you will see a sealing collar under the nut. Inspect it for dirt, deformation and tears. Pull out the ball. Inspect its surface - it should be smooth and clean. It is necessary to remove the seals and support springs - their poor condition can cause the tap to leak.
- If you are disassembling a faucet with a cartridge, remove it and thoroughly inspect it.
- Replace the failed part.
- Reassemble the faucet in reverse order.
It is important! Do not tighten the nuts too tightly, as this may lead to deformation of the rubber seals and disruption of the normal operation of the mixer.
Installing a new cartridge
solutions and problems
valve
So, it’s given: when the tap on the water supply is turned off, water flows to the mixer.
What does DIY bathroom faucet repair look like in this case?
- We close and reset the corresponding water supply riser.
Advice: the riser in the basement is easy to find, based on its placement along a flight of stairs.
- After making sure that the water is shut off, unscrew the valve head with an adjustable wrench.
- We clean the valve seat from debris and deposits. If necessary, change the gasket. In the absence of a factory gasket, a replacement can be cut from a car inner tube.
- We assemble the valve by wrapping the head with a polymer sealing thread, FUM tape or paint-soaked flax.
- We start the riser and control the operation of the valve.
What to do if the faucet in the bathroom is broken and water invariably flows down its stem? In the vast majority of cases, it is enough to open the valve all the way. The thread of the rod with the help of a washer will also press the stuffing box or rubber seal to the stuffing box, and the leak will stop.
When the oil seal is completely worn out, it must be refilled:
- Close the valve.
- Open the mixer tap to make sure that the valve is closed.
- Sequentially remove the wing and unscrew the oil seal nut.
- We take out the seal itself - the bushing pressed between the valve head and the stem.
- We wind one or two threads of graphite seal around the rod.
- Reassemble the valve in reverse order.
Cranebooks and cartridge
Next up is the mixer. First, let's look at the main circumstances of different leaks.
| Malfunction | Circumstance | Elimination |
| The screw valve does not shut off the water in the closed position. | Debris between valve and seat. | Open and close the tap completely a couple of times. Garbage, in most cases, is carried away by a current of water. |
| Gasket wear. | Close the valve on the supply line, unscrew the valve housing, and replace the gasket. | |
| The screw valve rotates. | Wear of the rod thread or axlebox body. | Kranbuksa changes completely. |
| The ceramic faucet does not shut off the water. | Ceramic plates chipped when trying to close an axle box jammed with scale. | Kranbuksa changes completely. |
| The single lever switch does not shut off the water. | The ceramic plates of the cartridge are chipped, the plastic plate clamps are broken. |
|
Now it’s time for various blockages.
- How to clean the faucet in the bathroom if cold water does not flow to the gander ? To begin with, it is enough to open both taps completely and close the spout (gander) with a hardened finger. For most of the year, the pressure in the DHW system is higher than in the cold water system, and the clogging is often carried out of the supply by countercurrent.
- What to do if trying to push through the blockage with a counterflow did not help ? After turning off the water, remove the mixer and try to clean the pipes directly through the eccentrics with an improvised cable made from a metal string. At one end of the string, a handle is bent, which allows it to be rotated; on the other, a hook the size of a pinhead is made, which practically scratches movement in the lime deposits.
How to tighten the faucet in the bathroom after the pipes are cleaned? Use new gaskets under the eccentric nuts, if necessary, completely unscrew the eccentrics (clips), rewind them with synthetic Tangit sealing thread and center them on the mixer nuts.
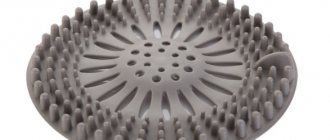
- How to clean the faucet in the bathroom if both cold and warm water flow with minimal pressure ? In most cases, the clogging is caused by a filter on the gander. It is enough to unscrew it manually or with a key and clear it of accumulated sand.
By the way: filter blockages will become much less frequent if you remove the stainless mesh from it, leaving only the plastic aerator. The downside of the modification is that the sand will pass through the filter without being retained in it.
Switch to shower
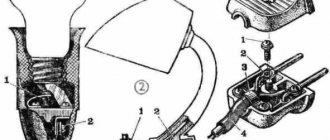
Here are the common problems with shower switches.
Button
If it does not switch the water partially or completely, then the problem is most likely in the destroyed rubber valve. Either the rubber ring on the valve is changed, or, in the absence of appropriate spare parts, the entire switch. The price of a switch for domestic, Chinese and Polish faucets rarely exceeds 300 - 400 rubles.
Lever
If the lever switch does not switch to a shower or a gander with limited lever travel, the reason is the wear of the switch barrel or the guides in the mixer body.
How to unscrew the faucet in the bathroom to replace the barrel?
- The switch lever is removed.
- The nut and gooseneck with the shower adapter are unscrewed.
- The nut with the rod seal is unscrewed.
- The rod with the eccentric is removed.
- The barrel is pushed out with a pencil or screwdriver through the top hole.
Replacing the faucet gasket or its core
Share
Link
Share to other sites
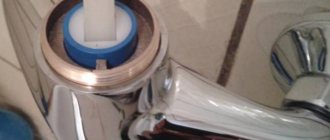
- If the water tap is constantly dripping, then in most cases this is due to a leaky gasket. If the faucet valve begins to turn (scroll) and the water does not shut off, then the thread on the core has broken. Let's look at both of these problems and try to solve them. To do this, we will replace not only the rubber gasket, but also the entire core. We will carry out the operation on a standard water tap, where hot and cold water is released using two valves. Such faucets were popular in Soviet times, and are now still used by many unassuming owners.
First you need to turn off the water. In our case, the core responsible for starting hot water needs to be replaced, so we only turned it off. Then you can start disassembling the valve. To do this, you need to get to the screw with which the valve is screwed to the core. To do this we needed to unscrew the small cap (required large pliers). In your case, everything may be even simpler; the red or blue cap is pryed off with a stationery knife and removed. It all depends on the type of valve.
How to unscrew a broken screw
If your attempts to unscrew the screw are unsuccessful, and the edges of the screw head have already been torn off, you should saw off two edges of the bolt with a hacksaw in order to make a smaller turnkey head. Then follow the previous procedure: fill the old bolt with kerosene or turpentine and leave everything for a while. After waiting a little, try to unscrew the screw.
A hammer and chisel will become faithful assistants in the fight against an unruly screw if all previous methods have proven ineffective. In order to remove an old screw, you need to place the chisel directly against the head of the screw and hit the chisel firmly with a hammer several times. In most cases, this method helps solve the problem of an unyielding screw.
After such operations, the bolt can be easily unscrewed using a wrench.
The main rule for easy handling of screws is their timely treatment with graphite lubricant.
Repair methods
Removing and replacing the axle box
Before you repair the mixer tap, you need to determine its design. As a rule, two-valve products are equipped with locking axle boxes, and single-lever mixers are equipped with either cartridges or special ball valves. More detailed information about the locking mechanism is contained in the instructions, which should have been included with the product upon purchase.
Note! If there are no instructions, you should not select an axle box, cartridge or gasket by eye. It is better to remove the element that has come out of service from the tap and find a completely identical one in a store or market, otherwise problems may arise in the operation of the part.
We remove the axle box from the socket
Ceramics take over
All hot and cold water mixers fail after a while. Their design provides for quickly wearing elements - the axle box tap for the mixer. In faucets made in old Soviet times, these are rubber gaskets. Time does not stand still and faucets have begun to improve, replacing rubber or bronze wear parts with ceramic ones.
Ceramics is not the clay from which dishes are made. These are powdery mixtures of various metals sintered at high temperatures. They have qualities superior to modern steel. Due to their increased hardness, ceramic parts are tens of times more durable than rubber parts.
Axlebox tap in the mixer - Photo 02
Ceramic products have such beneficial properties.
- mechanical strength,
- hardness,
- chemical and thermal resistance,
- do not rust.
high cost compared to rubber ones.
When the old valve axle is unscrewed
Now you can install the new part. If an axle box valve with a worm-type gasket is used, the rod must be tightened as much as possible before installation. The ceramic axle box has fragile parts, so it must be tightened carefully. Simply place the product in the appropriate cavity and then tighten it with a wrench.
At the end of the work, you can install all the parts back : first the plastic rings, then the handles and plugs.
The information presented in the article will help you understand how to unscrew a stuck faucet axlebox from the mixer. Basic methods include the use of chemicals, heating and tapping the joints. In rare cases, you will have to drill out the part using a drill or cutter.
Necessary tool
Whatever the complexity of the work, you will definitely need a tool. It is better to prepare it in advance so that the house is not left without water for a long time. First of all you will need:
An adjustable wrench is most convenient for unscrewing the faucet axle box
- adjustable and pipe wrench, pliers;
- a pair of wrenches corresponding to the size of the edges of the crane axle box. Typically 14mm and 17mm wrench sizes are suitable;
- screwdriver with a curly and flat tip;
- electric drill with a set of metal drills and a cutter.
In addition to the tool, you must have a spare crane axle box on hand. If you cannot successfully unscrew the old part or it cannot be repaired, it will have to be replaced with a new one.
Please note: the wide variety of Chinese parts on sale may require you to have different size keys. It is better if you have a small set of keys of different sizes on hand.
Insure against breakdowns: how to choose a quality gander
When purchasing such a simple part, it is enough to pay attention to the main characteristics so that the issue of repair will not be relevant for a long time. The future acquisition will be assessed according to the following parameters:
- Rotating or non-rotating. If the mixer is to serve a bathtub and a washbasin installed next to it, there is no choice left, and you will have to buy a rotating model. In other cases, it is better to buy a fixed mixer, insuring yourself against leaks in the connection area.
- Mounting location. For installation on a bathtub, a model in which the gander is attached to the bottom of the body is preferable - this reduces the height of the water fall and the accompanying noise. Only faucets with top mounting are installed on the washbasin or sink. For the kitchen, take a closer look at kitchen faucets with a flexible gooseneck - they are convenient to adjust in length and height, adjusting them to the dimensions of the dishes or sink.
- Availability of an aerator. This is a very desirable option that reduces water consumption by increasing the volume of the stream due to air, which is especially important for houses with meters. Even if you have your own well and water consumption is irrelevant, think about the amount of wastewater, because calling sewerage equipment is also not a cheap pleasure.
- Diameter of the fixing nut. When replacing the spout, do not forget to make sure that the purchase will fit the faucet body. If you are not sure about the parameters of the old gander, take it with you to choose the right one on the spot.
- Aerator shape. Cleaning the aeration mesh will sooner or later become necessary, so it is better to choose cut models. To unscrew the round aerator you will have to work hard.
- Material. It is impossible to see what the part is made of under the chrome coating, so ask the seller for documents confirming that the gib is made of brass. Instead, under the chrome there may be silumin - a fragile, easily deformed material. You can simply test the weight of the selected spout: a brass one will be three times heavier.
- Length. This does not affect the functionality of the mixer in any way, but it is advisable to choose a model with a spout length such that the water stream falls directly on the drain hole. This little detail will significantly reduce the amount of splashes that, when dry, form streaks on the mirror, walls and furniture around.
Drilling is a radical method
If, after trying all the above methods, the axle box valve still does not unscrew, you will need to perform complete dismantling with drilling a hole . For this:
- A hacksaw is used to cut off the external part of the crane box.
- Take a drill or cutter of a suitable diameter, which is used to drill out the inner part. This must be done with great care so as not to damage the mixer itself. Ceramic plates are broken out with a screwdriver. Drilling out the crane axle box
Breaking out ceramic elements with a screwdriver. The edge remaining inside is unscrewed using two pliers or “pincers”: one tool is inserted into the hole, the second one is used to perform rotational movements. To prevent damage, you must hold the base of the mixer with your hand. Pliers are inserted into the hole
Unscrewing using an adjustable wrench or pliers
Practical advice
As you have already seen, the service life of cartridges is greatly influenced by the quality of water, its hardness and the presence of hard impurities - debris, sand, rust, etc.
Sediment, plaque and the presence of foreign particles wear out the plates and seals, which complicates the operation of the lever, leads to leaks or “squeezing”, when the hot flow with excess pressure displaces the cold flow through the cracks formed in the tap.
Experts strongly recommend finding out the composition of the water and the impurities in it and, if necessary, including a cleaning filter at the inlet in the water supply wiring diagram.
Wear and tear also depends on the quality of the products purchased. You shouldn’t save a lot, as this can ultimately result in much larger expenses not only for repairing the faucet cartridge, but also for your and your neighbors’ bathroom or kitchen.
Heat treatment
It is used if the axle box valve does not unscrew after applying the previous method. As a rule, the faucet box and the adjacent part of the mixer body are made of different metals, which means they have different degrees of expansion when heated. This can help loosen the threads.
Construction hair dryer
A hair dryer is suitable for the job. It needs to be adjusted to the lowest temperature, and then warmed up at the joint at some distance from the thread. In this way, you can ensure that the part can be unscrewed by hand. Using an open fire will speed up the process significantly, but there is a risk of melting the plastic elements.
Another way to unscrew a stuck faucet is to fill a small saucepan with water, add a couple of tablespoons of soda and boil the product in it for 20 minutes. Then wipe the threaded area dry and unscrew the required part.
Which cartridge lubricant should I choose?
The problem of the faucet being difficult to operate can be solved by removing the ceramic cartridge and coating the discs inside with lubricant.
Let's look at what types of lubricating compounds are better and what they are:
Tsiatim-221 is a plastic composition made in accordance with GOST. Perfectly suitable for metal parts, rubber, plastic, ceramic, as well as for friction units. This lubricant is often used not only for mixers, but also for bearings in electrical machines and aggregate bearings in aircraft.
The consistency of Ciatim-221 is such that it does not dissolve in water. Resistant chemical composition - provides good lubricating quality, even at a pressure of 600 Pa it is not washed off. Temperature changes from -60 to +150 degrees will also not cause harm to the composition.
Due to its characteristics, Tsiatim-221 is in great demand, so purchasing it is very problematic, and sellers offer a less effective analogue - Tsiatim-201.
Silicone Grease. This composition is used to fill the space between the plates of the ceramic cartridge - the gap is too small, and without lubrication it is impossible to even move the handle from its place. This consumable material softens the rotation of the lever and allows it to be turned freely. If you feel like the lever is sticking when turning, then you need to update the silicone lubricant.
Silicone grease is a white, translucent paste. Do not confuse it with silicone sealant under any circumstances, otherwise the faucet will have to be thrown away. One application of paste should be enough for 50,000 lever revolutions. It is usually sold in auto parts stores and car markets. Price 8-10 dollars.
When applying silicone grease to the top plate, for convenience, the cartridge should be held upside down, but keep in mind that in this position it will be the bottom plate - there is no need to pour it into the holes. Next, you need to distribute it evenly; to do this, rotate the rod in the cartridge. If necessary, you can apply a little more.
If, after applying the composition, sand or rust still gets between the plates, then you need to buy a new cartridge.
RAVAK – Teflon lubricant. It is also insoluble in water, but is washed out over time, so the frequency of the need to lubricate parts increases.
But thanks to the list of advantages, Teflon grease is in demand among consumers:
- wide temperature range - withstands where others fail;
- It is enough to apply one drop on the face - ergonomics;
- its property does not allow it to turn yellow over time, as is usually the case with pastes;
- It can also be used to lubricate door hinges and shower enclosures, shower frames, and door handles.
This information will help you select and apply faucet lubricant correctly to prolong the operation of your plumbing fixtures.