It just so happens that the garage is often used not only as a shelter for a car, but also becomes a kind of “men's club”.
Here you can put your favorite car in order, discuss pressing problems with friends, and, if necessary, spend the night.
We are no longer talking about such an important function of this building as storing household items and conservation.
The construction of a garage cannot be approached according to the residual principle: “made from what was there.” Only a competent design and proper use of materials will make it a universal and durable structure.
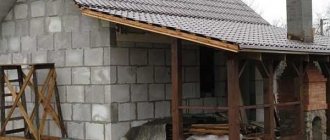
In recent years, building a garage from foam blocks has become extremely popular among car owners. We will consider this particular design option, starting from the foundation to the roof.
Characteristics of foam blocks as a material
Foam blocks are lightweight and inexpensive.
Foam blocks are preferred due to their affordable cost and low weight compared to bricks or cinder blocks . The latter feature makes it possible to significantly reduce the cost of creating a foundation (due to the small mass of the garage, a lightweight foundation can be used).
At the same time, foam concrete is a very durable material. It will certainly withstand the weight of all the structural elements of the garage.
Table: Dimensions of foam concrete blocks
| Foam block brand (determined by density) kg/m3 | Height mm | Width mm | Length mm | Required pcs. per 1 m2 of masonry | PC. in 1 m3 |
| D 500 | 250 | 200 | 600 | 6.7 | 33.3 |
| 250 | 26.7 | ||||
| 300 | 22.2 | ||||
| 350 | 19.0 | ||||
| 375 | 17.8 | ||||
| 400 | 16.7 | ||||
| 500 | 13.3 | ||||
| D 600 | 250 | 200 | 600 | 6.7 | 33.3 |
| 250 | 26.7 | ||||
| 300 | 22.2 | ||||
| 350 | 19.0 | ||||
| 375 | 17.8 | ||||
| 400 | 16.7 | ||||
| 500 | 13.3 |
There are 4 main types of foam concrete produced:
- Blocks of grades D150-D400 are heat-insulating material with a density from 150 to 400 kg/m3. In terms of strength, foam blocks begin to be standardized starting with grade D400 - B0.5-B0.75; the strength of such foam concrete is 9 kg/cm3. The above grades of material are not standardized for exposure to low temperatures;
- Foam concrete grades D500-D900, with a density of 500-900 kg/m3, are considered structural and thermal insulation. The strength of the D500 material is 13 kg/cm3. D600 – strength 16 kg/cm2, D700 – strength 24 kg/cm2, D800 – strength 27 kg/cm2, D900 – strength 35 kg/cm2;
- Foam block grades D1000-D1200, with a density of 1000-1200 kg/m3, are considered structural. Material strength D1000 – 50 kg/cm2, D1100 – 64 kg/cm2, D1200 – 90 kg/cm2;
- Foam block grades D1300-D1600 with a density of 1300-1600 kg/m3 are considered structurally porous. They are produced in small batches, for this reason their characteristics are not standardized in GOST.
The strength indicator may have deviations due to differences in humidity and temperature during the manufacture of blocks from a particular manufacturer; in addition, the strength is affected by the brand of cement and filler.
Roofing device
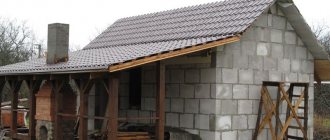
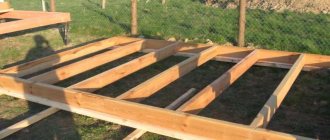
After the walls have been erected, all that remains is to install a stable structure of beams for the rafter roof. Don’t forget to put roofing felt under the beams first as a waterproofing layer.
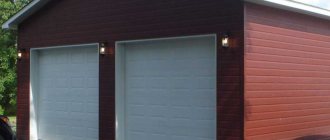
The final covering can be made of any material (profile sheet, metal tile, roofing felt), but it is desirable that the roof be combined with the roofs of existing buildings.
Garage roof sheathing
Advantages and disadvantages
Foam blocks have significantly more advantages than disadvantages
It is often argued which is better – non-autoclaved or autoclaved foam blocks. Manufacturers only praise their products, but in practice foam concrete and gas silicate blocks are very similar. And, naturally, both of them have both pros and cons.
Positive properties of non-autoclaved foam blocks
- High thermal insulation ability. Compared to brickwork, a wall made of this material has 3 times lower thermal conductivity. In terms of this characteristic, gas silicate blocks are not far behind them;
- Low weight - 2.5 times lower than that of expanded clay concrete. Gas silicate blocks have approximately the same mass. Because of this, non-autoclave and autoclave blocks are easier to load, transport over long distances and lay. They allow the construction of buildings without a strong foundation, which reduces labor intensity, simplifies installation and speeds up construction;
- High strength. Using blocks of a grade higher than D900, you can lay load-bearing walls of up to 3 floors. Gas silicate blocks have slightly higher strength;
- Excellent frost resistance. The porous structure of the material protects the interior of the room well from low temperatures. In case of possible freezing of the walls, the blocks do not crack due to the fact that the internal structure has enough space for the expansion of freezing moisture;
- High fire resistance. Both gas silicate and foam block can withstand exposure to flame for at least 4 hours. This can be checked in practice - point a gas burner at the block and look behind it. Unlike conventional concrete, the blocks will not crack or collapse;
- Biostable, environmentally friendly material. Over time, the blocks do not deteriorate or rot. They do not contain toxic components, and the material does not emit harmful substances. In this regard, gas silicate blocks are worse. In an autoclave, during the foaming of raw materials, small particles of lime and aluminum interact with each other, resulting in the formation of hydrogen. During operation of the material, it will be released in small quantities. Foam concrete does not have this disadvantage; foaming agents (protein or synthetic) are used in production, which do not emit harmful gases. In addition, the pores of the foam block are absolutely sealed - their structure resembles foam granules;
- It is also used for monolithic construction. You can make concrete directly on the construction site - you just need to install a special installation. Supply compressed air from the compressor through a special hose and deliver the material to the required location. But in this case, foam concrete can only serve as a heat-insulating material. For example, you can fold a half-brick wall, fasten sheets of moisture-resistant plasterboard at a distance on the other side, and fill the resulting space with foam concrete. It will cost less and take less time than installing traditional insulation;
- Ease of processing. It is easy to make grooves and holes in the material. You don’t need any special tools for this, you don’t have to put in much physical effort;
- Low cost compared to similar materials. Usually different building materials are compared by recalculating the costs to the cost of the brick. When using a lightweight (inexpensive) foundation, the cost of constructing a garage will be small. This is often a determining factor in the choice;
- Excellent resistance to moisture. This is achieved thanks to the sealed cells of the material. Gas silicate blocks (which have channels) have significantly lower moisture resistance; moisture through the channels quickly permeates this material. The sealed cells of the foam blocks even allow it to float on the surface of the water.
Disadvantages of foam blocks
- During masonry, significant shrinkage occurs due to the high moisture content; the wall can settle by 1-3 mm per 1 m of masonry. This happens if a lot of water is added to the composition during the production of blocks, or the masonry is made from fresh (immediately after production) blocks. In order for them to harden well, you need to keep the material for at least a month in a dry place. Irresponsible manufacturers do not meet this technological requirement. Gas silicate (autoclave) blocks do not have this disadvantage - this material is not subject to shrinkage. For this reason, these precautions are not necessary when working with gas silicate.
- There is a small ability to absorb moisture, which requires additional finishing of the surface of foam concrete walls. You can cover the walls with a concrete water repellent, plaster them, or install a ventilated façade;
- Foam concrete chips, most often on the edges. It must be carried and folded carefully; it is strictly forbidden to pour blocks into the body in bulk. But at the same time, the small mass of the foam block allows it to be carried carefully, completely eliminating possible damage;
- Walls made of foam concrete do not hold screws, dowels and nails well - they fall out. It is necessary to use special dowels designed for foam concrete and equipped with a special threaded attachment made of ABC plastic. First, screw the screw into the nozzle. You can use screws for woodworking. Having prepared a hole in the wall, clean it and carefully screw the nozzle and screw into it. This fastening method allows you to securely hang shelves or cabinets.
Summary
Garage designs don't necessarily have to have that much living space. If there is only one car, then all calculations regarding the garage should be made for it. In this case, the attic above the garage can be expanded by making it overhang the ground floor of the garage. In this case, an additional canopy is formed, under which the car can be placed for temporary parking. The presented garage projects do not use skylights. This is due to their significant cost, but this does not exclude the possibility of their presence in an individual garage project. They are easy to use and also increase the amount of natural light available throughout the day.
Recommended Posts
Design of a bathhouse with a terrace or veranda
Arrangement of a cellar in the garage for storing vegetables
How to make shelves for a garage with your own hands
DIY workbench
How to arrange a garage with your own hands
DIY automatic garage doors
Features of choosing foam blocks
When purchasing foam concrete, be sure to pay attention to the certificates of conformity
First, make sure that the foam block manufacturer has the necessary quality certificates, check compliance with GOST requirements and product delivery conditions . If maximum information is in the public domain, it means that the manufacturer has nothing to hide, and he uses high-quality materials. This is what large, reliable organizations do. A good manufacturer of foam blocks has sufficient space to organize production (at least 180 m2 is required), where all equipment can be conveniently placed. Industrial buildings must have a fixed roof and be heated.
The cost of the material offered is of great importance - find out the average market price for blocks of a certain brand. If you are offered material much cheaper, then you need to think - perhaps they are trying to sell you low-quality blocks.
Important! If a foam block manufacturer claims that its low-grade blocks can be used as structural ones, since they are made using a “special” technology, you should not trust such a manufacturer. No special recipes for mixing and processing raw materials can significantly improve the quality of products. You will not be able to build even a small reliable garage from such blocks - for load-bearing walls you need to use only especially strong grades of foam concrete.
Inspect the selected material before purchasing - the blocks cannot be white. This is impossible due to technology. Their color is grayish, heterogeneity of color is unacceptable.
Make sure that the cells of the blocks are sealed - if they are connected, dampness will quickly spread into the material. Break apart (with permission) the block and evaluate whether the interior and exterior structures are similar. Normal cells are round; cracks or chips inside the blocks are unacceptable.
For convenient wall laying, you need to buy blocks with the correct rectangular shape - make sure of this. To do this, place one foam block on top of another and shake them, examine all 4 planes of the blocks - the defect may be noticeable only on one of the sides. Subsequently, this can cause you troubles and increase the time spent on work.
If you bought foam blocks immediately after production, then do not rush to use them for masonry. They will achieve the required strength no earlier than after 28 days. For this reason, it is better to keep the purchased blocks for 2-3 weeks, covering them from the sun and rain.
Project No. 4 – garage with utility room or workshop
If you need additional space to store garden tools, children’s bicycles, strollers and other large items, or simply want to arrange your personal workspace, pay attention to the garage design with an additional zone in the middle. The total area of the garage will be slightly more than 68 sq.m.
At the same time, 26 sq.m. are allocated for parking of each car, and a little more than 16 sq.m. for additional premises.
The total area of the garage will be slightly more than 68 sq.m. At the same time, 26 sq.m. are allocated for parking of each car, and a little more than 16 sq.m. for additional premises.
- Wall type – brick;
- Exterior finishing – clinker tiles;
- The roofing material is metal tiles.
The advantage of the project is the presence of window openings both in the parking area and in the utility room. Also for convenience, there are doors in both car bays leading to the storage room, and a door leading from the middle room to the outside. The entrance door is prudently located under the canopy.
The only disadvantages include the lack of access directly to the street.
Drawing up a project and cost estimate
Foam block garage project
Before constructing a garage, prepare a detailed design and find out all the features of the site. It is necessary to determine the type of soil and the depth of groundwater - this will allow you to choose the right foundation for you .
The project can be drawn in a computer graphics editor or using pencils and paper. When determining the dimensions of a building, take into account all possible features. For example, do you need a cellar and inspection hole, how many cars do you plan to put in the garage. Do you need racks for storing spare parts and tools? Is any workspace necessary?
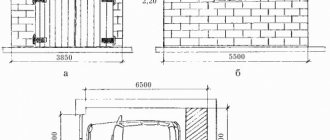
To accommodate one passenger car, it is enough to build a garage 3.5-4 m wide and 5-6 m long. If you have absolutely no knowledge of design or you have no idea what you will need, then take a closer look at ready-made projects - perhaps you will find something there , which is suitable for your conditions.
Territory marking
Upon completion of the preparatory work, as well as after purchasing all the necessary materials, you can begin marking the garage. Drive pegs into the corners of the future building. Stretch a string around the entire perimeter between them. Be sure to check the angle between the threads. It should be 90°. Or you can carry out axial marking - this is much simpler and more accurate. If the length of the thread is the same, then it will definitely be 90º. When marking, strictly adhere to the dimensions specified in the project.
When the markings are completed, stand near the future garage door and make sure that nothing will prevent them from opening. It could be a tree, a building, a fence, or anything else. If there are no serious obstacles, you can begin making the foundation.
Calculation
Calculations begin when the thickness of the foam block garage walls is known. If you have a wall thickness of 30 cm, then take a height of 20 cm and a length of 60 cm. We count the number of such blocks in 1 m2 and multiply by the total area of the walls (subtracting the dimensions of the windows and gate opening. The resulting number of blocks - the result you need.
The standard dimensions of a garage for one car are 3.5 x 6 m, but this size may vary depending on the conditions and tasks at hand. By calculating the required amount of foam block for 1 m2, you can calculate the number of blocks in one cubic meter of material. These calculations will allow you to buy the required amount of material to build a garage (pallets are designed for 0.9 m3 or 1.8 m3).
Floors
Everything is relatively simple here. After removing 15-20 cm of natural soil and leveling the base, it is covered with sand and compacted with a tamper. After this, a thick polyethylene film is laid, bringing its edges 15-20 cm onto the foundation to cut off ground moisture.
For reinforcement, use a regular masonry mesh (cell 10x10 cm). To create a protective layer of concrete, crushed stone is placed under it. Having poured the first “rough” layer (5-10 cm) and leveled it, the screed is given several days to gain strength. After this, wooden beacon slats are placed on the concrete with a step equal to the width of the “trowel”, the finishing screed is poured and carefully leveled.
Required materials and tools
To build a foam block garage you will need:
- Boards 5 mm thick - for formwork when pouring the foundation;
- Pre-sifted coarse sand, M400 cement - these materials are necessary for the foundation and construction of the garage floor;
- Reinforcement 12 mm thick, it is used to create foundation reinforcement;
- Foam concrete blocks for the construction of load-bearing walls;
- Adhesive suitable for installing foam concrete;
- Boards 5 mm thick and I-beams - to create a roof;
- For thermal insulation of the roof, you can use expanded clay backfill;
- Ruberoid - necessary for roofing and foundation waterproofing;
- Concrete mixer, tin buckets, shovel, trowel, welding machine, electrodes, trough.
Types of mansard roofs
An attic is a heated or cold space under the roof that is used as living space. According to building codes, the attic room must be equipped with windows for natural light and ceilings of sufficient height for a person.
Rooms under the roof in which these conditions are not met are called attics. The following types of roofs are suitable for installing an attic:
- Gable. The simplest design for attic equipment. It consists of two rectangular slopes and triangular pediments. To achieve the ceiling height required for a living space, it is necessary to lay a very steep slope angle. This increases the area and weight of the gable roof, making its installation economically impractical.
Installation of a mansard roof suitable for habitation requires mandatory thermal insulation, the organization of natural lighting using attic or vertical windows and forced ventilation.
Instructions for constructing a garage from foam blocks
Foundation preparation
The total budget for garage construction depends on the type of foundation chosen.
The correct arrangement of the foundation of the building directly affects its reliability and the service life of the garage. The type of foundation used affects the overall construction costs. For example, you should not make a deep foundation for a building made of foam blocks, otherwise it will turn out to be light and there will not be a large load from it, and a deep foundation will require additional costs.
The best option would be a strip foundation - to create such a structure you will only need to perform a few operations.
Frame installation
You can build a garage frame from foam blocks from any angle
You can start building walls from foam blocks from any angle you like. The purchased foam block should be placed with the long side along the walls - this way you will finish the construction faster and reduce material consumption.
You can additionally purchase special blocks designed for forming corners. They greatly simplify the laying and speed up the installation work, because there is no need to align the location of the surface of the blocks at the corners during laying. To install the blocks, use special glue or sand-cement mortar. It is better to lay the foam block with glue - it will improve thermal insulation and connect the individual masonry elements well together.
It is recommended to place foam blocks on special glue
The first stage of masonry.
First, to lay the corners of the garage, it is convenient to beat off the perimeter of the walls using pegs and a cord.
Second stage of masonry.
Start laying walls from any suitable angle. Once the corner block is secured, lay a row along the length of the wall. We installed another corner block and filled in a row of the second wall. Constantly monitor the location of the foam blocks using a level. After 2 rows of blocks, lay a reinforcing mesh between the rows. While working, do not forget to place metal rods in the solution between the rows of blocks, which are necessary for fastening the gate frame. The most difficult thing for a beginner is to form the lintel over the gate opening and subsequent laying of the upper part of the front wall. The easiest way to create a reliable opening is to lay an I-beam above the gate, and then place the blocks of the top of the front wall on it. Lay it in such a way that the edges of the I-beam are walled up in the walls by at least 20 cm.
Third stage of masonry.
At this stage you need to make the gate frame. It is made from a corner with shelves 5 cm wide, fasten the finished frame into the gate opening tightly to the wall, weld it to the rods previously laid in the masonry and secure it using a cement solution.
The fourth stage of masonry.
Lay the blocks up to the top of the walls, at which time you need to decide on the type of roof for the garage made of foam blocks.
Garage roof
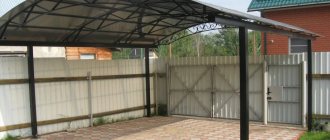
The easiest way to build a pitched roof
Most often, shed roofs are made for garages. It is the easiest to make, and it is better for novice builders to start with just such a design. The walls for it need to be laid with a slope towards the rear wall of the garage.
For every meter of wall, its height should be reduced by 5 cm. This is not difficult to do yourself, because the foam block is easy to saw and trim, it can be cut in any direction with a simple saw.
Features of laying foam blocks
- A solution of a special glue intended for laying foam blocks is coated with a vertical edge and spread over the surface with a spatula, forming a seam up to 20 mm thick;
- The first row of foam blocks must be laid on sealing mastic, first spreading the horizontal surface, and then the vertical plane of the block;
- To improve adhesion, the blocks are slightly moistened with plain water;
- During work, the masonry must be constantly monitored with a pre-tensioned cord and a building level;
- Possible surface distortions must be corrected immediately;
- To increase the strength of the wall, the initial and final rows of masonry are strengthened by placing steel mesh or reinforcement bars in the masonry - this will prevent the walls from bending and the appearance of cracks;
Sheathing technology
Foam block walls need to be lined in any case
Walls made of foam concrete blocks must be protected with cladding . Do not believe material sellers who claim that this is not necessary - they are blatantly lying to you. Gusts of wind, winter snow and summer moisture will constantly destroy unprotected foam concrete. As a facing layer, you can use plaster (mineral or ordinary) or a material that is used to create ventilated facades. The plaster must be applied over a special mesh, securing it to the wall surface.
To protect foam concrete from external influences, you can use a layer of brickwork. But do not forget to provide an air gap - brick and foam concrete have different air permeability. If they are laid tightly, then moisture vapor will not be able to escape through the brickwork in time. They will begin to penetrate back through the foam concrete and accumulate inside the garage.
Video on the topic
Foundation - the basis of foundations
Foam block is a relatively lightweight material, so there is no need to build a deep and heavy foundation. But not only the weight of the material influences the choice of one type of foundation or another. A more important criterion is the type and properties of the soil at the construction site. For example, if the groundwater level in your area is below 2–2.5 m, and the soil is non-heaving, homogeneous and dense, then you can build a lightweight strip foundation up to 0.5 m deep. A completely different situation arises with heaving soil , because you will have to build a monolithic foundation. This is explained by the peculiarity of the blocks, which do not tolerate bending loads well. As a result, the foam block bursts, and the building itself is destroyed. To avoid this, the walls are laid out on a monolithic slab, which “floats” in the ground along with the entire building.
If the project involves the construction of an inspection pit, then the option of a foundation with a monolithic slab is eliminated. In this case, it will be necessary to construct a buried strip or combined strip-pile foundation.
For example, consider the construction of a strip foundation with a depth of 0.8 m. The work is carried out in the following order:
- A trench is dug 0.8 m deep. The width is equal to the foam block (200 mm) and add 150 mm, resulting in a foundation thickness of 350 mm.
- The bottom of the trench should be thoroughly compacted.
- After this, a sand cushion is poured, consisting of 100–150 mm of sand and 70–100 mm of crushed stone. Each layer is also compacted.
- Install formwork for the foundation.
- A reinforcement frame welded or connected with knitting wire must be placed in the trench. As a result, you will make a frame for the strip foundation.
- Next, you need to fill the foundation with concrete, one at a time and thoroughly vibrate it.
While the concrete is drying, you can begin making an inspection hole, if this is provided for in the project.
Care and operation of a foam block garage
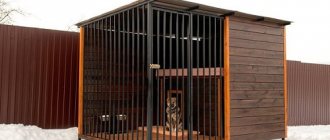
Ventilation is of great importance for long and reliable operation of the garage.
Considering the physical properties of this material, it is advisable to provide a supply and exhaust ventilation system in the foam block garage by installing an electric cooler of sufficient power . For efficient operation of the ventilation system, the size of the exhaust opening must be made 2-3 times smaller compared to the supply opening.
The main problem for a foam block garage is the appearance of condensation, which leads to corrosion of the car. For this reason, reliable ventilation in such a garage is of great importance.
Thermal insulation
Foam concrete walls retain heat well. When using a garage only as a parking place for a car, there is no need to make additional thermal insulation. But if you need to organize comfortable conditions for get-togethers with friends, then it is best to create three-layer insulation for the garage. It should contain:
- The first layer is foam or mineral wool;
- The second layer is used to protect against moisture (polyethylene is suitable for this);
- The third layer is used for finishing. Drywall is well suited for this; it is glued to the walls, after which the surface is plastered and subjected to finishing.
When building a garage in a region with a harsh climate, additional insulation will be required.
The construction of a garage from foam blocks allows you to get a building for storing a car with high performance qualities. Please note that the purchase of foam concrete blocks will take approximately 30% of the total construction costs. The main costs are to create the foundation of the building and the roofing system. But such a garage is considered one of the cheapest places to store a car.
Is it worth getting involved with an attic superstructure?
Garages with an attic are currently considered a classic construction of this type of structure.
This popularity among car owners is due to a number of advantages:
- One of the main problems of maintaining a garage is its proper heating and heating during the cold season. With an attic floor, it will be cheaper and easier to heat the garage: heat from the living space automatically penetrates into the garage located below.
- To build a garage with an attic on the 2nd floor, a relatively small plot of land will be required than in the case of the construction of 2 separate structures. Consequently, this will save on the purchase of building space.
Typically, a garage box is built from concrete blocks, slabs and other materials that have high resistance to temperature changes and strength characteristics, due to which such a structure can withstand superstructures in the form of attics.
At the project planning stage, first of all, you should decide on the overall dimensions of the future structure. Traditionally, the dimensions of a garage of a similar design are 6x4 m. If you plan and arrange the roof in the attic successfully, then for personal use there will be about 15-17.
If this space is not enough, then it makes sense to design and build a garage for 2 cars: this will simultaneously expand the “living” area and space for placing vehicles.
https://youtube.com/watch?v=ja4D41dGk-g
Gate installation
Installation of a gate or frame under a gate is often carried out even before the construction of walls begins. At the place where they are installed, roofing material is first laid on the foundation in several layers. The gates are fixed with wooden blocks. In order for them to end up being built into a foam concrete wall, pieces of reinforcement must first be secured to them. They must then lie in the masonry joints of the wall, so the height of their location must be correctly calculated. The gate is fixed at the top using a beam with a metal frame.
Frame for garage doors Source www.stroytal.ru
Inspection hole
This is an optional, but very convenient element of the garage. Arranging a viewing hole may present certain difficulties. So, in an area where water occurs at a depth of more than 2.5 meters, everything can be done easily and quickly. But if the water flows higher, then the inspection hole must be provided with a drainage system.
- First, a hole is dug for the hole. This takes into account the desired depth of the finished pit, as well as the thickness of the drainage, waterproofing, sand cushion and finishing screed.
- A layer of gravel (100 mm) is poured into the bottom of the hole and compacted.
- A layer of sand (50 mm) is placed on top and compacted too.
- A trench is dug along the perimeter of the finished pit for drainage.
- Then geotextiles are laid with overlaps of 80 cm on each side.
- Next, a layer of gravel is poured into the trench and a drainage pipe is laid with a slight slope.
- The pipes are covered with gravel and covered with geotextiles.
- The floor of the pit is covered with clay.
- Lay waterproofing.
Waterproofing inspection pit Source stroyservis-74.ru
- Formwork and a reinforcing frame are installed at the bottom of the pit.
- The bottom is filled with concrete with the addition of waterproof components.
- Another layer of waterproofing is laid on the dried screed.
- The walls of the pit are also treated with clay.
- The walls can be lined with brick or monolithic concrete. The second option requires formwork and reinforcement.
- The finished surfaces of the walls and floors are covered with cladding. Any option of the owner's choice will do.
- A metal frame must be laid along the perimeter of the upper edge of the finished pit.
- A safety rail is placed on top of the frame to prevent the car's wheels from accidentally falling into the pit.