An attic is a room with a sloping ceiling located directly under the roof of the house. The attic walls are about half a meter high, and the highest point is more than two. A few centuries ago, in the vast majority of homes it was just a room in which unnecessary things were stored. Over time, the trend has changed, and being the owner of an attic has now become fashionable and prestigious. However, to make it truly cozy, the ceiling in the attic must first be insulated and then decorated.
Why insulate the roof
The roof quickly heats up in the sun, allows heat to pass through in cold weather, collects condensation when temperatures drop, and does not protect against extraneous sounds (branches, raindrops, birds and animals).
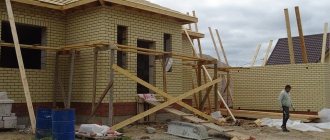
Before tackling the ceiling, take care of the roof above the attic living area.
Good roofing material plus high-quality heat and waterproofing equals savings on the operation of the house. Putting the formula into practice will reduce heat loss by a third, reduce the frequency and cost of repairs, and create comfortable living conditions in the upper chambers.
How it's done?
The roof can be of a broken configuration, be single-pitched, or gable.
In each case, you will need to carefully plan the process. This is the first step that is necessary to determine the area of the room and select the correct cutting for a specialist from the installer company. The customer will then need to decide on the style of the room. Depending on the general concept, the design of the structure, color and texture of the canvas are selected. At this point, you need to think about the type of fasteners and how the lighting fixtures will look. If you decide to act on your own, you will have to do the following:
- Take measurements. To do this, they usually use a laser tape measure or another, a pencil, masking tape, or paper for recording measurements.
- Remove parameters and fix. Next, the size of the material is selected based on these dimensions; cutting will be done using these dimensions at the manufacturing plant.
- Using the prepared markings, install the profiles. Attach by bending in the right places, as required by the roofing geometry.
- Screw the metal frame with screws.
- Next, unwind the fabric and attach it with clothespins. If this is a fabric fabric, then the next step is simply fastening along the perimeter of the ceiling. If PVC film is used, you will have to look for a heat gun. It is used to warm up the room and the canvas itself before installation in order to stretch it and make it as elastic as possible.
- Secure the softened fabric onto the profiles with a spatula. First, this is done in the corners, then evenly, straightening the folds, the canvas is brought around the entire perimeter. At the end, to be sure, heat the material with a gun, and at the end lay a camouflage cord.
- Wipe the cloth from dust.
Although the installation of a stretch ceiling itself is quite simple and straightforward, it is still better to invite a team of specialists to install the attic ceiling. They will certainly do it better and faster.
What does thermal protection consist of?
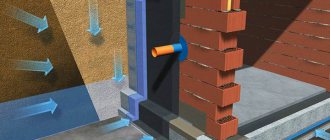
The heat-saving sandwich includes six layers:
- roof
- sheathing
- counter-lattice
- waterproofing (protects the insulation from moisture from the outside)
- thermal insulation material
- vapor barrier (obstacle from moisture from the room)
The principle of insulation is to fill the under-roof space with a heat insulator, to prevent moisture from entering from outside (precipitation) and steam condensate from inside the house.
The layers are laid with seams staggered and sealed with construction tape to seal. The insulation is placed tightly in or on the roof sheathing, so that there is an air gap between the insulation - the structure must breathe.
The ceilings in the attic of an already built house are insulated from the inside, starting from the roofing.
At the construction stage, the “pie” is formed in the reverse order. Don’t forget about the membranes in the roof, they are needed to remove condensate fumes.
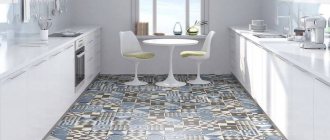
Color spectrum
Allows you to uniquely transform and change the decorated room.
- White.
- Brown.
- Beige.
- Blue.
- Green.
- Lilac.
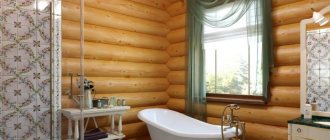
The photo shows a wooden ceiling with a window, painted lilac in the interior of an attic bedroom.
Thermal insulation materials
There are many thermal insulators on the market, these are
- mineral wool,
- expanded polystyrene,
- fiberglass boards,
- foam concrete,
- ecowool,
- polyurethane foam mixture.
Using spray insulation (the last three positions) yourself is difficult - the work requires skills and special equipment.
When purchasing, pay attention to thermal conductivity, density, moisture absorption, and vapor permeability. The material must meet the requirements of environmental friendliness and fire safety, and its weight must meet the strength of supporting structures.
When the work is completed, nothing prevents you from doing the cladding and making the ceiling in the attic to the highest standard.
Stucco features, advantages and disadvantages
Stucco molding
The classic way to decorate the ceiling is stucco
Just a few decades ago, stucco molding belonged exclusively to large administrative buildings, ancient houses and museums, but nowadays stucco molding is a common element of a classic interior.
A variety of materials are used to make stucco:
- gypsum;
- stone (soft);
- alabaster;
- polyurethane;
- polystyrene;
- fiberglass.
Advantages of stucco
Stucco on the ceiling
The last three options represent alternative solutions that make the production of decorative elements less expensive. The advantages of stucco molding made from classic materials are impressive, reliable, and durable, but modern versions can also boast some significant advantages: lightness, moisture resistance, good workability and low cost.
Disadvantages of cheap stucco
- The outlines of the structure give the impression of being fuzzy and blurred due to the characteristics of the material.
- Products are fragile and prone to deformation. Any mechanical impact from the outside will damage the structure.
Tools for installing stucco molding
Finishing the ceiling with stucco
- Nails.
- Air gun.
- Assembly adhesive.
- Miter box.
- Hacksaw.
- Special glue.
- Sandpaper.
- Wet sponge.
DIY installation of stucco on the ceiling
Stucco on the ceiling
Stucco molding made of polyurethane and polystyrene, as a rule, is sold in the form of ready-made structures, so at the preliminary stage you only need to select the products you like and purchase them. In order to know the required number of elements, you should make calculations, that is, measure the perimeter of the room. At this point, the preparatory work can be considered complete.
The most difficult process is installing the stucco cornice. The installation technology is presented below.
Step 1. Make marks on the surface of the ceiling and cornices using a simple pencil.
Step 2. Insert the cornice into the miter box and use a hacksaw to cut the product at an angle of 45 degrees. This is required to connect the corners of the room as simply as possible.
Step 3. Apply mounting adhesive to the surface of the wall, ceiling and cornice.
Step 4. Apply the cornice according to the markings made and secure it with nails using a pneumatic gun.
Step 5. We fill the gaps with special glue, the shape of the tube and the outlet of which allow the procedure to be carried out without additional tools.
Step 6. Sand the defects using sandpaper.
Step 7. Wipe off any remaining glue with a damp sponge.
Step 8. Decorate the cornice with paints.
An example of decorative stucco on the ceiling
Attaching the cornice is the last stage of installing stucco on the ceiling. All other work is extremely simple, since to carry it out you only need to apply glue to the surface of the material and the ceiling.
Cladding materials
An insulated roof guarantees a favorable indoor climate. If the room is well heated and ventilated, the choice of materials for arranging the attic ceilings of a private house is unlimited and depends on the amount of money you are willing to spend.
We offer a list sorted in descending order of price:
- drywall
- plywood
- lining
- stretch ceiling
- parquet board
- caisson blocks
The list is not closed - while you are reading the article, new items may have appeared on sale.
Cost table
In order for you to have a rough idea of future expenses and be able to prudently adjust your budget, we offer you a small table that shows the average current prices for the materials used for finishing the ceiling with plasterboard.
| Name | Vacation unit | Price |
| self-tapping screws | packaging (200 pcs.) | from 120 rubles |
| gypsum board sheets | sheet(3 m2) | from 250 rubles |
| UD profile | PC. | from 40 rubles |
| CD profile | PC. | from 45 rubles |
| ceiling hangers | PC. | from 4 rubles |
| dowels | packaging (200 pcs.) | from 125 rubles |
Drywall
Drywall is construction cellulose (cardboard) lined with gypsum.
The sheets are easy to install; when wet, the material takes any shape, which it retains when dry.
Complex design ideas become reality - bulges, bends, depressions, attic ceilings of different levels and intricate configurations. Communications and electrical wiring are hidden by a smooth surface, and the dense structure supports the weight of mounted lamps, chandeliers and decorative elements.
The material is inexpensive and environmentally friendly, however, it is susceptible to deformation during shrinkage of premises, which limits its use in houses under construction.
Manufacturers offer sheets with enhanced fire-resistant properties (marked in red), increased moisture resistance (green), and anti-noise acoustic plasterboard.
GKL is attached to the ceiling sheathing, the joints are sealed with putty, the material serves as the basis for wallpaper, textured plaster, painting or becomes an addition to them.
Technological progress of work
Finishing the attic with plasterboard involves the following steps:
- Preparing the attic space for finishing - vacate the room, clean the foundations, carry out work to eliminate leaks in the roof, check the reliability of the beams and rafters of the roofing system;
- Design and calculation work;
- Perform markings according to the drawings;
- Mount the frame;
- Laying and wiring of communication systems;
- Installation of plasterboard sheets;
- Corner protection;
- Preparation of surfaces for decorative finishing.
GKL cladding
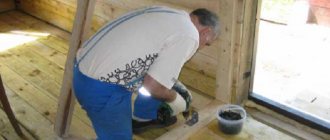
Lining
An economical option is lining; its installation is simple and the price is low.
A 30X30 mm block serves as a frame for fastening the lining and creates an air gap between the vapor barrier and the finishing.
The block is mounted to the ceiling sheathing using dowel-nails with threads, which allows you to level the surface of the cladding. When the installation is completed, the lining is covered with stain, varnish or acrylic-based paint.
Eurolining and imitation timber are varieties of conventional lining that do not require additional processing, have a smooth shiny surface, a noble appearance and are a little more expensive.
The ceiling in the attic will look original if you place the slats at an angle, combine multidirectional zones, and create play of light and shadow.
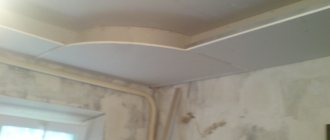
Inclined frame device
The first thing to do is to mark the horizon line of the ceiling in those places where plane alignment is provided.
After marking the horizon, we attach the P-suspension and tighten the cords for the CD profile.
In our case, a round lamp with a diameter of 300 mm will be mounted in the ceiling, so when installing the frame it is necessary to leave space for it.
It is more convenient to cut the profile in place, since it is easier to set a continuous guide than to adjust short sections.
Note. In areas of straight ceilings, in accordance with the requirements for gypsum plasterboard frames, only the CD profile is used as load-bearing ribs.
After leveling the frame and installing the sheets on a straight ceiling, we measure the place where the sheets meet and draw a straight line (red in the photo). This is done using a long rule - the plane is selected with a margin for the thickness of the CD profile. Then we attach the UD guide to the straight ceiling profile.
Then we mark and fasten the P-hangers so that they fit under the straight ribs. We insert the outer CD edges into the inclined UD profile, which will serve as beacons. We fix them at the edges and stretch the cords.
The joining of the guides is carried out only in the area of the P-suspension. The profiles must fit into each other; for this, the edges must be trimmed.
Both planes of the ceiling are joined at an internal obtuse angle. At the junction there must be reinforcements from the paired UD profile.
To do this, the frame ribs must be free at the edges. Carefully cut the CD profile of the ribs in place with a grinder (scissors deform the ends).
We install the remaining ribs and put a UD guide on their free ends, check and adjust the plane according to the rule.
Parallel to the aligned angle guide, close to it, install the UD guide (beacon) of the conjugate plane.
Using the rule and cords, we set the opposite (response) CD beacon on the suspensions and stretch the cords. Filling the internal space of the inclined plane should be done using standard gypsum board installation technology.
Attention! Position the ribs so that the gypsum board sheet naturally fits the bottom plane of the wall. Subsequently, it will be pressed with a horizontal strip, which will provide additional strength.
Overhanging joints (valleys) must necessarily have a reinforcement perimeter made of UD guides.
The use of foam is justified in all areas of work with inclined planes. The more widely it is used, the more reliable the fixation of P-suspensions. This is especially important at junctions with stone walls.
Type of finished frame:
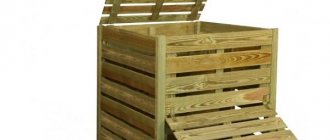
Coffered ceilings
Coffered blocks are a memory of the ceilings of ancient castles and palaces.
Imitations of cells made from intersecting beams are made from wood, polyurethane, wood fiber material (MDF) and gypsum board. A coffered ceiling in the attic is a luxury that is suitable for rooms with a high vault (3 meters or more).
Plasterboard blocks, in our opinion, are the optimal solution in terms of price, quality and ease of installation (you can do it yourself).
Video description
The video shows how craftsmen install a stretch ceiling in an attic room:
In general, you need to be careful with PVC stretch ceilings. They are not recommended for installation in residential premises, because polymer sheets do not allow air to pass through. And the period of guaranteed operation does not exceed 5 years. Therefore, we classified this option for attic ceiling decoration in the “unusual” category.
Open beam design
Another unusual option. This is when the rafter system of the attic roof is not covered, but, on the contrary, their presence is reinforced. To help you understand what we are talking about, look at the photo below. It clearly shows the beams that serve as rafter legs.
The rafter legs of the attic roof are part of the design of the room Source fandemia.com
In fact, the option is very effective. And creating it is not very difficult. For this purpose, the rafter legs are not completely covered. The cladding is mounted between them on the so-called cranial bars. These are square wooden slats that are nailed along the rafters (to them) so that the lower part of the rafter legs is visible after installing the facing layer. That is why rafters are chosen with a width of at least 250 mm.
They are often replaced with timber. This increases the cost of the roofing structure, and installation becomes more difficult. Therefore, another simpler option is used - so-called false beams are installed. They are made from plywood, plasterboard, polypropylene, and gypsum. Essentially, these are just boxes that are mounted at the location where the rafter legs are installed. They are secured either with self-tapping screws or with adhesive. By the way, you can use ordinary boards as false rafters.
Beams out
By the way, about beams, it is not necessary to imitate them, much less hide them. The design features and profile of the attic ceiling can be effectively played up by highlighting the protruding elements with light and color.
A low vault can be raised by reflecting light from glossy surfaces, merging the tones of walls and ceilings, or contour lighting.
Dark colors, transverse lines, eat up space. Light colors and vertical orientation work more actively in contrast. High ceilings don’t matter; the more complex the relief, the more interesting the interior.
Lighting
This point is very important. If the sloping ceiling is designed in the interior of the attic, then there is not too much light here. You'll have to find a way to fit enough lights. And in other, even more spacious rooms, light will never be superfluous. And here it is already possible to determine the favorites among finishing materials for such unusual floors. The easiest way to solve the problem of placing lamps on compositions made of the following materials:
- Drywall that will allow you to easily install recessed lighting
- Tension fabric with the same advantages
Other finishing options will not solve this problem so easily. You will have to place wires, technical communications, etc. somewhere. Therefore, when deciding how to decorate a sloping ceiling, you should give preference to these two types of finishes.
Stretch ceiling
A popular method of arranging ceilings in apartments is acceptable for the attic of a private house. Stretch ceilings hide defects, create multi-level configurations of various shapes, colors with matte, shiny surfaces and graphic inserts.
One square meter of stretch ceiling weighs about 250-300 grams, its load on structures is negligible.
It is hardly wise to do the installation yourself. Finding equipment, stretching the fabric, decorating window openings, installing chandeliers and lamps without preparation will not be possible.
If you hire a specialized company, you will only have to choose a design and think in advance about whether the ceiling height is sufficient so as not to accidentally damage the coating. A careless movement or a break will undo the work done, and you will have to start all over again.
Arrangement of ceilings is a creative and technically complex matter. It doesn’t matter what the ceiling cladding will be made of, the main thing is to do everything according to technology, then the bedroom, office or bathroom in the attic will be the best place in the house. It is up to the owner of the house to try on the roles of an architect and decorator or call on craftsmen for help.
Which finish to choose depending on the room
It is necessary to take into account the purpose of the room and its features. For example, for a bathroom or kitchen, choose ceiling cladding that can withstand moisture well. These include plastic panels, waterproof paint, stretch film (but it is better to place it away from the work surface so as not to touch it with a knife).
For a nursery, it is important that the materials are environmentally friendly and safe, but easy to clean. It is better to use wood that is varnished or painted. To diversify the interior, you can choose two or three colors or add an image of your favorite character, animal, etc.
For the bedroom, choose calm colors that do not irritate or interfere with sleep. And the living room or billiard room can be decorated brighter and bolder.
Another important factor is the size of the room, including height. Often rooms in the attic are small. But this shortcoming is corrected by a skillful choice of finishes. Light colors, especially white and cool shades, push the boundaries of space. To raise the ceiling, lining, laminate or panels are laid vertically. And horizontal placement will expand the room.
Making a high-quality ceiling on the attic floor is more difficult than under a flat ceiling. But the efforts will not be in vain. The interior of a spacious cottage or a modest private house will become unique and reflect the individuality of the owners.
What is an attic
An attic is a living space resembling an attic, which is formed on the upper floors of houses with an attic roof. Anyone with special skills in the construction process can build an attic on their own.
The attic floor is understood as a floor in the attic, the façade of which is formed entirely or partially by the surfaces of a sloping or sloping roof. In fact, it is a full-fledged living space inside the building.
To reduce the load on an already erected structure, lightweight materials and structures are used during construction of the attic floor. Wood is indispensable in these matters. The attic is often built independently from wood; beams, logs or frame-panel technology are used for this purpose.
The difference between the attic and the second floor - comparative characteristics
If you try to compare which is better, the attic or the second floor, you will get something like the following picture.
| Parameter | Attic | Second floor |
| Price | Below. The amount of savings depends on the type of attic | Higher |
| Duration of work | Lower compared to building a floor | High |
| Height of vertical walls | Up to 1.5 m.p. | Over 1.5 m.p. |
| Load on foundation and load-bearing walls | Below | Higher |
| Air volume | Lower due to sloping walls | Higher |
| Square | The usable area is smaller due to the “dead” zones where the roof meets the wall | Higher |
| Room layout | The layout of the attic floor is carried out taking into account the presence of blind areas | Free |
| Land area | Doesn't change | Doesn't change |
| Illumination | Better, more light penetrates due to sloping windows | Depends on the number and location of windows. In addition, the deep slope of the window blocks 2/3 of sunlight |
| Glazing area | 25% less than when using vertical windows | Minimum 1:8 to the surface area of the walls (depending on location) |
| Window | Sloping attic | Vertical |
| Temperature | If all stages of work are carried out correctly, the result is almost the same | If all stages of work are carried out correctly, the result is almost the same |
| Heat loss | Higher | Below |
| The need for thermal insulation material | Below | Higher. The ceiling above the floor needs to be insulated |
| Aesthetics of the structure | A house with an attic floor looks more elegant and unusual | Typical design |
However, it is worth noting that there are cases when it is impossible to build an attic floor. For example:
- load-bearing walls and foundation may not withstand additional load;
- the walls are made of porous materials that can collapse.
- small house dimensions. With a mandatory height of 2.3 m (according to sanitary standards, SNiP is limited to 1.5 m), it is difficult to equip a full-fledged living space with a small surface area. If the width of the house is less than 5 m.p. There is no point in building an attic. The resulting area will be insignificant, but the costs for it will be high.