The material for constructing a shed can be any building material.
But this article is devoted to expanded clay concrete blocks. Let's consider why it is advisable to use them for the construction of outbuildings, how to make the correct calculations and according to what rules for constructing the walls of a shed from expanded clay concrete?
We will discuss the important issue of material requirements for the construction of such premises, as well as whether it is necessary to make a design for the structure and how to do it.
Characteristics of foam blocks and gas blocks and their differences
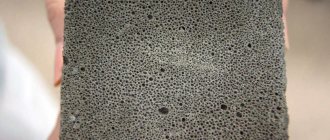
Cellular concrete can be obtained in two ways, and the main difference is the type of substance due to which pores are formed in the mixture. In the production of foam concrete, protein or synthetic foaming agents are used, and to swell the mixture in the production of aerated concrete, aluminum paste, diluted to a suspension, is used. There is also a combined option called gas foam concrete.
- No matter how the pore formation reaction takes place, the hardened concrete stone acquires a spongy structure, which is why it is called cellular. The pore sizes and their structure are different, which depends on the intensity of the chemical reactions taking place in the mixture and the hardening temperature. The characteristics of finished products are influenced by both the component composition of concrete and the conditions under which they gain strength.
- Natural conditions are when the blocks harden at ambient temperature or in a drying chamber at a temperature not exceeding +45 degrees. This technology is called hydration technology. If the blocks are sent for treatment with hot steam (+190 degrees) in an autoclave, this technology is called synthesis.
Processing in a high-pressure chamber allows concrete to gain 90 percent strength in a matter of hours, when at a temperature of +30 degrees this figure can only be achieved in a week. In concrete in an autoclave, completely different reactions occur, the structure is significantly strengthened, and therefore the strength characteristics of such a material are much higher.
- For mass use, foam concrete is produced mainly for hydration, often strengthening the concrete mass by adding polymer or glass fiber. As for aerated concrete, it is often produced using the synthesis method. It allows you to obtain blocks with the best combination of density and strength, which is why this particular material is used for building houses. Since the technology for its production is more complex, it naturally has a higher price tag.
- To make a household block made of aerated concrete cheaper, you can purchase blocks of not the first, but the second category for construction. They will have more chips, breaks and deviations from the geometry, but for a shed this is not so important. A good option for such an object would be a non-autoclaved gas or foam block. Their prices are practically no different; in August 2021, material for a utility block made of aerated concrete (Moscow region) can be purchased on average for 2,500 rubles. per m3.
Here are the comparative characteristics of cellular concrete blocks with the same density of 500 kg/m3:
| Characteristic | Foam blocks | Non-autoclaved aerated blocks | Autoclave gas blocks |
| Strength class (compression) | IN 1 | B1.5 | B2.5 |
| Frost resistance | Not standardized | Not standardized | F50 |
| Thermal conductivity W/m*S (the lower the better) | 0,18 | 0,17 | 0,14 |
| Relation to water | Does not absorb | Absorbs | Absorbs |
| Relation to fire | Does not burn | Does not burn | Does not burn |
| Possibility of monolithic construction | Eat | No | No |
| Wall thickness for a shed | 300 mm | 300 mm | 200 mm |
| Is it possible to make a foundation for a barn? | No | No | No |
Autoclaved gas blocks have the highest strength. Concrete used for the construction of load-bearing walls must have a strength class of at least B1.5. Non-autoclaved gas blocks fit into this standard, albeit to a minimum. But foam blocks with a density of D500 have class B1 and even B0.75 - and this clearly classifies them as thermal insulation materials, and not structural ones. It is the coldest of the three presented materials of the same density.
Foam blocks and hydration gas blocks for building a shed should be taken with a density of D600, but an autoclaved gas block can be taken that is less dense. Today, aerated concrete from the best manufacturers, even with a volumetric mass of 300 kg/m3, has a strength class of B2. Such walls, due to their low thermal conductivity coefficient, will be warmer, which is important if vegetables, preserves, animals or poultry are kept in the barn.
Flaws
Disadvantages of houses made of expanded clay concrete:
- Low building height. This is due to the lack of strength of the elements, which is only enough to build a maximum of a three-story house. In this case, the thickness of the walls must be at least 40 cm.
- Need for finishing. It is impossible to leave a house without external cladding for longer than 2 years.
- Unattractive appearance. Unfinished houses look gray and unkempt.
- The need to insulate the wall if its thickness is less than 40 cm. Although this factor is largely determined by the regional climate.
- High moisture absorption rate. The material is porous, so it quickly absorbs water. If it does not have time to weather and freezes, this will lead to gradual destruction of the structure.
- Difficulty of processing. Cutting expanded clay concrete blocks requires special equipment. Considering that the material is fragile, this process is fraught with a number of difficulties.
Advantages and disadvantages
In general, the advantages and disadvantages of a utility block at the dacha built from aerated blocks or foam blocks
Affordable price
Large format, speeds up construction time
You can build a utility block from aerated concrete with your own hands; the material is easy to cut and saw without power tools
The walls of the barn will be warm and windproof
In an unheated room there is no need to take care of protecting the masonry from steam from the inside
You can choose any option for finishing the outside, including installing a non-ventilated facade
Service life
Fire resistance
With constant exposure to moisture, aerated concrete can absorb up to 30% of its own weight of water. But it just as easily releases it into the atmosphere, so the walls of unheated buildings can be used without external decoration
Good geometry will allow masonry to be carried out using glue, which will reduce the consumption of masonry mixture
Cellular concrete does not have high strength and does not take bending loads well. The foundation must be made monolithic, otherwise cracks will form in the masonry.
Porous bases have little resistance to pull-out loads, so heavy shelves must be hung on the walls of the barn using specialized fasteners. Better yet, install floor shelving.
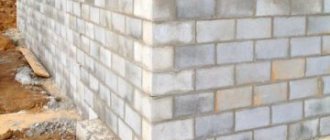
Block Features
The composition of expanded clay concrete includes sand, cement and granulated clay. Blocks are formed by vibration pressing. By design, the block can be full or hollow - with rectangular voids. Due to the large size of the block and its light weight, the construction of walls occurs quickly.
The main difference from wood is the fire resistance of expanded clay concrete. The low coefficient of water absorption and the components included make the material biologically resistant. Another advantage of expanded clay blocks is their low cost. The disadvantages of the material include the need for mandatory insulation and external finishing of the building, and this is additional expense.
Structure of expanded clay concrete blocks
Shed dimensions
No one will bother building a stone shed if you only need to store a few shovels and buckets in it. To do this, you can generally assemble a frame house measuring 1.5 * 2 m. If you need a large utility block made of aerated concrete, the size in the plan is 6 * 3 or 5 * 4 m. The maximum is not limited - it all depends on the specific functionality of the building. Comfortable wall height is 2500 mm, roof elevation at the highest point is 4 m.
Price for construction work
The cost of building a shed from foam blocks in different cities of Russia:
- In Moscow and the Moscow region, the cost of building a turnkey shed starts from 180,000 rubles.
- In Yekaterinburg, prices start from 155,000.
- In Kazan, such a service can be provided for 190,000 rubles.
Prices are negotiated individually and depend on the volume and complexity of the work to be done.
Selection of tools and materials
To build a shed from aerated concrete with your own hands, you need to stock up on the following tools:
- for cutting aerated concrete: hacksaw or circular saw;
- to adjust the additions and eliminate differences: a plane and grater for aerated concrete, a mallet;
- for installation of blocks: plastic container, mixer, toothed ladle or spatula (if on cement glue); mounting gun (if foam glue is used); trowel (if the masonry will be carried out at the central building);
- for reinforcement: if you use rods, you need a wall chaser;
- to control the evenness of the masonry: level, plumb line, square, mooring cord.
The rest of the tools are general construction tools: shovel, hammers, metal shears, grinder, hammer drill, wood hacksaw, screwdriver.
Creating a foundation for a shed made of aerated concrete
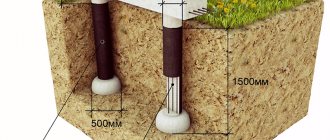
A barn made of aerated concrete, like any other structure, must stand on a monolithic foundation, because masonry made of cellular concrete does not react well to soil movements. The specific option is selected depending on the type and moisture of the soil, but in the overwhelming majority such a building can be placed on a tape with a slight depth. On weak or deeply frozen soils, it makes sense to support such a tape on bored piles.
A regular tape can be poured traditionally, using removable formwork - or you can simplify the work by using large blocks of permanent formwork, into the voids of which heavy concrete is poured. The blocks themselves can be made of pressed sand concrete, concrete with lightweight aggregates (polystyrene, expanded clay, wood shavings).
On screw piles
In principle, it is not recommended to build aerated concrete walls supported by screw piles. We have already stated the reason; the masonry needs a rigid foundation. But a barn is a small building, and if the soil is very weak or water-saturated, all buildings on the site have to be placed on piles. With screw supports, of course, it is easier than with monolithic ones, and construction goes faster. They can be used, but the grillage that connects the heads together should not be metal, as is done for frames, but reinforced concrete.
From aerated concrete
Aerated concrete blocks should not be used for the foundation of a shed, as they will quickly collapse from direct contact with the ground. As a result, the service life of the building will rapidly decrease. The foundation must be made of heavy concrete, and the first row of masonry is separated from it by cut-off waterproofing.
Building without a foundation
No matter how much someone would like to build a utility block from aerated concrete without a foundation, this cannot be done. Any masonry requires a rigid supporting base. Without it, you can only build a frame frame, the lower frame of which is thrown through simple point supports such as an expanded clay block buried in the ground. This number will not work with aerated concrete.
Monolithic slab for a barn
An excellent foundation option is a monolithic slab. Yes, it is more expensive, but given the small amount of excavation work and the fact that you will already have a finished floor for the shed, the extra costs are offset. The slab may not be buried at all; the pit is dug only to the thickness of the underlying layers. Let's say it will be 200 mm of compacted sand fill. The average thickness of the slab itself can be the same.
If the shed is small, a slab thickness of 150 mm will be sufficient. For a large one, combined with a garage or bathhouse, you can make a calculation.
- To do this, you need to calculate the weight of the box (F) and apply the following formula: S > 1.2 * F/R0.
- R0 is the calculated soil resistance, you will find it in this plate:
• 1.2 is a reliability coefficient, a constant value.
The area of the foundation S must be at least slightly larger than the figure obtained as a result of the indicated arithmetic operations.
As for the amount of materials required for the foundation, they can be calculated using an online calculator. It is easier to reinforce it using mesh cards welded from rods in the factory.
When starting the construction of a shed, remember that it is necessary to provide a distance from the fence of at least 1 m. If it will contain animals or birds, this distance should be increased to 4 meters.
Conclusion
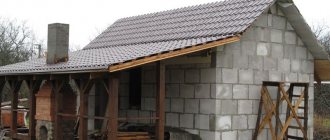
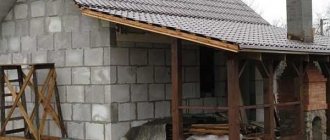
Almost finished building
There is absolutely nothing complicated in the construction of a non-residential structure, as we have seen. The recommendations are simple, the advice is rational, and all the work will take at most a few days (also find out how to build a garage from cinder blocks yourself).
If you are interested in this and are ready to get started, then in the video presented in this article you will find additional information on this topic.
Laying the walls of a barn from aerated blocks
So, your foundation is ready, you can go buy blocks. They should be unloaded close to the installation site, on a specially prepared flat area that is not flooded with rainwater. You cannot store in two tiers!
It is not advisable to put the blocks into work right away; they need to rest for one or two weeks. If the products are autoclaved, during this time the initial humidity will decrease slightly, for which the shrink film is removed from the sides of the stack. If the blocks are not stored under a shelter, it is better to leave the top of the stack closed.
If the blocks are not autoclaved, there is a possibility that they did not have time to gain 100% strength at all, which requires at least 28 days. It is not profitable for the manufacturer to wait so long, and blocks most often go on sale with 70% strength. So waiting will be beneficial in any case.
How to start masonry
You need to apply the contours of the future masonry to the foundation using dye thread, dowels or a grinder to get an accurate plan of the walls.
- Then check the horizontalness of the base surface and, if necessary, level it with sand-cement mortar. The thickness of the screed should not exceed 20 mm. Without waiting for this layer to harden, you can immediately perform waterproofing.
- Most often, narrow roll materials with a width corresponding to the thickness of the masonry are used for this purpose. If nothing needs to be leveled, they are glued to the base using bitumen mastic. At the joints of the strips, an overlap of 15 cm must be provided.
- The first row of blocks will be laid on top of the waterproofing, also on a solution of cement and sand. Which masonry mortar should be used next will depend on the geometry of the blocks. If you are using substandard material to build a shed, it is better to use the same DSP for masonry, since the seams will be thick and working with glue in such a situation is unprofitable.
Perhaps you have leftover autoclave blocks from building a house, or you simply decided to buy high-quality material for your outbuildings. Then only the first row is placed on the DSP, the remaining rows of blocks will be mounted with glue - cement or polyurethane.
- The masonry begins with corner blocks that will act as beacons. The first beacon is placed on the corner that turns out to be the highest - and the rest are already aligned with it. If the shed is more than 10 m long, an intermediate block must be installed. If there is a transverse internal wall, the middle beacon is placed precisely at the intersection.
- A mooring cord is attached to the corner blocks, which will serve as a guide for laying intermediate blocks. Although there are special devices for fixing the cord, this can also be done using nails that are easily driven into aerated concrete.
The cement-sand mixture is applied only to the base (horizontally), it is better to coat the vertical seams with glue. And if the blocks used have end-cut grooves and ridges, their joints can be generally left dry.
How to prepare mortar and glue
If you decide to use DSP for laying blocks (the first row or all walls), you need an M75 mortar. It can be made from different grades of cement, which determines the dosage of sand. If you use M300 cement, then one part of it will use 4 parts of sand. At M400, the proportion of sand increases to 5 parts, and at M500 – to 7. The maximum sand fraction is 2.0 mm. Water is added after mixing the dry ingredients until the solution is workable.
If you have bags of cement glue at your disposal, you only need to mix it with water, which is why you need an electric drill with a mixer attachment. The amount of water is taken according to the instructions on the package. It is poured into a container, after which the dry mixture is poured into it. It is recommended to mix the entire bag at once; on average, the resulting glue is enough to lay a cubic meter of blocks. After stirring, the mixture is infused for 10 minutes, then mixed again. Application requires a toothed bucket or carriage, but for small volumes of work you can get by with a spatula-comb. Only the width of its canvas must be matched to the thickness of the wall.
The easiest way is to use polyurethane glue, but it can only work with category 1 autoclave blocks. Only with good geometry of the products will the glue consumption be minimal, and the bottle will be enough for 1 m3 of masonry. Before use, shake the container well with the valve facing down, then screw it onto the gun. The glue is applied in strips to the horizontal and vertical surfaces of the blocks. The number of stripes depends on the thickness of the masonry: if it is 150-250 mm, two strips are enough, if more - 3 strips. When installing partitions, only 1 strip is applied.
Next rows
The installation of blocks of one row should be carried out immediately along the entire perimeter of the barn, after which you can proceed to the next one. They start it again from the corner, installing the block so as to ensure that the vertical seam is ligated at least 10 cm. Thus, all the seams in the row will be ligated.
No more than 4 rows are laid out per day; overnight the glue gains strength and you can continue working. Unevenness may form in each row due to height deviations of the blocks. The difference must be eliminated using an aerated concrete plane or trowel. The resulting dust must be swept away with a brush so that it does not impair the adhesion of the adhesive to the aerated concrete.
In each row of masonry there must be extensions - at the end of the row, or closer to the opening. To do this, the block is sawed with a hacksaw or circular saw, after which the cut area is leveled with a float. The minimum size of addition is a quarter of the length of the product. If this requirement cannot be met, another full-size block must be reduced.
Pre-made pencil markings will help you make an even cut, or you need to use a jig square. You cannot cut blocks directly on the wall.
Is it necessary to reinforce
Reinforcement helps the masonry resist tensile loads and reduces the risk of cracking. Therefore, areas above door and window openings are subject to mandatory reinforcement. If you decide to use lintels to cover them, then you need to reinforce those areas where they rest. The reinforcement is inserted deep into the masonry 50 cm from the vertical border of the opening.
Horizontal rows, if the length of the barn is less than 6 m, do not need to be reinforced - only the first row is reinforced. Under the ceiling, it is better to pour a belt of monolithic concrete, or lay it out of clay brick.
Is it worth using expanded clay for a utility room?
If we briefly answer the question about the advisability of building a shed from expanded clay concrete, then the answer will be unequivocal - yes.
Firstly, it is an environmentally friendly material.
It includes:
- cement;
- sand;
- water;
- expanded clay;
- additives to improve performance properties.
Unlike cinder block, expanded clay concrete is environmentally safe for humans , food and households that will live in the barn (chickens, rabbits, etc.).
During operation, the material does not emit toxins or other toxic substances that would be absorbed into objects located indoors and have a negative effect on them.
In addition, expanded clay concrete is mainly made in large blocks, which are equal in area to approximately 7 standard bricks. Therefore, working with this material will be especially easy and advisable for beginners . They won't have to level every little element. Instead, there will be large, convenient products with which the building will be built much faster and easier.
But since some people prefer to leave the barn with one masonry, without finishing the blocks with a decorative layer, it is not advisable for such people to build a barn from expanded clay concrete. Expanded clay concrete is a porous material that does not tolerate moisture getting inside it. Therefore, the direct action of rain and snow will very quickly destroy the installed elements.
The barn must either be built from expanded clay concrete, but then be sure to finish it with decor and a protective layer, or choose another building material.
Stone requirements
If the owner of the house still decides to use expanded clay concrete, then you need to make sure that it meets the requirements for the material for this building:
- Strength products for the construction of a shed can be minimal - from M15 to M35. The strength grade of the product should not be lower than the grade of cement used for masonry mortar.
The brands must be the same, otherwise cracks may appear on the walls. Sometimes the accompanying documents for the product indicate the release strength (the one that was immediately after pouring the solution into the molds) instead of the nominal strength, and this indicator is always less than the specified strength.But this should not be scary, since the blocks gain their final strength after 28 days after preparation. Therefore, if this time has already passed since the date of release of the product, then you can safely buy such products and not worry about their durability.
- Density – minimum D. Despite the fact that the barn is a non-residential premises, its walls will still bear mechanical load, both from the weight of the roof and from objects that will be attached to its walls. Therefore, the density of masonry products should not be the lowest.
- Frost resistance is at least F50, so that it is enough for 50 freeze-thaw cycles. With each such cycle, the strength of the product decreases, therefore, the higher the frost resistance, the longer the strength of the building will be maintained.
- Deviations from the specified dimensions should not be more than 3-4 mm in length, 3 mm in thickness, 4 mm in height and 3 mm in the evenness of the edges of the material. These requirements are specified in GOST.
- Dimensions . To construct the walls of a building, standard blocks measuring 200x200x400 mm are usually used.
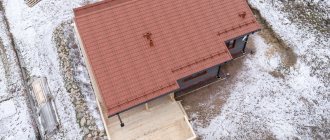
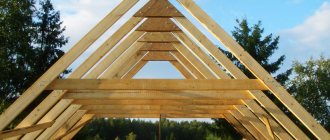
Roof for a shed made of aerated concrete
The simplest roof structure is the one with one slope, which is usually mounted on sheds. Its slope can be ensured by the masonry itself; in this case, the back wall is made higher than the front. As an option, wooden posts are installed on the back wall.
For a barn measuring 3 * 5.5 m, the roof area at an angle of inclination of 18 degrees will be about 23 m2. The minimum cross-section of the rafters is 40x150 mm in the amount of 11 pieces in increments of 60 cm. Their length will be 416 cm. The lathing, for example, under slate, is laid perpendicular to the rafters. It is made from boards 25x150 mm, stuffed every 350 mm.
Schematic drawing
Initially, the builder must decide on the functional purpose of the building . A barn is often used to store various household equipment, keep livestock, or set up mini-workshops. Based on this, you can draw a drawing that indicates the dimensions of the structure, the presence of partitions, windows, and doors. The initial height can be taken as 2-2.4 m, area 6-9 m² - these are standard parameters.
Based on the drawing, it is very easy to calculate the number of modules that will be used in the work. Next, a construction site is selected. As a rule, the building is located behind the house or to the side, at a short distance.
However, the following recommendations should be taken into account:
- in order to comply with all the standards for choosing the location of the facility, it is recommended to familiarize yourself with SNiP 02/30/97;
- if a toilet is installed as an addition, poultry/livestock will be kept in the room, the minimum distance to the walls of a residential building is taken to be 12 m, to the border of the adjacent plot - 4 m;
- when arranging a shed combined with a shower room, the distance from the house should be at least 8 m, 1 m to the neighboring plot.
When the required volume of material has been calculated and it is on site, you can proceed to foundation work. In this case, it is effective to introduce a strip or columnar supporting base.
Installing a floor in a barn made of aerated concrete
The floor covering for the shed is selected depending on its specific functionality. If inventory is simply stored there, they can be ground or adobe. But since the owner decided to build a garage not from boards or corrugated sheets, but from aerated concrete, it means that he wants the room to be as warm as possible.
The structure of the floor largely depends on the structure of the foundation. If it's a stove, then there's not much to think about. You already have a concrete base, which can simply be covered with technical linoleum on a backing or board. If the foundation is strip, you can pour a concrete floor over the ground, but there is a lot of hassle with it. It makes sense to flood only if animals will be kept in the barn.
It is much easier to make logs and lay OSB sheets on them. This material is the best in price and quality, given that it is not afraid of moisture. The slabs can be used both as a subfloor and as a finishing floor. For insulation, you can pour granulated polystyrene foam, ecowool or sawdust into the space between the joists for insulation, or lay slab material, preferably polystyrene foam.
The structure of the floor is shown in the diagram:
Vitaly Kudryashov
Builder Author of the portal full-houses.ru
Ask a Question
OSB boards do not require finishing. If the top covering is plank, it must be treated with an antiseptic or simply painted.
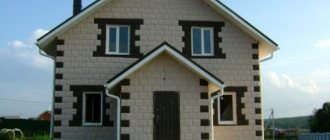
Residential building project
It is best to order a schematic plan for the construction of a residential building with a full list of calculations from a local architectural office or from specialists from a construction company who will complete the work quickly and professionally. The project will be officially registered in the land registry, with a unique number assigned to it, on the basis of which further registration of the residential premises and its connection to communications will then take place.
The project, in addition to the diagram, fully describes the plan and sequence of work, taking into account the soil, area, location and other important factors
Particular attention is paid to the construction of the foundation and the study of soils, freezing characteristics and the proximity of groundwater passage
Here they use SP 45.13330.2012 (rules for the construction of earthworks and foundations), as well as SP 50-101-2004 (foundation).
For a one-story house, the diagram may look like this:
In order to calculate the required amount of materials yourself, you can use an online calculator.
The project includes the following details:
- geographical location, taking into account technical and sanitary standards;
- features of climate and average annual temperature;
- indication of requirements for soil, groundwater and communications;
- planned area, number of floors, number of rooms;
- type of foundation chosen;
- number of interior partitions;
- degree of frost resistance of blocks;
- process of wall insulation;
- door and window openings;
- roof type;
- wall thickness (pie);
- proposed connection to communications (type of heating, water supply, electricity, sewerage);
- types of expanded clay concrete that will be used, their dimensions and volume;
- the total quantity of all building materials involved, including insulation materials;
- selected types of finishes;
- possibility of influence of external factors.
All important calculations will be included in the project, in addition to the drawings. The building codes that you need to rely on in the process will also be indicated there. As for the dacha, it must be located, according to technical standards, 30 m from the nearest body of water, and located 3 m from the owner’s boundary between buildings.
Decorating and landscaping the barn
A barn is not a house, so its walls can remain not only without external decoration, but also without internal decoration. However, many owners prefer to do it to give the walls a more aesthetic appearance. In addition, you don’t have to think about how to protect the walls from exposure to atmospheric moisture.
- There is little you can think of that is better and cheaper than plaster for finishing aerated concrete masonry. First it is performed from the inside, and then, after 3-4 weeks, from the outside. This time is required for the initial moisture of the autoclave blocks to decrease. When hydration blocks are used for masonry, the order of finishing does not matter.
- If when plastering the walls of houses on the facade it is recommended to use only special plasters for cellular concrete, then for an unheated shed an ordinary sand-cement mixture is also suitable, from which you can make, for example, a fur coat. If cement glue was used to install the blocks, it can also be used for plastering.
- To prevent hairline cracks from appearing on the plaster, the coating must be reinforced with fiberglass mesh. First, the surface is treated twice with a deep penetration primer to improve the adhesion of the layers. Then a thin layer of plaster is applied, the mesh is recessed into it with an overlap, and, covering with the finishing layer, it is smoothed. Decorative plaster can also be the finishing touch if you want your outbuilding to look no worse than your home.
- Alternatively, the outside of the shed walls can be finished with hanging material (lining or vinyl siding), mounting it directly on the walls without sheathing. This option is great for unheated buildings.
- Curtain facades of heated buildings must be ventilated. This is important when the barn is combined, for example, with a bathhouse. In this case, the inside of the walls is completely lined with vapor barrier foil material.
In this case, measures must be taken from the outside to ensure that even that small amount of steam that does get into the thickness of the walls can escape from them on the street side.
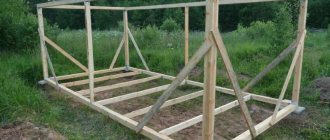
DIY construction instructions
A shed made of foam blocks is built according to the following algorithm:
The area for the foundation is leveled.- A trench is dug along the perimeter to a depth of at least 50 cm. If the soil is silty, then it should be 100 cm. The width of the strip foundation trench is 30 cm.
- Pour sand into the bottom and compact it. The layer of sand should be 10 cm. Cover it with the same layer of crushed stone and lay a waterproofing layer.
- Formwork for pouring concrete is made from wooden planks. For reliability, it is fixed with clamps and spacers. Reinforcing mesh with a rod thickness of 10-12 mm is laid on the waterproofing layer.
- Fill the prepared trench with concrete. The optimal grade is concrete M200-250. After 4 weeks it should completely harden.
- The concrete is cleaned of contaminants, protrusions and irregularities are cut off, and covered with roofing felt.
- Prepare a solution for fixing foam blocks. For this, sand and cement are used in a ratio of 1:3.
- The first block row is laid. They start laying from the corner and go further along the perimeter. The thickness of the seam should not be more than 30 mm. To make the walls of the barn strong, reinforcing bars with a diameter of 8 mm are laid on top of every fourth row of foam blocks.
- Once the wall is erected and the glue has set firmly, the roof is installed. To do this, beams are attached to the top row on metal studs. The studs themselves should be at a distance of 1 m 20 cm, no more. 2 layers of roofing material are laid on top of the beams.
- They install the outer trusses, stretch the twine between them, and attach them to the mauerlat. When they are fixed, the remaining trusses are installed.
- A rafter system is installed and covered with a layer of waterproofing material. The sheathing and roofing material are installed on top.
The outer walls of the shed are primed and insulated. The following can be used as insulation:
- Styrofoam,
- mineral wool,
- polyurethane foam or penofol.
Install doors and windows. The barn is being painted and plastered.
Organization of storage areas
The interior improvement of the barn is also carried out depending on the functionality. Since in most cases it contains all the gardening tools, you need to figure out how to store it so that it is always convenient to quickly find it. In order not to attach many hooks to the masonry, it is better to nail one long board or block to the wall, with grooves or hooks for tool holders. For large items, car wheels or cans, it is better to put a rack, for vegetables - boxes on the floor.
The main thing is that hanging shelves and racks are properly secured. Aerated concrete weakly resists pull-out loads, so to hang shelves you should not use ordinary nails, but expansion dowels with screw fastening elements. This will not only save you from unnecessary problems with walls and stored items, but is also a basic safety measure.
As for safety precautions for construction work, you can familiarize yourself with them by studying the set of rules 12-135-2003.