The cold type attic is simpler than the insulated type, but there are subtleties here too. We analyze the arrangement of a roof with a cold attic, as well as advice from experienced builders.
The cold type of attics is most common in individual construction. It is rightly believed that building such a roof is easier than doing full insulation of the space under the roof. However, even when arranging a roof with a cold attic, there are non-obvious points. Let's figure out what mistakes inexperienced builders most often make and how to make a cold roof according to all the rules.
How to insulate a ceiling in a cold attic
Today, there are many options for insulating an attic floor with your own hands. The most widely used thermal insulation materials are
:
- mineral wool. This includes glass, stone and slag wool. Available in slabs and mats;
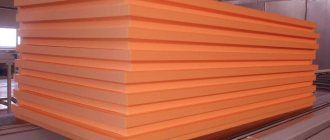
- expanded polystyrene and polystyrene. Expanded polystyrene is a higher quality material than polystyrene foam. It has greater strength and density, less moisture absorption;
- polyurethane foam (PPU). One of the most technologically advanced, high-quality and expensive insulation materials;
- bulk materials (sawdust, expanded clay, slag, etc.).
Before you insulate the attic of a private house with one of the above insulation materials, you need to decide which of them will be the most rational. For example, it is simply impossible to lay mineral wool slabs well. For such a case, it is better to use bulk insulation, which will fill all the voids and irregularities.
Do-it-yourself insulation with mineral wool is quite common due to its good thermal insulation and sound insulation properties. Before laying the mineral wool, a vapor barrier is laid on the attic floor to prevent moisture from entering from the lower rooms.
Most often, mineral wool is laid in two layers. A vapor barrier is also laid on top and only then a subfloor is made for movement around the attic.
Insulation with expanded polystyrene (foam) is also recommended to be done with a layer of vapor barrier membrane underneath it. Although the moisture permeability of these materials is insignificant, it is better to play it safe and get rid of possible future difficulties. For self-insulation in a cold attic, it is better to use polystyrene foam boards, as they are stronger than polystyrene foam.
Insulating a non-residential attic with polyurethane foam (PPU) is the most effective and high-quality method for a wooden private house. The main advantages of polyurethane foam are as follows:
:
- absolute seamlessness. After applying polyurethane foam, a monolithic layer of thermal insulation is created;
- environmental friendliness. The material does not contain volatile components that may be released during its operation;
- high adhesion. Polyurethane foam adheres to almost any surface except polyethylene and fluoroplastic surfaces;
- PPU has one of the lowest thermal conductivity coefficients;
However, it is worth considering that the material must be applied to dry surfaces with a temperature of +10 °C. In addition, you won’t be able to apply polyurethane foam yourself. This will require equipment and specialists who can correctly select the content of components and configure the equipment. Therefore, insulating an attic with this material will require significant financial investments.
The oldest and most proven method of insulating an attic floor with your own hands is thermal insulation with bulk materials. Before filling the material, a lining layer is laid - glassine, vapor barrier membrane, etc. Here everything depends on the specific type of insulation and the technology of its preparation before direct installation on the attic floor.
When insulating the walls in the attic, if any, you can use all of the above materials. The only exceptions are bulk materials, which, for obvious reasons, are not suitable for thermal insulation of walls.
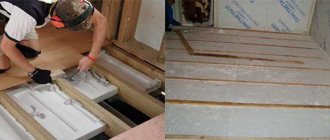
Technology for creating an attic floor using wooden beams
If you have experience in construction work, you can install the ceiling of a cold attic using wooden beams yourself. This process is performed at the final stage of roofing work.
The sequence of actions will be as follows:
- Installation of load-bearing beams. For a small private house, wooden floors made from timber with a cross-section of 150x150 or 200x200 millimeters are suitable. They are laid on concrete or brick walls.
- Installation of lag. They are placed on the edge perpendicular to the beams in increments of 60 centimeters. The logs are made from boards with a cross section of 150x50 millimeters.
- Laying thermal insulation. The insulation is placed between the joists - it will protect against the penetration of cold from the attic.
- Installation of rough and finished floors.
- Covering load-bearing beams on the side of the room to decorate the ceiling surface.
When insulating the attic floor, you should not forget about installing hydro- and vapor barriers.
Where to insulate the ventilation pipe?
Mandatory insulation is necessary in places where temperature changes occur. In areas where warm and cold air come into contact, condensation appears most abundantly. Here is the dew point. When designing the insulation of exhaust ducts, the position of this point is calculated first of all.
The goal is to move it as close as possible to the outlet of the ventilation pipe. The ideal option is when the mixing zone of cold and warm air flows is moved outside the house.
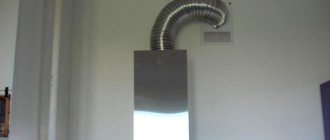
Since this rarely occurs, on a ventilation pipe that crosses a cold attic and then goes out onto the roof, the area that passes through the ceiling of the upper floor or attic must be insulated. The pipe itself is insulated along its entire length until it reaches the roof.
In the case of supply ventilation, the amount of condensate that falls on the outer walls of the ventilation duct is directly proportional to its length. This phenomenon is also influenced by the installation feature. In large areas, in addition to pipes, valves are also insulated.
In order not to create preconditions for the occurrence of a dew point, i.e. conversion of water vapor contained in the air into water, air ducts in a cold attic must be insulated and ventilation equipment installed
The insulated valve looks like an adjustable blind. The latter limit the passage and slightly increase the temperature of the air supplied from outside, because The design contains tubular heaters.
The speed of air supplied through the valve is controlled using levers or an electrically driven system. Warming up the valve blades with heating elements is necessary to prevent them from icing. This changes the temperature of the supply air masses slightly.
Why is this necessary?
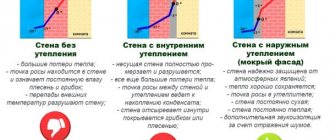
The key word is condensate. Without insulation, it will inevitably form on the inner surface of the ventilation duct and flow down the inner walls, flowing through leaky joints into the main walls and ceilings. The consequences are obvious: dampening of the walls and ceiling, the appearance of mold and their gradual destruction.
The effect of condensation on the ventilation duct itself depends on what material it is made of:
- Galvanization can be damaged if the protective anti-corrosion layer is damaged. Which, however, is inevitable when cutting sheets.
- PVC and corrugated aluminum pipes tolerate contact with moisture without any consequences.
Another trouble associated with moisture condensation is the gradual freezing of frost on the inner walls of the ventilation duct outside the warm room. Over several weeks of operation in severe frosts, the pipe clearance can decrease from 100 - 150 millimeters to zero.
Where does condensate come from?
There are two reasons for its appearance.
- Human life is associated with excessive air humidification. When washing dishes, cooking, doing laundry, even just breathing, the atmosphere is saturated with water vapor.
- Meteorologists have long used the concept of relative humidity. The higher the air temperature, the more water vapor it can hold. 100 percent relative humidity is the maximum amount of water that can be contained in the air in a vapor state. However, as soon as the temperature changes, with the same amount of steam in the air, the relative humidity will change. With significant cooling, it can exceed 100%, after which excess water will inevitably begin to condense on the surface with a low temperature. In our case, on the inner surface of the ventilation duct.
Consequences of moisture condensation in the ventilation duct.
A special case
In production, there is often a need for forced ventilation with high air flow rates. In particular, to remove harmful volatile production products, sawdust, shavings, etc.
The noise of the air and what it carries becomes a serious problem in some cases. In factory premises, ventilation insulation is often aimed not so much at combating condensation, but at banal sound insulation. The methods, however, are the same.
Methods and materials for ventilation insulation
The following methods of insulation exist:
- Use of rolled materials (mineral wool insulation, foamed polyethylene, foam rubber).
- The use of “shells” (cylinders for pipes, can be made from mineral wool, foamed polyethylene or rubber, polystyrene foam or EPS, polyurethane foam).
Sheet materials (foam plastic, extruded polystyrene foam, sheet polyurethane foam) - can be used for insulation of air ducts, but only for rectangular and square ones. This option is used very rarely, since it is inconvenient to install, it takes much more time, and there are a large number of joints between the sheets.
First of all, the method and material of insulation is selected based on the shape of the ventilation duct:
- For round channels: roll insulation and “shell” can be used. Sheet material for a round air duct will not work, since it cannot be bent.
- For rectangular and square channels: only roll insulation can be used.
Round and rectangular insulated air ducts
Additionally, the following can be placed on top of the insulation layer on the pipe:
- Galvanized casing.
- Plastic casing.
In private homes, such protection is not necessary, since it is intended to prevent mechanical damage to the insulation.
Application of roll materials
This option for insulating air ducts is simple to apply:
- The air duct is tightly wrapped with insulation.
- To prevent the insulation from falling off, it is secured at equal intervals with soft wire.
If we are talking about large-diameter air ducts that are insulated with mineral wool, then in addition to wire, pins are used for fastening. For this:
- The pins are welded to the outer surface of the ventilation duct using a resistance welding machine.
- Mineral wool is tightly wound around the air duct, pinned onto the pins.
- The insulation wound on top is fixed with pressure washers, which are attached to each pin.
- Next, for additional fixation, a wire is used, which is wound over the insulation.
Roll of foiled mineral wool
The method using roll insulation is good for the following reasons:
- simple and quick to use;
- allows you to create a layer of insulation without seams or joints;
- if necessary, allows you to quickly remove the heat insulator in the desired area (for example, to repair a pipe, or to replace insulation).
The following materials can be used:
Mineral wool insulation. The option is the most common, cheap and effective. The common thickness is 5 cm; rolls with a thickness from 4 to 8 cm can be found on sale. Thicker mineral wool is convenient to use only for large-diameter pipes, which are not used in low-rise residential construction. There are insulators with an outer foil layer (increases efficiency and serves as additional mechanical protection)
The downside is that mineral wool cakes and crumbles over time, and you need to be careful when working with it.
Foamed polyethylene. The option is simpler and cheaper, but also less effective
The thickness of such insulation is small (from 2 to 40 mm), so it will have to be wound in several layers.
Foamed rubber. Almost the same as foamed polyethylene.
When it comes to choosing an insulator for an air duct, the easiest way is to choose the first option.
Application of shell
The shell is a cylinder that is put on the insulated area. That is, in essence, it is a pipe made of insulating material. It could be:
- mineral wool;
- foam rubber;
- foamed polyethylene;
- foam/EPS;
- polyurethane foam.
The shell can be either solid (can be put on the pipe only when laying an air duct) or separate (can be put on a ready-made and working ventilation system).
Polyurethane foam shell for pipe insulation
The use of shells is ideal for areas passing through the wall: winding roll insulation there is very difficult and inconvenient. It is also convenient to use the shell on straight areas. But where the pipe turns, it will no longer be possible to put on the cylinder, and you will have to use a mat.
The process of using shells for ventilation insulation looks like this:
- A shell is placed on the pipe.
- If the shell is separate, its parts are fastened together using glue (reliably, but it will be more difficult to separate them if necessary) or wire (a simpler and more convenient method).
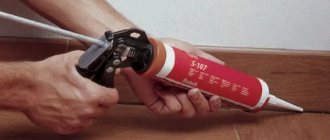
- The joints between the cylinders are taped with construction tape.
Rafter system: how to correctly calculate the number of legs
The main task of the rafters is to become a reliable support for the roof. The rafter legs must confidently withstand the weight of the roofing material and the additional load created by wind and snow masses. While the weight of the roof is easy to calculate based on the properties of the selected material, the snow load is individual for each region. You can obtain data on average and peak loads from the regional meteorological service.
Since the roof will not be insulated, when calculating the distance between the elements of the rafter system, the width of the insulation layers is not taken into account. There are many frame options for cold roofs. The most common solutions fit into the following parameters:
- The lumber used is a board with a width of 10 to 20 cm and a thickness of 5-7 cm.
- The pitch between the rafter legs is from 0.6 to 1.2 m.
- The counter-lattice is made of boards 3-4 cm thick.
Online calculators will help you calculate each roof frame element that is optimal for the planned roof load. Such services (for example, kalk.pro) allow you to determine the geometric dimensions of each element, build a three-dimensional model and print drawings.
When creating a rafter system, it is extremely important to ensure that the outer surface of all rafter legs is positioned strictly in the same plane. If the rafters are not level enough, problems cannot be avoided when creating sheathing and roofing. In order to perfectly align all the elements, the outer rafters are rigidly secured with spacers, and a cord is pulled between them. To learn how to properly install a gable roof rafter system with your own hands, read here.
Misconceptions about ventilation
It is not enough to ventilate the attic; it is important that it is done correctly. However, there are several common misconceptions among people who are planning to deal with this issue. They should be discussed in more detail
They should be discussed in more detail.
- There is a need for ventilation only in the summer. In fact, the attic not only needs to be ventilated in the heat, but also to smooth out the large temperature difference between inside and outside the attic in winter. If this is not done, then the humidity will inevitably increase - an excellent environment for the existence of mold and mildew. It is extremely difficult to combat these phenomena, and in advanced cases, mold can penetrate inside the rooms - then there will be no need to talk about any comfort.
- Ventilation removes warm air from the room in winter. In fact, if heat is poorly retained in a house, then it is not the ventilation that should be blamed, but poor-quality thermal insulation. It is because of this that conditions are created under which moist and cold air enters the attic.
- The size of the ventilation holes does not matter. In fact, the area of these holes is important. With a small ventilation area, the effect will be practically zero. So that the room is well ventilated, and at the same time heat leaks are not allowed, for 500 sq.m. area required 1 sq.m. ventilation holes.
Sequence of work
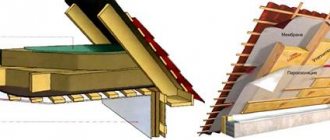
Diagram of a pitched roof without insulation.
To install the waterproof membrane, you must remember that its installation is carried out with some sagging, approximately 20 mm. This device allows condensation to drain, that is, the rafters and other roof elements are protected from moisture. In order for water to effectively evaporate and not stagnate, creating an unfavorable atmosphere, it is necessary to ensure the presence of a ventilation gap, which is made between the waterproofing film and the roof ridge.
This gap allows air to circulate unhindered in the under-roof space, removing all traces of condensation. The membrane itself to protect the roof should not have ruptures or other defects; it should be secured using a construction stapler.
An overlap must be made; the edges of the film must be secured with tape.
Among the features that distinguish a cold roof, it should be noted that it can be constructed for any climatic region. Many people mistakenly believe that this type of roof is completely unsuitable for the northern region, but this is not the case. This is where a cold attic is a traditional solution for a residential building. The attic floor itself is insulated, that is, the use of a cold roof does not in any way affect the internal microclimate of the upper floors. The attic itself may not even be used, since installing a layer of insulation between the upper floor and the under-roof space solves all problems regarding heat loss.
Diagram of a standing seam roof.
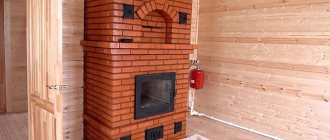
When constructing a cold roof, one should not forget about such a stage of work as proper insulation of technological openings and exits. To do this, all ventilation shafts, chimneys, and entrances to the roof surface must be thermally insulated. This will avoid such troubles as icing, condensation, precipitation, and heat loss.
To cover a roof of this design, a wide variety of roofing materials can be used. Most often this is metal tiles, the installation of which does not pose any problems. This option is considered optimal, since all installation work is completed in the shortest possible time, no additional work is required. You can use other materials for coating, for example, flexible tiles. But here a number of technological difficulties already arise that can make installation more expensive and complex. Therefore, the use of metal profiled sheet in this case is preferable.
Attic space: the need for ventilation
The design of the ventilation system is the most important part of the design.
Ventilation is involved in the heat exchange processes of the entire residential building. During the hot season, the roof can heat up over one hundred degrees, and heated hot air enters the house, aggravating the heat in it. In cold weather, other problems may arise. Cooled air forms drops of condensation on insulated floors: this moisture negatively affects wooden elements.
Even basic ventilation can prevent premature damage to the rafters.
Attic ventilation ensures mixing and equalizing the temperatures of the roof structure and the external environment. It prevents the formation of ice during the melting of the snow cover, avalanches and the appearance of large icicles
Arranging a high-quality air exchange system is actually extremely important
The advantages of this option
The installation of such a roof is quite simple - you will need to erect a structure, lay a layer of waterproofing, lathing and counter-lattice, and a roof covering. The main thing when erecting a cold roof is to provide a ventilation gap to allow condensed moisture to drain away. This is necessary to ensure that the supporting structure and roofing material do not deteriorate under the influence of moisture.
The installation of such a roof itself should not be accompanied by complications during the work; you just need to correctly fasten the roof covering so that it does not allow precipitation to pass through the joints into the under-roof space. Before creating a roof pie for a cold attic, it is worth performing the entire list of calculations, determining the slope of the slopes, the pitch of the sheathing, and choosing the appropriate method for fixing the metal tile sheets.
Installation of thermal insulation on ventilation pipes
Expanded polystyrene insulation
Ventilation pipes insulated with polystyrene foam are less susceptible to corrosion, which significantly increases their service life.
No special skills are required to install polystyrene foam shells. To install it:
- Determine the shell size that is needed.
- Use a saw or knife to cut the shells.
- Place the shell parts on the pipe, offset by a few centimeters from each other, and carefully close the side joints.
Ventilation pipes that are insulated with polystyrene foam shells are quite easy to dismantle in case of an emergency and just as easy to install back.
Polypropylene and polyurethane foam
These materials have significantly lower thermal conductivity and high fire resistance. Ventilation pipes are insulated with polyurethane foam and polypropylene as follows:
- Determine the required size.
- Cut the material into half-cylinders.
- Provide an allowance for the cover layer.
- Install half-cylinders on the ventilation pipes.
- Securely secure the joints using bandages.
PPU (polyurethane foam) shell for pipes
Insulation with foamed polyethylene
A ventilation pipe insulated with this material is the most popular today. Foamed polyethylene is a ready-made shell that completely encloses and insulates the pipes.
To perform thermal insulation of pipes:
- Take measurements of the material.
- Separate the insulating shell along a special seam.
- Attach the casing to the pipe.
- Using mounting tape or glue, secure the joints and seams of the insulating shells.
For square air ducts, foamed polyethylene is produced in rolls (for example, Energoflex Star Duct)
Regardless of how to insulate the exhaust pipe or the location of the thermal insulation material, the main thing is to prevent cold bridges that reduce the effectiveness of insulation and ensure high vapor resistance
To do this, special attention must be paid to the junctions of the ducts with the building structures, where there is the greatest likelihood of cold bridges appearing
Lathing
Wooden elements that are secured across the rafters and counter battens. The lathing serves as a base for the roofing material; depending on the type of covering, the choice is made in favor of a continuous or step-by-step structure.
- Solid - sheathing made of OSB sheets or plywood, which is used under soft roofing material (bitumen shingles, composite tiles).
- Stepping - made of bars or boards, serves as the basis for hard coverings (metal tiles, corrugated sheets, ondulin).
Do-it-yourself thermal insulation installation technology
When planning the thermal protection of the air duct, you should prepare the required amount of insulation and fasteners based on preliminary measurements.
Necessary calculations
If you plan to use ready-made shells, you need to determine the length of the areas to be processed and prepare the material with some reserve. In the case of roll insulation, you should additionally calculate the required width of the product. To do this, determine the diameter of the pipe, add the double parameter of the thickness of the insulator, and multiply the result by 3.14 (Pi number).
Preparatory work
Before starting work on insulating the outer section of the ventilation duct, you should remove the deflector if you are going to work with a finished casing that is pulled over the pipe. In other cases there is no need to dismantle the protective umbrella
It is also important to prepare clamps and other fasteners in the required quantity
Insulation with mineral wool
To install roll insulation, the following set of tools and materials is required:
- construction knife;
- stapler;
- aluminum tape;
- roulette;
- rubber spatula.
Aluminum tape will be needed to insulate air ducts with mineral wool.
Foil-coated mineral wool is used, which ensures reliable waterproofing of the fibrous base of the insulation. Insulation in the form of stone wool with foil from the Isover brand is especially in demand.
Stages of work:
- carry out markings on the aluminum-coated canvas, taking into account the overlap, and cut the required number of blanks. Moreover, you should make a cut along the length of the end, retreating from the edge by 7-8 cm. Next, remove the cotton wool along the cut line, leaving a layer of foil;
- wrap the pipe with insulation so that the protrusion of the foil along the edge covers the joining seam;
- The connecting line is fixed with a stapler in 10 cm increments and taped on top with aluminum tape.
To insulate the corner elements of the ventilation duct, curved fragments of insulation, cut according to the parameters of the base, are used. The outdoor section of the air duct must be strengthened with clamps over mineral wool. You also need to build a protective box from tin.
Insulation with polyurethane foam
Polyurethane foam insulation is sprayed using special equipment. Due to the high cost of installation work with the participation of professionals, polyurethane foam is used mainly in the installation of industrial exhaust air removal systems. Manufacturers also offer compact installations for mixing foam insulation components for insulation of air ducts in private housing construction. The complete set weighs around 30 kg and allows you to foam small pipework in the attic and on the roof.
Foam insulation
The slab material is used in the construction of ventilation systems with a rectangular cross-section. The expanded polystyrene layer is equipped with special waterproofing products in the form of a membrane or foil. Blanks are cut from the plates to the required sizes, and the fragments are mounted using clamps, tape, a stapler or metal wire. To eliminate gaps at the outer corners, additionally seal the joints with foam.
Waterproofing is required depending on the density parameters of the slabs. For example, PPS-60 does not require protection from moisture, but PPS-40 should be used in conjunction with a waterproofing membrane.
The nuances of installing self-adhesive thermal insulation
Self-adhesive insulation – grade “C” penofol – is valued for its ease of installation. The outer surface of the material based on foamed polyethylene is finished with an aluminum coating. The back side of the insulator is coated with glue, which is covered with a film. The canvas is cut to the required size in accordance with the parameters of the air duct, the film is removed and glued to the selected surface of the pipe. The edges of the self-adhesive thermal insulation are folded with an overlap of at least 5 cm and secured with aluminum tape.
Thermal insulation with special cylinders
The shell is used only for round pipes, selecting a model of the appropriate size. Solid cylinders with a longitudinal section are relevant when arranging small-diameter ventilation ducts. The shell is opened along the gap line, put on the pipe and secured with tape or a clamp. Collapsible models of finished cylinders are also in demand for thermal insulation of areas where the air duct exits the heated room and outdoor segments of the ventilation duct with the obligatory construction of a protective box.
https://youtube.com/watch?v=cAdd-rjvEfA
Roofing pie structure for metal tiles, including waterproofing
Covering a cold attic with metal tiles is the most convenient and easiest way to arrange a roof. In this case, the roofing pie will consist of waterproofing material laid on the rafter frame, sheathing and roofing (metal tiles). Actually, laying such a coating is very quick. The insulating film is secured with staples or nails, then it is additionally pressed with a counter-lattice screwed with self-tapping screws. The laying of the sheathing slats is carried out taking into account the dimensions of the metal tiles. The lathing board is taken with dimensions of 25-100 mm, and sometimes plywood or particle boards are used if continuous flooring is required.
The film or membrane for waterproofing the attic is laid freely, with some sagging. However, it is worth making sure that the integrity of the coating is not compromised, that is, any holes or cracks are excluded. As a rule, the film can sag by 15-25 mm. In this way, ventilation of the inside of the waterproofing membrane is achieved, and condensed moisture is removed onto the eaves strip and further into the drain. Neglecting such a simple rule will ultimately provoke premature deformation of the roof frame and the entire roof.
The peculiarity of a metal roof is that cold roofing film is not able to reduce the noise level that occurs when intense rain falls on the metal. Therefore, residential premises with such roofing are provided with a layer of thermal insulation that absorbs strong noise. Without such a layer, only non-residential attic spaces are usually equipped.
So, a cold roof will include the following layers:
- A vapor barrier for a cold roof is laid from inside the room, which only releases moisture to the outside and prevents it from penetrating into the living rooms.
- Next, install the rafter frame for the roof.
- The next layer is a waterproofing material. The film is laid with sagging to drain condensate.
- Next, a counter-lattice is attached, which presses the waterproofing, securing it, and provides ventilation gaps.
- Then the sheathing is stuffed to secure the roofing. It is made from slats 50x50 mm and laid along the slopes with an indentation of 35-45 cm. Based on the type of roofing and the slope of the slopes, the pitch of the sheathing and the thickness of the board for it may vary.
- The last thing to do is lay the metal tiles.
What is the point of insulating ventilation?
Actually, the insulation itself is necessary to prevent the conditions for the occurrence of the so-called dew point. According to the construction standard SP-50.1333-2012, this term refers to the temperature at which water vapor contained in the air precipitates in the form of water on surrounding objects, that is, condenses. Naturally, the dew point directly depends on air humidity; the higher it is, the closer the dew point is to the ambient temperature.
Table for determining dew point.
Let's start with the fact that on an unprotected pipe in the attic floor, condensation can fall out both from the inside and from above the air duct. This moisture is dangerous in its own way in both cases. So the water constantly flowing down the pipe will naturally be absorbed into the ceiling
And here it doesn’t matter whether it’s concrete, wood or any other material, sooner or later it will begin to collapse. Add to this the unpleasant stains around the pipe on the ceiling of the top floor; More than half of the ventilation ducts and pipes are now made of galvanized iron
Zinc coating is a good thing, but if it is damaged, which is inevitable when cutting and installing, the thin iron sheet will begin to rust and it will take a little time for holes to appear on the pipe, no more than 2 - 3 years;
Cutting mats made of cotton insulation.
- In addition to domestic ventilation, in houses with 2 floors and above, fan ventilation for the sewer system is installed. To put it simply, this is a continuation of the sewer riser leading to the roof. So, with the extreme humidity that exists in the sewer, the attic sector of such a pipe with a diameter of 100 mm freezes tightly already at a temperature of -5ºC or -7ºC within a week. And this already entails problems with the operation of the sewerage system;
- In addition to its direct function, insulation for ventilation pipes is a good sound insulator. Having installed such a system, you will not have to listen to the howling of the wind in your pipes;
- But a rotten ceiling, a damaged ceiling, constant wind chimes, an unpleasant smell from the sink and a sewage system frozen in winter are just minor problems; the appearance of mold and mildew inside a household ventilation system is much more dangerous. The fact is that such “vegetation” spreads by aerosol; in other words, mold spores are carried by air currents. Naturally, once they get into the ventilation system, they will regularly irrigate the entire house, and the people living in the house will constantly breathe in all this bouquet. The consequences can be very different, from mild malaise to chronic headaches and allergies.
Wrapping a glass wool cocoon with a waterproofing cloth.
Now weigh the pros and cons and decide for yourself whether you need to insulate the ventilation pipes in your home. I think the answer is obvious and further we will dwell in detail on common materials and methods of their installation.
Financial expenses
Insulation of the under-roof space requires additional construction and insulation materials and labor costs, which increases the budget for building a house. If you are limited in funds or do not plan to equip the attic space as a living space, then such expenses are unlikely to pay off in the future. In addition, ensuring the functionality and quality of such an attic requires its maintenance and timely repairs.
Shell for thermal insulation
The shell can be monolithic (in this case it is strung on a pipe) or prefabricated. The last option is used for ready-made operating systems. The shell can help out in places where the pipe runs through the wall. When winding roll insulation in such cases, difficulty may arise. Quite good results can be achieved in outdoor open areas. However, those points where the air duct turns cannot be covered with a cylinder. In such conditions, it is recommended to use insulating mats.
The shell can be made of:
- Foam plastic.
- Mineral wool.
- Extruded polystyrene foam.
- Polyethylene.
- Rubber.
During operation, a lot of noise occurs in the supply and exhaust air ducts. As the cross-section of the pipe increases, the throughput becomes higher, but the resistance also increases. Internal finishing allows you to make the surface as smooth as possible, which slows down the air flow less.