[contents]
A foam block is a block measuring 0.6 x 0.2 m, made of foam concrete.
Advantages of building with foam blocks
- It is cheaper to build a house from foam concrete than wood or brick, and if you build it yourself, the savings will increase several times. Having a low cost, houses made of this material have most of the characteristics that houses made of brick and wood have.
- They are environmentally friendly, as they do not contain chemicals that negatively affect human health, and have excellent sound insulation.
- The surface of the foam block is easy to process and significant effort is not required to process the walls.
- Also, due to its porosity, it allows air to pass through. Therefore, there will be practically no high humidity in the house.
- The simplicity and speed of construction from foam concrete is due to its large size and the fact that instead of cement-sand mortar, a special adhesive composition can be used.
- Foam blocks are fire-resistant, they will not burst or crack at high temperatures, unlike concrete, therefore they will be able to protect the reinforcement from heating for a long time.
Materials for home finishing
Since foam concrete cannot boast of a presentable appearance, it is subjected to additional finishing.
Various materials are suitable for finishing activities, including:
- Lining, siding or decorative panels. This promotes good ventilation of the façade and prevents moisture accumulation.
- Facing brick, artificial imitation stone or porcelain stoneware. They transform the design of the building and also prevent the problem of air stagnation.
- Mineral grout or thin varieties of plaster. They provide a strict but cozy design.
Interior work is carried out using decorative panels of plasterboard, wood or plastic, plaster and silicate paints. The use of wallpaper is also practiced.
Instructions. How to build a house from foam concrete with your own hands?
You can see the foundation diagram in the photo
Foundation
Foam blocks weigh less than brick, so there is no need to make a strong foundation. We are not saying that you can save money on the foundation; it just won’t require huge expenses.
The best option for such a house is a strip foundation:
- We calculate the width and depth of the formwork system. The width is equal to the cross section of the future structure, and the depth depends on the local climate and the degree of soil freezing.
- We dig a trench about 2 m deep. We lay sand at the bottom, moisten it with water and compact it well. To give the foundation the correct shape, we install the formwork and secure the strips of roofing felt. We install a belt of reinforcement along the entire length of the trench for fastening.
- Now we fill the foundation with a solution consisting of 5 parts of crushed stone, 3 parts of sand and 1 part of cement and gradually build it up, periodically compacting it.
- The foundation must stand and “mature” within a month. At this time, cover it from sunlight and periodically moisten it with water.
- Next, we roll out roofing material on the concrete structure to prevent moisture from entering.
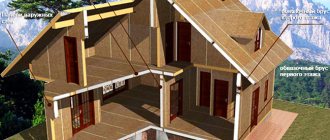
Wall masonry
See photo for wall laying diagram
- We start laying the blocks in the corners, from the highest corner of the house.
- Having pulled the cord over the corners, we begin laying the first row. Joining large sizes between blocks reduces heat conservation and sound insulation to a minimum, therefore, if a block does not fit to complete a row, we saw it, apply glue and install it in the resulting gap.
- We lay foam blocks, strictly observing the correct levels horizontally and vertically. We immediately clean out any uneven surfaces and remove dust.
- We lay the reinforcement along the entire perimeter of the masonry in a specially cut groove filled with glue. During laying, we comply with all building codes and reinforce the places for door and window openings using fiberglass weaves. Upon completion of the masonry, we make a reinforcement belt of concrete along the top of the walls for the subsequent installation of the roof.
- Externally we insulate with glass wool 50 mm wide. We fix wind and waterproof material on top.
Overlap
We design the floor according to a well-known scheme, which gives an idea of how the load on the beam, the dimensions of the span and the sections of the beams interact. You can use boards connected with screws and treated with an antiseptic.
First we lay the end beams, then the rest. We attach a metal sheathing over the beams and apply a mesh of fiberglass and mineral insulation.
Roofing and slate covering
We build a rigid structure using timber sheathing and supplementing it with trusses.
- We fasten the boards at an angle of 90 degrees to the rafter legs. We cut off the corners of slate sheets so that there is no layering at the joints.
- We make holes in the slate, the diameter of which should be larger than the diameter of the nail.
- We fasten the slate with nails, nailing it from the bottom row into pre-prepared holes.
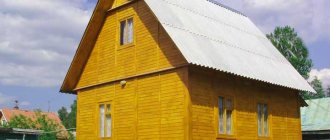
Finishing a house from foam blocks
When construction is completed, it must be completed with finishing, both from the outside and from the inside. Drywall, boards, plaster and much more are suitable for finishing the inside of a house.
For exterior finishing, siding, plaster followed by painting, or facing brick are suitable.
Video
In this video you can learn about the technology of cladding a house from foam concrete blocks.
What kind of foundation is required?
The main part of the costs when building a house falls on the arrangement of the foundation. This structure is subject to a large load from load-bearing walls, so it must be as strong and reliable as possible. In the case of foam concrete, this impact is minimized because the material is lightweight.
For such houses, the following types of foundations are used:
- On slabs.
- On the tape.
- On stilts.
- Combined - pile-grillage.
To choose the best option, you need to consider the following nuances:
- Soil density
. On motionless soils, it is customary to install a strip or pile-grillage foundation. If the groundwater level is high or in swampy conditions, it is better to choose a slab or pile option.
- Soil freezing depth
. If the foundation is placed above this point, under the influence of heaving, the foundation will begin to be squeezed out and deformed. This will lead to distortion of the building and damage to wall structures.
- Availability of basement
. If you plan to build basements, it is better to use a buried tape.
- Project implementation timeframe
. Pile-grillage and pile foundations are laid as quickly as possible, but in some conditions they are prohibited.
Based on all the factors, you can find the optimal solution for each case.
We calculate the cost of construction
To make the calculation, let’s take a one-story house measuring 10 by 10 m, 3 m high, and calculate the cost of the walls.
- First, let's calculate the perimeter of the walls: 10 + 10 + 9.40 + 9.40 = 38.8 m (rounded to 39 m). The total length along the perimeter is 39 m.
- Then we calculate the area of the walls: 39 x 3 = 117 square meters. m. Next, from this number we subtract the area of window and door openings. For example, it is equal to 15 square meters. m. 105 - 15 = 90 sq. m. We calculated the net area of the walls without window and door openings.
- Let's find out how many foam blocks we need per square meter. We calculate the area of one foam block: 0.6 x 0.2 = 0.12 sq. m. That is, for 1 sq. m of wall we will need: 1 / 0.12 = 8.3 foam blocks.
- Now let's determine how many blocks will be needed to build the external walls of the house: 90 x 8.3 = 747 blocks.
- Using the same formula, we determine the number of blocks required for the main wall: its length is 9.40, height is 3 m. 9.40 x 3 = 28.2 sq. m. - area of the main wall. Subtract the area of the doors, let it be 6 square meters. m = 22.2 sq. m. round to 23. 23 x 8.3 = 190.9 pieces.
- Now we add the number of blocks required for the construction of the external and main walls: 747 + 191 = 938 pieces. Thus, it turns out that to build our house 10 x 10 m, we will need 938 foam blocks.
- The approximate price of foam blocks is about three thousand rubles per 1 cubic meter. m. In 1 cubic. m. - 27.7 pieces. So 938 is about 34 cc. meters. Now 34 x 3 thousand = 102 thousand rubles. Thus, 102 thousand rubles. necessary to invest to build the walls of our house.
Not very expensive, right?
Houses made from foam blocks are inexpensive houses, at the same time warm, reliable and stable. We also recommend considering houses made of gas silicate blocks; they have a number of advantages.
You can live in it as comfortably as in a house built of brick. Such a house will withstand any weather surprises and ensure your comfortable stay in it.
Structure and features of foam concrete
A foam block is a parallelepiped of one of the fixed sizes. With a standard block length of 600 mm, the width and height may vary :
- 300 by 250 mm;
- 300 by 100 mm;
- 400 by 250 mm;
- 400 by 200 mm.
When building a house, it is recommended to use foam blocks of the required thickness at once, and not to build walls of two or more pieces.
Foam concrete and foam blocks also have brands (usually the following values appear on the packaging after the letter D):
- 100-300 – for internal thin partitions;
- 400-600 – if you require thermal insulation properties (they are not suitable for a load-bearing wall!);
- 600-900 – for the external walls (load-bearing) of houses they are suitable, structural foam blocks;
- 900-1600 – structural reinforced, ideal for load-bearing walls, but are significantly more expensive compared to the previous category.
Masonry from foam blocks Source pinterest.com
Foam blocks are used to create the following structures :
- Non-reinforced and reinforced partitions;
- Building blocks;
- Thermal insulation works;
- Filling voids;
- Roofs and fences.
The quality of the cement mortar is determined simply - just rub the finished block. It's even better to take a piece of block and try to grind it; poor quality material will crumble into dust. The color should be uniform, without inclusions or sharp transitions.
See also: Catalog of companies that specialize in the construction of turnkey country houses from foam concrete blocks.
Calculation example
Let's say the perimeter of the building is 6x6 m, height 6 m, wall thickness 0.4 m, grade D600 = 24 m.p.x6x0.4x600 = 34560 kgf. Weight is calculated as the density of foam concrete multiplied by the volume of the walls.
The roof area is calculated as follows: double the length of the slope, multiplied by the length of the cornice, is equal to 6/2, then 3/cos45 = 4.29 m. Thus. roof area = 2x4.29=8.58x12
103 m2, the weight of 1 m2 of material is approximately 40-80 kg. The weight of the roof with snow is 103x70 = 7210 kg. The weight of the roof will be equal to: 4124+7210+900+1500=13730 kg.
The weight of the interior decoration, furniture, and people is added to the mass of the walls and roof: that’s another 34,000 kg.
We get S= 1.2x(34000+13730+34560)/1.2x600 =137.15 kg/m.
Many people believe that the foundation for a foam block house should be lighter than for a brick building. But the calculation of the foundation will necessarily take into account the influence of all external factors affecting the structure.
There are builders who believe that it is better to build the foundation for a foam block house from foam blocks or foam concrete. To do this, it is necessary to compact the sand until the road surface is hard. After this, reinforcement is installed and foam concrete is poured.
Preparing a foundation pit and load-bearing cushion for a two-story house.
Strip foundation depth for the house.
Preparing a pit for a two-story building.
Having developed a foundation pit, the bottom is measured using a level and the edge and area are cleared of crumbling soil. Then markings are made for the load-bearing concrete pad. The width of such concrete preparation is 100−1200 mm, with a thickness of 150−250 mm. It can be used to mount both a monolithic foundation and a block one. The formwork is prepared according to the diagram, installed around the perimeter, using reinforcement as stops, simply driving them into the ground.
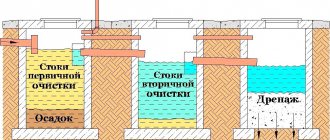
Reinforcement is done in one tier, with class A 1-3 reinforcement. The mesh cell has a size of 200×200 mm, the joints are knitted with wire. The laying depth of the load-bearing belt is at least 1.8−2.2 meters for medium heaving soils of type 2. What is important when laying is to make a cushion of crushed stone under the base. The thickness of the pillow for a two-story house must be at least 120 mm. Crushed stone is laid on compacted soil. Then water drainage measures are installed or waterproofing material is laid. If construction is frozen for the winter, a pit is dug at the lowest point of the pit to collect water. The size of the sump (storm pit) must be at least 6 cubic meters.
Second block level: residual alignment
For the second layer, masonry mortar can no longer be used. If any errors remain, or the solution has settled too much in some place, use an adhesive solution.
If you are sure that everything is smooth, you can use foam. Sometimes the entire second layer is laid on foam, except for 1-3 blocks that unexpectedly fall into the masonry mortar.
Correct application of the solution: create an air layer inside that retains heat
Foam, as we wrote above, is very easy to work with. Before applying it, the block is moistened with water, for which a wide brush is useful.
The foam is pressed under pressure in two parallel strips onto the bottom block and onto the side wall.
It holds the building material securely and dries very quickly. Try not to get yourself dirty, as it is extremely difficult to remove foam from clothes or hair.
Just remember the rule: each laid block must be checked by level from above and from the side.
First level: special attention to markings
In order for the first layer of blocks to lie flat, you need to work “under the rope”. Since the blocks should overhang the foundation slightly from the outside, the rope is stretched along the outer edge of the house.
It should run exactly along the edge of the block. Use a laser level to determine the height of the rope. This is especially important if the foundation has some skew.
Since the blocks can only be raised to the highest point, we use more masonry mortar where the level is lower.
Laying the second level of foam block with glue
After placing cement mortar on the foundation waterproofing, we install the first block and check it with a short level. If there is a misalignment, use a rubber hammer until the block lies flat.
Once we have achieved perfect evenness, we lay the second block, gluing both blocks with adhesive solution to each other. We again check the evenness with a level along the top surface and along the side wall of the future house.
It’s better not to rush and lay out the first layer perfectly evenly, because the errors will add up, resulting in a general warp of the wall.
Pile installation technology
After marking the construction site, pile elements are placed in the corners, under load-bearing walls in increments of 1.5-2 meters.
After marking the construction site, pile elements are placed in the corners, under load-bearing walls in increments of 1.5-2 meters. A properly installed pile-screw foundation can withstand a load of up to 25 tons per element. But installation is not difficult, and we can do it with our own hands:
- The head of the finished element is equipped with a metal heel firmly welded to the rod. The nickel has holes for attaching equipment, where the gate is secured;
- Rotation of the gate deepens the pile into the ground, and during the screwing process, soil compaction occurs;
- The foundation requires the installation of a metal frame structure, attached to the pile heads by welding. This is a lattice base, made either from rods or from channel scraps.
Before starting tying, it is worth checking the level of the piles above the ground - an indicator of 15 cm is considered the norm. If the landscape has slopes, the height of the piles will vary. In places where load-bearing wall panels are supposed to be installed, a profile is placed, the width of the shelf of which is identical to the width of the block element.
Construction and concreting of bored piles
The arrangement of the basement also requires attention. Piles are constantly exposed to aggressive environments, so all elements need to be protected
It is especially important to prevent deformation of the structure in the cold season, otherwise damage to the frame will increase the risk of destruction of the structure
Facing piles does not take much time: the house is covered around the perimeter with panel sheets, then insulated with any available material and waterproofed with film
The entire structure can be covered with siding, but it is important to leave small expansion joints between the fence and the bottom of the house; they will protect the structure from temperature deformations