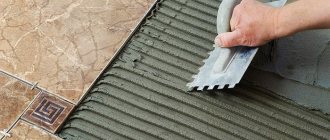
Cutting tiles with a grinder
Sometimes there are cases when you need to cut a narrow strip of tiles 0.5–2 cm, and a regular tile cutter will not take it because its legs are too wide.
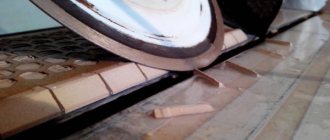
In such cases, you need to draw a cut line with a pencil and make a cut with a grinder and a diamond blade. But if you try to cut it off at one time, the narrow strip will break off in parts. Therefore, you need to smoothly and without pressure go over the markings with a grinder to make a cut about 2 mm deep. You need to walk the disk along the line, and not directly along it, then the width of the already narrow strip will not decrease.
Using the same method, passing along the same seam several times, you will cut a narrow strip. The second and subsequent times you can drive the grinder faster, but try to press it to the opposite side, then there will be no chips.
It is better to do this work in weight, so the vibration will go into your hands. When you see that the strip will soon fall, it is advisable to place something soft so that it does not break.
Cutting tiles with a grinder using a special diamond-coated tile disc
Be sure to wear glasses when working with an angle grinder.
How to choose the right disc for tiles
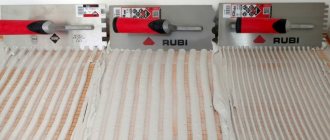
For cutting, metal discs with diamond coating on its edges are used. But they are different: for concrete, brick, stone. Tile disks do not have any holes, the soldering on them is uniform and smooth. Concrete discs have slots on the solder and will create chips when vibrating. If you cut ceramic tiles with it, these chips can fly into your face.
We make a cut at 45 degrees
Ceramic pencil skirting is best for protecting sharp outer corners of tiles
To beautifully join external corners, many craftsmen file the edges at 45 degrees so as not to use ceramic corners. But in dangerous places where it is possible to slip, it is still better to use so-called pencil curbs, although some consider them a “collective farm”.
If you use a professional electric tile cutter, then the inclined platform there makes it easy to make a 45-degree angle on the tile bevel, but not everyone has such a tool. You can easily make such an angle yourself using the same grinder “by eye”. The disc is drawn along the cut line, and it should be slightly inclined inward.
Method of joining platbands without trimming
Today, platbands are often not cut at an angle and then joined together, but the joints are made at right angles. This method of connecting platbands does not require any special trimming, which is very convenient. In addition, this method looks more modern and attractive.
Cutting at an angle using a miter box
If you still need to cut this or that part at an angle, then you should stock up on a miter box - a simple device that looks like a small box. The miter box has slots that are designed for a saw or a long sharp knife. Of course, these slots are made to form a smooth and precise 45 degree angle.
However, a miter box can have many slots at once, at different angles. This is convenient because with the help of one device you can trim any parts at different angles.
There are adjustable miter boxes on sale. The slots in such a miter box can be adjusted, which allows the master to set exactly the angle that is required at the moment. In particular, it is quite simple to move the slits of such a miter box to a position of 45 degrees.
Now you can trim the workpiece simply. A baguette, platband or plinth is placed in the miter box, after which a saw is inserted into the slots and the excess is simply cut off. The angle ends up being perfect, exactly 45 degrees.
What to do if there is no miter box? Very simple. You need to make a template according to which it will not be difficult to transfer the necessary markings to the workpieces. As a template, you can choose thick cardboard or anything else that will be appropriate in this case.
Using Templates
If you don’t have a protractor, miter box or ready-made corner elements, you’ll have to look for a suitable template. Of course, the template must have the desired angle. It is applied to the workpiece and the workpiece is marked with a pencil. This is one of the easiest ways to achieve the desired result.
DIY miter box for cutting pipes
Using a template is not very convenient - you have to make the cut along the mowing line, holding the grinder suspended, which leads to large errors. If you have a welding machine, you can make a simple miter box - guides for the grinder disk, preventing it from moving to the side.
To do this, use a previously made template, drill a hole in the side of which and weld a nut. When working, a homemade miter box is placed on the profile, a bolt is screwed into its nut and the device is pressed against the profile surface. A grinder with a metal disc is used to make a cut, lightly pressing the disc against the side surface of the device. It is clear that with prolonged use, the edges in the miter box are gradually ground down, and although the process occurs simultaneously on all edges, some errors will appear over time. Therefore, it is better to make the device from hard, wear-resistant metal in order to increase its service life and obtain a more accurate instrument.
Why is it better not to use a 45° bevel on external corners?
Why don’t we make a 45° bevel on the outer corners, but install profiles on them? This question may arise for many masters. For some reason, the use of all kinds of profiles is considered a low indicator in the work of a master. In this case, as you can see, we have a glass frieze installed around the entire perimeter of the room. Unlike the main tile, it has a pattern on the opposite side, onto which glue is applied. If we were to make a 45° bevel of the entire tile and these friezes, we would get this abutment angle:
Then this whiteness cannot be restored by anything - no paints, no grouts - to its original color. Therefore, the technically correct thing here is not to make any overlaps, but to install stainless steel profiles. They give the room a more attractive look.
In conclusion, we can say: always have your professional technical approach in any matter without any prejudices.
Some tips for cutting pipes
Sometimes households need to cut to connect a pipeline at different angles or along an axis. The main tool for performing these works is a universal grinder and metal discs.
Sources:
https://laminatepol.ru/21523-rezku-plitki-pod-45-gradusov.html https://dekoriko.ru/remont/instrumenty/chem-zapilit-plitki-pod-45-gradusov/ https://montagtrub .ru/kak-otrezat-trubu-pod-45-gradusov-s-tochnostyu/
How to correctly form an acute angle?
The next step after the process of cutting the tiles to a certain degree is its proper use, as well as the organization of a right angle. To do this, the following points must be observed:
- Using a special building level, you need to glue the first part of the tile evenly. Its trimmed edge should protrude slightly beyond the base of the right angle;
- the second tile should be glued in the same way opposite, the period of fixation of the glue allows you to move and adjust the touching tiles to achieve tight contact.
Before you start facing the corner, you should check the consistency of the vertical wall. Even with the lowest elevation changes, the angle at the top may not converge and may not turn out smooth. It will be impossible to disguise or repair this flaw in the future.
The scope of use of tiles cut at an angle of forty-five degrees has certain limitations. As a result of the clay being cut from the back, the narrowed edges of the tiles become thin and fragile, so they can easily break off.
Waterjet cutting of tiles
Taking advantage of the variety of colors and textures, craftsmen use the most advantageous combinations that make the interior unique and truly exclusive. But sometimes choosing just a combination is not enough
When the need arises to emphasize the importance of a place or the status of its owner, the conversation turns to various panels, zones, borders, and decoration of facades
Waterjet cutting of ceramic tiles is a reliable assistant for the modern designer, allowing him to implement the most ambitious, exclusive design projects. Hydrocutting of tiles allows you to process materials of various thicknesses and dimensions, and to combine seemingly incompatible materials (inserts made of metal, stone, glass) into a single product.
Porcelain tiles are highly durable, and special technologies have been developed for cutting them. The most advanced of them was waterjet cutting of porcelain stoneware, being universal (curvilinear cutting, straight cutting while maintaining high precision), it has firmly established itself in the Russian market and is successfully used in various industries. Hydrocutting of porcelain stoneware and ceramic tiles allows you to cut materials of various thicknesses and densities, and produce parts of various shapes with any radius of curvature. Thanks to the minimum cutting width (about 1 mm) and the minimum load on the material, the most rational use of the amount of material is achieved (no breakages, chips, or overheating). In addition, cutting porcelain tiles with waterjet has a high accuracy of 0.1 millimeters, and products made using this method do not require additional processing - the edges of porcelain tiles are polished with abrasive particles, the cut is smooth and even, allowing to significantly reduce production time and optimize the cost of the finished product.
Silicone seam
Making this connection is the most technically correct, and many grout manufacturers recommend making the connection this way.
Many customers like it because regular cement grout has a matte effect, while silicone grout has a glossy effect. This corner formation is carried out after all the grouting has been completed.
Using the basic grout mixture
The simplest, but no less labor-intensive way to form an internal junction is to use the main grout mixture.
Let’s say from experience: if you do not have permanent walls, but, say, made of APA plasterboard panels, then this method of formation will not suit you, since you may subsequently get a crack in this seam. In this case, the previous method is better for you. Let's also add that we prefer the rounded shape of the junction. To do this, we perform this grouting in several stages. First, we fill the space between the tiles, and only then we directly form a rounded shape. And, unlike the two previous methods, here we first grout the corners, and only then do the rest of the grouting on the walls.
How to cut skirting boards at inner corners: step-by-step action plan
Begin installing the skirting boards in one of the corners. If this is your first experience, choose the part of the room in which something will stand. Not always, of course, the first pancake is lumpy, but still it’s better to play it safe. To make corner on the baseboard, work slowly. One was sawed off, checked, adjusted. Let's move on to the next one. It is better to fasten after two adjacent corners have been assembled. But you shouldn’t delay the assembly too much either.
Trimming skirting boards in corners requires certain skills. But by making a few joints yourself, you can beautifully design complex angles
How to use a miter box to cut baseboards? Place the device in front of you, preferably on a table, but it can also be on the floor. It doesn’t matter which way you turn it, it’s symmetrical. Insert the bar into the profile and turn it so that it will stand against the wall. When cutting down a floor plinth in a miter box, the “wall” is the wall that is farthest from you. Once again: firmly press the baseboard strip against the back wall in the position in which it will be installed. Insert a hacksaw into the required slots. You can start sawing.
How to tile a corner with embedded tiles?
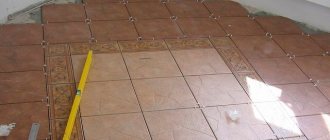
We level the first tile.
Then immediately set the second half of the corner. While the glue under the first tile is still fresh, you can move it a little and form a nice angle.
We move up, in each row we immediately form the entire corner (we place two tiles at once). There is no need to lay out all the tiles on one side of the corner to the ceiling, and then start the second - this is not correct.
It is important that the plane of the corner that will be lined has a clear vertical level, otherwise the corner will begin to converge or, conversely, diverge. In general, it will turn out ugly
You can find out how to cut mosaics at 45° using a tile cutter here.
How to cut a mosaic at 45° with a grinder (video) - here.
Cutting tiles at a 45 degree angle.
Decorating a tiled corner without using a plastic corner has recently been gaining popularity. We can name several probable reasons for this phenomenon: • Because it is new and still rare. “Not like everyone else” is often the main argument. • The absence of unnecessary elements in the design has always been and will be the best solution. This is the law of harmony.
• There is no need to match the color of the corner to the color of the tile.
Sawing tiles at 45 degrees at a corner.
How and with what to make a 45 degree cut at the end of the tile?
The best option is to obtain a cut on the tile using a cutting machine, where it is possible to turn the cutting wheel at an angle to the tile being cut. The machine can be with or without water supply to the cutting zone. This does not affect the quality of the wash. Wet cutting provides more comfortable working conditions - less dust. With any option, the quality of the bevel is acceptable and you can quickly cut a large volume of tiles.
I cut the tiles at 45 degrees on a machine.
The only difficulty arises when cutting concave tiles. This is not a defect - the tiles have this shape. The machine cannot repeat the deflection when filing:
Therefore, the cut part should not reach the front edge of the tile - where the enamel begins. Chips appear. Especially on porcelain tiles. It is better to finish this area manually. This can be done with a grinding wheel on a turbine. It's faster and easier. But not always better quality. The grinding wheel can select stronger or weaker in certain places.
I washed down the sanding with a grinder.
A more even plane is obtained manually, from longitudinal movements along the tile with a block covered with sandpaper. Longitudinal movements scrape off the protrusions, making a bevel in one plane. Another trick. The bevel on the tiles must be made at a sharper angle (less than 45 degrees). Nothing changes visually, but the ease of cladding is significant. This method is not suitable for ceramic plinths, where the joining of the ends of two tiles is visible from above.
Joining ceramic plinths at 45 degrees.
It is better to make the cut on the painted end of the tile (for many tiles, one end out of 4 is half or completely covered with enamel). In this case, you can not bring the bevel at 45 degrees to the very edge, but leave a one-millimeter strip at the end. The end of the tile on coal is obtained without chipping and is less vulnerable to impacts
This often occurs because the tile has a slightly convex surface in the middle, and when cut at an angle, the circle catches the front enamel on the ends of the tile.
White stripes appeared when cutting the end of the tile at 45 degrees.
In the case of light grout, the unpainted tip of the tile is less noticeable.
Disadvantages of a 45 degree corner on a tile:
• The corner becomes more vulnerable to impacts. Especially if it is on the aisle. It is enough to hook the slope with an empty metal bucket so that a piece of the ground corner on the tile flies off. • The labor intensity of the work increases, and hence the price.
You can hook such a corner with anything, even a harmless trouser belt buckle:
Experts' opinion about cutting tiles at a 45-degree angle.
You can also prepare a 45 angle on the tiles using a grinder. A lot of dust. Not the same quality. But it's real. The main thing is cheap and always possible.
Cutting the stone at an angle of 45 degrees is the only way to get out of this situation.
The angle on the decorative stone is 45 degrees.
Generalization
Recently, when tiling walls with tiles, many people refuse to use plastic corners. Refusal sounds different every time. Some people are unable to match the color of the plastic ceiling to the color of the ceramic tiles, others prefer to use as few additional elements as possible in the decoration, while others simply like to experiment and try something new.
The very idea of cutting the tiles at an angle of 45 degrees and joining the tiles at a right angle is not new. It was often used by builders when cladding façade ceremonial elements with marble. Now a similar technique has begun to be used when designing niches and boxes behind which utility lines are hidden. It allows you to get a rather interesting solution
But when using it, it is important to know that the corner on the tile, sharpened at an angle of 45 degrees, has its technical disadvantages
Firstly, the corner becomes fragile, it is vulnerable, any strong blow can destroy the tiled lining. Therefore, this technique cannot be used when finishing surfaces located in the passage plane. It is enough to hook a corner with a metal bucket, and it will crack and crumble, or become covered with chips.
Secondly, such a finishing option significantly increases the labor intensity of the work, which means the final cost of repairs will increase significantly. Forming a right angle using cutting requires the use of professional construction equipment. Therefore, if you want to experiment on your own in the direction described, you need to think carefully and weigh the pros and cons.
How to trim (saw) wavy tiles at an angle of 45°?
Not everything is as simple as it seems at first glance...
Spanish tiles Ibero, Next Bone collection.
People with spatial thinking will immediately understand that tiles with volumetric (3D) waves on the front cannot be cut at an angle of 45° as easily as regular straight tiles.
The fact is that usually cutting the end of the tile at 45° is performed along the factory edge of the tile and the lower part of the clay is cut off, almost reaching the glaze (0.5-1mm), so as not to chip it.
Whatever angle of inclination of the disk we choose, the cut will always go along the straight edge of the tile.
But (!) wavy tiles do not have a straight glaze edge line along which you can make a cut at an angle of 45°.
Those. it turns out that we will either undercut part of the clay if we are guided by the lower edge of the glaze, or we will cut off part of the glaze if we are guided by its upper edge.
What does this entail? And the fact is that in the first case we will get an ugly (not completely brought together) right angle of two tiles, and in the second case we will get a chipped (chapped) edge of the glaze of the tile, which will also not suit us.
A decision needs to be made. We choose the second option.
We focus on the upper edge of the glaze and partially cut it off from below, so that the two tiles brought together form a clear right angle.
To make it clearer what we are talking about, I will show a cut of the tile on the trim.
So, the tiles were really cut very ugly, despite a good machine, a good disk on it and all our efforts and efforts.
The edge of the tile was torn and chipped.
This cannot be allowed.
What are we doing? We take a sanding attachment on a grinder with Velcro for different sanding wheels and sand the cut edges of the tiles with it.
The grinder must have a speed controller and these speeds must be at a minimum (2000-3000 rpm), otherwise, at high speeds, the sandpaper will not grind, but melt the edge of the tile.
This is what we got.
Very, very not bad, considering that this is not a factory edge of the tile.
Then everything is as always - glue the tiles into place and get a right angle from the tiles without using any corners.
And the same corner after grouting the tiles.
By the way, the situation is the same with the internal corner - you need to make a cut at 45 degrees, only directed in the other direction, otherwise there will be uneven cracks in the corner.
This is the “waste” left from pruning.
And this is what comes out in the corner.
How to avoid chipping
Chips are the most undesirable result when installing tiles. You cannot turn a blind eye to them, as negative consequences are possible:
- the service life of the coating is reduced;
- everything clings to the corners of the jagged edges,
- tiles quickly collapse;
- Surface care becomes more difficult due to sharp edges.
How to cut tiles at 45 degrees without chipping? Recommendations from the experts will help you with this:
- the tile is cut (filed) only from the wrong side, leaving a distance of 0.5-1 mm to the glaze;
- for the grinder, take a new diamond-coated disc;
- work must be done slowly.
- The tiles are laid entirely, the joints (90 degrees) are formed with metal corners.
- The upper part is overlapped - it protrudes forward by the thickness of the facing element. The vertical one is located below.
- Corner ceramic parts are used, which are a single fragment.
Modern design projects require a variety of skills from craftsmen, including tile processing. To work with tiles, you often have to cut them at 45 degrees. Thanks to this technique, it is possible to line various protrusions and niches, corners between the wall and the floor with such material. Also, cutting at an angle is needed when you want to create an unusual masonry. Let's take a closer look at how this is done correctly, as well as what tools are used to carry out all the work.
Using a sander
Few people know how to make a corner with tiles with high quality and in a fairly short time, with the lowest financial costs. The most successful option for creating a 45-degree angle on a tile is to use an angle grinder equipped with a diamond blade. The disc is designed for dry cutting. You should work with such tools carefully and with caution so that subsequent laying of tiles in the corners is successful.
If you don’t have the skill to create a 45-degree cut, it’s best to practice first, that is, take unnecessary tile elements and experiment on it. Cutting tiles at an angle is a very labor-intensive process that requires skills and abilities. Trial options will allow you to carry out work more accurately and efficiently, that is, to properly train your hand.
Trimming (bevelling) tiles at 45 degrees |
In order to beautifully veneer an outer right corner, the end of the tile is sawed at an angle of 45 degrees and a right angle is formed from two such tiles.
This method eliminates the need to use overhead plastic or aluminum corners.
Such angles look much more impressive and neat.
How can I set the tiles at 45 degrees?
Everywhere this action has different names - notching, burring, trimming, cutting a corner at 45° or the Kremlin angle. The meaning is the same everywhere - the end of the tile is ground down and a right angle is formed from two tiles.
In order to do this beautifully and efficiently, you will need an electric tile cutter with the ability to tilt the cutting part at an angle of 45°. Or, as a last resort, a grinder with a diamond blade.
Electric tile cutter
For these purposes, we use well-proven Chinese water-cooled tile cutters Feida TC 200 or Feida TC 250.
Its platform rotates at an angle of up to 45° (even a little more) and allows you to cut the end of the tile beautifully and evenly.
Grinder (angle grinder)
If you don’t have an electric tile cutter, you can use an angle grinder (angle grinder) or simply a grinder with a diamond blade for ceramics/porcelain tiles/stone.
It is much more difficult to achieve a high-quality result with this tool, although many masters work this way.
You have to somehow fix the tile or hold it in your hands and gradually cut the corner with a grinder, which is not always possible to do smoothly - the human factor here has a much greater influence than when using a machine.
To level the cut, you can use sanding attachments - sanding wheels with Velcro or a “turtle”.
When working with such attachments, be sure to use an angle grinder with adjustable speed. The angle grinder must be powerful enough, because it needs to work at the lowest speeds. At high speeds, the ceramics will not be polished, but will simply burn (melt) - this will not improve the appearance in any way.
How to properly cut a 45 degree corner of a tile?
The most important condition for obtaining a beautiful corner from a tile is to not reach the glaze a little, 0.5-1mm when fitting.
Only the clay should be cut off, not the outer glaze.
Otherwise, when cutting the glaze, the edge of the tile will never be smooth, but will be “ragged” and jagged.
If you need to cut the tiles at 45 degrees not from the factory edge, but somewhere in the middle, then this can also be done quite beautifully.
The main secret is that you cannot immediately cut the tiles at an angle. First, the tiles are cut directly to the required size, and only then they are cut at 45 degrees.
It is very advisable to walk along the cut edge with sandpaper or the same “turtle”, then the result will be much better.
This is what we did when forming a corner from wavy tiles.
How to tile a corner with embedded tiles?
We level the first tile.
Then immediately set the second half of the corner. While the glue under the first tile is still fresh, you can move it a little and form a nice angle.
We move up, in each row we immediately form the entire corner (we place two tiles at once). There is no need to lay out all the tiles on one side of the corner to the ceiling, and then start the second - this is not correct.
You can find out how to cut mosaics at 45° using a tile cutter here.
How to cut a mosaic at 45° with a grinder (video) - here.
tools, cutting tiles at 45 degrees, cutting tiles, laying tiles, forming a corner from tiles,
Features of mosaic cutting
In modern interior design, mosaic coverings are often used. It is used for cladding columns, bathtubs, and boxes; it allows you to finish in an original style and create entire pictures. For convenience, ready-made modules from 30x30 cm, consisting of small elements, are produced. When performing trimming, the main task is to securely fix small fragments.
The cutting on the machine is carried out as follows:
- The mosaic module is placed between two sheets of plywood about 1 cm thick, face down. In this case, you should step back 1-2 cm from the edge of the tile.
- The entire structure is fastened with self-tapping screws in 3-4 places, depending on the size of the module.
- The workpiece is placed on the working surface of an electric tile cutter. The cutting disc is set at an angle of 45 degrees and all fragments are cut evenly.
- The final cutting is done using a grinder with a diamond blade.
- If necessary, the surface is additionally treated with sandpaper.
- Masking tape is glued to the front side of the mosaic module: 2 overlapping strips. The distance from the edge is 1-2 cm. This ensures sufficient fixation of small fragments.
- The cutting is done using an electric tile cutter from the back side of the tile. The module is placed on a solid base, for example, on a large format tile.
- To obtain a more uniform and smooth cut, use a grinder.
- The final finishing is carried out using a device made of a wooden block and sandpaper.
Embedding a mosaic with a grinder consists of the following steps:
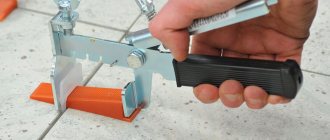
- The ceramic module is placed between two plywood pieces of the same shape and size. The top element is placed at a distance of 1-2 cm from the edge of the mosaic.
- The entire structure is covered with a board from above and securely attached to the table with clamps.
- The cutting is carried out using a grinder with a diamond blade in two steps: first, the entire module is sawed at an angle of 45 degrees. Then the surface of each fragment is more carefully leveled.
- Sandpaper is used to make the cutting area smooth.
Electric tile cutter for cutting
As the name suggests, a tile cutter is a more highly specialized tool, which means that cutting tiles can be done with better quality. Of course, not everyone will buy it for one-time use. If we are talking about a high-quality model with additional functions, then this tool will be quite expensive. In addition, you can achieve really good results with experience, so you will have to spend some time acquiring the necessary skills.
If we are talking about professional finishers, then they should have an electric tile cutter in their arsenal. Cutting tiles with it takes less time, and such a machine leaves less dust.
The tile cutter operates in two modes:
- for straight cutting;
- for cutting at the desired angle.
Using a tile cutter
To learn how to use this tool correctly, you need to follow a certain procedure:
Painting tape is applied to the tile in place of the cut. Mark the desired cutting width on the tile using a pencil and ruler. Place it on the tool platform. Press the tile and carefully push it towards the disc. First you need to cut off the excess, and then grind the corner. You must not allow the glaze to touch, otherwise the edges will look uneven. If, however, the surface decorative layer of the tile has been damaged, then with sufficient skills it can be sanded with emery.
If, however, the surface decorative layer of the tile has been damaged, then with sufficient skills it can be sanded with emery.
How to choose a corner for tiles
Installing decorative plastic corners is much easier. Cutting them is not difficult and you can use the most ordinary tool, for example, a knife or even ordinary scissors. Even a non-professional can select and place a plastic corner, and the length of such a strip will be 250 cm. To be more precise, the canvas is made of polyvinyl chloride.
This is the cheapest and most practical option for the bathroom, because:
- He is not afraid of fungus;
- It is not expensive at all;
- Bacteria do not accumulate or spread on its surface;
- He is not afraid of exposure to chemical bathroom cleaning products.
You can make a corner of absolutely any material and not worry about water getting under it and causing mold to form, since the cladding is carried out as tightly as possible, and all joints are sealed with special compounds. Some people believe that sealing joints using a corner may not be necessary, but it is better to avoid this mistake, as it can cause a lot of problems. Installation will not require much effort and time, and in return you can get a lot of benefits. In particular, increasing the service life of coatings on walls and floors in the bathroom.
The decorative corner under the tiles is quite easy to install
In general, the choice of tiled corner is made in relation to the thickness of the canvases installed in the room. Canvases are available for sale, the thickness of which varies from 6-12 numbers. It is based on such data that the choice of material is made. Experts recommend choosing a corner with a number such that the thickness of the opening in the trim is 1 mm greater than that of the tile. Accordingly, if you are laying tiles with a thickness of 9 mm, then you need to choose trim number 10.
Before gluing the product, you must, of course, purchase it and select it as competently as possible. To be more precise, in order not to purchase excess fabric, you need to accurately calculate the length of the corners that need to be sealed. Be sure to have 1-2 spare trims in stock. Due to the fact that their cost is not too high, the stock will not require significant financial costs. External and external joints must be calculated separately, so as not to mistakenly acquire all the corners of the same type.
Features of working with external and internal corners for tiles
The corner layout of tiles should be carried out only using a corner, which must be smooth, high-quality and specially selected
Before installing tiles in a room, you should pay attention to what type of ceiling will be installed. Depending on this, you can save on tiles, since less of it will be needed, and besides, the corner must be installed clearly to the level of the ceiling covering. Trimming the tiled corner is carried out even before it is installed, especially if we are talking about a metal sheet
Trimming the tiled corner is carried out even before it is installed, especially if we are talking about a metal sheet.
- With various colors;
- Different in length;
- Various types and configurations.
It is especially convenient to use colored products if you plan to lay out colored tiles. To choose the best shade, you should buy a corner with the material right away or just take the tiles with you.
Today, tile trim may differ in appearance and configuration.
As already noted, tiled trim can be external and external, as well as plastic and metal. The choice of such materials is simply huge and there will be no problems with choosing a suitable canvas. However, it is not uncommon for beginners in finishing work to encounter difficulties in purchasing corners. The difference between the products is not too big, but still there.
Metal trim has other advantages and they come in different colors. For example, modern designers consider it very stylish to install corners on tiles with chrome or gold plating. This is how you can not only decorate, but also transform a room.
Tags
materials mosaic diagonal laying of tiles kitchen foam plastic podium for shower stall cutting tiles at 45 degrees trimming tiles reinforcement floor screed concrete waterproofing waterproofing shower cabin bathtub bathroom primer leveling tile replacement grouting tiles soundproofing the floor our services holes in tiles marking tile laying mortar for screed we recommend! laying mosaics laying tiles laying floor tiles bathroom floor screed heated floor thin-layer screed tamping the base cracks in the screed forming a corner from tiles cement prices for services finishing floor screed extruded foam plastic
Miter box for skirting boards
A carpenter's miter box is a device for making cuts at a certain angle. It is used with a hacksaw. In principle, you can make a miter box yourself by assembling a guide from boards and making cuts in the walls. There are various models on sale ranging from 15 to several hundred dollars. They differ in capabilities and materials, although they are all called “miter box”. Professional models are made on the basis of a good hacksaw and have a scale that allows you to set the saw as needed. With such a tool, it is not a problem to set any desired cutting angle in order to correctly cut the plinth for a perfect fit.
Professional carpenter's miter box - a tool with a wide range
The simplest miter box is a plastic U-shaped profile with slots in the walls. These slots are used as a guide for the hacksaw. They do not allow the canvas to deviate. In any version there are two cuts - straight and at 45 degrees. Some may have a couple more options.
How to cut a baseboard at 45 degrees? One way is to use a miter box
Sometimes a hacksaw is included, sometimes not. Usually the ones included are not very good. You can use any hacksaw, selecting a blade for the material you plan to cut. It is important that the canvas moves freely in the slots.
Sources:
https://laminatepol.ru/21523-rezku-plitki-pod-45-gradusov.html https://instabur.ru/plitka-pod-45/ https://ingener-pto.ru/2019/12/12 /kak-pravilno-otrezat-ugol-45-gradusov/
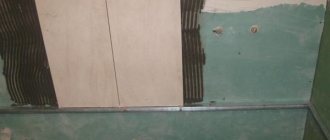
Measuring and cutting tiles
Finishing the second row of wall tiles, I approach the niche in which the heating radiator is located. And here I have to first mark and cut the tiles, and then do the grouting.
I lay the tiles and install spacer crosses, first marking the place where the edge will pass. I will tightly stick adhesive tape onto the future edge to protect the future tile from chipping.
Of course, there is an option to first cut the tiles to width using a tile cutter, but I will immediately cut and process the edges of the tiles with a grinder. I re-apply the tile with the tape already glued and make a mark for cutting, adding the thickness of the tile and the gap for the glue - this way I immediately take into account the thickness of the tile glued to the end of the niche.
Now I will draw a line on the tape along the mark I made earlier.
In this case, the tape protects the tile from chipping the enamel when cutting.
For cutting and subsequent beveling I will use a small grinder
Note the disk that is installed here
This is a disc for stone and concrete, which has notches on the cutting part. There is also a disk with a solid cutting part - there are no notches on it, and it is designed for cutting stone and tiles when cooled with water. This disc is not suitable for cutting tiles with a grinder, but you can try to make a bevel with it.
A lot depends on the quality of manufacturing of these discs. Take the time to look at the options at a hardware store.
Be sure to use safety glasses and gloves when working with an angle grinder.
First, I will cut the tiles with a grinder along the intended line
This operation must be done slowly and be careful not to go beyond the line
This cut is made at right angles to the tile. After removing the excess part, lightly sand the edge.
Magazine "Designer"
How to cut ceiling plinth correctly. Important little things
The measurements required to cut the plinth for the ceiling should be done in a special way. To determine and mark the internal corner, the length should be measured from the corner itself. To mark the outer corner, it is necessary to take into account that the plinth will protrude into the interior of the room at a distance equal to its width.
It is not advisable to fasten the skirting boards until their exact location has been measured and the counter plinth has been cut. Only after the perfect convergence of both strikers in the corner can you begin their installation and fastening. If you work with polyurethane or wooden skirting boards, defects and flaws can be corrected with a nail file or file. To fit a foam product, you should arm yourself with a sharp knife.
If even after finishing the skirting boards there remains even a small gap, do not rush to get upset - it is easy to repair it with ordinary putty. Cutting the ceiling plinth accurately and accurately is not so difficult. But in order to acquire at least a small skill, first try to practice on small workpieces.
Ways to cut the trim at 45 degrees without using a miter box
The easiest way is to use an ordinary protractor, which is found in every home where a school-age child lives. With its help, marking is not so difficult.
Important: The drink itself is also important. To avoid the formation of cracks, it is recommended to use a hacksaw not for wood, but for metal. Yes, this method takes more time, but the cut will be much more accurate and smoother.
When the marking using a protractor is made, you need to position the platband on a horizontal surface so that the front side is at the top. It is recommended to make a cut along the entire plane of the clypeus.
If there are no office supplies nearby, you can use a regular tile, with which you can draw 90-degree angle By dividing it into 2 halves, we get a template for a 45-degree angle, which can be used for marking instead of a miter box.
READ How to Correctly Set Up a Cultivator
If you have a ruler, the task becomes several times simpler. You just need to take a piece of paper A-4 and draw a square, and then draw the bisectors of the corners. To make it more convenient, you can take a small board and attach it to one of the corners, which will allow you to fix the structure. Well, then you need to attach the platband and start sawing.
Corner cutting
First you need to take a couple of blanks, then cut them at a right angle. Pressing the end of the plank against the perpendicular wall, we apply one plank. We draw a line on the ceiling along the contour of the baseboard. We remove the first plank, then, in the same way, resting the end against the wall, we apply a counter plank. We mark the fishing line along the contour in the same way.
The point where the two separate lines intersect is the mark at which the workpiece is cut. Each strip is applied to the surface again, and the point of the future cut is marked on both. From the found point to the other edge of the plinth strip we draw a fishing line. We cut the skirting boards according to the previously made outlines, carefully join them, and place them in the place where they will be installed.
This method allows you to more accurately process internal corners.
How to achieve a perfectly right angle at the joint?
If you want to create an even joint, you will have to work as carefully as possible:
- To begin with, the first tile is attached using a building level. Its edge should extend slightly beyond the plane of the corner of the base.
- After this, the second side of the corner is leveled. Each tile adhesive has its own hardening time, which is how long you are given to trim the resulting angle.
- Subsequent fragments of tiles are glued using the same principle. The main thing is that the vertical of the walls is maintained initially, otherwise it will be almost impossible to hide the defect from unsuccessful joints.
Keep in mind that at the joints after cutting, the tiles become more fragile. For this reason, this installation is usually not used on surfaces subject to high impact loads. It is especially rarely used when facing steps. So, when designing street stairs, builders most often use metal corners, and sometimes they overlap the tiles so that the top module protrudes slightly above the side one.
Another way to create a bias edge:
If you want to trim a piece of ceramic with your own hands in an easier way, then there is another option. To do this, draw a line on the decorative side of the tile with a glass cutter. After this, turn it over with the wrong side facing you, and then use a grinder to make a V-shaped cut across the entire width of the tile. Now you can break off the excess and also fine-tune it using sandpaper.
Marking a corner with a piece of paper
Marking with a paper sheet is one of the simplest ways to complete the task. A square sheet is required. It folds exactly diagonally. The resulting template for cutting pipes must be wrapped around the product so that the long side runs parallel to its cross-section.
Then an angle of 45 degrees is formed on the smaller side. All that remains is to mark the cutting line using a construction pencil or marker on a sheet of paper.
It is recommended to wrap the marking area with narrow tape to prevent it from being accidentally erased. This method is excellent for long, large pipes with the cut location approximately in the middle of the product.
Trimming "on the spot"
The walls, floor and ceiling will not always be perfectly flat in practice. Most often they have irregularities. For this reason, there is no need to cut the workpieces at clear and precise angles, because anyway they will not fit perfectly.
Instead, it is sometimes convenient to trim the same ceiling plinth in place. That is, first they glue one strip of the plinth, trim it in the corner, and cut the second strip under it.
Of course, it is hardly possible to cut the workpiece perfectly. However, if a small gap appears in the corner, it can always be covered with putty or gypsum plaster. Nothing special.
How to cut a corner of a plinth or baguette without a miter box
When installing skirting boards, it is important to form the corners correctly. They are the ones who often spoil the overall picture. How to make a corner on a plinth - external and internal, how and with what to cut. We will discuss all this further.